
Chapter at a Glance

Microsoft Office 2010 programs have a common user interface—the way the program looks and the way you interact with it—which means that skills and techniques you learn in one program are also useful in the others.
Certain information that you provide in one Office 2010 program is made available to other Office 2010 programs so that you don’t have to provide it individually in each program. Other settings are specific to the program you’re working in. The basic Office 2010 user interface includes a standard method of giving commands by using tools gathered on a dynamic toolbar, called the ribbon. Commands are represented by buttons, by lists or galleries from which you choose settings, or by fields in task panes and dialog boxes in which you specify settings. You can customize some of the content that is available from the ribbon by hiding sets of commands (tabs) or by creating custom tabs. You can also collect frequently used buttons, lists, and galleries on a separate toolbar, the Quick Access Toolbar, so that they are available to you from anywhere in the program.
Each program has standard settings based on the way that most people work with the program. However, you can customize the settings to meet your specific needs and to fit the way that you work.
In this chapter, you’ll first familiarize yourself with the standard Office 2010 program working environment. Then you’ll customize the working environment, ribbon, and Quick Access Toolbar in Microsoft Word 2010, using techniques that are common to working in any Office 2010 program.
Note
Practice Files You don’t need any practice files to complete the exercises in this chapter. For more information about practice file requirements, see Using the Practice Files at the beginning of this book.
The most common way to start any Office 2010 program is from the Start menu, displayed when you click the Start button at the left end of the Windows Taskbar. On the Start menu, click All Programs, click the Microsoft Office folder, and then click the program you want to start.
When you start Microsoft Word, Excel, or PowerPoint without opening a specific file, the program window appears, displaying a new blank document, workbook, or presentation. When you start Microsoft OneNote without opening a specific notebook, the program window displays the notebook you opened most recently.

Note
See Also Windows 7 introduced many efficient new window-management techniques. For information about ways to work with a program window on a Windows 7 computer, refer to Windows 7 Step by Step by Joan Lambert Preppernau and Joyce Cox (Microsoft Press, 2009).
A typical Office 2010 program window contains the following elements:
 The title bar displays the name of the
active document. At the left end of the title bar is the program icon, which you click to display
commands to move, size, and close the program window. Three buttons at
the right end of the title bar serve the same functions in all Windows
programs:
You can temporarily hide the program window by clicking the Minimize button, adjust the size of the
window by clicking the Restore Down/Maximize
button, and close the active document or exit the program by clicking
the Close button.
The title bar displays the name of the
active document. At the left end of the title bar is the program icon, which you click to display
commands to move, size, and close the program window. Three buttons at
the right end of the title bar serve the same functions in all Windows
programs:
You can temporarily hide the program window by clicking the Minimize button, adjust the size of the
window by clicking the Restore Down/Maximize
button, and close the active document or exit the program by clicking
the Close button.By default, the Quick Access Toolbar appears to the right of the program icon at the left end of the title bar. Each program has a default set of Quick Access Toolbar buttons; most commonly, the default Quick Access Toolbar displays the Save, Undo, and Redo buttons. You can change the location of the Quick Access Toolbar and customize it to include any command to which you want to have easy access.
Below the title bar is the ribbon. All the commands for working with file content are available from this central location so that you can work efficiently with the program.
Note
See Also The appearance of buttons and groups on the ribbon changes depending on the width of the program window. For information about changing the appearance of the ribbon to match our images, see Modifying the Display of the Ribbon at the beginning of this book.
Across the top of the ribbon is a set of tabs. Clicking a tab displays an associated set of commands.
Tip
You might find it efficient to add all the commands you use frequently to the Quick Access Toolbar and display it below the ribbon, directly above the workspace. For information, see Customizing the Quick Access Toolbar later in this chapter.
Commands related to managing the program and files (rather than file content) are gathered together in the Backstage view, which you display by clicking the colored File tab located at the left end of the ribbon. Commands available in the Backstage view are organized on named pages, which you display by clicking the page tabs located in the left pane.
Commands related to working with file content are represented as buttons on the remaining tabs. The Home tab is active by default.
On each tab, buttons are organized into named groups. Depending on your screen resolution and the size of the program window, the commands in a group might be displayed as labeled buttons, as unlabeled icons, or as one or more large buttons that you click to display the commands within the group. You might want to experiment with the screen resolution and width of the program window to understand their effect on the appearance of tab content.
If a button label isn’t visible, you can display the command, a description of its function, and its keyboard shortcut (if it has one) in a ScreenTip by pointing to the button.
Tip
You can control the display of ScreenTips and of feature descriptions in ScreenTips. Simply display the Backstage view, click Options to open the program’s Options dialog box, and click the ScreenTip setting you want in the User Interface Options area of the General page. For more information, see Changing Program Settings later in this chapter.
 Related but less common commands might be available
in a dialog box or task pane, which you display by clicking the
dialog box launcher located in the
lower-right corner of the group.
Related but less common commands might be available
in a dialog box or task pane, which you display by clicking the
dialog box launcher located in the
lower-right corner of the group.Tip
You might find that less commonly used commands from earlier versions of a program are not available from the ribbon. However, these commands are still available. You can make missing commands accessible by adding them to the Quick Access Toolbar. For more information, see Customizing the Quick Access Toolbar later in this chapter.
Some buttons include an integrated or separate arrow. To determine whether a button and arrow are integrated, point to the button or arrow to display its border. If a button and its arrow are integrated within one border, clicking the button will display options for refining the action of the button. If the button and arrow have separate borders, clicking the button will carry out the default action indicated by the button’s current icon. You can change the default action of the button by clicking the arrow and then clicking the action you want.


 Above the right end of the ribbon is the Minimize The Ribbon button. Clicking
this button hides the commands but leaves the tab names visible. You can
then click any tab name to temporarily display its commands. Clicking
anywhere other than the ribbon hides the commands again. When the full
ribbon is temporarily visible, you can click the button at its right
end, shaped like a pushpin, to make the display permanent. When the full
ribbon is hidden, you can click the Expand
The Ribbon button to redisplay it.
Above the right end of the ribbon is the Minimize The Ribbon button. Clicking
this button hides the commands but leaves the tab names visible. You can
then click any tab name to temporarily display its commands. Clicking
anywhere other than the ribbon hides the commands again. When the full
ribbon is temporarily visible, you can click the button at its right
end, shaped like a pushpin, to make the display permanent. When the full
ribbon is hidden, you can click the Expand
The Ribbon button to redisplay it. Clicking the Help button at the
right end of the ribbon displays the program-specific Help window in
which you can use standard techniques to find information.
Clicking the Help button at the
right end of the ribbon displays the program-specific Help window in
which you can use standard techniques to find information.Note
See Also For information about the Help system, see Getting Help at the beginning of this book.
Across the bottom of the program window, the status bar displays information about the current file and provides access to certain program functions. You can control the contents of the status bar by right-clicking it to display the Customize Status Bar menu, on which you can click any item to display or hide it.
At the right end of the status bar in the Word, Excel, and PowerPoint program windows are the View Shortcuts toolbar, the Zoom button, and the Zoom slider. These tools provide you with convenient methods for adjusting the display of file content.
Note
See Also For information about changing the file content view, see Viewing Files in Different Ways in Chapter 2.


The goal of all these features of the program environment is to make working in the program as intuitive as possible. Commands for tasks you perform often are readily available, and even those you might use infrequently are easy to find.
For example, when a formatting option has several choices available, they are often displayed in a gallery of thumbnails. These thumbnails display visual representations of each choice. If you point to a thumbnail in a gallery, the Live Preview feature shows you what that choice will look like if you apply it to the selected content.

In this exercise, you’ll start Word and explore the tabs and groups on the ribbon. Along the way, you’ll work with galleries and the Live Preview feature.
On the Start menu, click All Programs, click Microsoft Office, and then click Microsoft Word 2010.
Tip
If this is the first time you’ve started an Office 2010 program, Office prompts you to enter your full name and initials. Office 2010 programs use this information when tracking changes, responding to messages, and so on. Next, Office prompts you to select the type of information you want to share over the Internet, and offers the option of signing up for automatic program updates from the Microsoft Update service. None of these options place you at risk, and all can be quite useful.
The Word program window opens in Print Layout view, displaying a blank document. On the ribbon, the Home tab is active. Buttons related to working with document content are organized on this tab in five groups: Clipboard, Font, Paragraph, Styles, and Editing.
Point to each button on the Home tab.
Word displays information about the button in a ScreenTip.
Click the Insert tab, and then explore its buttons.
Buttons related to all the items you can insert into the document are organized on this tab in seven groups: Pages, Tables, Illustrations, Links, Header & Footer, Text, and Symbols.
Click the Page Layout tab, and then explore its buttons.
Buttons related to the appearance of the document are organized on this tab in five groups: Themes, Page Setup, Page Background, Paragraph, and Arrange.
In the Page Setup group, display the ScreenTip for the Margins button.
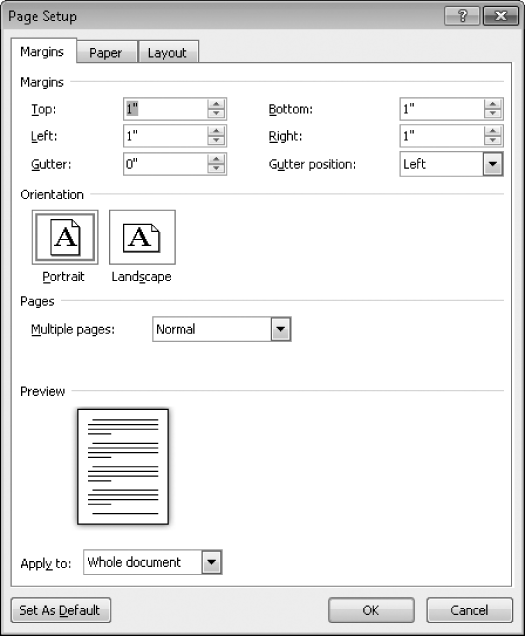
- In the lower-right corner of the Page Setup group, click the Page Setup dialog box launcher.
The Page Setup dialog box opens.
Notice that you can preview the results of your changes before applying them.
 In the Themes group,
click the Themes button.
In the Themes group,
click the Themes button.The group expands to display a gallery of the available themes.
Press the Esc key to close the gallery without making a selection.
 In the Page
Background group, click the Page
Color button, and then in the top
row of the Theme Colors palette, point to
each box in turn.
In the Page
Background group, click the Page
Color button, and then in the top
row of the Theme Colors palette, point to
each box in turn.The blank document page shows a live preview of what it will look like if you click the color you are pointing to. You can see the effect of the selection without actually applying it.
Press Esc to close the palette without making a selection.
Click the References tab, and then explore its buttons.
Buttons related to items you can add to documents are organized on this tab in six groups: Table Of Contents, Footnotes, Citations & Bibliography, Captions, Index, and Table Of Authorities. You will usually add these items to longer documents, such as reports.
Click the Mailings tab, and then explore its buttons.
Buttons related to creating mass mailings are organized on this tab in five groups: Create, Start Mail Merge, Write & Insert Fields, Preview Results, and Finish.
Click the Review tab, and then explore its buttons.
Buttons related to proofreading documents, working in other languages, adding comments, tracking and resolving document changes, and protecting documents are organized on this tab in seven groups: Proofing, Language, Comments, Tracking, Changes, Compare, and Protect.
Click the View tab, and then explore its buttons.
Buttons related to changing the view and other aspects of the display are organized on this tab in five groups: Document Views, Show, Zoom, Window, and Macros.
On the ribbon, click the File tab, which is color-coded to match the logo color of the Word program.
The Backstage view of Word 2010 is displayed. Commands related to managing documents (such as creating, saving, and printing) are available in this view.
If the Info page is not already displayed in the Backstage view, click Info in the left pane.
On the Info page of the Backstage view, the middle pane provides options to control who can work on the document, to remove properties (associated information), and to access versions of the document automatically saved by Word. The right pane displays the associated properties, as well as dates of modification, creation, and printing, and the names of people who created and edited the document.
Note
See Also For information about working with properties, see Preparing Documents for Electronic Distribution in Chapter 7.
In the left pane, click Recent.
The Recent page displays the names of the documents you recently worked on. By default a maximum of 20 names is displayed. You can change this number on the Advanced page of the Word Options dialog box.
Note
See Also For information about the Options dialog box, see Changing Program Settings later in this chapter.
In the left pane, click New.
The New page displays all the templates on which you can base a new document.
Note
See Also For information about creating documents, see Creating and Saving Files in Chapter 2.
In the left pane, click Print.
The Print page displays all print-related commands and provides a pane for previewing the current document as it will appear when printed.
Note
See Also For information about printing, see Chapter 7.
In the left pane, click Share.
The Share page displays all the commands related to making the current document available to other people.
In the left pane, click Help.
The Help page displays all the ways you can get help and support for Word.
On the Help page, under Tools for Working With Office, click Options.
The Word Options dialog box opens. In this dialog box are program settings that control the way the program looks and performs.
Note
See Also For information about the Options dialog box, see the next section, Changing Program Settings.
At the bottom of the Word Options dialog box, click Cancel.
You return to the blank document with the Home tab active on the ribbon.


Earlier in this chapter, we mentioned that you can change settings in the Options dialog box for each program to customize the program environment in various ways. After you work with a program for a while, you might want to refine more settings to tailor the program to the way you work. Knowing your way around the Options dialog box makes the customizing process more efficient.
In this exercise, you’ll open the Word Options dialog box and explore several of the available pages.
Note
SET UP You don’t need any practice files to complete this exercise. Open a blank document if necessary, and then follow the steps.
 On the Home tab, in
the Font group, point to the Bold button.
On the Home tab, in
the Font group, point to the Bold button.Word displays a ScreenTip that includes the button name, its keyboard shortcut, and a description of its purpose.
Display the Backstage view, and click Options.
The Word Options dialog box opens, displaying the General page.
If you prefer not to see the Mini Toolbar when you select text, you can disable that feature by clearing the Show Mini Toolbar On Selection check box. Similarly, you can disable the live preview of styles and formatting by clearing the Enable Live Preview check box.
Under User Interface options, display the Color scheme list, and click Black.
Display the ScreenTip style list, and click Don’t show feature descriptions in ScreenTips.
Under Personalize your copy of Microsoft Office, verify that the User Name and Initials are correct, or change them to the way you want them to appear.
Click OK to close the Word Options dialog box.
The program window elements are now black and shades of gray.
In the Font group, point to the Bold button.
The ScreenTip now includes only the button name and its keyboard shortcut.
Open the Word Options dialog box, and in the left pane, click Display.
On this page, you can adjust how documents look on the screen and when printed.
In the left pane, click Proofing.
This page provides options for adjusting the AutoCorrect settings and for refining the spelling-checking and grammar-checking processes.
Note
See Also For information about AutoCorrect and checking spelling, see Correcting Spelling and Grammatical Errors in Chapter 3.
Display the Save page.
On this page, you can change the default document format; the location and save frequency of the AutoRecover file (a backup file created by Word while you’re working in the file); the default location to which Word saves files you create; and the default location for files you check out from document management servers (such as Microsoft SharePoint) and drafts of those files saved while you are working offline.
The Save page also has options for specifying whether you want the fonts used within the current document to be embedded in the document, in the event that someone who opens the document doesn’t have those fonts on his or her computer.
Under Save documents, display the Save files in this format list.
Notice the many formats in which you can save files. One of these is the Word 97-2003 Document format that creates .doc files compatible with earlier versions of Word. If you upgraded to Word 2010 but your colleagues are still working in an earlier version of the program, you might want to select this option so that they will be able to view and work with any document you create.
Click away from the list to close it, and then display the Language page.
If you create documents for international audiences, you can make additional editing languages available on this page. You can also specify the display, Help, and ScreenTip languages.
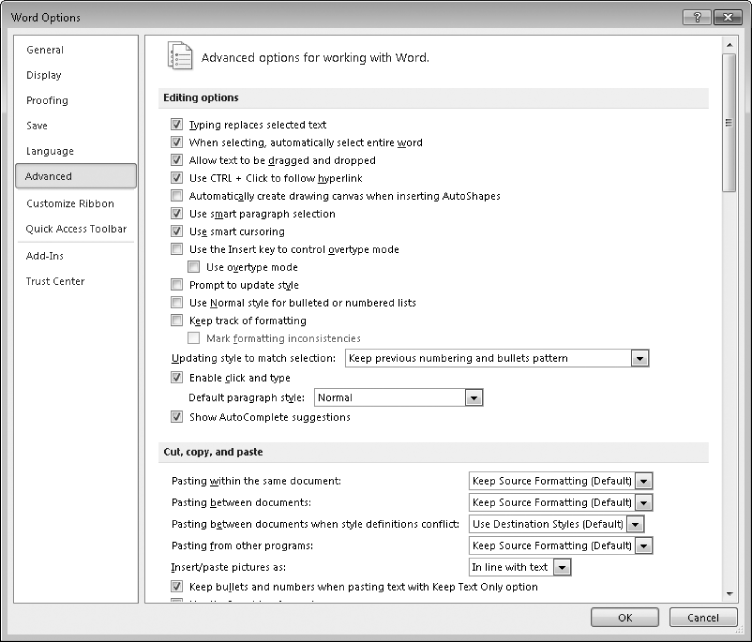
This page includes options related to editing document content; displaying documents on-screen; printing, saving, and sharing documents; and a variety of other options. Although these options are labeled Advanced, they are the ones you’re most likely to want to adjust to suit the way you work.
Take a few minutes to explore all the options on this page.
In the General area at the bottom of the page are two buttons:
Skipping over the Customize Ribbon and Quick Access Toolbar pages, which we discuss in later topics in this chapter, click Add-Ins.
This page displays all the active and inactive add-ins and enables you to add and remove them. (Add-ins are utility programs that provide additional functionality to an Office program.)
Display the Trust Center page.
This page provides links to information about privacy and security. It also provides access to the Trust Center settings that control the actions Word takes in response to documents that are provided by certain people or companies, that are saved in certain locations, or that contain potentially harmful elements such as ActiveX controls or macros.
Under Microsoft Office Word Trust Center, click Trust Center Settings, and then in the left pane of the Trust Center dialog box, click Trusted Locations.
On this page, you can specify the locations from which Word will not block content.


The ribbon was designed to make all the commonly used commands visible so that people can more easily discover the full potential of an Office 2010 program. But many people use an Office program to perform the same set of tasks all the time, and for them, seeing buttons (or even entire groups of buttons) that they never use is just another form of clutter.
Note
See Also For information about minimizing and expanding the ribbon, see Customizing the Quick Access Toolbar later in this chapter.
Would you prefer to see fewer commands than appear on the ribbon by default? Or would you prefer to see more specialized groups of commands? Well, you can. From the Customize Ribbon page of an Office 2010 program’s Options dialog box, you can control the tabs that appear on the ribbon, and the groups that appear on the tabs.

On this page, you can customize the ribbon in the following ways:
If you rarely use a tab, you can turn it off.
If you use the commands in only a few groups on each tab, you can remove the groups you don’t use. (The group is not removed from the program, just from its tab.)
You can move a predefined group by removing it from one tab and then adding it to another.
You can duplicate a predefined group by adding it to another tab.
You can create a custom group on any tab and then add commands to it. (You cannot add commands to a predefined group.)
You can create a custom tab on the ribbon. For example, you might want to do this if you use only a few commands from each tab and you find it inefficient to flip between them.
Don’t be afraid to experiment with the ribbon to come up with the configuration that best suits the way you work. If at any point you find that your new ribbon is harder to work with rather than easier, you can always reset everything back to the default configuration.
Tip
If you upgraded from Office 2007 or an earlier version of Office, you might find that some commands present in the earlier version are not available on the ribbon. A few old features have been abandoned, but others that people used only rarely have simply not been exposed in the user interface. If you want to use one of these hidden features, you can make it a part of your program environment by adding it to the ribbon or to the Quick Access Toolbar. You can find a list of all the commands that do not appear on the ribbon but are still available in a program by displaying the Customize Ribbon page of the program’s Options dialog box and then clicking Commands Not In The Ribbon in the Choose Commands From list.
In this exercise, you’ll customize the ribbon in the Word program window by using techniques that are common to all Office 2010 programs. You’ll turn off tabs, remove groups, create a custom group, and add a command to the group. Then you’ll create a tab and move groups of buttons to it. Finally, you’ll reset the ribbon to its default state.
Note
SET UP You don’t need any practice files to complete this exercise. Open a blank document if necessary, and then follow the steps.
Open the Word Options dialog box, and then click Customize Ribbon.
The Customize Ribbon page is displayed.
In the list on the right, clear the check boxes of the Insert, Page Layout, References, Mailings, and Review tabs. Then click OK.
The ribbon now displays only the File, Home, and View tabs.
Redisplay the Customize Ribbon page of the Word Options dialog box, and in the right pane, select the Page Layout check box. Then click the plus sign to display the groups on this tab.
Above the left pane, click Choose commands from and then, in the list, click Main Tabs. In the Main Tabs list, click the plus sign adjacent to Page Layout to display the groups that are predefined for this tab.
In the right pane, click the Paragraph group, and then click Remove.
The group is removed from the Page Layout tab on the ribbon (the list on the right) but is still available in the list on the left. You can add it back to the Page Layout tab or add it to a different tab at any time.
In the right pane, click the plus sign adjacent to Home to display its groups, and then click the word Home.
 Below the right pane, click New Group. When the New Group
(Custom) group is added to the bottom of the Home group
list, click Rename, type Final in the Display
name box, and click OK. Then
click the Move Up button until the Final group is at the top of the list.
Below the right pane, click New Group. When the New Group
(Custom) group is added to the bottom of the Home group
list, click Rename, type Final in the Display
name box, and click OK. Then
click the Move Up button until the Final group is at the top of the list.Because of its location in the list, the new group will appear at the left end of the Home tab.
In the Choose commands from list, click File Tab.
The available commands list changes to include only the commands that are available in the Backstage view, which you display by clicking the File tab.
In the available commands list, click Inspect Document, and click Add. Then repeat this step to add Mark as Final.
The two commands are added to the custom group.
In the right pane, remove the Font, Paragraph, and Styles groups from the Home tab, and remove the Page Background group from the Page Layout tab.
Click the word Home, and then below the list, click New Tab.
A new tab is added to the right pane and is selected for display on the ribbon. It has automatically been given one custom group.
Click Remove to remove the custom group.
Click New Tab (Custom), and then click Rename. In the Rename dialog box, type Formatting in the Display name box, and click OK.
Display Main Tabs in the list on the left, and then expand the Home and Page Layout tabs.
With the Formatting tab selected in the right pane, add the Font, Paragraph, and Styles groups from Home in the left pane, and then add Page Background from Page Layout.
The right pane shows the new configuration of the Home, Formatting, and Page Layout tabs.
In the Word Options dialog box, click OK.
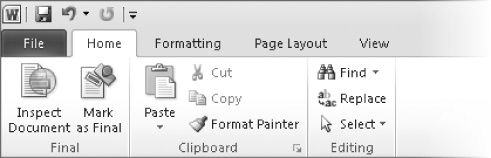
The Home tab displays the new Final group.
Click the Formatting tab.
The formatting commands are now collected on the Formatting tab.
Display the Customize Ribbon page of the Word Options dialog box. In the lower-right corner, click Reset, and then click Reset all customizations. Then in the message box asking you to confirm that you want to delete all ribbon and Quick Access Toolbar customizations, click Yes.
Click OK to close the Word Options dialog box.
The default ribbon configuration is restored.


If you regularly use a few buttons that are scattered on various tabs of the ribbon and you don’t want to switch between tabs to access the buttons or crowd your ribbon with a custom tab, you might want to add these frequently used buttons to the Quick Access Toolbar. They are then always visible in the upper-left corner of the program window.
Clicking Quick Access Toolbar in the left pane of a program’s Options dialog box displays the page where you specify which commands you want to appear on the toolbar.

On this page, you can customize the ribbon in the following ways:
You can define a custom Quick Access Toolbar for the program, or you can define a custom Quick Access Toolbar for a specific file.
You can add any command from any group of any tab, including contextual tabs, to the toolbar.
You can display a separator between different types of buttons.
You can move buttons around on the toolbar until they are in the order you want.
You can reset everything back to the default Quick Access Toolbar configuration.
![]() If you never use more than a few buttons, you can add those buttons to the Quick
Access Toolbar and then hide the ribbon by double-clicking the active tab or by
clicking the Minimize The Ribbon button. Only the Quick Access Toolbar and tab
names remain visible. You can temporarily redisplay the ribbon by clicking the
tab you want to view.
If you never use more than a few buttons, you can add those buttons to the Quick
Access Toolbar and then hide the ribbon by double-clicking the active tab or by
clicking the Minimize The Ribbon button. Only the Quick Access Toolbar and tab
names remain visible. You can temporarily redisplay the ribbon by clicking the
tab you want to view.
![]() You can permanently redisplay the ribbon by double-clicking
any tab or by clicking the Expand The Ribbon button.
You can permanently redisplay the ribbon by double-clicking
any tab or by clicking the Expand The Ribbon button.
![]() As you add buttons to the Quick Access Toolbar, it expands
to accommodate them. If you add many buttons, it might become difficult to view
the text in the title bar, or not all the buttons on the Quick Access Toolbar
might be visible, defeating the purpose of adding them. To resolve this problem, you can move
the Quick Access Toolbar below the ribbon by clicking the Customize Quick Access Toolbar button and then
clicking Show Below The Ribbon.
As you add buttons to the Quick Access Toolbar, it expands
to accommodate them. If you add many buttons, it might become difficult to view
the text in the title bar, or not all the buttons on the Quick Access Toolbar
might be visible, defeating the purpose of adding them. To resolve this problem, you can move
the Quick Access Toolbar below the ribbon by clicking the Customize Quick Access Toolbar button and then
clicking Show Below The Ribbon.
In this exercise, you’ll add a couple buttons to the Quick Access Toolbar for all documents, and then you’ll test the buttons.
Note
SET UP You need the Agenda document located in your Chapter01 practice file folder to complete this exercise. Open the document, and then follow the steps.
Open the Word Options dialog box, and then click Quick Access Toolbar.
The Customize The Quick Access Toolbar page displays a list of available commands on the left side, and a list of the currently displayed commands on the right side.
Tip
If you want to create a Quick Access Toolbar that is specific to the active file, click the arrow at the right end of the box below Customize Quick Access Toolbar, and then click For <file name>. Then any command you select will be added to a toolbar specific to that file instead of the toolbar for the program.
At the top of the available commands list on the left, double-click Separator.
Scroll down the available commands list, click the Quick Print command, and then click Add.
Repeat step 3 to add the Text Highlight Color command.
The Text Highlight Color command is added to the list of commands that will appear on the Quick Access Toolbar.
Click OK to close the Word Options dialog box.
The Quick Access Toolbar now includes the default Save, Undo, and Repeat buttons and the custom Quick Print and Text Highlight Color buttons, separated by a line.
To print a document with the default settings, you no longer have to click the File tab to display the Backstage view. Click Print in the left pane, and then click the Print button.
 If you want to test printing from the Quick Access
Toolbar, ensure that your printer is turned on, and then on the Quick
Access Toolbar, click the Quick Print
button.
If you want to test printing from the Quick Access
Toolbar, ensure that your printer is turned on, and then on the Quick
Access Toolbar, click the Quick Print
button.Now let’s see how easy it is to highlight or remove highlighting from text when you are working primarily with the commands on a tab other than the Home tab.
Click the Review tab. Then select the first highlighted paragraph, Proof of notice of meeting.
 On the Quick Access Toolbar, click the Text Highlight Color arrow, and then click
No Color.
On the Quick Access Toolbar, click the Text Highlight Color arrow, and then click
No Color.The yellow highlight is removed from the selection. The No Color option becomes the default for the Text Highlight Color button.
Select the next highlighted paragraph, and on the Quick Access Toolbar, click the Text Highlight Color button.
The yellow highlight is removed from the selection.
Display the Quick Access Toolbar page of the Word Options dialog box, click Reset, and then click Reset only Quick Access Toolbar.
In the Reset Customizations message box, click Yes to return the Quick Access Toolbar to its default contents. Then click OK to close the Word Options dialog box.

The Office 2010 program environment is flexible and can be customized to meet your needs.
Most of the settings that control the working environment are gathered on the pages of the Options dialog box.
You can customize the ribbon to make the development tools you need most often easily accessible.
You can provide one-click access to any command by adding a button for it to the Quick Access Toolbar, either for the program or for one file.