
Chapter at a Glance

When you finish developing a document, you’ll often want to distribute either a printed version or an electronic version. Before committing the document to paper, you should check that the pages are efficiently laid out and that there are no glaring problems, such as headings that print on separate pages from their text. Microsoft Word 2010 provides several tools you can use to manipulate how much text appears on each page and to control page layout. It also provides tools for finalizing an electronic document and ensuring that the end product of all your hard work contains no traces of personal or confidential information. When you are ready to print, you can control precisely how many copies and what parts of your document appear on paper.
In this chapter, you’ll first preview a document and make some adjustments to improve its presentation. Then you’ll look at the options available for controlling page breaks. You’ll print a document, and finally, you’ll inspect and finalize it for electronic distribution.
Note
Practice Files Before you can complete the exercises in this chapter, you need to copy the book’s practice files to your computer. The practice files you’ll use to complete the exercises in this chapter are in the Chapter07 practice file folder. A complete list of practice files is provided in Using the Practice Files at the beginning of this book.
Usually while you’re creating a document, you’ll make decisions about the size of the margins and the direction of the page (called the orientation) to best suit your content. You can use the Margins and Orientation commands in the Page Setup group of the Page Layout tab to make any necessary adjustments to the document, and you can use the Size command to change the paper size.
You can also display the Page Setup dialog box, where you can make these basic layout changes all in one place.

Working on your document in Print Layout view helps to ensure that the document looks tidy on the page. However, before you print the document, you’ll almost always want to check how it will look on paper by previewing it. Previewing is essential for multipage documents but is helpful even for one-page documents. To preview a document, you display the Print page of the Backstage view and then page through the document displayed in the right pane. This view shows exactly how each page of the document will look when printed on the specified printer.

If you don’t like what you see in the preview pane of the Print page, you don’t have to leave the Backstage view to make adjustments. The middle pane of the Print page provides tools for making the following changes:
Orientation You can switch the direction in which a page is laid out on the paper. The default orientation is Portrait, in which the page is taller than it is wide. You can set the orientation to Landscape, in which the page is wider than it is tall.
Paper size You can switch to one of the sizes available for the selected printer by making a selection from a list.
Margins Changing the margins of a document changes where information can appear on each page. You can select one of Word’s predefined sets of top, bottom, left, and right margins, or set custom margins.
Tip
All the pages of a document have the same orientation and margins unless you divide the document into sections. Then each section can have independent orientation and margin settings. For more information about sections, see Controlling What Appears on Each Page later in this chapter.
If your printer is capable of scaling the pages of your document, you’ll also see an option to set the number of pages to print per sheet of paper, up to 16. You might use this option to print a booklet with two pages per sheet that will be folded in the middle. You might also be tempted to use this option to save paper, but bear in mind that the smaller the pages, the harder it is to read them.
You can also open the Page Setup dialog box from the Print page to make multiple adjustments in one place.
In this exercise, you’ll preview a document, change the orientation, and adjust the margins.
Note
SET UP You need the InfoSheetA_start document located in the Chapter07 practice file folder, and an active printer connection, to complete this exercise. Open the InfoSheetA_start document, and save it as InfoSheetA. Then follow the steps.
Display the Backstage view, and in the left pane, click Print.
The Print page is displayed, with a preview of the document on the right. The shaded background of the document is not displayed because it will not be printed.
 In the lower-right corner of the preview pane,
click the Zoom button, and then in the
Zoom dialog box, click Many pages, click the monitor button, and
click the second page icon in the top row of the grid (1x2 Pages). Then click OK.
In the lower-right corner of the preview pane,
click the Zoom button, and then in the
Zoom dialog box, click Many pages, click the monitor button, and
click the second page icon in the top row of the grid (1x2 Pages). Then click OK.Under Settings in the middle pane, click Custom Margins.
In the list, click Wide.
The text rewraps within the new margins.
 In the page range in the lower-left corner of the
preview pane, click the Next Page
button.
In the page range in the lower-left corner of the
preview pane, click the Next Page
button.The page range updates to show that the document now has three pages and that page 2 is the active page.
Click the Next Page button again to see the last page of the document.
At the bottom of the middle pane, click Page Setup.
The Page Setup dialog box opens, displaying the Margins page. Notice that selecting Wide margins on the Print page set the left and right margins to 2 inches.
In the Pages area, display the Multiple pages list, and click Mirror Margins.
The Preview area now displays two pages side by side, and in the Margins area, Left and Right have changed to Inside and Outside.
In the Margins area, change the value in the Outside box to 1″.
In the pages in the Preview area, the width of the outside margins decreases.
Return the Multiple pages setting to Normal, and in the Margins area, change the value in the Left box to 1”.
If you want, in the Page Setup dialog box, click the Paper tab and then the Layout tab, and notice the available options on those pages. Then click OK.
On the Print page, the margins setting is now Normal Margins, and the page range indicator shows that the number of pages in the document has decreased to two.


When a document includes more content than will fit between its top and bottom margins, Word creates a new page by inserting a soft page break. If you want to break a page before Word would normally break it, you can insert a manual page break in one of three ways:
Click Page Break in the Pages group on the Insert tab.
Click Breaks in the Page Setup group on the Page Layout tab, and then click Page.
Press Ctrl+Enter.
Tip
As you edit the text in a document, Word changes the location of the soft page breaks, but the program cannot change the location of any manual page breaks you might have inserted.
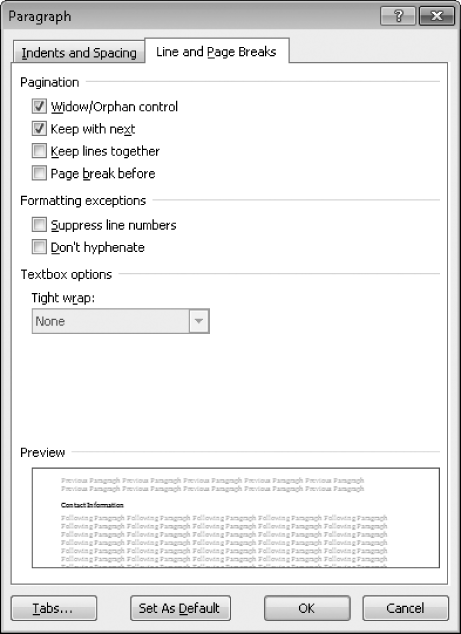
If a paragraph breaks so that most of it appears on one page but its last line appears at the top of the next page, the line is called a widow. If a paragraph breaks so that its first line appears at the bottom of one page and the rest of the paragraph appears on the next page, the line is called an orphan. These single lines of text can make a document hard to read, so by default, Word specifies that a minimum of two lines should appear at the top and bottom of each page. However, on the Line And Page Breaks page of the Paragraph dialog box, you can change whether page breaks are allowed to create widows and orphans. You can also change the following options:
Keep with next This option controls whether Word will break a page between the paragraph containing the cursor and the following paragraph.
Keep lines together This option controls whether Word will break a page within a paragraph.
Page break before This option controls whether Word will break a page before the paragraph containing the cursor.
Tip
You can apply these options to individual paragraphs, or you can incorporate them into the styles you define for document elements such as headings. For information about styles, refer to Microsoft Word 2010 Step by Step, by Joyce Cox and Joan Lambert (Microsoft Press, 2010).
In addition to page breaks, you can insert section breaks in your documents. A section break identifies a part of the document that has page settings, such as orientation or margins, that are different from those of the rest of the document. For example, you might want to put a large table in its own section so that you can turn it sideways by changing its orientation to Landscape.
You insert a section break by clicking Breaks in the Page Setup group on the Page Layout tab and then selecting from the following section types:
If formatting marks are displayed, a section break appears in Print Layout view as a double-dotted line from the preceding paragraph mark to the margin, with the words Section Break and the type of section break in the middle of the line.
Tip
To remove a page or section break, click at the left end of the break and then press the Delete key.
In this exercise, you’ll insert page and section breaks, and ensure that the pages break in logical places.
Note
SET UP You need the OfficeInfo_start document located in the Chapter07 practice file folder to complete this exercise. Open the OfficeInfo_start document, and save it as OfficeInfo. Display formatting marks, and then follow the steps.
Scroll through the document, noticing any awkward page breaks, such as a topic or list that starts close to the bottom of a page.
 On the Home tab, in
the Editing group, click the Select button, and then click Select All.
On the Home tab, in
the Editing group, click the Select button, and then click Select All. Click the Paragraph
dialog box launcher, and then in the Paragraph dialog box, click the Line
and Page Breaks tab.
Click the Paragraph
dialog box launcher, and then in the Paragraph dialog box, click the Line
and Page Breaks tab.Because different settings have been applied to different paragraphs in the document, all the check boxes have a solid filling.
Double-click all the check boxes to clear them.
Select the Keep lines together check box (click more than once if necessary), and then click OK.
This setting ensures that none of the paragraphs will be broken across two pages. Word alerts you to the presence of this formatting by displaying a square symbol to the left of each paragraph.
Press Ctrl+Home to release the selection, and then scroll through the document, again looking for untidy page breaks.
Click to the left of the Facilities heading.
 On the Insert tab,
in the Pages group, click the Page Break button.
On the Insert tab,
in the Pages group, click the Page Break button.Word breaks the page and moves the Facilities heading and the following text to the next page.
Scroll down to the bottom of page 3, select the Supplies heading and the three lines that follow it (the third line is at the top of page 4), and then display the Line and Page Breaks page of the Paragraph dialog box.
In the Pagination area, leave the Keep lines together check box selected, select the Keep with next check box, and then click OK.
Word moves the selection to the next page.
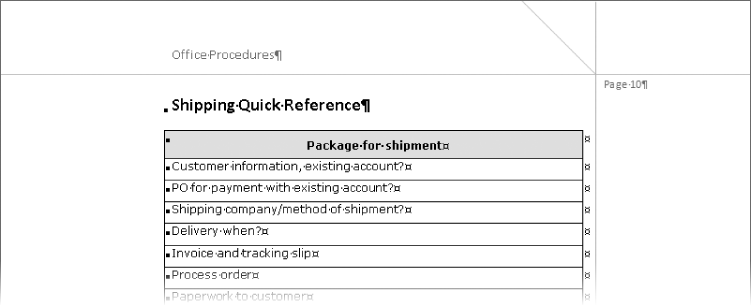
Scroll down to page 9, and click to the left of the Shipping Quick Reference heading.
 On the Page Layout
tab, in the Page Setup group, click the
Breaks button, and then under Section Breaks, click Next Page.
On the Page Layout
tab, in the Page Setup group, click the
Breaks button, and then under Section Breaks, click Next Page.Word pushes the heading to the next page.
Scroll up until the text on page 9 is displayed.
A double dotted line with the words Section Break (Next Page) appears at the right end of the paragraph preceding the section break.
 Scroll down to page 10, and with the cursor in the Shipping Quick Reference heading, on the Page Layout tab, in the Page Setup group, click the Margins button. Then in the Margins gallery, click Wide.
The table in the new section shrinks in width to fit between the wider margins.
 On the Insert tab,
in the Header & Footer group, click
the Header button, and then click Edit Header.
On the Insert tab,
in the Header & Footer group, click
the Header button, and then click Edit Header.In the Navigation group of the Design contextual tab, the Link To Previous button is selected, meaning that the header of the new section has inherited the settings of the preceding section. Because the preceding section has no header on its first page, this one doesn’t have one either.
 On the Design
contextual tab, in the Options group,
clear the Different First Page check box. Then click the Close Header and Footer button.
On the Design
contextual tab, in the Options group,
clear the Different First Page check box. Then click the Close Header and Footer button.Now the header from pages 2 through 9 of the preceding section is repeated on page 10 in this section.


When you are ready to print a document, you display the Print page of the Backstage view, and then, to print one copy on the current printer with the settings shown, you simply click the Print button.
If you need to use settings other than the defaults, you can change the following:
Number of copies Click the arrows or type the number you need.
Printer Switch to a different printer, or click Printer Properties to change the printer options.
Print range Print the entire document, the selected text, the current page, or a custom range of pages. (Point to the information icon to the right of the Pages box to see the format in which to enter a custom range.)
Sides of the paper Print on one side or both sides, either manually or, if your printer has duplex capability, automatically.
Collation For multiple copies of a multipage document, print all the pages in the document as a set or print all the copies of each page as a set.
If your printer has multiple paper trays or a manual paper feeder, you can select the paper source you want to use, on the Paper page of the Page Setup dialog box.
In this exercise, you’ll see how to select a different printer before sending two copies of the current page of a document to be printed.
Note
SET UP You need the InfoSheetB_start document located in the Chapter07 practice file folder, and multiple active printer connections, to complete this exercise. Open the InfoSheetB_start document, and save it as InfoSheetB. Then follow the steps.
Display the Backstage view, and in the left pane, click Print.
If you don’t need to change any settings, you can simply click the Print button at the top of the middle pane of the Print page.
If you have more than one printer available and you want to switch printers, under Printer in the middle pane, click the option displaying the name of the default printer, and in the list, click the printer you want.
Point to the information icon to the right of the Printer area heading.
In the Copies box next to the Print button, change the number of copies to 2.
Under Settings, click the arrow to the right of the first box to expand the list of print options, and then in the list, click Print Current Page.
Leaving the other settings as they are, click the Print button at the top of the middle pane.
Word prints two copies of the document’s first page on the designated printer, and returns you to the document.

When a document is complete, you can distribute it in two basic ways: on paper or electronically. If you distribute it electronically, you need to ensure that no private or inappropriate information is attached to the file and that it can be viewed by the people to whom you are sending it.
Many documents go through several revisions, and some are scrutinized by multiple reviewers. During this development process, documents can accumulate information that you might not want in the final version, such as the names of people who worked on the document, comments that reviewers have added to the file, or hidden text about status and assumptions. This extraneous information is not a concern if the final version is to be delivered as a printout. However, these days, more and more files are delivered electronically, making this information available to anyone who wants to read it.
To examine some of the attached information, you can display the document’s properties on the Info page of the Backstage view. You can change or remove the information in either the Document Panel or the Properties dialog box. However, Word provides a tool called the Document Inspector to automate the process of finding and removing all extraneous and potentially confidential information. After you run the Document Inspector, you see a summary of its search results, and you have the option of removing all the items found in each category.
Word also includes two other finalizing tools:
Check Accessibility Checks for document elements and formatting that might be difficult for people with certain kinds of disabilities to read.
Check Compatibility Checks for the use of features not supported in earlier versions of Word.
After you have handled extraneous information and accessibility and compatibility issues, you can mark a document as final and make it a read-only file, so that other people know that they should not make changes to this released document.
In this exercise, you’ll inspect a document for inappropriate information and mark it as final.
Note
SET UP You need the InfoSheetC_start document located in the Chapter07 practice file folder to complete this exercise. Open the InfoSheetC_start document, and save it as InfoSheetC. Then follow the steps.
Display the Backstage view, and in the left pane, click Info.
In the right pane you see the properties that have been saved with the file. Some of the information, including the name of the author, was attached to the file by Word. Other information, such as the title, was added by a user.
 In the right pane, click the Properties button, and then in the list, click Advanced Properties.
The Properties dialog box for this document opens. On the General page of the dialog box are properties maintained by Word.
Click the Summary tab.
Notice that additional identifying information is displayed on this page.
Click Cancel to close the Properties dialog box.
In the Prepare for Sharing area of the Info page, click Check for Issues, and then click Inspect Document.
The Document Inspector dialog box opens, listing the items that will be checked.
Without changing the default selections in the Document Inspector dialog box, click Inspect.
The Document Inspector reports the presence of the properties you viewed earlier, as well as some custom XML data.
To the right of Document Properties and Personal Information, click Remove All.
To the right of Custom XML Data, click Remove All.
Click Reinspect, and then click Inspect.
Word has removed the properties and XML data.
In the Document Inspector dialog box, click Close.
The right pane of the Info page now shows that there are no custom properties attached to the document.
In the Permissions area of the Info page, click Protect Document, and then click Mark As Final.
A message tells you that the document will be marked as final and then saved.
Click OK.
A message tells you that the document has been marked as final and that typing, editing commands, and proofing marks are turned off.
Click OK.
The Permissions area now indicates that the file is final.
Click the Insert tab.
An orange bar appears, notifying you that the document has been marked as final.
Click the Insert tab again.
The tab’s groups and buttons are displayed, but all of the buttons are inactive.


You should always preview a document before printing it.
You can use page and section breaks and page break options to ensure that pages break in logical places.
All the printing options are now gathered together on the Print page of the Backstage view.
Before distributing a document, you can use the Document Inspector to remove private or inappropriate information.