
Chapter at a Glance

When you use a computer or typewriter to create text documents, you are word processing. When you use a specialized computer program to create professional-quality documents that combine text and other visual elements in non-linear arrangements, you are desktop publishing. Microsoft Publisher 2010 is designed specifically to handle the various desktop publishing needs of individuals and small organizations. Publisher makes it easy to efficiently create a wide range of publications, from simple flyers to complex brochures. Even novice users will be able to work productively in Publisher after only a brief introduction.
In this chapter, you’ll first learn various ways to create blank publications and publications based on existing content. You’ll then store standard contact information in Publisher for later use. Finally, you’ll preview and print a publication.
Note
Practice Files Before you can complete the exercises in this chapter, you need to copy the book’s practice files to your computer. The practice files you’ll use to complete the exercises in this chapter are in the Chapter29 practice file folder. A complete list of practice files is provided in Using the Practice Files at the beginning of this book.
When you start Publisher without opening a publication, the New page of the Backstage view is displayed. From this page, you can start a new publication either from scratch or based on one of the many publication templates that are available.

The New page of the Backstage view provides several options for starting a new publication, including the following:
If you need help designing the publication layout, you can base the publication on one of the design templates that comes with Publisher. If none of these templates meets your needs, you can download a sample publication from Microsoft Office Online and then customize it. You can also base publications on your own custom templates.
Note
See Also For information about creating your own templates, see the sidebar Custom Templates, later in this chapter.
If you have an existing publication that is close enough in content and design to be a good starting point, you can save a copy of that publication as the starting point for the new one.
If your content is in a Microsoft Word document, you can import the document into Publisher and then lay out the text as you want it.
If you want to manually design the publication, you can create a blank publication and specify the page size you want.
Note
See Also For information about creating a blank publication, see Working with Text Boxes in Chapter 30.
Creating a publication from a blank page is time-consuming and requires quite a bit of design skill and knowledge about Publisher. Even people with intermediate and advanced Publisher skills can save time by capitalizing on the work someone else has already done. On the New page of the Backstage view, you can choose a publication type, preview thumbnails of the available designs of that type, and experiment with different color schemes and font schemes.
Tip
The templates that come with Publisher, as well as those that are available from Office Online, have associated keywords. You can type a keyword in the Search For Templates box at the top of the Getting Started window and then click the Search button (the green arrow to the right of the search location list) to display thumbnails of templates to which that keyword has been assigned.
When you create a publication based on a template, you are not opening the actual template file; instead, you are creating a new file that includes all the placeholders, graphic elements, and formatting of the template. You customize the publication with your own information, typing text and placing graphics and other elements in the placeholders provided. The new file is temporary until you save it.
To import the text of a Word document into a publication, you click Import Word Documents in the More Templates section of the New page and then choose a document design, page size, and column layout. (If you prefer, you can forego the design and choose only a generic page size or a paper format such as those available from Avery.) Publisher converts the document and inserts it into a new publication, adding as many pages as necessary to hold the complete document. You can then add a title and replace any other placeholders that are part of the design, or you can add new elements to suit the purpose of the publication.
Tip
You can create a simple publication directly from a Word document. In the Backstage view, click the Open button. Then with All Publisher Files selected as the file type in the Open Publication dialog box, locate and double-click the Word document you want to use. The new publication contains the document text but doesn’t have a template applied.
In this exercise, you’ll create a publication based on a ready-made template that comes with Publisher. You’ll also import a Word document.
Note
SET UP You need the Importing document located in your Chapter29 practice file folder to complete this exercise.
 Click the Start
button, click All Programs, click
Microsoft Office, and then click
Microsoft Publisher 2010.
Click the Start
button, click All Programs, click
Microsoft Office, and then click
Microsoft Publisher 2010.Publisher starts and displays the New page of the Backstage view.
Tip
If you are already working on a publication, you can display the New page by clicking the File tab to display the Backstage view, and then clicking New in the left pane.
The page is divided into sections displaying blank publication templates, “most popular” publication template categories, and other available template categories.
At the top of the New page, in the template location list under the Available Templates heading, click Installed Templates.
Publisher displays only those templates that were installed on your computer when you installed Publisher or the Microsoft Office Professional 2010 software suite.
In the More Templates section of the New page, click Quick Publications.
The New page displays the publication templates in the Quick Publications category. The category is shown on the gray bar near the top of the page.
The left pane of the New page displays thumbnails of the publication templates in the Quick Publications category. The selected publication is indicated by an orange frame. The right pane displays a larger thumbnail of the selected template, and any available customization options.
In the left pane, click the Brocade thumbnail.
The right pane displays a larger thumbnail of the Brocade publication template and the customization options that you can set before you create the publication.
Note
See Also For information about creating information sets, see Storing Personal and Company Information later in this chapter.
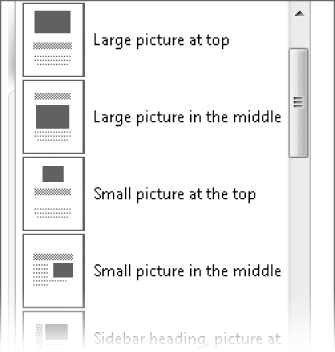
In the right pane, under Options, click the Layout arrow (to the right of the Large picture at top setting).
The Layout list displays available layout options for this template.
In the Layout list, click Large picture in the middle.
All the thumbnails change to show this layout option.
At the bottom of the right pane, click Create.
A one-page publication based on the selected template opens in the Publisher program window. The picture placeholder shown in the template thumbnail is not visible on the page.
Note
Troubleshooting The appearance of buttons and groups on the ribbon changes depending on the width of the program window. For information about changing the appearance of the ribbon to match our screen images, see Modifying the Display of the Ribbon at the beginning of this book.
Point to the center of the page, below the heading, where the picture placeholder was shown in the template thumbnail.
A picture placeholder appears on the page.
 On the Page
Design tab, in the Template group, click Change
Template.
On the Page
Design tab, in the Template group, click Change
Template.From the Change Template window that opens, you can apply a different Quick Publication template to the open publication, or you can switch to an entirely different type of publication.
In the More Installed Templates section of the left pane, click Layers. Then in the lower-right corner of the Change Template window, click OK.
The Change Template window closes.
Note
Troubleshooting In some instances, the Change Template dialog box opens. From this dialog box, you can apply the selected template to the current publication or create a new publication based on the selected template.
If the Change Template dialog box opens, click Apply Template To The Current Publication, and then click OK.
The fonts, colors, and arrangement of the existing content change to reflect the new template.
Display the Backstage view and then, in the left pane, click New.
In the More Templates section of the New page, click Import Word Documents.
The left pane of the New page displays thumbnails of document templates. The right pane displays a larger thumbnail of the selected template, and the available customization options.
In the Installed Templates list, click Crossed Lines.
Scroll down the right pane if necessary. In the Options section, click the Columns arrow (to the right of the 1 option) and then, in the Columns list, click 2.
In the Options section of the right pane, select the Include title page check box.
The Import Word Documents gallery changes to display the title page templates associated with each template.
At the bottom of the right pane, click Create.
In the Import Word Document dialog box, navigate to your Chapter29 practice file folder.
Because Publisher is searching for a Word document, the publications saved in this folder are hidden.
In the Import Word Document dialog box, click the Importing document, and then click OK.
For the purposes of this exercise, in the Microsoft Publisher dialog box that opens, click Don’t Save.
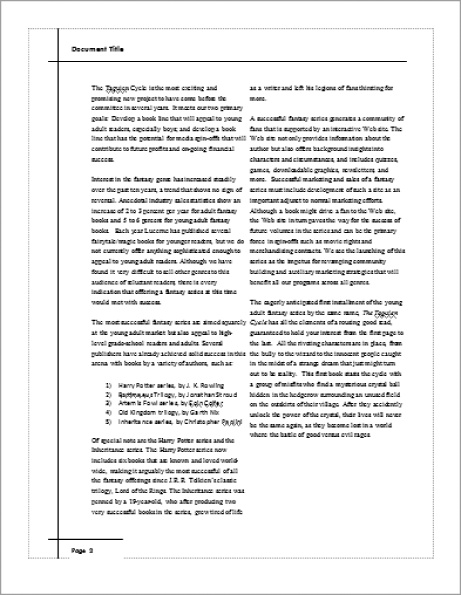
Publisher creates a new publication, based on the Crossed Lines template, that contains the text of the Importing document.
In the Page Navigation pane, click the Page 2 thumbnail.
Publisher has inserted the contents of the imported Word document in two columns on the second page.


Many of the publications you create by using Publisher will include the same personal or company contact information, such as a name, a mailing address, a telephone number, and an e-mail address. Instead of entering this information for each new publication, you can save it as an information set. Then whenever a new publication includes an item from the information set, Publisher automatically pulls it from the stored record and inserts it in the publication. Similarly, to update personal or company information throughout the publication, you need only update it once, in the information set.
In this exercise, you’ll create two information sets and apply them to a publication.
Note
SET UP You need the Logo image located in your Chapter29 practice file folder to complete this exercise. Display the New page of the Backstage view, and filter the page to display only installed templates. Then follow the steps.
On the New page, in the Most Popular section, click Business Cards.
Publisher displays the available business card templates.
In the Installed Templates section, double-click Marker.
Publisher creates a business card containing placeholders for standard information. The user name you provided when first configuring Office or an Office program might already be shown on the card.
 Point to the text box containing the phone number,
and click the information icon that appears.
Point to the text box containing the phone number,
and click the information icon that appears.A list of information set options appears.
In the list, click Edit Business Information.
The Create New Business Information Set dialog box opens.
Note
Troubleshooting The Create New Business Information Set dialog box appears only if you have not previously created an information set. If you already have an existing information set, the Business Information dialog box appears. You can click New in the Business Information dialog box to display the Create New Business Information Set dialog box.
Fill in the information in all the boxes other than the Logo and Business Information set name boxes. Delete the placeholder for any information that does not apply.
For example, if you are filling in personal information, delete the entries in the Job Position Or Title and Organization Name boxes and remove the logo.
Below the Logo box, click Change.
The Insert Picture dialog box opens. You navigate in this dialog box the same way you do in the Save As or Open dialog box.
Navigate to your Chapter29 practice file folder, and then double-click the Logo file.
The selected logo appears in the Logo preview pane.
In the Business Information set name box, replace Custom 1 with a name that represents the information you just entered. (For example, you might enter Company or Personal.) Then click Save.
The Business Information dialog box opens.
In the Business Information dialog box, review the information you just entered, and then click Update Publication.
The business card now appears with your information in place.
Click the address block to activate it, and make a change to the address. (For example, you could add a suite or apartment number.)
Click the information icon and then, in the list, click Save to Business Information Set.
The business card doesn’t change.
Tip
After you insert an item into a publication from the information set, you can add to it or delete parts of it without affecting the way it is stored in the information set. Similarly, if an item such as a tagline or motto is not included in the information set, you can replace the corresponding placeholder in a publication with text without affecting the saved information set. Unless you click the Save To Business Information Set command, the changes exist only in the specific publication and are not part of the information set.
Click the information icon and then, in the list, click Edit Business Information.
The Business Information dialog box opens. The information you changed directly on the card is shown in the dialog box and is now part of the saved information set.
In the Business Information dialog box, click New.
The Create New Business Information Set dialog box opens. The dialog box contains the information you supplied earlier in this exercise. Custom 1 appears in the Business Information Set Name box.
In the Create New Business Information Set dialog box, enter a different set of information, again deleting any elements that are not relevant.
For example, if you previously entered your company information, you might want to enter personal information this time.
In the Business Information set name box, type an appropriate name, and then click Save.
The Business Information dialog box reflects your changes.
In the upper-left corner of the dialog box, click the Select a Business Information set arrow.
The two information sets you’ve created are available in the list.
In the Business Information dialog box, click Close.
The information shown on the business card remains unchanged.
On the Insert tab, in the Text group, click the Business Information button.
The Business Information pane expands, displaying the information saved in the current information set.
In the Business Information gallery, point to your name.
The selected information field is highlighted.
At the bottom of the Business Information gallery, click Edit Business Information.
The Business Information dialog box opens.
In the Business Information dialog box, in the Select a Business Information set list, click the name of the second information set you created. Then click Update Publication.
Publisher updates the business card publication to reflect the new information set.


When you are ready to print a publication, you can print to your computer’s default printer with the default settings by clicking the Print button on the Print page of the Backstage view. From the same page, you can choose a different printer or change the print settings.
Note
See Also For information about print settings in Office 2010 programs, see Chapter 7.
In the right pane of the Print page of the Backstage view, Publisher displays a preview of how your publication will look on paper when printed with the current print settings. You can page through multipage publications by clicking the Next Sheet and Previous Sheet buttons at the bottom of the preview pane.
In addition to visually checking your publication in the preview pane, you can locate possible problems by using the Design Checker, which is available from the Info page of the Backstage view.
Usually the simple settings in the left pane of the Print page will meet your needs. When you want to print only a few copies of a publication, using your own printer is quick and easy. If you need many copies, you will often save time and money by going to a copy shop or professional printer. If you’re preparing a publication for a professional printer, you can access advanced settings by clicking Commercial Print Settings on the Info page of the Backstage view.

From the Commercial Print Settings menu you can choose any of the following commands:
Choose Color Model In the Color Model dialog box, you can define the colors in your publication as RGB colors, single color, spot colors, CMYK process colors, or a combination of spot and process colors.
Manage Embedded Fonts From the Fonts dialog box, you can embed fonts into the publication so that the text of your publication will display the same on all computers.
Registration Settings From the Publication Registration Settings dialog box, you can add registration settings (marks that define the area to be printed and provide other necessary information to commercial printers) to your publication.
In this exercise, you’ll run the Design Checker, preview a publication, and then print the publication.
Note
SET UP You need the Printing_start publication located in your Chapter29 practice file folder to complete this exercise. Ensure that your computer is connected to a printer. Open the Printing_start publication, and save it as Printing. Display the Backstage view, and then follow the steps.
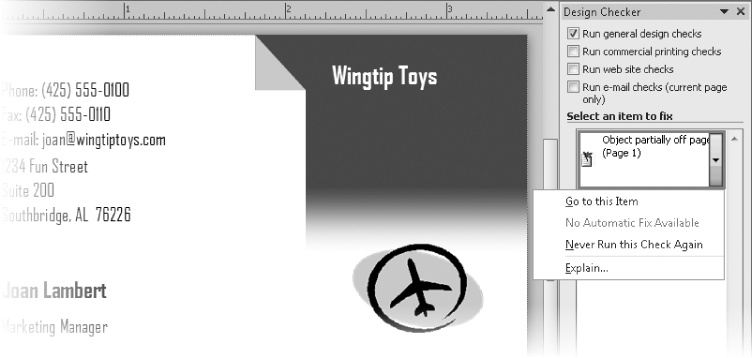
On the Info page of the Backstage view, click the Run Design Checker button.
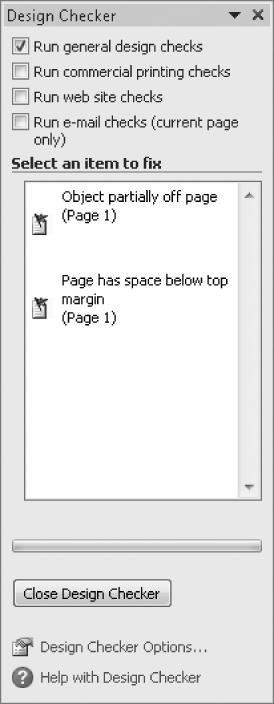
The Design Checker task pane opens. Publisher checks the publication for possible issues and displays two in the Select An Item To Fix list.
In the Select an item to fix list, point to Object partially off page (Page 1), click the button that appears, and then click Go to this Item.
In the lower-right corner of the first page of the publication, Publisher selects the OTSI company logo.
In the Select an item to fix list, point to Page has space below top margin (Page 1), click the button that appears, and then click Go to this Item.
Publisher selects all the objects on the page so that if you wanted to, you could move them upward to decrease the white space at the top of the page.
In the Design Checker task pane, select the Run web site checks check box.
Additional errors appear in the Select An Item To Fix list.
Scroll down the Select an item to fix list, point to Picture does not have alternative text (Page 5), and then click the button that appears.
The menu of options includes a suggested fix for the problem.
On the menu, click Go to this Item.
Publisher selects the graphic on page 5 of the publication.
In the Select an item to fix list, point to Picture does not have alternative text (Page 5), click the button that appears, and then click Fix: Add Alternative Text.
The Format Picture dialog box opens, displaying the Web page.
In the Alternative text box, enter Image depicting a variety of Microsoft Office documents and features.
In the Format Picture dialog box, click OK.
The selected error disappears from the Select An Item To Fix list.
Close the Design Checker task pane.
In the left pane of the Backstage view, click Print.
The Print page of the Backstage view displays information about the current publication and printer.
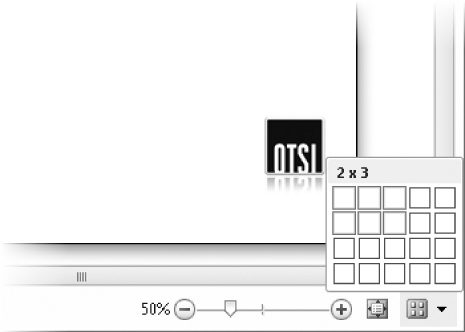
 In the lower-right corner of the Print page, click the View Multiple Sheets button. In the Multiple Sheets gallery that appears,
point to the sheet icon at the intersection of the second row and
third column.
In the lower-right corner of the Print page, click the View Multiple Sheets button. In the Multiple Sheets gallery that appears,
point to the sheet icon at the intersection of the second row and
third column.The Multiple Sheets gallery heading changes to 2 x 3 to reflect the selected page view.
In the Multiple Sheets gallery, click the selected sheet icon.
The preview pane changes to display the six pages of the publication in the selected layout. The page dimensions are indicated to the left and above the currently active publication page.
 At the top of the preview pane, to the right of
the slider, click the Show Page
Numbers
button.
At the top of the preview pane, to the right of
the slider, click the Show Page
Numbers
button.In the preview pane, a page number appears on each sheet of the publication.
Point to page 3, and when the pointer changes to a magnifying glass, click the mouse button.
Publisher displays the part of page 3 that you clicked at a magnification level of 100 percent.
Click the magnified page 3 to return to the previous view.
 In the lower-right corner of the Print page, click the Fit to Sheet button.
The preview pane displays only page 1, which is currently active in Publisher.
In the Settings section of the left pane of the Print page, click Print All Pages and then, in the list, click Print Custom Range.
The page range 1-6 appears in the Pages box.
In the Pages box, replace 1-6 with 2, and then press Tab or Enter.
Page 2 appears in the preview pane.
Important
Because publications are usually carefully laid out before they are printed, it is unlikely that you will want to change settings such as the paper size and orientation from the Print page of the Backstage view. Instead you should change them from the Page Design tab of the ribbon so that you can see the effects on your publication before you print it.
If you have more than one printer available and you want to switch printers, click the Printer arrow and then, in the list, click the printer you want to use.
In the Copies of print job box, change the setting to 2. Then click the Print button.
Publisher prints two copies of the second page of the publication on the designated printer.


From the Backstage view, you can create a publication based on one of the many purpose-specific templates that come with Publisher. You can specify fonts, colors, and layout options before creating the publication.
Publisher doesn’t have multiple views, but because publications often consist of many different elements, it is important to know how to zoom in and out to check details or to get an overview of the entire publication.
You can store sets of personal and company information for Publisher to automatically enter in all the appropriate places in your publications.
You can check the placement of elements within your publication before printing the publication.