
Chapter at a Glance

A database that contains the day-to-day records of an active company is useful only if it is kept current and if the information stored in it can be found quickly. Although Microsoft Access 2010 is fairly easy to use, entering, editing, and retrieving information in Datasheet view is not a task you would want to assign to someone who’s not familiar with Access. Not only would these tasks be tedious and inefficient, but working in Datasheet view leaves far too much room for error, especially if details of complex transactions have to be entered into several related tables. The solution to this problem is to create and use forms.
A form is an organized and formatted view of some or all of the fields from one or more tables. Forms work interactively with the tables in a database. You use controls in the form to enter new information, to edit or remove existing information, or to locate information. The controls you will use most frequently in an Access form are:
Text box controls You can view or enter information in these controls. Think of a text box control as a little window through which you can insert data into the corresponding field of the related table or view information that is already in that field.
Label controls These tell you the type of information you are looking at in the corresponding text box control, or what you are expected to enter in the text box control.
Tip
An Access form can also include a variety of other controls, such as list boxes, that transform the form into something very much like a Windows dialog box or wizard page. For information about Access 2010 features not covered in this book, refer to Microsoft Access 2010 Step by Step by Joyce Cox and Joan Lambert (Microsoft Press, 2010).
In this chapter, you’ll discover how easy it is to create forms to view and enter information. You’ll also modify forms to suit your needs by changing their appearance and the arrangement of their controls.
Note
Practice Files Before you can complete the exercises in this chapter, you need to copy the book’s practice files to your computer. The practice files you’ll use to complete the exercises in this chapter are in the Chapter27 practice file folder. A complete list of practice files is provided in Using the Practice Files at the beginning of this book.
Before you begin creating a form, you need to know the following:
Which table the form should be based on
How the form will be used
After making these decisions, you can create a form in the following ways:
By clicking the table you want in the Navigation bar, and then clicking the Form button in the Forms group on the Create tab. This method creates a simple form that uses all the fields in the table.
By using a wizard. This method enables you to choose which of the table’s fields you want to use in the form.
Manually in Layout view where you can see the underlying data or Design view where you have more control over form elements.
You will usually want to start the process of creating forms that are based on tables by using the Form tool or a wizard—not because the manual process is especially difficult, but because it is simply more efficient to have the tool or a wizard create the basic form for you and then refine that form manually.
In this exercise, you’ll use the Form tool to create a form based on a table. You will then enter a couple of records by using the new form and refresh the table to reflect the new entries.
Note
SET UP You need the GardenCompany03_start database located in your Chapter27 practice file folder to complete this exercise. Open the GardenCompany03_start database, and save it as GardenCompany03. Then follow the steps.
Important
The practice file for this exercise contains tables that look similar to those in the practice file for Chapter 25. However, to simplify the steps, we have removed the relationships between the tables. Be sure to use the practice database for each chapter rather than continuing on with the database from an earlier chapter.
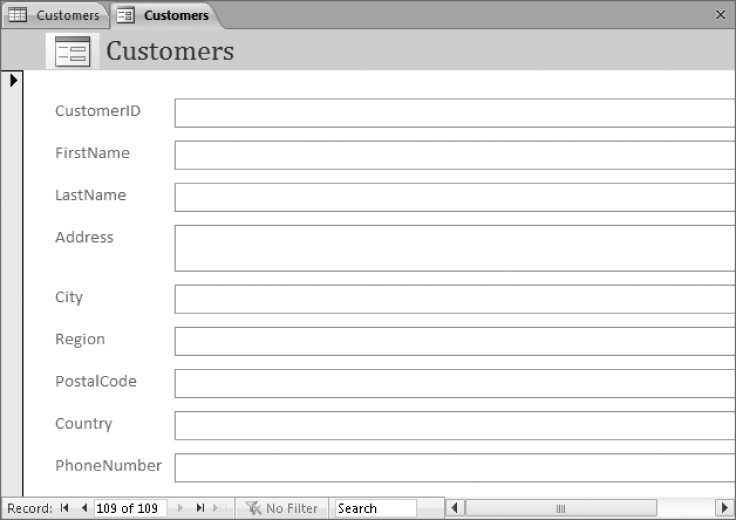
In the Navigation pane, display All Access Objects, and then in the Tables group, double-click Customers.
The Customers table opens in Datasheet view.
Notice the CustomerID field, which contains a unique identifier for each customer and is the primary key field. In this case, the unique identifier is not an auto-generated number, but the first three letters of the customer’s last name combined with the first two letters of his or her first name.
 On the Create tab,
in the Forms group, click the Form button.
On the Create tab,
in the Forms group, click the Form button.Access creates a simple form based on the active table and displays the form in Layout view. In this view, you can make adjustments to the layout and content of the form by clicking the buttons on three Form Layout Tools contextual tabs.
Tip
You don’t have to open a table to create a form based on it. You can simply click the table in the Navigation pane to select it and then click the Form button in the Forms group on the Create tab. But it is sometimes useful to have the table open behind the form so that you can verify the form contents against the table contents.
Note
Troubleshooting The appearance of buttons and groups on the ribbon changes depending on the width of the program window. For information about changing the appearance of the ribbon to match our screen images, see Modifying the Display of the Ribbon at the beginning of this book.
The Form tool has configured all the field names in the table as labels and all the fields as text boxes. In the header at the top of the form, the name of the table appears as a title, and the form icon appears as a placeholder for a logo.
Move the mouse pointer over the form, and click any label or text box control.
In Layout view, you can adjust the controls on the form, so any control you click becomes selected, ready for manipulation.
 On the View
Shortcuts toolbar, click the Form
View button. Then move the mouse pointer
over the form, and click the City
label.
On the View
Shortcuts toolbar, click the Form
View button. Then move the mouse pointer
over the form, and click the City
label.In Form view, the Form Layout Tools contextual tabs are no longer displayed. Clicking a label doesn’t select the label for manipulation; instead it selects the entry in the adjacent text box, ready for editing.
 In the record navigation bar at the bottom of the
form, click the Next Record
button.
In the record navigation bar at the bottom of the
form, click the Next Record
button.Access displays the second record in the table.
Use the record navigation bar to display a few more records.
 At the right end of the record navigation bar,
click the New (Blank) Record button.
At the right end of the record navigation bar,
click the New (Blank) Record button.Access displays a blank Customers form, ready for you to enter information for a new customer.
Click the CustomerID label.
The text box to the right now contains the cursor.
Type ASHCH, and press Tab.
When you start typing, the icon that indicates a record is receiving data (two dots and a pencil) appears in the bar to the left. When you press Tab or Enter, the cursor moves to the next text box.
Type the following information, pressing the Tab key to move to the next text box.
FirstName
Chris
LastName
Ashton
Address
89 Cedar Way
City
Redmond
Region
WA
PostalCode
88052
Country
USA
PhoneNumber
(425) 555-0191
When you finish entering the phone number, press Enter.
Because you just typed the last field value in the record, Access displays another blank record. The record navigation bar now shows that this will be the 110th record in the table.
Type the following information, pressing the Tab key to move from text box to text box.
CustomerID
BERJO
FirstName
Jo
LastName
Berry
Address
407 Sunny Way
City
Kirkland
Region
WA
PostalCode
88053
Country
USA
PhoneNumber
(425) 555-0187
 When you finish entering the phone number, press
Enter. Then in the record navigation bar, click the Previous Record button.
When you finish entering the phone number, press
Enter. Then in the record navigation bar, click the Previous Record button.Access cancels the new record and displays the record you just created.
 Click the Customers
table tab, and on the record navigation
bar, click the Last Record button.
Click the Customers
table tab, and on the record navigation
bar, click the Last Record button.The two records you entered in the form do not appear at the bottom of the table, and the record navigator bar indicates that there are only 108 records in the table.
 On the Home tab, in
the Records group, click the Refresh All
button.
On the Home tab, in
the Records group, click the Refresh All
button.Access synchronizes the form data input with the table, updates the record navigator bar to show 110 records, and displays the top of the table.
Close the Customers table.
 On the Quick Access Toolbar, click the Save button. Then in the Save As dialog box, click OK to accept Customers
as the form name.
On the Quick Access Toolbar, click the Save button. Then in the Save As dialog box, click OK to accept Customers
as the form name.Access saves the form. The Forms group appears on the Navigation bar, listing Customers as the only form in the database.


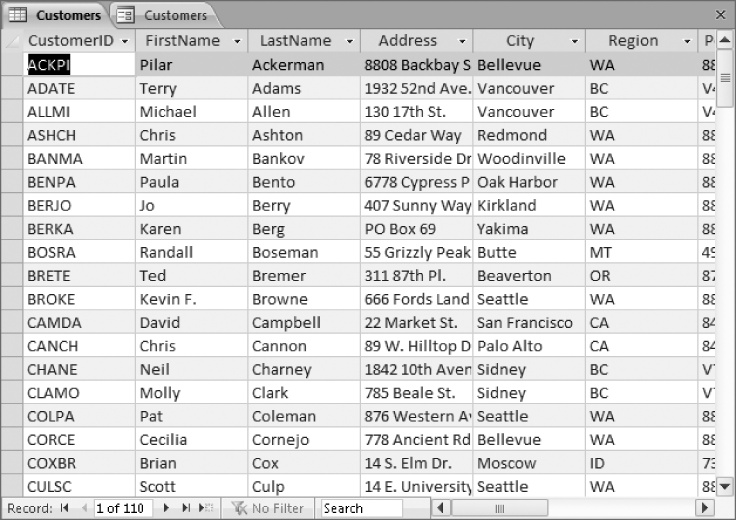
When you create a form by using the Form tool, as you did in the previous exercise, the form includes every field in the table on which it is based. Each field is represented on the form by a text box control and its associated label control. The form is linked, or bound, to the table, and each text box is bound to its corresponding field. The table is called the record source, and the field is called the control source.
Forms and their controls have properties that determine how they behave and look. A form inherits some of its properties from the table on which it is based. For example, each text box name on the form reflects the corresponding field name in the source table. The text box label also reflects the field name, unless the field has been assigned a Caption property, in which case it reflects the caption. The width of each text box is determined by the Field Size property in the table.
Even though a form is bound to its table, the properties of the form are not bound to the table’s properties. After you have created the form, you can change the properties of the form’s fields independently of those in the table. You might want to change these properties to improve the form’s appearance—for example, you can change the font, font size, alignment, fill color, and border.
One of the quickest ways to change the look of a form is to change the theme applied to the database. A theme is a combination of colors and fonts that controls the look of certain objects. In the case of a form, it controls the color and text of the header at the top of the form and the text of the labels and text boxes. By default, the Office theme is applied to all databases based on the Blank Database template and their objects, but you can easily change the theme by clicking the Themes button in the Themes group on the Design contextual tab, and then making a selection from the Themes gallery. While the gallery is displayed, you can point to a theme to display a live preview of how the active database object will look with that theme’s colors and fonts applied.
If you like the colors of one theme and the fonts of another, you can mix and match theme elements. First apply the theme that most closely resembles the look you want, and then in the Themes group, change the colors by clicking the Colors button or the fonts by clicking the Fonts button.
Tip
If you create a combination of colors and fonts that you would like to be able to use with other databases, you can save the combination as a new theme by clicking Save Current Theme at the bottom of the Themes gallery.
If you like most of the formatting of a theme but you want to fine-tune some elements, you can do so in Layout view. In this view, you can see the records from the table to which the form is bound, so when you make adjustments, you can see the impact on the data. (Changes to the data can be made only in Form view.) You might also want to add your organization’s logo or a small graphic that represents the form’s contents.
In this exercise, you’ll change the form properties that control its colors and text attributes. You’ll also add a logo to the form.
Note
SET UP You need the GardenCompany03 database you worked with in the preceding exercise and the Logo graphic located in your Chapter27 practice file folder to complete this exercise. Open the GardenCompany03 database, and then follow the steps.
In the Navigation pane, under Forms, right-click Customers, and then click Layout View.
 On the Design
contextual tab, in the Themes group,
click the Themes button.
On the Design
contextual tab, in the Themes group,
click the Themes button.The Themes gallery appears.
Point to each thumbnail in turn, pausing to see its name in the ScreenTip that appears and the live preview of the form header and text.
 On the Design tab,
in the Header/Footer group, click the
Logo button.
On the Design tab,
in the Header/Footer group, click the
Logo button.With the contents of your Chapter27 practice file folder displayed in the Insert Picture dialog box, double-click the Logo picture.
The logo replaces the form icon to the left of the title in the form header.
Now let’s experiment with individual properties.
On the Customers form, click the CustomerID label (not its text box).
 On the Format
contextual tab, in the Font group, click
the Font Size
arrow, and then in the list, click 8.
On the Format
contextual tab, in the Font group, click
the Font Size
arrow, and then in the list, click 8.The label text is now significantly smaller.
 Click the CustomerID
text box (not its label), and then on the Design contextual tab, in the Tools group, click the Property
Sheet button.
Click the CustomerID
text box (not its label), and then on the Design contextual tab, in the Tools group, click the Property
Sheet button.The Property Sheet for this form opens and displays the properties for the object whose name appears in the text box at the top of the pane. Above the box, the type of object is identified. The properties are organized below the box on four pages: Format, Data, Event, and Other. You can display all the properties on one page by clicking the All tab.
In the Property Sheet, click the Format tab.
All the commands available in the Font group on the Format tab of the ribbon (plus a few more) are available on this page of the Property Sheet.
On the Format page, click Font Size, click the arrow to the right of the adjacent property, and in the list, click 8.
Set the Font Weight property to Bold.
On the form, the entry in the CustomerID text box reflects your changes.
Tip
Sometimes the Property Sheet might obscure your view of the controls on the form. You can change the width of the Property Sheet or of any task pane by dragging its left border to the left or right. You can undock the Property Sheet from the edge of the window and move it elsewhere by dragging its title bar. Double-click the title bar to dock it again.
At the right end of the box at the top of the Property Sheet, click the arrow, and then in the object list, click Label3.
The FirstName label is now selected. You can display the properties of any object on the form, including the form itself, by clicking the object you want in the object list.
Repeat step 11 to change the font size of the FirstName label to 8 points.
You have now made changes to three controls on this form.
These different ways of selecting a control and changing its properties provide some flexibility and convenience, but it would be a tedious way to make changes to several controls in a form. The next two steps provide a faster method.
 In the upper-left corner of the dotted frame
surrounding all the controls on the form, click the Select All button.
In the upper-left corner of the dotted frame
surrounding all the controls on the form, click the Select All button.All the controls within the dotted frame are now surrounded by thick orange borders to indicate that they are selected. In the Property Sheet, the selection type is Multiple selection, and the box below is blank. Only the Format settings that are the same for all the selected controls are displayed. Because the changes you made in the previous steps are not shared by all the selected controls, the Font Size and Font Weight settings are now blank.
Repeat steps 11 and 12 to set the Font Size and Font Weight properties of the selected controls to 8 and Bold.
With the controls still selected, set the Back Style property to Normal.
Although you can’t see any change, the background of the labels is no longer transparent.
 Click the Back Color
property, and then click the Ellipsis
button at the right end of the property.
Click the Back Color
property, and then click the Ellipsis
button at the right end of the property.This Ellipsis button has different names and serves different purposes for different properties. In this case, clicking the Ellipsis button displays a color palette.
Under Theme Colors in the palette, click the third box (Light Green, Background 2).
The background of all the controls changes to light green.
Set the Special Effect property to Shadowed, and the Border Color property to the fifth box under Theme Colors in the color palette (Green, Accent 1).
In the form, click away from the selected controls to release the selection.
In the form, click the FirstName label. Then in the Property Sheet, click the Caption property, change FirstName: to First Name, and press Enter.
Repeat step 22 to change LastName to Last Name and PhoneNumber to Phone.
- On the Quick Access Toolbar, click the Save button to save the design of the Customers form, and then close it.
The Property Sheet attached to the form also closes.


Forms generated with the Form tool are functional, not fancy. By default, they are arranged in the Stacked layout, which arranges all the label controls in a single column on the left and all their corresponding text box controls in a single column to their right. All the boxes of each type are the same size, and in the boxes, the text is left-aligned.
If it suits the needs of your data better to display records in a tabular layout much like that of a table in Datasheet view, you can click Tabular in the Table group on the Arrange contextual tab.
If the default layout doesn’t suit your needs or preferences, you can customize it. Most of the rearranging you are likely to want to do can be accomplished in Layout view, where you can see the impact on the underlying data. If you want to make more extensive changes to the layout of a non-Web database, you can switch to Design view.
In Layout view, you can do the following to improve the form’s layout and make it attractive and easy to use:
Add and delete a variety of controls
Change the size, color, and effects of controls
Move controls
Change text alignment
Change control margins
Tip
The order in which you make changes can have an impact on the results. If you don’t see the expected results, click the Undo button on the Quick Access Toolbar to reverse your previous action, or click the Undo arrow, and click an action in the list to reverse more than one action.
In this exercise, you’ll size, align, and rearrange the label and text box controls in a form.
Note
SET UP You need the GardenCompany03 database you worked with in the preceding exercise to complete this exercise. Open the GardenCompany03 database, and then follow the steps.
In the Navigation pane, under Forms, right-click Customers, and click Layout View.
Because the Property Sheet was open when you last closed the form, it opens with the form.
 Click the CustomerID
label (not its text box), and on the Arrange contextual tab, in the Rows
& Columns group, click the Select Column
button.
Click the CustomerID
label (not its text box), and on the Arrange contextual tab, in the Rows
& Columns group, click the Select Column
button.With all the labels selected, on the Format page of the Property Sheet, set the Text Align property to Right.
All the labels are right-aligned in their boxes. The Property Sheet indicates that by default, the Width property of the labels is 1.0611″.
Point to the right border of the CustomerID label, and when the pointer changes to a two-headed horizontal arrow, drag to the left until CustomerID just fits in its box.
In the Property Sheet, adjust the Width property to 0.8″, and press Enter.
Select the CustomerID text box (not its label), and change its Width property to 1.5″.
Tip
Throughout this book, we refer to measurements in inches. If your computer is set to display measurements in centimeters, substitute the equivalent metric measurement. As long as you are entering the default units, you don’t have to specify the unit type.
The width of all the text box controls is adjusted, not just that of the CustomerID text box.
Notice that the controls are different heights. We’ll fix that next.
- Above the upper-left corner of the dotted border
that surrounds all the controls, click the Select
All button to select all the controls
within the border. Then in the Property
Sheet, set the Height
property to 0.25″.
 On the Arrange
contextual tab, in the Position group,
click the Control Margins button, and then click Narrow.
On the Arrange
contextual tab, in the Position group,
click the Control Margins button, and then click Narrow.Now all the controls are the same height and width and have the same interior margins.
 Click the Phone
label (not its text box), and on the Arrange contextual tab, in the Rows
& Columns group, click the Select
Row button.
Click the Phone
label (not its text box), and on the Arrange contextual tab, in the Rows
& Columns group, click the Select
Row button.Point anywhere in the selection, and drag upward, releasing the mouse button when the insertion line sits below the Last Name label or text box.
The Phone label and text box move to their new location. As you can see, it is easy to move controls within the structure of the Stacked layout. But suppose you want to rearrange the form so that some controls are side by side instead of stacked.
Point to the selected label and text box, and try to drag it to the right of the Last Name controls above.
The controls will not move out of their columns. They are confined by the Stacked layout applied to the form. To make more extensive layout adjustments, you need to remove the layout from the form.
Above the upper-left corner of the dotted border, click the Select All button. Then right-click the selection, click Layout, and click Remove Layout.
The dotted border disappears, and the form is no longer constrained by the Stacked layout.
Click the Last Name label, and then press the Delete key.
Click the LastName text box, point to the A in Ackerman, and when the pointer is shaped like a four-headed arrow, drag up and to the right until the pointer sits slightly to the right of the FirstName text box.
When you release the mouse button, the control snaps to an invisible grid that helps maintain consistent spacing on the form.
In the Property Sheet, adjust the Left property to 2.7″.
Hold down the Shift key, and click the two adjacent controls to add them to the selection. Then top-align the controls by setting the Top property to 0.6″.
Click the First Name label, and change the label’s Caption property to Name.
Rearrange the remaining controls in logical groupings on the form, and then close the Property Sheet.
We adjusted the position of the phone controls and then grouped and sized the address controls.
Tip
If you rearrange controls or add new controls to a form and then find that pressing Tab jumps around erratically instead of sequentially from one control to the next, you can change the tab order. When working in Layout view, you click the Other tab in the Property Sheet and set the Tab Index property for each control in the tab order you want. When working in Design view, you click the Tab Order button in the Tools group on the Design tab to display the Tab Order dialog box, where you can drag fields into the correct order.
Close the Customers form, clicking Yes when prompted to save its layout.


The quickest way to create a form that includes all the fields from one table is by using the Form tool. You can then use the form to view and enter records.
A form that is based on a table is bound to that form. The table is called the record source.
By default, the form displays one text box control and its associated label control for each field in the table.
Each text box control is bound to its field, which is called the control source.
Each control has several properties that you can change in Layout view or Design view to improve the look and layout of the form.