
Chapter at a Glance

In this chapter, you will learn how to | |
|---|---|
✓ | Work in the user interface. |
✓ | Create and save presentations. |
✓ | Open, move around in, and close presentations. |
✓ | View presentations in different ways. |
Using Microsoft PowerPoint 2010 is the easiest way to efficiently create effective presentations. Need to convince management to invest in that new piece of equipment? Need to present the new annual budget to the Board of Directors? Need to give a report about a recent research study? PowerPoint can help you get the job done in a professional, visually appealing way.
The PowerPoint 2010 working environment, called the user interface, makes sophisticated presentation features accessible. As a result, even novice users will be able to work productively with PowerPoint after only a brief introduction.
In this chapter, you’ll first familiarize yourself with the features of the PowerPoint working environment, including the Backstage view, tabs and groups, galleries, and Live Preview. Then after creating and saving several new presentations, you’ll open an existing PowerPoint presentation, learn ways to move around in it, and close it. Finally, you’ll explore various ways of viewing slides so that you know which view to use and how to tailor the program window for a specific task.
Practice Files
Before you can complete the exercises in this chapter, you need to copy the book’s practice files to your computer. The practice files you’ll use to complete the exercises in this chapter are in the Chapter01 practice file folder. A complete list of practice files is provided in Using the Practice Files at the beginning of this book.
As with all Microsoft Office 2010 programs, the most common way to start PowerPoint is from the Start menu displayed when you click the Start button at the left end of the Windows Taskbar. When you start PowerPoint without opening a specific presentation, the program window appears, displaying a new blank presentation.

The program window contains the following elements:
The title bar displays the name of the active presentation. At the left end of the title bar is the PowerPoint icon, which you click to display commands to move, size, and close the program window. At the right end of the title bar are three buttons that control the window. You can temporarily hide the program window by clicking the Minimize button, adjust the size of the window by clicking the Restore Down/Maximize button, and close the active presentation or exit PowerPoint by clicking the Close button.
By default, the Quick Access Toolbar appears to the right of the PowerPoint icon at the left end of the title bar, and displays the Save, Undo, and Redo buttons. You can change the location of the Quick Access Toolbar and customize it to include any command that you use frequently.
Tip
If you create and work with complicated presentations, you might achieve greater efficiency if you add all the commands you use frequently to the Quick Access Toolbar and display it below the ribbon, directly above the workspace. For information, see Customizing the Quick Access Toolbar in Chapter 15.
Below the title bar is the ribbon. All the commands for working with your PowerPoint presentation content are available from this central location so that you can work efficiently with the program.
Troubleshooting
The appearance of buttons and groups on the ribbon changes depending on the width of the program window. For information about changing the appearance of the ribbon to match our screen images, see Modifying the Display of the Ribbon at the beginning of this book.
Across the top of the ribbon is a set of tabs. Clicking a tab displays an associated set of commands.
Commands related to managing PowerPoint and PowerPoint presentations (rather than slide content) are gathered together in the Backstage view, which you display by clicking the colored File tab located at the left end of the ribbon. (The File tab and Backstage view replace the Microsoft Office Button and Office menu found in Microsoft Office PowerPoint 2007.) Commands available in the Backstage view are organized on pages, which you display by clicking the buttons and page tabs located in the left pane.
Commands related to working with slide content are represented as buttons on the remaining tabs of the ribbon. The Home tab is active by default.
On each tab, buttons are organized into named groups.
If a button label isn’t visible, you can display the command, a description of its function, and its keyboard shortcut (if it has one) in a ScreenTip by pointing to the button.
See Also
To see a complete list of keyboard shortcuts, see Appendix A at the end of this book.
Tip
You can control the display of ScreenTips and of feature descriptions in ScreenTips. Display the Backstage view, click Options to open the PowerPoint Options dialog box, and change settings in the User Interface Options area of the General page. You can also change the language of ScreenTip content on the Language page and control the display of keyboard shortcuts in ScreenTips in the Display area of the Advanced page. For more information, see Changing Default Program Options in Chapter 15.
Related but less common commands are not represented as buttons in a group. Instead, they’re available in a dialog box or task pane, which you display by clicking the dialog box launcher located in the lower-right corner of the group.
Some buttons include an integrated or separate arrow. To determine whether a button and arrow are integrated, point to the button or arrow to display its border. If a button and its arrow are integrated within one border, clicking the button will display options for refining the action of the button. If the button and arrow have separate borders, clicking the button will carry out its current default action. You can change the default action of the button by clicking the arrow and then clicking the action you want.
To the right of the ribbon tab names, below the Minimize/Maximize/Close buttons, is the Minimize The Ribbon button. Clicking this button hides the ribbon commands but leaves the tab names visible. You can then click any tab name to temporarily display its commands. Clicking anywhere other than the ribbon hides the commands again. When the full ribbon is temporarily visible, you can click the button at its right end, shaped like a pushpin, to make the display permanent. When the full ribbon is hidden, you can click the Expand The Ribbon button to redisplay it.
Clicking the PowerPoint Help button at the right end of the ribbon displays the PowerPoint Help window in which you can use standard techniques to find information.
See Also
For information about the PowerPoint Help system, see Getting Help at the beginning of this book.
Across the bottom of the program window, the status bar displays information about the current presentation and provides access to certain program functions. You can control the contents of the status bar by right-clicking it to display the Customize Status Bar menu, on which you can click any item to display or hide it.
At the right end of the status bar are the View Shortcuts toolbar, the Zoom Level button, the Zoom Slider, and the Fit Slide To Current Window button. These tools provide you with convenient methods for adjusting the display of presentation content.

You can switch views and adjust the zoom percentage by using the tools in the lower-right corner of the program window.
See Also
For information about different views, see Viewing Presentations in Different Ways later in this chapter.


The goal of all these features of the PowerPoint environment is to make working on a presentation as intuitive as possible. Commands for tasks you perform often are readily available, and even those you might use infrequently are easy to find.
For example, when a formatting option has several choices available, they are often displayed in a gallery of images, called thumbnails. These galleries give you an at-a-glance picture of each choice. If you point to a thumbnail in a gallery, the Live Preview feature shows you what that choice will look like if you apply it to the presentation, slide, or selection.

You can display the content of the active presentation in four primary views: Normal view, Slide Sorter view, Reading view, and Slide Show view. You carry out most of the development work on a presentation in Normal view, which is the default.
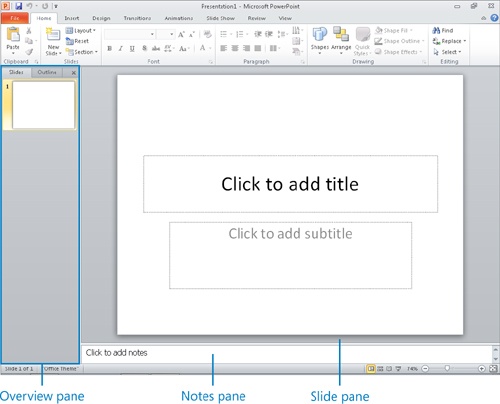
Normal view consists of the following three panes:
Overview. This pane appears by default on the left side of the program window and has two tabs: Slides and Outline. Clicking the Slides tab displays small thumbnails of all the slides in the active presentation. Clicking the Outline tab shows all the text on the slides displayed as an outline. Clicking the Close button in the pane’s upper-right corner closes the pane, and clicking the Normal button in the Presentation Views group of the View tab opens it again.
Slide. This pane occupies most of the program window and shows the current slide as it will appear in the presentation.
Notes. This pane sits below the Slide pane and provides a place for entering notes about the current slide. These notes might be related to the development of the slide or they might be speaker notes that you will refer to when delivering the presentation.
In this exercise, you’ll start PowerPoint and explore the Backstage view and ribbon. Along the way, you’ll see how to take advantage of galleries and Live Preview.
Set Up
You don’t need any practice files to complete this exercise. Start your computer, but don’t start PowerPoint yet. Then follow the steps.
On the taskbar, click the Start button, point to All Programs, click Microsoft Office, and then click Microsoft PowerPoint 2010.
The PowerPoint program window opens, displaying a blank presentation. The Home tab is active.
If your program window is not maximized, click the Maximize button to maximize it now.
On the Home tab, buttons related to creating slide content are organized in six groups: Clipboard, Slides, Font, Paragraph, Drawing, and Editing. Only the buttons representing commands that can be performed on the currently selected presentation element are active.
Point to the active buttons on this tab to display the ScreenTips that name them and describe their functions.
For example, when you point to the New Slide button, a ScreenTip displays information about the button’s function and provides a keyboard shortcut.
Click the Insert tab, and then explore its buttons.
Buttons related to all the items you can insert are organized on this tab in seven groups: Tables, Images, Illustrations, Links, Text, Symbols, and Media.
Click the Design tab, and then explore its buttons.
Buttons related to the appearance of your presentation are organized on this tab in three groups: Page Setup, Themes, and Background.
In the Background group, display the ScreenTip for the Background Styles button.
The ScreenTip tells you that you can use this command to choose the background graphic that is part of the selected theme.
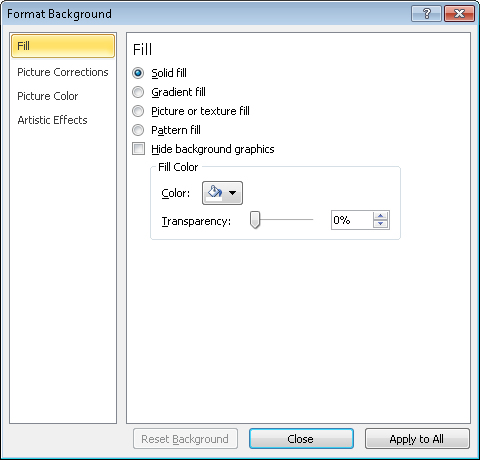
In the lower-right corner of the Background group, click the Background dialog box launcher.
The Format Background dialog box opens.
In the Format Background dialog box, click Close.
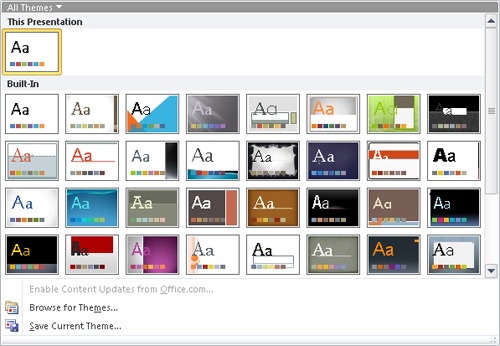
In the Themes group, point to (but don’t click) each thumbnail in the Themes gallery.
In the Slide pane, PowerPoint displays a live preview of what the slide will look like if you click the thumbnail you’re pointing to. You can see the effect of the selection without actually applying the effect.
In the scroll bar to the right of the thumbnails in the Themes group, click the Down button.
The next row of theme thumbnails scrolls into view.
In the Themes group, click the More button.
PowerPoint displays the entire Themes gallery.
Point to various themes in the gallery, observing the effect on the slide.
Press the Esc key to close the gallery without applying a theme.
Click the Transitions tab, and then explore its buttons.
This tab is new in PowerPoint 2010. (Transitions are no longer just another form of animation, but are now a presentation element in their own right.) Buttons related to the transition of slides in your presentation are organized on this tab in three groups: Preview, Transition To This Slide, and Timing.
Click the Animations tab, and then explore its buttons and gallery.
Buttons related to slide animation are organized on this tab in four groups: Preview, Animation, Advanced Animation, and Timing.
Click the Slide Show tab, and then explore its buttons.
Buttons related to displaying your presentation are organized on this tab in three groups: Start Slide Show, Set Up, and Monitors.
Click the Review tab, and then explore its buttons.
Buttons related to editorial tasks are organized on this tab in four groups: Proofing, Language, Comments, and Compare.
Click the View tab, and then explore its buttons.
Buttons related to changing the view or the display of the presentation are organized on this tab in seven groups: Presentation Views, Master Views, Show, Zoom, Color/Grayscale, Window, and Macros.
Click the File tab, which is color-coded to match the color assigned by Microsoft to the PowerPoint program.
The Backstage view is displayed. Commands related to managing presentations (such as creating, saving, and printing) are available in this view.
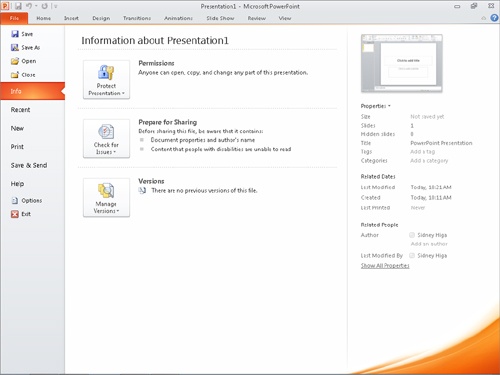
If the Info page is not already displayed in the Backstage view, click Info in the left pane.
On the Info page of the Backstage view, the middle pane provides a means of controlling who can work on the presentation, of removing properties (associated information), and of accessing versions of the presentation automatically saved by PowerPoint. The right pane displays the associated properties, including dates of modification, creation, and printing, and who created and edited the presentation.
See Also
For information about working with properties, see Finalizing Presentations in Chapter 6.
In the left pane, click Recent.
The Recent page displays the names of the presentations you recently worked on. By default, a maximum of 20 names is displayed. You can change this number on the Advanced page of the PowerPoint Options dialog box.
See Also
For information about the PowerPoint Options dialog box, see Changing Default Program Options in Chapter 15.
The New page displays all the templates on which you can base a new presentation.
See Also
For information about creating presentations, see the next topic, Creating and Saving Presentations.
In the left pane, click Print.
The Print page gathers together all print-related commands and provides a pane for previewing the current slide as it will appear when printed.
See Also
For information about printing, see Previewing and Printing Presentations in Chapter 6.
In the left pane, click Save & Send.
The Save & Send page displays all the commands related to making the current presentation available to other people.
See Also
For information about working with other people on presentations, see Chapter 12.
In the left pane, click Help.
The Help page displays all the ways you can get help and support for PowerPoint.
On the Help page, under Tools for Working With Office, click Options.
The PowerPoint Options dialog box opens. In this dialog box are program settings that control the way the program looks and behaves.
See Also
For information about the PowerPoint Options dialog box, see Changing Default Program Options in Chapter 15.
At the bottom of the PowerPoint Options dialog box, click Cancel.
You return to the current presentation with the Home tab active on the ribbon.


To work efficiently with PowerPoint 2010, you must be able to decide the best way to start a presentation. The New page of the Backstage view provides several options for creating a new presentation:
Blank presentation. If you know what your content and design will be and you want to build the presentation from scratch, you can start with a blank presentation. By the time you finish reading this book and working through its exercises, you’ll be able to confidently create powerful presentations of your own. In the meantime, you’ll probably want to use the other options available on the New page.
Tip
When you first start PowerPoint, a blank presentation is displayed in the presentation window, ready for you to enter text and design elements. If you’re already working in PowerPoint, you can open a new blank presentation by clicking the File tab to display the Backstage view, clicking New, and then double-clicking Blank Presentation.
Content template. From the New page of the Backstage view, you can preview and download presentations that are available from the Microsoft Office Online Web site, located at office.microsoft.com, and then customize these templates to meet your needs. When you create a new presentation based on a template, you’re not opening the template; instead you’re creating a new file that has all the characteristics of the template.
Design templates. Creating attractive presentations from scratch is time-consuming and requires quite a bit of skill and knowledge about PowerPoint. You can save time by basing your presentation on one of the design templates that come with PowerPoint. A design template is a blank presentation with a theme, and sometimes graphics already applied to it. PowerPoint supplies a title slide and leaves it to you to add the other slides you need.
Existing presentation. If you or a colleague have already created a presentation that is close enough in content and design to be a good starting point, you can use that presentation as the basis for the new one.
Whether you create a new presentation from scratch or base it on a template or existing file, it exists only in your computer’s memory until you save it. You save a presentation the first time by clicking the Save button on the Quick Access Toolbar or by displaying the Backstage view and then clicking Save As. Either action opens the Save As dialog box, in which you can assign a name and storage location.

If you want to save the presentation in a folder other than the one shown in the Address bar, you can use standard Windows techniques in the Address bar or in the Navigation pane on the left to navigate to the folder you want. If you want to create a new folder in which to store the file, you can click the New Folder button on the toolbar.
After you save a presentation for the first time, you can save changes simply by clicking the Save button. The new version of the presentation then overwrites the previous version. If you want to keep both the new version and the previous version, click Save As in the Backstage view, and then save a new version with a different name in the same location or with the same name in a different location. (You cannot have two files with the same name in the same folder.)
Tip
By default, PowerPoint periodically saves the presentation you are working on in case the program stops responding or you lose electrical power. To adjust the time interval between saves, display the Backstage view, and click Options. In the left pane of the PowerPoint Options dialog box, click Save. Specify the period of time in the box to the right of the Save AutoRecover Information Every check box, and then click OK.
In this exercise, you’ll create and save a couple of presentations based on templates. You’ll also use an existing presentation as the basis for a new one.
Set Up
You need the SalesMeetingMay_start presentation located in your Chapter01 practice file folder to complete this exercise. With only a blank presentation open in PowerPoint, follow the steps.
Click the File tab to display the Backstage view, and then click New.
The New page is displayed.
In the center pane, below Office.com Templates, click the Presentations thumbnail.
The center pane displays folders representing categories of presentations that are available from Office.com.
In the center pane, click Business.
The center pane displays images of all the ready-made business presentations that are available from Office.com.
If necessary, scroll down in the center pane, noticing the wide variety of presentations available.
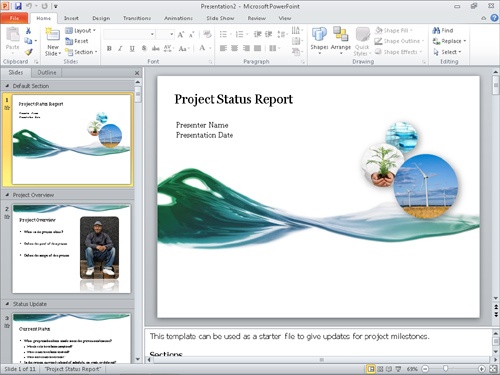
Click the Project status report presentation thumbnail, and then in the right pane of the window, click Download.
Tip
If a message box appears telling you that you can download templates from Office.com only if you are running a genuine version of PowerPoint, click Continue, and follow any additional instructions.
A presentation based on the selected template opens in Normal view.
On the Slides tab of the Overview pane, click slide 2. Then continue clicking slide thumbnails, scrolling down the pane as necessary, to display each slide of the presentation in turn.
The slides contain generic instructions about the sort of information that you might want to include in a presentation for a project status report. You can replace these instructions with your own text.
On the Quick Access Toolbar, click the Save button.
The Save As dialog box opens, displaying the contents of the folder you last used in the Save As or Open dialog box.
Use standard Windows techniques to navigate to your Chapter01 practice file folder.
On the toolbar, click the New folder button.
A folder named New folder appears, with the name selected for editing.
Type My Presentations, press Enter, and then double-click the new My Presentations folder.
My Presentations is now the current folder in the Save As dialog box.
In the File name box, click the existing entry, type My Presentation, and then click Save.
Troubleshooting
Programs that run on the Windows operating system use file name extensions to identify different types of files. For example, the extension .pptx identifies PowerPoint 2010 as well as PowerPoint 2007 presentations. Windows 7 programs do not display these extensions by default, and you shouldn’t type them in the Save As dialog box. When you save a file, PowerPoint automatically adds whatever extension is associated with the type of file selected in the Save As Type box.
Display the Backstage view, click New, and then in the Office.com Templates area, click Design slides.
The center pane now displays categories of ready-made designs.
In the center pane, click each category folder in turn, scroll through the thumbnails of the various design collections, and then click the Back button at the top of the center pane to return to the list of categories.
In the center pane, click the Business folder, click the World in hand design template thumbnail, and then in the right pane, click Download.
A new presentation with one title slide opens in Normal view.
Display the Backstage view, and click Save As.
The Save As dialog box opens, displaying the contents of the My Presentations folder.
In the Address bar, click Chapter01 to display the contents of that folder.
In the File name box, type My Presentation, and then click Save.
PowerPoint saves the My Presentation file in your Chapter01 practice file folder. You have now saved two presentations with the same name, but in different folders.
Display the Backstage view, click New, and at the right end of the top row, click New from existing.
The New From Existing Presentation dialog box opens, displaying the contents of your Chapter01 practice file folder.
Double-click the SalesMeetingMay_start presentation.
A quick glance at the title bar tells you that instead of opening the SalesMeetingMay_start presentation, PowerPoint has opened a new presentation based on that file, effectively using SalesMeetingMay_start as a template.
On the Quick Access Toolbar, click the Save button.
Because this presentation is a new file, PowerPoint displays the Save As dialog box so that you can name the presentation.
In the File name box, type SalesMeetingMay, and then click Save.


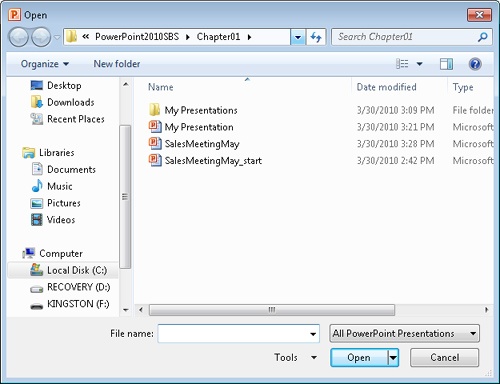
To open an existing presentation, you click the File tab to display the Backstage view and then click Open to display the Open dialog box. The first time you use this command, the Open dialog box displays the contents of your Documents library. If you display the dialog box again in the same PowerPoint session, it displays the contents of whatever folder you last used. To see the contents of a different folder, you use standard Windows techniques to navigate to that folder. After you locate the file you want to work with, you double-click it to open it.
Tip
Clicking a file name and then clicking the Open arrow in the lower-right corner of the Open dialog box displays a list of alternative ways to open the selected file. To look through the presentation without making any inadvertent changes, you can open the file as read-only, or you can open an independent copy of the file. You can open a file in a Web browser. In the event of a computer crash or other similar incident, you can tell PowerPoint to open the file and attempt to repair any damage.
When a presentation is open, you can use several techniques to move from slide to slide, including the following:
By clicking the slide you want to move to on the Slides tab of the Overview pane
By using the scroll bar on the right side of the Slide pane
By clicking the Previous Slide or Next Slide button at the bottom of the Slide pane scroll bar
By pressing the Page Up and Page Down keys on the keyboard
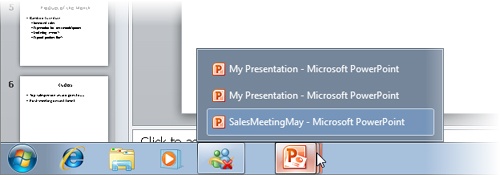
Every time you open a presentation, it opens a new instance of PowerPoint. If you have more than one presentation open, clicking the Close button at the right end of a presentation’s title bar closes that presentation and exits that instance of PowerPoint. If you have only one presentation open and you want to close the presentation but leave PowerPoint running, you must click the File tab to display the Backstage view and then click Close in the left pane.
In this exercise, you’ll open an existing presentation and explore various ways of moving around in it. Then you’ll close the presentation.
Set Up
You need the MayMeeting_start presentation located in your Chapter01 practice file folder to complete this exercise. With the presentations from the previous exercise still open on your screen, follow the steps.
Click the File tab to display the Backstage view, and then click Open.
The Open dialog box opens, showing the contents of the folder you used for your last open or save action.
If the contents of the Chapter01 folder are not displayed, navigate to that folder now.
Double-click MayMeeting_start to open it, and then save the presentation in your Chapter01 practice file folder as MayMeeting.
Now you can work with this presentation without fear of overwriting the original.
In the Overview pane, on the Slides tab, click slide 3.
At the bottom of the scroll bar on the right side of the Slide pane, click the Next Slide button to move to slide 4.
Click the Previous Slide button to move back to slide 3.
Drag the scroll box slowly down to the bottom of the scroll bar.
As you move down the scroll bar, a ScreenTip tells you the number and name of the slide that will be displayed if you release the mouse button at that point.
Press the Page Up key until slide 3 is displayed.
Press Ctrl+Home to move to slide 1.
At the right end of the title bar, click the Close button to close the MayMeeting presentation.
On the Windows Taskbar, point to the PowerPoint button.
Thumbnails of all the open presentations are displayed.
Point to the SalesMeetingMay thumbnail, and then click the Close button that appears.
Repeat step 12 for all but one of the presentations.
Display the Backstage view, and then in the left pane, click Close.
PowerPoint closes the last open presentation but remains running.

PowerPoint has four primary views to help you create, organize, and display presentations. There are other views, but these are the ones you’ll use most frequently:
Normal. As you know, this view includes an Overview pane where you move to a specific slide on the Slides tab or work with the presentation outline on the Outline tab; a Slide pane where you can work on the content of an individual slide; and a Notes pane where you can enter development and delivery notes.
See Also
For information about working with text on the Outline tab and in the Slide pane, see Entering Text in Placeholders and Editing Text in Chapter 3.
See Also
For information about working with notes, see Preparing Speaker Notes and Handouts in Chapter 6.
Slide Sorter. In this view, the slides of the presentation are displayed as thumbnails so that you can easily reorganize them. You can also apply transitions from one slide to another, as well as specify how long each slide should remain on the screen.
See Also
For information about changing the order of slides, see Rearranging Slides and Sections in Chapter 2.
See Also
For information about applying transitions, see Adding Transitions in Chapter 5.
Reading View. In this view, which is ideal for previewing the presentation, each slide fills the screen. You can click buttons on the navigation bar to move through or jump to specific slides.
Slide Show. In this view, each slide fills the screen. You use this view to deliver the presentation to an audience.
See Also
For information about delivering a presentation to an audience, see Delivering Presentations in Chapter 6.

You can switch among these views by clicking the buttons on the View Shortcuts toolbar at the right end of the status bar. Alternatively, you can click the buttons in the Presentation Views group on the View tab to activate all but Slide Show view, which you activate from the Slide Show tab.

The Presentation Views group also includes a button for Notes Page view. In this view, you can create speaker notes that contain elements other than text. Although you can add speaker notes in the Normal view’s Notes pane, you must be in Notes Page view if you want to add graphics to your notes.
See Also
For information about creating more elaborate notes, see Preparing Speaker Notes and Handouts in Chapter 6.
Tip
Are you wondering what the Master Views group is all about? You can control the default look of a presentation by working with the masters displayed in Slide Master view, Handout Master view, or Notes Master view. For information about masters, see Viewing and Changing Slide Masters in Chapter 13.
You can use other buttons on the View tab to display rulers and gridlines to help you position and align slide elements, to change the zoom percentage of the current slide, to see how a colored slide will look if rendered in black and white (usually for printing), to arrange and work with windows, and to view macros.
See Also
The subject of macros is beyond the scope of this book. For information, see PowerPoint Help.
When you are working in Normal view, you can adjust the relative sizes of the panes to suit your needs by dragging the splitter bar that separates them. When you point to a splitter bar, the pointer changes to a double bar with opposing arrows, and you can drag in either direction. You can hide a pane by dragging the splitter bar to shrink the pane as far as it will go. Simply drag the splitter bar back to widen the pane again. If you adjust the width of the Slides tab in the Overview pane, the size of the slide thumbnails is adjusted accordingly—that is, you can see more small thumbnails in a narrow pane and fewer large thumbnails in a wide pane.
Tip
Any changes you make to a view, such as adjusting the sizes of panes, are saved with the presentation that is open at the time and do not affect other presentations.
In this exercise, you’ll switch among different PowerPoint views and then return to Normal view, where you’ll adjust the size of the panes. You’ll see how to display more than one presentation at the same time and experiment with adjusting the zoom percentage.
Set Up
You need the BuyingTrip_start and DesigningColor_start presentations located in your Chapter01 practice file folder to complete this exercise. Open both presentations, and save them as BuyingTrip and DesigningColor, respectively. Then with both presentations open and BuyingTrip displayed on your screen, follow the steps.
In the Overview pane, click the Outline tab.
The pane switches from showing thumbnails of the slides to showing an outline of the text of the presentation. The pane automatically widens to accommodate the length of the bullet points, and the Slide pane and Notes pane shrink accordingly.
On the Outline tab, click in the title for slide 3.
Slide 3 of the presentation is now shown in the adjacent Slide pane.
On the View tab, in the Presentation Views group, click the Slide Sorter button.
All the slides now appear as thumbnails in one large pane. Slide 3 is surrounded by an orange border, indicating that it is selected.
Hold down the Alt key, point to any slide, and then press and hold the mouse button.
While you hold down the mouse button, only the slide’s title is visible against a white background, making it easier to locate the slide you want.
Release the Alt key and the mouse button to restore the display of formatting.
On the View Shortcuts toolbar, click the Normal button.
On the Slide Show tab, in the Start Slide Show group, click the From Beginning button.
PowerPoint displays a full-screen view of the first slide in the presentation.
Without moving your mouse, click its button to advance to the next slide.
Continue clicking the mouse button to advance through the presentation one slide at a time.
After the last slide in the presentation, PowerPoint displays a black slide.
Click again to return to Normal view.
Point to the splitter bar between the Slide pane and the Notes pane, and when the pointer changes to a double bar with opposing arrows, drag the bar down until the Notes pane is completely closed.
Drag the splitter bar at the bottom of the Slide pane upward as far as it will go.
You cannot close the Slide pane completely, but you can make it easier to enter notes about the slide.
On the View tab, in the Window group, click the Switch Windows button, and then click DesigningColor.
Notice that customizing Normal view for one presentation does not affect Normal view for the other presentation.
In the Window group, click the Arrange All button.
In the workspace, you can now see both open presentations at the same time.
Experiment with the other commands in the Window group, and then at the right end of the DesigningColor title bar, click the Close button.
At the right end of the BuyingTrip title bar, click the Maximize button, and then reset the size of the Notes pane.
Click the slide in the Slide pane, and on the View tab, in the Zoom group, click the Zoom button.
The Zoom dialog box opens.
In the Zoom dialog box, click 100%, and then click OK.
Notice that the zoom percentage also changes on the View Shortcuts toolbar at the right end of the status bar, and the slider moves to the middle.
At the left end of the slider on the status bar, click the Zoom Out button until the percentage is 50%.
Each time you click the button, the slider moves to the left and the zoom percentage decreases.
At the right end of the slider, click the Zoom In button.
The zoom percentage increases to 60%.
At the right end of the status bar, click the Fit slide to current window button.
The displayed slide expands to fit the available space in the Slide pane


Because the PowerPoint interface makes commands easily accessible, you can quickly create sophisticated presentations.
How you create a new presentation depends on whether you need help developing the content, the design, or both.
Office.com provides many templates that you can customize to meet your needs.
You can save a presentation in an existing folder or in a new folder. You cannot store two presentations with the same name in the same folder.
You can move around a presentation in several ways: by clicking thumbnails on the Slides tab; by clicking the Next Slide or Previous Slide button; by scrolling the Slide pane; or by pressing the Page Up or Page Down key.
PowerPoint has four primary views: Normal, Slide Sorter, Reading View, and Slide Show. You can switch views by clicking buttons on the View Shortcuts toolbar or by clicking buttons in the Presentation Views group on the View tab.
In Normal view, you can change the zoom percentage of your slides and the size of the panes to suit the way you work.