
18 Implementing Secure Transactions with PHP and MySQL
IN THIS CHAPTER, WE EXPLAIN HOW TO DEAL with user data securely from input, through transmission, and in storage. This way, you can implement a transaction between your site and a user securely from end to end.
Key topics covered in this chapter include
![]() Using Secure Sockets Layer (SSL)
Using Secure Sockets Layer (SSL)
![]() Determining whether to store credit card numbers
Determining whether to store credit card numbers
Providing Secure Transactions
Providing secure transactions using the Internet is a matter of examining the flow of information in your system and ensuring that, at each point, your information is secure. In the context of network security, there are no absolutes. No system is ever going to be impenetrable. By secure, we mean that the level of effort required to compromise a system or transmission is high compared to the value of the information involved.
If you are to direct your security efforts effectively, you need to examine the flow of information through all parts of your system. The flow of user information in a typical application, written using PHP and MySQL, is shown in Figure 18.1.
Figure 18.1 User information is stored or processed by these elements of a typical web application environment.
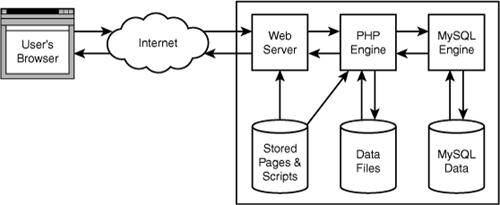
The details of each transaction occurring in your system will vary, depending both on your system design and on the user data and actions that triggered the transaction. You can examine all of them in a similar way. Each transaction between a web application and a user begins with the user’s browser sending a request through the Internet to the web server. If the page is a PHP script, the web server will delegate processing of the page to the PHP engine.
The PHP script might read or write data to disk. It might also use the include() or require() constructs to include other PHP or HTML files. It also sends SQL queries to the MySQL daemon and receives responses. The MySQL engine is responsible for reading and writing its own data on disk.
This system has three main parts:
![]() The user’s machine
The user’s machine
![]() The Internet
The Internet
![]() Your system
Your system
The following sections describe security considerations for each separately, but obviously the user’s machine and the Internet are largely out of your control.
The User’s Machine
From your point of view, the user’s machine is running a web browser. You have no control over other factors such as how securely the machine is set up. You need to bear in mind that the machine might be very insecure or even a shared terminal at a library, school, or café.
Many different browsers are available, each having slightly different capabilities. If you consider only recent versions of the most popular two browsers, most of the differences between them affect only how HTML will be rendered and displayed, but you also need to consider security or functionality issues.
Note that some people disable features that they consider a security or privacy risk, such as Java, cookies, or JavaScript. If you use these features, you should either test that your application degrades gracefully for people without these features or consider providing a less feature-rich interface that allows these people to use your site.
Users outside the United States and Canada might have web browsers that support only 40-bit encryption. Although the U.S. Government changed the law in January 2000 to allow export of strong encryption (to nonembargoed countries) and 128-bit versions are now available to most users, some of them will not have upgraded. Unless you are making guarantees of security to users in the text of your site, this issue need not overly concern you as a web developer. SSL automatically negotiates for you to enable your server and the user’s browser to communicate at the most secure level they both understand.
You cannot be sure that you are dealing with a web browser connecting to your site through your intended interface. Requests to your site might be coming from another site stealing images or content, or from a person using software such as cURL to bypass safety measures.
We look at the cURL library, which can be used to simulate connections from a browser, in Chapter 20, “Using Network and Protocol Functions.” This tool is useful to you, as a developer, but can also be used maliciously.
Although you cannot change or control the way users’ machines are set up, you do need to bear these issues in mind. The variability of user machines might be a factor in how much functionality you provide via server-side scripting (such as PHP) and how much you provide via client-side scripting (such as JavaScript).
Functionality provided by PHP can be compatible with every user’s browser because the result is merely an HTML page. Using anything but very basic JavaScript involves taking into account the different capabilities of individual browser versions.
From a security perspective, you are better off using server-side scripting for such things as data validation because, that way, your source code is not visible to the user. If you validate data only in JavaScript, users can see the code and perhaps circumvent it.
Data that needs to be retained can be stored on your own machines, as files or database records, or on your users’ machines as cookies. We look at using cookies for storing some limited data (a session key) in Chapter 23, “Using Session Control in PHP.”
The majority of data you store should reside on the web server or in your database. There are a number of good reasons to store as little information as possible on a user’s machine. If the information is outside your system, you have no control over how securely it is stored, you cannot be sure that the user will not delete it, and you cannot stop the user from modifying it in an attempt to confuse your system.
The Internet
As with the user’s machine, you have very little control over the characteristics of the Internet, but this does not mean you can ignore these characteristics when designing your system.
The Internet has many fine features, but it is an inherently insecure network. When sending information from one point to another, you need to bear in mind that others could view or alter the information you are transmitting, as discussed in Chapter 15, “E-commerce Security Issues.” With this point in mind, you can decide what action to take.
Your response might be to
![]() Transmit the information anyway, knowing that it might not be private and might not arrive unaltered.
Transmit the information anyway, knowing that it might not be private and might not arrive unaltered.
![]() Digitally sign the information before transmitting it to protect it from tampering.
Digitally sign the information before transmitting it to protect it from tampering.
![]() Encrypt the information before transmitting it to keep it private and protect it from tampering.
Encrypt the information before transmitting it to keep it private and protect it from tampering.
![]() Decide that your information is too sensitive to risk any chance of interception and find another way to distribute your information.
Decide that your information is too sensitive to risk any chance of interception and find another way to distribute your information.
The Internet is also a fairly anonymous medium. It is difficult to be certain whether the person you are dealing with is who he claims to be. Even if you can assure yourself about a user to your own satisfaction, proving this beyond a sufficient level of doubt in a forum such as a court might be difficult. This causes problems with repudiation, which we discussed in Chapter 15.
In summary, privacy and repudiation are important issues when conducting transactions over the Internet.
You can secure information flowing to and from your web server through the Internet in at least two different ways:
![]() Secure Sockets Layer (SSL)
Secure Sockets Layer (SSL)
![]() Secure Hypertext Transfer Protocol (S-HTTP)
Secure Hypertext Transfer Protocol (S-HTTP)
Both these technologies offer private, tamper-resistant messages and authentication, but SSL is readily available and widely used, whereas S-HTTP has not really taken off. We look at SSL in detail later in this chapter.
Your System
The part of the universe that you do have control over is your system. Your system is represented by the components within the rectangular box shown previously in Figure 18.1. These components might be physically separated on a network or all exist on the one physical machine.
You are fairly safe in not worrying about the security of information while the various third-party products that you use to deliver your web content are handling it. The authors of those particular pieces of software have probably given them more thought than you have time to give them. As long as you are using an up-to-date version of a well-known product, you can find any well-known problems by judicious application of Google or your favorite web search engine. You should make it a priority to keep up to date with this information.
If installation and configuration are part of your role, you do need to worry about the way software is installed and configured. Many mistakes made in security are a result of not following the warnings in the documentation or involve general system administration issues that are topics for another book. We suggest you buy a good book on administering the operating system you intend to use or hire an expert system administrator.
One specific issue to consider when installing PHP is that installing PHP as a SAPI module for your web server is generally more secure, as well as much more efficient, than running it via the CGI interface.
The primary point you need to worry about as a web application developer is what your own scripts do or not do. What potentially sensitive data does your application transmit to the user over the Internet? What sensitive data do you ask users to transmit to you? If you are transmitting information that should be a private transaction between you and your users or that should be difficult for an intermediary to modify, you should consider using SSL.
We already discussed using SSL between the user’s computer and the server. You should also think about the situation in which you are transmitting data from one component of your system to another over a network. A typical example arises when your MySQL database resides on a different machine from your web server. PHP connects to your MySQL server via TCP/IP, and this connection is unencrypted. If these machines are both on a private local area network, you need to ensure that the network is secure. If the machines are communicating via the Internet, your system will probably run slowly, and you need to treat this connection in the same way as other connections over the Internet.
It is important that when your users think they are dealing with you, they are, in fact, dealing with you. Registering for a digital certificate protects your visitors from spoofing (someone else impersonating your site), allows you to use SSL without users seeing a warning message, and provides an air of respectability to your online venture.
Do your scripts carefully check the data that users enter? Are you careful about storing information securely? We answer these questions in the next few sections of this chapter.
Using Secure Sockets Layer (SSL)
The Secure Sockets Layer protocol suite was originally designed by Netscape to facilitate secure communication between web servers and web browsers. It has since been adopted as the unofficial standard method for browsers and servers to exchange sensitive information.
Both SSL versions 2 and 3 are well supported. Most web servers either include SSL functionality or can accept it as an add-on module. Internet Explorer and Firefox have both supported SSL from version 3.
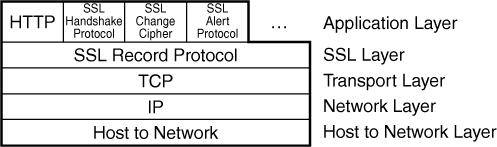
Networking protocols and the software that implements them are usually arranged as a stack of layers. Each layer can pass data to the layer above or below and request services of the layer above or below. Figure 18.2 shows such a protocol stack.
Figure 18.2 The protocol stack used by an application layer protocol such as Hypertext Transfer Protocol.

When you use HTTP to transfer information, the HTTP protocol calls on the Transmission Control Protocol (TCP), which in turn relies on the Internet Protocol (IP). This protocol in turn needs an appropriate protocol for the network hardware being used to take packets of data and send them as an electrical signal to the destination.
HTTP is called an application layer protocol. There are many other application layer protocols such as FTP, SMTP, and Telnet (as shown in Figure 18.2), and others such as POP and IMAP. TCP is one of two transport layer protocols used in TCP/IP networks. IP is the protocol at the network layer. The host to network layer is responsible for connecting the host (computer) to a network. The TCP/IP protocol stack does not specify the protocols used for this layer because you need different protocols for different types of networks.
When you send data, the data is sent down through the stack from an application to the physical network media. When you receive data, it travels up from the physical network, through the stack, to the application.
Using SSL adds an additional transparent layer to this model. The SSL exists between the transport layer and the application layer. This configuration is shown in Figure 18.3. The SSL modifies the data from the HTTP application before giving it to the transport layer to send it to its destination.
Figure 18.3 SSL adds an additional layer to the protocol stack as well as application layer protocols for controlling its own operation.
SSL is capable of providing a secure transmission environment for protocols other than HTTP. Other protocols can be used because SSL is essentially transparent. The SSL provides the same interface to protocols above it as the underlying transport layer. It then transparently deals with handshaking, encryption, and decryption.
When a web browser connects to a secure web server via HTTP, the two need to follow a handshaking protocol to agree on what they will use for items such as authentication and encryption.
The handshake sequence involves the following steps:
1. The browser connects to an SSL-enabled server and asks the server to authenticate itself.
2. The server sends its digital certificate.
3. The server might optionally (and rarely) request that the browser authenticate itself.
4. The browser presents a list of the encryption algorithms and hash functions it supports. The server selects the strongest encryption that it also supports.
5. The browser and server generate session keys:
a. The browser obtains the server’s public key from its digital certificate and uses it to encrypt a randomly generated number.
b. The server responds with more random data sent in plaintext (unless the browser has provided a digital certificate at the server’s request, in which case the server will use the browser’s public key).
c. The encryption keys for the session are generated from this random data using hash functions.
Generating good quality random data, decrypting digital certificates, generating keys, and using public key cryptography take time, so this handshake procedure takes time. Fortunately, the results are cached, so if the same browser and server want to exchange multiple secure messages, the handshake process and the required processing time occur only once.
When data is sent over an SSL connection, the following steps occur:
1. It is broken into manageable packets.
2. Each packet is (optionally) compressed.
3. Each packet has a message authentication code (MAC) calculated using a hashing algorithm.
4. The MAC and compressed data are combined and encrypted.
5. The encrypted packets are combined with header information and sent to the network.
The entire process is shown in Figure 18.4.
Figure 18.4 SSL breaks up, compresses, hashes, and encrypts data before sending it.

One thing you might notice from the diagram is that the TCP header is added after the data is encrypted. This means that routing information could still potentially be tampered with, and although snoopers cannot tell what information you are exchanging, they can see who is exchanging it.
The reason that SSL includes compression before encryption is that although most network traffic can be (and often is) compressed before being transmitted across a network, encrypted data does not compress well. Compression schemes rely on identifying repetition or patterns within data. Trying to apply a compression algorithm after data has been turned into an effectively random arrangement of bits via encryption is usually pointless. It would be unfortunate if SSL, which was designed to increase network security, had the side effect of dramatically increasing network traffic.
Although SSL is relatively complex, users and developers are shielded from most of what occurs because its external interfaces mimic existing protocols.
Transport Layer Security (TLS), currently in version 1.1, is based directly on SSL 3.0 but contains improvements intended to overcome weaknesses of SSL and offer further flexibility. TLS is intended to be a truly open standard, rather than a standard defined by one organization but made available for others.
Screening User Input
One of the principles of building a safe web application is that you should never trust user input. Always screen user data before putting it in a file or database or passing it through a system execution command.
In several places throughout this book, we have described techniques you can use to screen user input. We’ve listed them briefly here as a reference:
![]() You should use the
You should use the addslashes() function to filter user data before it is passed to a database. This function escapes out characters that might be troublesome to a database. You can use the stripslashes() function to return the data to its original form.
![]() You can switch on the
You can switch on the magic_quotes_gpc and magic_quotes_runtime directives in your php.ini file. These directives automatically add and strip slashes for you. The magic_quotes_gpc applies this formatting to incoming GET, POST, and cookie variables, and the magic_quote_runtime applies it to data going to and from databases.
![]() You should use the
You should use the escapeshellcmd() function when you are passing user data to a system() or exec() call or to backticks. This function escapes out any metacharacters that can be used to force your system to run arbitrary commands entered by a malicious user.
![]() You can use the
You can use the strip_tags() function to strip out HTML and PHP tags from a string. This function prevents users from planting malicious scripts in user data that you might echo back to the browser.
![]() You can use the
You can use the htmlspecialchars() function, which converts characters to their HTML entity equivalents. For example, < is converted to <. This function converts any script tags to harmless characters.
Providing Secure Storage
The three different types of stored data (HTML or PHP files, script-related data, and MySQL data) are often stored in different areas of the same disk but are shown separately in Figure 18.1. Each type of storage requires different precautions and is examined separately.
The most dangerous type of data you store is executable content. On a website, this usually means scripts. You need to be very careful that your file permissions are set correctly within your web hierarchy. By this, we mean the directory tree starting from htdocs on an Apache server or inetpub on an IIS server. Others need to have permission to read your scripts to see their output, but they should not be able to write over or edit them.
The same proviso applies to directories within the web hierarchy. Only you should be able to write to these directories. Other users, including the user who the web server runs as, should not have permission to write or create new files in directories that can be loaded from the web server. If you allow others to write files here, they could write a malicious script and execute it by loading it through the web server.
If your scripts need permission to write to files, make a directory outside the web tree for this purpose. This is particularly true for file upload scripts. Scripts and the data that they write should not mix.
When writing sensitive data, you might be tempted to encrypt it first. This approach, however, usually provides little value. Let’s put it this way: If you have a file called creditcardnumbers.txt on your web server and a cracker obtains access to your server and can read the file, what else can he read? To encrypt and decrypt data, you need a program to encrypt data, a program to decrypt data, and one or more key files. If the cracker can read your data, there is probably nothing stopping him from reading your key and other files.
Encrypting data could be valuable on a web server, but only if the software and key to decrypt the data were not stored on the web server, but were stored on another machine instead. One way of securely dealing with sensitive data would be to encrypt it on the server and then transmit it to another machine, perhaps via email.
Database data is similar to data files. If you set up MySQL correctly, only MySQL can write to its data files. This means that you need to worry only about accesses from users within MySQL. We already discussed MySQL’s own permission system, which assigns particular rights to particular usernames at particular hosts.
One issue that needs special mention is that you will often need to write a MySQL password in a PHP script. Your PHP scripts are generally publicly loadable. This issue is not as much of a disaster as it might seem at first. Unless your web server configuration is broken, your PHP source is not visible from outside.
If your web server is configured to parse files with the extension .php using the PHP interpreter, outsiders will not be able to view the uninterpreted source. However, you should be careful when using other extensions. If you place .inc files in your web directories, anybody requesting them will receive the unparsed source. You either need to place include files outside the web tree, configure your server not to deliver files with this extension, or use .php as the extension on these files as well.
If you are sharing a web server with others, your MySQL password might be visible to other users on the same machine who can also run scripts via the same web server. Depending on how your system is set up, this situation might be unavoidable. You can avoid this problem by having a web server set up to run scripts as individual users or by having each user run her own instance of the web server. If you are not the administrator for your web server (as is likely the case if you are sharing a server), discussing this issue with your administrator and exploring security options might be worthwhile.
Storing Credit Card Numbers
Now that we’ve discussed secure storage for sensitive data, one type of sensitive data deserves special mention. Internet users are paranoid about their credit card numbers. If you are going to store them, you need to be very careful. You also need to ask yourself why you are storing them and whether it is really necessary.
What are you going to do with a card number? If you have a one-off transaction to process real-time card processing, you will be better off accepting the card number from your customer and sending it straight to your transaction processing gateway without storing it at all.
If you have periodic charges to make, such as the authority to charge a monthly fee to the same card for an ongoing subscription, this approach might not be an option. In this case, you should think about storing the numbers somewhere other than the web server.
If you are going to store large numbers of your customers’ card details, make sure that you have a skilled and somewhat paranoid system administrator who has enough time to check up-to-date sources of security information for the operating system and other products you use.
Using Encryption in PHP
A simple, but useful, task you can use to demonstrate encryption is sending encrypted email. For many years, the de facto standard for encrypted email has been PGP, which stands for Pretty Good Privacy. Philip R. Zimmermann wrote PGP specifically to add privacy to email.
Freeware versions of PGP are available, but you should note that it is not Free Software. The freeware version can legally be used only for noncommercial use.
You can download the freeware or purchase a commercial license of PGP from PGP Corporation. For details, see http://www.pgp.com.
For more information on the history of PGP and the available versions, read the article, “Where to Get PGP,” from Philip Zimmerman: http://www.philzimmermann.com/EN/findpgp/findpgp.html.
An open source alternative to PGP has more recently become available. Gnu Privacy Guard, known as GPG, is a free (as in beer) and Free (as in speech) replacement for PGP. It contains no patented algorithms and can be used commercially without restriction.
The two products perform the same task in fairly similar ways. If you intend to use the command-line tools, the differences might not matter, but each has different interfaces such as plug-ins for email programs that automatically decrypt email when it is received.
GPG is available from http://www.gnupg.org.
You can use the two products together, creating an encrypted message using GPG for somebody using PGP (as long as it is a recent version) to decrypt. Because we are interested in the creation of messages at the web server, we provide an example here using GPG. Using PGP instead does not require many changes.
As well as the usual requirements for examples in this book, you need to have GPG available for this code to work. GPG might already be installed on your system. If it is not, don’t be concerned—the installation procedure is straightforward, but the setup can be a bit tricky.
Installing GPG
To add GPG to your Linux machine, you can download the appropriate archive file from www.gnupg.org. Depending on whether you choose the .tar.gz or .tar.bz2 archive, you need to use gunzip or tar to extract the files from the archive.
To compile and install the program, use the same commands as for most Linux programs:
configure (or ./configure depending on your system)
make
make install
If you are not the root user, you need to run the configure script with the --prefix option as follows:
./configure --prefix=/path/to/your/directory
You use this option because a nonroot user will not have access to the default directory for GPG.
If all goes well, GPG will be compiled and the executable copied to /usr/local/bin/gpg or the directory that you specified. You can change many options. See the GPG documentation for details.
For a Windows server, the process is even easier. Download the zip file, unzip it, and place gpg.exe somewhere in your PATH (C:Windows or similar will be fine). Create a directory at C:gnupg. Then open a command prompt and type gpg.
You also need to install GPG or PGP and generate a key pair on the system where you plan to check mail.
On the web server, you’ll find very few differences between the command-line versions of GPG and PGP, so you might as well use GPG because it is free. On the machine where you read mail, you might prefer to buy a commercial version of PGP to have a nicer graphical user interface plug-in to your mail reader.
If you do not already have a key pair, generate one on your mail reading machine. Recall that a key pair consists of a public key, which other people (and your PHP script) use to encrypt mail before sending it to you, and a private key, which you use to either decrypt received messages or sign outgoing mail. It is important that you generate the key on your mail-reading machine rather than on your web server because your private key should not be stored on the web server.
If you are using the command-line version of GPG to generate your keys, enter the following command:
gpg --gen-key
You are prompted with a number of questions. Most of them have a default answer that you can accept. On separate lines, you are asked for your real name, your email address, and a comment, which will be used to name the key. (My key is named 'Luke Welling <[email protected]>'. I am sure that you can see the pattern. Had I provided a comment, too, it would be between the name and address.)
To export the public key from your new key pair, you can use the following command:
gpg --export > filename
This command gives you a binary file suitable for importing into the GPG or PGP key ring on another machine. If you want to email this key to people so that they can import it into their key rings, you can instead create an ASCII version like this:
gpg --export -a > filename
Having extracted the public key, you can upload the file to your account on the web server by using FTP.
The following commands assume that you are using Unix. The steps are the same for Windows, but directory names and system commands are different. First, log in to your account on the web server and change the permissions on the file so that other users will be able to read it. Type
chmod 644 filename
You need to create a key ring so that the user who your PHP scripts get executed as can use GPG. Which user this is depends on how your server is set up. It is often the user nobody but could be something else.
Change so that you are the web server user. You need to have root access to the server to do this. On many systems, the web server runs as nobody. The following examples assume this user. (You can change it to the appropriate user on your system.) If this is the case on your system, type
su root
su nobody
Create a directory where nobody can store his key ring and other GPG configuration information. It needs to be in nobody’s home directory.
The home directory for each user is specified in /etc/passwd. On many Linux systems, nobody’s home directory defaults to /, which nobody does not have permission to write to. On many BSD systems, nobody’s home directory defaults to /nonexistent, which, because it doesn’t exist, cannot be written to. On our system, nobody has been assigned the home directory /tmp. You need to make sure your web server user has a home directory that he can write to.
cd ~
mkdir .gnupg
The user nobody needs a signing key of her own. To create this key, run this command again:
gpg --gen-key
Because your nobody user probably receives very little personal email, you can create a signing-only key for her. This key’s only purpose is to allow you to trust the public key you extracted earlier.
To import the pubic key exported earlier, use the following command:
gpg --import filename
To tell GPG that you want to trust this key, you need to edit the key’s properties using this command:
gpg --edit-key 'Luke Welling <[email protected]>'
On this line, the text in single quotation marks is the name of the key. Obviously, the name of your key will not be 'Luke Welling <[email protected]>', but a combination of the name, comment, and email address you provided when generating it.
Options within this program include help, which describes the available commands: trust, sign, and save.
Type trust and tell GPG that you trust your key fully. Type sign to sign this public key using nobody’s private key. Finally, type save to exit this program, keeping your changes.
Testing GPG
GPG should now be set up and ready to use. Creating a file containing some text and saving it as test.txt will allow you to test it.
Typing the following command (modified to use the name of your key)
gpg -a --recipient 'Luke Welling <[email protected]>' --encrypt test.txt
should give you the warning
gpg: Warning: using insecure memory!
and create a file named test.txt.asc. If you open test.txt.asc, you should see an encrypted message like this:
-----BEGIN PGP MESSAGE-----
Version: GnuPG v1.0.3 (GNU/Linux)
Comment: For info see http://www.gnupg.org
hQEOA0DU7hVGgdtnEAQAhr4HgR7xpIBsK9CiELQw85+k1QdQ+p/FzqL8tICrQ+B3
0GJTEehPUDErwqUw/uQLTds0r1oPSrIAZ7c6GVkh0YEVBj2MskT81IIBvdo95OyH
K9PUCvg/rLxJ1kxe4Vp8QFET5E3FdII/ly8VP5gSTE7gAgm0SbFf3S91PqwMyTkD
/2oJEvL6e3cP384s0i8lrBbDbOUAAhCjjXt2DX/uX9q6P18QW56UICUOn4DPaW1G
/gnNZCkcVDgLcKfBjbkB/TCWWhpA7o7kX4CIcIh7KlIMHY4RKdnCWQf271oE+8i9
cJRSCMsFIoI6MMNRCQHY6p9bfxL2uE39IRJrQbe6xoEe0nkB0uTYxiL0TG+FrNrE
tvBVMS0nsHu7HJey+oY4Z833pk5+MeVwYumJwlvHjdZxZmV6wz46GO2XGT17b28V
wSBnWOoBHSZsPvkQXHTOq65EixP8y+YJvBN3z4pzdH0Xa+NpqbH7q3+xXmd30hDR
+u7t6MxTLDbgC+NR
=gfQu
-----END PGP MESSAGE-----
You should be able to transfer this file to the system where you generated the key initially and run
gpg test.txt.asc
to retrieve your original text. The text will be written to a file with the same name as it had before—in this case, test.txt.
To have the text echoed to the screen, use the -d flag:
gpg -d test.txt.asc
To place the text in a file of your choice rather than the default name, you can use the -o flag as well and specify an output file like this:
gpg -do test.out test.txt.asc
Note that the output file is named first.
If you have GPG set up so that the user your PHP scripts run as can use it from the command line, you are most of the way there. If this setup is not working, see your system administrator or the GPG documentation.
Listings 18.1 and 18.2 enable people to send encrypted email by using PHP to call GPG.
Listing 18.1 private_mail.php—The HTML Form to Send Encrypted Email
<html>
<body>
<h1>Send Me Private Mail</h1>
<?php
// you might need to change this line, if you do not use
// the default ports, 80 for normal traffic and 443 for SSL
if($_SERVER['SERVER_PORT']!=443) {
echo '<p style="color: red">WARNING: you have not
connected to this page using SSL. Your message could
be read by others.</p>';
}
?>
<form method="post" action="send_private_mail.php">
<p>Your email address:<br/>
<input type="text" name="from" size="40"/></p>
<p>Subject:<br/>
<input type="text" name="title" size="40"/></p>
<p>Your message:<br/>
<textarea name="body" cols="30" rows="10"></textarea></p>
<br/>
<input type="submit" name="submit" value="Send!"/>
</form>
</body>
</html>
Listing 18.2 send_private_mail.php—The PHP Script to Call GPG and Send Encrypted Email
<?php
//create short variable names
$from = $_POST['from'];
$title = $_POST['title'];
$body = $_POST['body'];
$to_email = 'luke@localhost';
// Tell gpg where to find the key ring
// On this system, user nobody’s home directory is /tmp/
putenv('GNUPGHOME=/tmp/.gnupg'),
//create a unique file name
$infile = tempnam(' ', 'pgp'),
$outfile = $infile.'.asc';
//write the user’s text to the file
$fp = fopen($infile, 'w'),
fwrite($fp, $body);
fclose($fp);
//set up our command
$command = "/usr/local/bin/gpg -a \
--recipient 'Luke Welling <[email protected]>' \
--encrypt -o $outfile $infile";
// execute our gpg command
system($command, $result);
//delete the unencrypted temp file
unlink($infile);
if($result==0) {
$fp = fopen($outfile, 'r'),
if((!$fp) || (filesize($outfile)==0)) {
$result = -1;
} else {
//read the encrypted file
$contents = fread ($fp, filesize ($outfile));
//delete the encrypted temp file
unlink($outfile);
mail($to_email, $title, $contents, "From: ".$from."
");
echo '<h1>Message Sent</h1>
<p>Your message was encrypted and sent.</p>
<p>Thank you.</p>';
}
}
if($result!=0) {
echo '<h1>Error:</h1>
<p>Your message could not be encrypted.</p>
<p>It has not been sent.</p>
<p>Sorry.</p>';
}
?>
To make this code work for you, you need to change a few things. Email will be sent to the address in $to_email.
In Listing 18.2, you need to change the line
putenv('GNUPGHOME=/tmp/.gnupg'),
to reflect the location of your GPG key ring. On our system, the web server runs as the user nobody and has the home directory /tmp/.
We used the function tempnam() to create a unique temporary filename. You can specify both the directory and a filename prefix. You are going to create and delete these files in around 1 second, so it’s not very important what you call them as long as they are unique. We specified a prefix of pgp' but let PHP use the system temporary directory.
The statement
$command = "/usr/local/bin/gpg -a \
--recipient 'Luke Welling <[email protected]>' \
--encrypt -o $outfile $infile";
sets up the command and parameters that will be used to call GPG. You need to modify this statement to suit your situation. As when you used it on the command line, you need to tell GPG which key to use to encrypt the message.
The statement
system($command, $result);
executes the instructions stored in $command and stores the return value in $result. You could ignore the return value, but it lets you have an if statement and tells the user that something went wrong.
After you finish with the temporary files you use, you delete them using the unlink() function. This means that your user’s unencrypted email is stored on the server for a short time. If the server fails during execution, it is even possible that the file could be left on the server.
While you are thinking about the security of your script, it is important to consider all flows of information within your system. GPG encrypts your email and allows your recipient to decrypt it, but how does the information originally come from the sender? If you are providing a web interface to send GPG-encrypted mail, the flow of information will look something like Figure 18.5.
Figure 18.5 In the encrypted email application, the message is sent via the Internet three times.

In this figure, each arrow represents the message being sent from one machine to another. Each time the message is sent, it travels through the Internet and might pass through a number of intermediary networks and machines.
The script you are looking at here exists on the machine labeled Web Server in the diagram. At the web server, the message is encrypted using the recipient’s public key. It is then sent via SMTP to the recipient’s mail server. The recipient connects to his mail server, probably using POP or IMAP, and downloads the message using a mail reader. Here, he decrypts the message using his private key.
The data transfers in Figure 18.5 are labeled 1, 2, and 3. For stages 2 and 3, the information being transmitted is a GPG-encrypted message and is of little value to anybody who does not have the private key. For transfer 1, the message being transmitted is the text that the sender entered in the form.
If the information is important enough that you need to encrypt it for the second and third leg of its journey, sending it unencrypted for the first leg is a bit silly. Therefore, this script belongs on a server that uses SSL.
If you attempt connection to this script without SSL, it will provide a warning. You verify this by checking the value of $_SERVER['SERVER_PORT']. SSL connections come in on port 443. Any other connection will cause an error.
Instead of providing an error message, you could deal with this situation in other ways. You could redirect the user to the same URL via an SSL connection. You could also choose to ignore it because it is not important if the form was delivered using a secure connection. What is usually important is that the details the user typed into the form are sent to you securely. You could simply have given a complete URL as the action of your form.
Currently, the open form tag looks like this:
<form method="post" action="send_private_mail.php">
You could alter it to send data via SSL even if the user connected without SSL, like this:
<form method="post" action="https://webserver/send_private_mail.php">
If you hard-code the complete URL like this, you can be assured that visitors’ data will be sent using SSL, but you will need to modify the code every time you use it on another server or even in another directory.
Although in this case, and many others, it is not important that the empty form is sent to the user via SSL, sending it this way is usually a good idea. Seeing the little padlock symbol in the status bar of their browsers reassures people that their information will be sent securely. They should not need to look at your HTML source and see the action attribute of the form to know whether their data will be safe.
Further Reading
The specification for SSL version 3.0 is available from Netscape: http://wp.netscape.com/eng/ssl3/.
If you would like to know more about how networks and networking protocols work, a classic introductory text is Andrew S. Tanenbaum’s Computer Networks.
Next
We’ve wrapped up our discussion of e-commerce and security issues. In the next part of the book, we look at some more advanced PHP techniques, including interacting with other machines on the Internet, generating images on the fly, and using session control.