
Chapter 18
Building Connected Web Parts
IN THIS CHAPTER
Connected Web Parts make it easy to share data across Web Parts that are running on your page or, more formally, allow your interactions with one Web Part to “trickle down” to other Web Parts. This chapter discusses two Web Parts that provide Master—Detail functionality on the page. This is a typical scenario of two Web Parts that are connected in which selecting a record in the master (or provider) Web Part changes the values of the details (or consumer) Web Part.
You need four things to create connected Web Parts:
- An agreed-upon interface for the data that will be provided
- A provider Web Part
- A consumer Web Part
- A connection between the two Web Parts
This chapter shows you how to complete these four steps to creating connected Web Parts.
Building the Provider
This chapter’s example is based on the Customers—Orders Master-Detail relationship in the Northwind database. It contains two connected Web Parts, a provider and a consumer, as well as an interface that defines the type of data that will be consumed. Figure 18.1 illustrates the conceptual design of the two Web Parts on the page.
Figure 18.1. Connected Web Parts example.

Creating the Data Interface
You define what data will be served up by your provider Web Part by creating a contract, which is actually an interface that is defined in your code. This interface is implemented by the provider Web Part so that consumers will know what data will be sent to them by the provider. The following code excerpt defines the interface for the chapter example:
public interface ISelectedCustomer
{
string CustomerID { get;}
}
The ISelectedCustomer interface defines one read-only property, CustomerID. The CustomerID property is the actual data point that will be passed to the consumer Web Part and will be used to retrieve all orders for a selected customer.
Note
Note that in this example, only one property is sent to consumers; however, you aren’t limited by the number of properties in which your provider can send.
Creating the Provider Web Part
After you have decided on what data your provider Web Part will be sending out, you can now create the Web Part. As with all other Web Parts, this inherits from the WebPart class and also implements the ISelectedCustomer interface, which physically defines the read-only CustomerID property. Listing 18.1 defines a provider Web Part that renders a DropDownList of customers from the Northwind database.
Listing 18.1. Provider Web Part


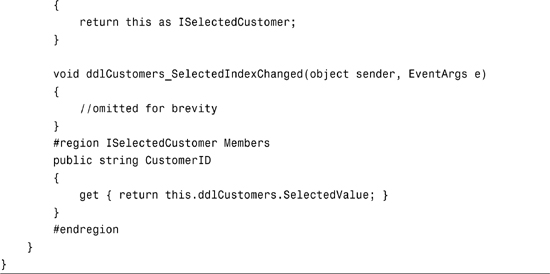
You should pay particular attention to the three pieces of this class definition that relate to a provider Web Part. First, as has already been discussed, the class must inherit the interface that defines the data that will be provided to any consuming Web Parts. Second (and obviously), any properties and methods that are defined by the interface must be implemented. In this example, the class must have a CustomerID property. Third, you must define a method that will return an instance of the implemented interface, as illustrated in the following code:
[ConnectionProvider("CustomerID", "CustomerID")]
public ISelectedCustomer GetCustomerID()
{
return this as ISelectedCustomer;
}
Notice that the method is decorated with the ConnectionProvider attribute. The parameters that are passed into this attribute (in this example) define the DisplayName and UniqueID of the data that is being provided. Though it isn’t a required parameter, the UniqueID parameter will be used when connecting your provider and consumer Web Parts, so it is a good idea to always specify a Unique ID for your provider’s data. Note that there are many overloads of this attribute, so choose the one that best fits your scenario. The ConnectionProvider attribute tells the ASP.NET runtime that this is the data that is being served up by your Web Part. The method returns an instance of the ISelectedCustomer interface. Because your class implements this interface, you can simply return the active instance of the class (or this), which exposes the CustomerID property to any consumers.
Building the Consumer
Building a Web Part consumer is quite easy, compared to building a provider. All that is required is to account for receiving the data that is being served up by a provider Web Part!
Coding a consumer is the same as coding a standard Web Part with a few minor additions. First, you need to define a variable in your class to hold the data that is being consumed (continuing with this example, it will be an instance of ISelectedEmployee). Next, you need to define a way to receive the data that is being sent to the consumer. Listing 18.2 is an example of a Web Part consumer that receives an instance of ISelectedEmployee and displays a customer’s orders in a GridView control.
Listing 18.2. Consumer Web Part
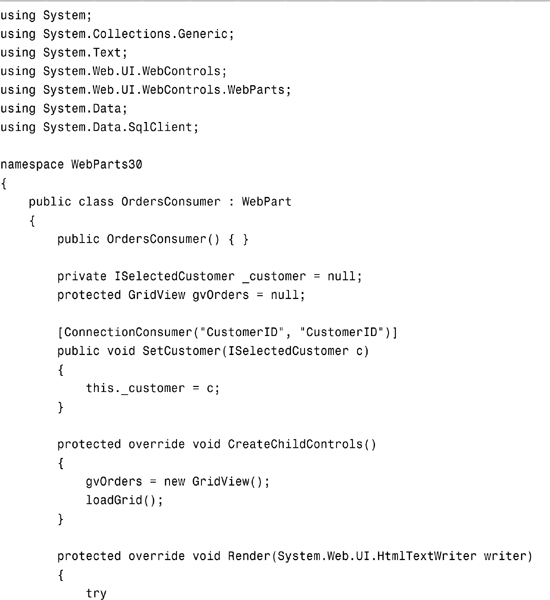
If you look carefully at the preceding code example, you’ll notice an instance of ISelectedCustomer called _customer is defined. This is where the data that you are consuming from the provider will be stored. The following is an excerpt of the method definition that populates the _customer object with the data that is being provided.
[ConnectionConsumer("CustomerID", "CustomerID")]
public void SetCustomer(ISelectedCustomer c)
{
this._customer = c;
}
The SetCustomer method is decorated with the ConnectionConsumer attribute, which defines the data that is being provided to the Web Part. Like the ConnectionProvider attribute that was set up in the provider Web Part, the ConnectionConsumer attribute also specifies a Display Name and Unique ID parameter, which again will be used to identify the data when you connect the two Web Parts.
The SetCustomer method acts very similarly to a “loader” event handler, as it gets executed when your control loads and is connected to a provider. Although you can (and probably will) use a different name for your consumer method, this method is required of all Web Part consumers. It must be defined as a public void method and must contain one parameter, which is the instance of your interface that will be coming into the Web Part from the provider.
Note
Note that if you forget these rules on how to define your method, Visual Studio 2005 does a good job of letting you know the requirements when you compile your code.
Connecting Web Parts
After you have finished developing your provider and consumer Web Parts, the hard part is over. To complete the cycle of developing connected Web Parts, you must “connect” your provider and consumer Web Parts. This allows the provider to send out data to any consumers. The three approaches to connecting Web Parts are as follows:
- In code, using the
ProviderConnectionPoint,ConsumerConnectionPoint, andConnectionPointclasses - Configuring each Web Part inside of the SharePoint user interface
- Configuring a static connection with the
WebPartManageron the page
All three of these approaches accomplish the same goal—they allow your connected Web Parts to talk. This section shows you how to connect Web Parts by using the third approach, using a static connection with the WebPartManager on the page.
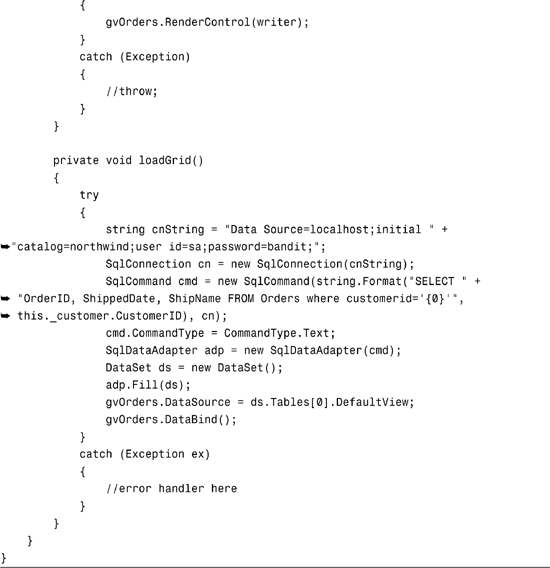
In the ASP.NET 2.0 Portal Framework, the WebPartManager class is required to manage the interaction and functionality of Web Parts on the page. So far in this book, you have learned that this includes the personalization aspects of the Web Parts that are viewable on the page. In addition, the WebPartManager class functionality includes managing connections between provider and consumer Web Parts. Figure 18.2 illustrates the Properties window of the WebPartManager class in Visual Studio 2005.
Figure 18.2. WebPartManager Properties window.
To add a static connection to your Web Part manager, click the Build (ellipsis) button. This opens up the WebPartConnection Collection Editor, which is shown in Figure 18.3.
Figure 18.3. WebPartConnection Collection Editor.
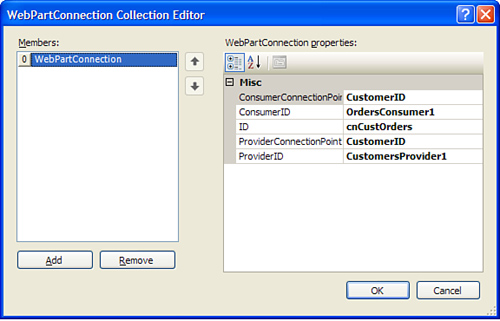
To set up the static connection, you must first configure five properties, which are described in Table 18.1.
Table 18.1. Properties Required to Set Up a Static Connection

After you configure the static connection, a new section will appear in the Hypertext Markup Language (HTML) markup area of the ASP.NET web page that contains the WebPartManager control. Listing 18.3 is an example of an ASP.NET web page that has been configured with the provider and consumer Web Parts that you learned how to build in this chapter.
Listing 18.3. Connecting Provider and Consumer Web Parts

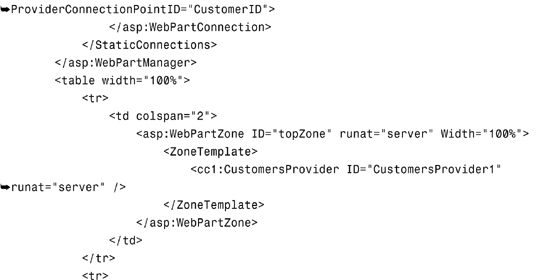

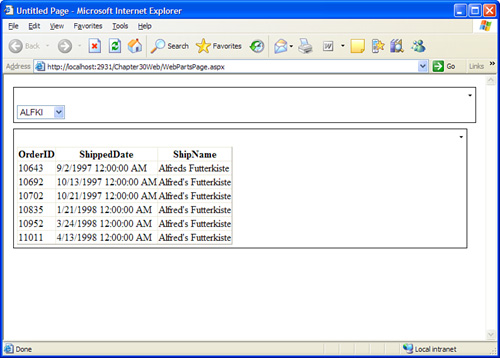
If you first take note of the markup that has been generated for the static connection, you can see the results of configuring the static connection property of the WebPartManager class. Figure 18.4 illustrates the rendered page where the user selects a customer from the DropDownList control and that customer’s order information is displayed in the grid.
Figure 18.4. Provider and consumer Web Parts on a page.
Summary
In this chapter, you learned how to create a Web Part that provides data, a Web Part that consumes data, and a Web Part that connects the two. You can use these skills to create a robust suite of reusable Web Parts that can provide data to and consume data from other Web Parts in your site infrastructure.