
Chapter 23
Using the Meeting Workspace Web Service
IN THIS CHAPTER
- Overview of Meeting Workspaces
- Managing Meeting Workspaces
- Managing Meetings
- Managing Meeting Attendance
- Accessing Meeting Workspace Lists
The Meeting Workspace Web Service is one of the many powerful and extremely useful web services made available to developers. This web service is provided by Windows SharePoint Services (WSS), so you do not need access to a portal server to utilize this web service.
This chapter provides you with an overview of Meeting Workspaces, including a walk-through of creating a sample Meeting Workspace site that will be used in the code samples throughout the chapter. After you have a sample Meeting Workspace up and running, this chapter shows you all of the things that you can accomplish using the Meeting Workspace Web Service.
Overview of Meeting Workspaces
Meeting Workspaces were introduced to solve a very specific problem that exists within virtually any workplace, whether you work in Information Technology (IT), Management, Development, Marketing, or anywhere else. Just about everyone has been in the situation where they send out a meeting request and they include a quick agenda in the body of the request. Some people see the agenda, others don’t. Worse—when the agenda changes, you have to resend the request to everyone after modifying the body of the message request. Even worse is that there is no way for you to track the responsibilities of each attendee—you can just see who’s going to show up from the Scheduling tab in Microsoft Outlook. All of this leads to a very unsatisfying meeting experience. There is no collaboration, no defined meeting workflow, no central place to store meeting minutes, meeting presentation materials, agendas, task lists, and other data related to a meeting that must be tracked. The Meeting Workspace provides this central location of collaboration in which meeting attendees and organizers can collaborate, share information, publish pertinent documents, and even record crucial meeting decisions on the website.
Creating a Meeting Workspace Site
To create a Meeting Workspace site that will be used in the samples throughout the rest of this chapter, first open a browser window to the Microsoft Office SharePoint Server (MOSS) 2007 portal home page. In the case of the screenshots in this chapter, that is http://win2k3r2lab. Complete the following steps to create a new team collaboration site and a Meeting Workspace underneath it:
- Click the Site Actions button.
- Click the Create Site link.
- Call the new site Research Team.
- Select the standard template.
- Set the uniform resource locator (URL) name of the site to
research. - Make sure that, after the site is created, you are looking at the Research Team home page.
- Click the Site Actions button.
- Click the Create Site button.
- Call the new site Defect Tracking Vendor Analysis.
- Select
defecttrackingas the URL for the new site. - Click the Meetings tab in the template selection area and then choose Decision Meeting Workspace.
- After being created, you should have a Meeting Workspace that looks very much like the one shown in Figure 23.1. Go ahead and add some sample data to mimic the data shown in the screenshot.
Figure 23.1. A sample Meeting Workspace.

Managing Meeting Workspaces
The tasks you just completed to manually create a Meeting Workspace can be done programmatically through the web service. In addition to creating Meeting Workspaces, you can delete them, modify their details, and get a list of all Meeting Workspaces. This can be extremely useful and powerful if you want to integrate Meeting Workspace functionality into other systems within your enterprise, such as automated scheduling software, or if you want to enhance the existing integration between Outlook 2007 and SharePoint 2007.
This section walks you through creating a Windows Forms application that manages SharePoint 2007 Meeting Workspaces.
Listing Available Meeting Workspaces
Before working on listing Meeting Workspaces, you need an application to work with. Create a new Windows Forms application called WorkspaceManager and add a web reference to the following URL: http://[your server]/research/_vti_bin/meetings.asmx.
Name the reference research. It doesn’t matter which meetings.asmx service you reference because the URL is dynamically entered in the application anyway. Next, drag a text box named parentsiteUrl and a list view named workspaceList onto the form. Set the view’s mode to “Detail”. You also need a button with the text Load Workspaces somewhere on the form. Add the following code to the button’s event handler:

Obviously, you need to change the user credentials and URL to match your system. If you followed the directions at the beginning of the chapter and created a sample Meeting Workspace, your form should look very similar to the one shown in Figure 23.2 when you run the application and click the Load Workspaces button.
Figure 23.2. List of Meeting Workspaces on a SharePoint site.

Creating a Workspace
Creating a workspace is a fairly simple process. The only thing that can be difficult is that you must specify the site template name when creating the workspace. Unfortunately, you can’t simply specify “Meeting Workspace” or “Decision Meeting Workspace” when creating the workspace. Instead, you need to specify the internal template name as defined in the SharePoint Extensible Markup Language (XML) files. To save you the trouble of sifting through the XML files, Table 23.1 lists the template name and configuration number of each type of Meeting Workspace.
Table 23.1. Meeting Workspace Template Names and Configurations

To create a new Meeting Workspace, you specify the template name, a pound sign, and the configuration number. So, to create a new Multipage Meeting Workspace, you would pass the string MPS#4 as a parameter to the CreateWorkspace method.
Now that you have access to the most important piece of information required to create workspaces, you can add an Add Workspace button to the form in the sample application. Add the following code to the event handler for the Click event:

Run the application and add a new workspace (it could take as long as 30 seconds to create the new workspace depending on your lab environment) and then reload the workspace list. You should see a form that looks similar to the one shown in Figure 23.3.
Figure 23.3. Adding multiple workspaces.

Deleting a Workspace
Given that you use the parent, or container, site to enumerate the list of available workspaces and to create new workspaces, you might think that you use the same parent site to delete a workspace. To delete a Meeting Workspace, the web reference must actually refer to the Meeting Workspace to be deleted. For example, if you were going to delete the Meeting Workspace tempWorkspace from the parent site Research, you might set the URL of your web reference to http://[servername]/Research/tempWorkspace/_vti_bin/meetings.asmx to delete the tempWorkspace Meeting Workspace.
To add the “Delete” functionality to the existing Windows Forms application, simply add a new button to the interface called deleteWorkspaceButton and set its text to “Delete Workspace.” The following code shows an event handler for this button that deletes the workspace indicated by the currently selected list view item:

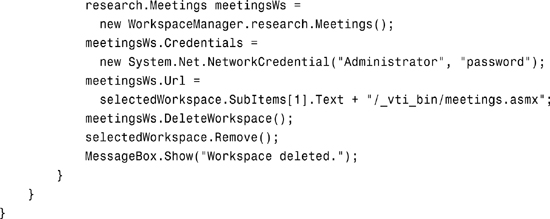
The parameterless method, DeleteWorkspace, is responsible for deleting the workspace data and the provisioned SharePoint site.
Changing Workspace Details
The only detail you can change of a Meeting Workspace that you can change with the Meeting Workspace Web Service (as opposed to direct site management) is the title of the workspace. You do this using the SetWorkspaceTitle method. After adding a new TextBox called renameTitle and a button called renameWorkspaceButton, create an event handler that looks like the following code to make use of the SetWorkspaceTitle method:
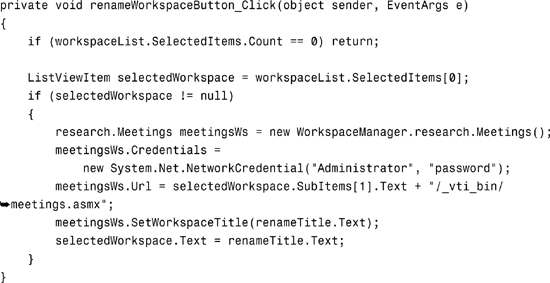
The new user interface, showing a recently renamed Meeting Workspace, should look similar to the one illustrated in Figure 23.4.
Figure 23.4. Renaming a Meeting Workspace.

Managing Meetings
Meeting management can be tricky if you haven’t spent a lot of time working with meetings and Meeting Workspaces as an end user or an administrator within MOSS. This section shows you how to use the Meetings Web Service to create, remove, update, and restore meetings for a given Meeting Workspace.
Creating Meetings
Creating a new meeting is a process that might be confusing at first. A lot of developers assume that if they create a meeting within a Meeting Workspace that a new calendar entry is created on the parent site. This isn’t the case. What happens is a new instance of the Meeting Workspace is created given the new start and end dates. You can duplicate this by creating multiple meetings through the SharePoint graphical user interface (GUI) on the parent site and associating all of them with the same Meeting Workspace. It is important to note that even though the Meeting Workspace itself remains the same, all list data changes with each instance. This allows the user to hold multiple meetings concerning the same topic and have each meeting have its own agenda, attendee list, and so on. If the meeting is associated with a calendar entry, the Meeting Workspace header will contain a Go to Calendar link. You can switch between meetings within a Meeting Workspace with a navigational control on the left side of the site.
Add a context menu to the ListView control from the sample you have been building throughout this chapter with a new item called Add Meeting. This menu adds a new meeting to the selected workspace by opening up a dialog box (a form you should create called MeetingDetails) and using the values from the dialog box as parameters to the AddMeeting method, as shown in the following code:
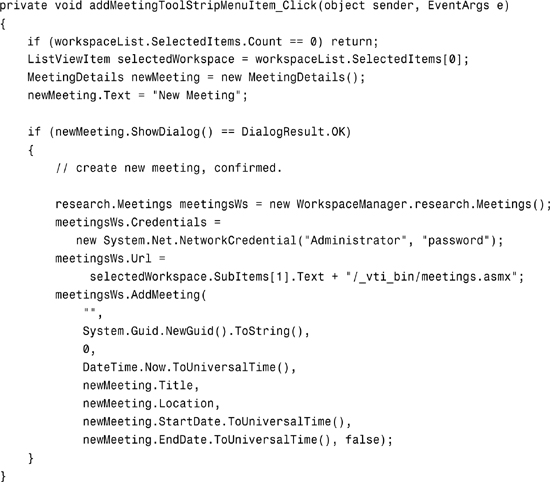
You don’t have to use a globally unique identifier (GUID) for the ID of the meeting, but if you have a Meeting Workspace that will have quite a few meetings, you might just find it convenient to use GUIDs for the meeting identifiers.
Another way that you can create a meeting is through the use of the AddMeetingFromiCal method. This method creates a new meeting based on information contained in an Internet Calendar (iCal) file. To use this method, simply locate the iCal file you want to use, load it into a string, and pass it to the AddMeetingFromICal method, as follows:
meetingsWs.AddMeetingFromICal("", iCalText);
Note
You must be careful with authentication when using web services. Everything in SharePoint is done with regard to a specific user. Therefore, when your application attempts to create a meeting, it is doing so as the authenticated user. This means that if you attempt to supply an email address for the organizer, your code is essentially indicating that it is an authorized delegate for that user to create meetings. The caveat here is that if the currently authenticated user is not actually an authorized delegate, security issues and even runtime exceptions can occur. If you aren’t sure what to do, just leave the organizer field as an empty string to use the email address of the currently authenticated user.
Removing Meetings
Removing a meeting is just a matter of getting the unique ID of an existing meeting and supplying it to the RemoveMeeting method on the Meetings Web Service. Unfortunately, you can’t use the Meetings Web Service to iterate through the list of meetings associated with Meeting Workspace. For that, you need to use the Lists Web Service (discussed in Chapter 22, “Using the Lists Web Service”) to obtain the list items from a special list called Meeting Series. The following code snippet obtains the list of all meetings stored within a Meeting Workspace site:

Table 23.2 contains a cheat sheet of some of the more important XML attribute names (columns) that are returned as part of the hidden Meeting Series list. For a complete list, you can look at the list specification XML or just examine the XML node returned in the preceding method call.
Table 23.2. Meeting Series Columns
After you have the unique ID of the meeting, the method call to remove a meeting looks like this:
XmlNode node = meetingsWs.RemoveMeeting(instanceId, meetingGuid, 0,
DateTime.Now.ToUniversalTime(), cancelMeeting);
instanceId is the instance of the meeting (0 for recurring or first instance, 1 or higher for additional instances) and cancelMeeting is a Boolean value indicating whether the meeting should be deleted entirely or just disconnected from the workspace.
Keep in mind that you cannot remove meetings (instances) from Meeting Workspaces using the user interface; it can only be done programmatically via the application programming interface (API) or through web services.
Updating Meetings
Updating an existing meeting requires the same information as deleting an existing meeting. You must supply the unique ID of the meeting and the updated information such as the new title, description, location, and start and end dates, as shown in the following code snippet:
![]()
Remember that the only way to get at the list of meetings associated with a Meeting Workspace is through the SharePoint API or the Lists Web Service. The false at the end of the parameter list indicates that the dates are in the standard Gregorian calendar format.
Instead of having to manually specify the meeting information in explicit parameters, you can pass the meeting information in iCal (Internet Calendar) format to the web service. iCal data is often found in email attachments containing meeting invites and in many common email clients and personal information managers. To update a meeting using iCal information, simply load the iCal file into a single string and pass it to the UpdateMeetingFromICal method as follows:
meetingsWs.UpdateMeetingFromICal(iCalText, ignoreAttendees);
iCal data can contain information about event attendees as well. By passing the Boolean flag ignoreAttendees, you can indicate whether you want SharePoint to process the attendee data contained within the iCal file. If you have an iCal file that already contains precise attendee information, you can have SharePoint parse through that rather than having your code do it manually, which is definitely a time-saver.
Restoring Meetings
The RestoreMeeting method restores a previously removed meeting and reestablishes the link between the meeting and the Meeting Workspace. The code to restore a meeting is quite simple because it only requires the unique ID (in this chapter you have been using GUIDs) of the meeting itself:
XmlNode result = meetingsWs.RestoreMeeting(meetingGuid);
Managing Meeting Attendance
Attendee responses are specific to an instance of a Meeting Workspace, or rather, they belong to a specific meeting and not to the entire workspace as a whole. When you are setting the attendee response, you need to supply the recurrence identifier of the appropriate workspace instance, the unique identifier of the meeting, and the email address of the attendee.
To see how to set the attendee acceptance status (Accepted, Declined, or Tentative), first add a new ListView to the existing form. This one will be called meetingList and will be populated with the list of meetings belonging to the currently selected Meeting Workspace. Set the SelectedIndexChanged event handler of the workspaceList control to the following code (the GetListItems call should look familiar):

Obviously, in a production application you wouldn’t keep instantiating the service and setting credentials; that would be something that would be done once per application load.
Now create a new context menu strip called meetingContextMenu, associate it with the meetingList control, and add a Set Attendee action with the following click event handler:

Anytime the new context menu item is clicked, it tells SharePoint that the attendee [email protected] (that is the email address of the administrator on the lab machine used in this example) has declined that particular meeting. If you are working with multiple meetings created for a single Meeting Workspace by the application in this chapter, you will be able to switch between the various meetings and see how the attendee status has only been modified for one instance of a meeting and not all instances within the Meeting Workspace.
Accessing Meeting Workspace Lists
Chapter 22 showed you the mechanics of working with lists of data contained within SharePoint using the Lists Web Service, so that code isn’t rehashed here. However, Meeting Workspaces do have their own custom list types with their own custom fields; Tables 23.3 through 23.6 provide a helpful quick reference of some of the more commonly used columns. Remember that when you get this data as XML via the Lists Web Service, the column names contain the ows_ prefix.


![]()
Table 23.6. “Things to Bring” Fields

Summary
Meeting Workspaces are a powerful feature of Microsoft Office SharePoint Server (MOSS). They provide a centralized location around which meeting collaboration and information sharing can take place. They provide a central location for document storage, specialized list management, and even calendar integration with Microsoft Outlook. This chapter showed you how your client applications—whether those applications are Windows Forms, Windows Presentation Foundation (WPF), or ASP.NET applications—can harness the power of Meeting Workspaces and meetings through the Meetings Web Service (meetings.asmx). Finally, you also saw that you can combine the power of the Meetings Web Service with the utility of the Lists Web Service to exert complete control over the entire Meeting Workspace experience through web services.
When you run the samples in this chapter, make sure to change the URLs of the services and of the SharePoint server to match that of your own environment. You need either a local copy of MOSS installed or access to a copy of it over the network.