
Chapter 14
ASP.NET Server Control Primer
IN THIS CHAPTER
Before discussing creating Web Parts that integrate into Microsoft Office SharePoint Server (MOSS), you must first look at creating ASP.NET server controls because a Web Part is actually a special type of server control.
Contrasting Server Controls and User Controls
Learning the art of creating a server control is necessary knowledge that you must have as a SharePoint developer. Server controls are at the very core of Web Part development, so it is important to understand the basics of server control development before you learn how to build your first Web Part. Before discussing ASP.NET server controls, it is important to understand how they differ from ASP.NET user controls, as they are often confused with each other.
Figure 14.1 illustrates a few subtle differences between server controls and user controls. This section breaks down the differences in the two, beginning with user controls.
Figure 14.1. Server controls versus user controls.
User controls are very similar to ASP.NET web pages in that they can contain both a Hypertext Markup Language (HTML) and a code-behind (or code-beside) programmable interface. You can easily create a user control with the Visual Studio .NET Integrated Development Environment (IDE). The following listing creates a user control that simply collects information about a user on your website and displays that information in a ListBox control. To keep it simple, the example only collects a user’s first name, last name, and phone number. Note that the server-side code is coded inline with the user control’s HTML.14.1
Listing 14.1. Information Collection User Control

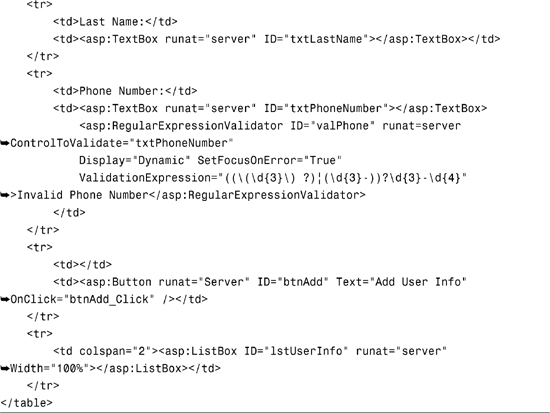
As you can see by looking at the code, our user control looks very similar to a standard .aspx web page in that it contains both server-side logic as well as HTML code to display information to the user. However, instead of a complete HTML page, all that is required is the piece that will be “snapped” into your page. When your web application is compiled, all of the server-side logic gets compiled into the web application’s Assembly, which means that when you compile and deploy your web application (including Assemblies and all dependent files), your user controls get wrapped up as distinct units of your application.
It is typically a best practice to utilize user controls to break out functionality of a page into modular pieces. For example, in a large, team environment, you can easily break up the functionality of complex pages into user controls and distribute the work among the team.
Server controls, on the other hand, are a little more difficult to develop. Unlike user controls, server controls don’t have a “user interface,” so to speak. When you create a server control, it must be compiled into a class library (or .dll file) and deployed separately from your application.
Server controls are meant to be shared by multiple web applications, whereas user controls are meant to be used by a single web application. You should consider a few things when you are creating server control libraries for your applications.
Note
If you are creating a server control library that will be common to multiple web applications, you might consider strong-naming the Assembly and deploying to the Global Assembly Cache. This ensures that the Assembly will be deployed once as well as provides the ability for versioning your controls.
If you separate your pages into distinct, reusable web controls, you can take advantage of using fragment caching, which is where you cache data-bound controls to reduce the number of trips to the database that are required to reload controls that are rendered on the page. The ASP.NET runtime keeps these controls prerendered in memory, thus significantly increasing performance. The following example demonstrates the processing instruction that is required to enable caching on a control.
<%@ OutputCache VaryByParam="true" Duration="60" %>
This tells the runtime to cache the control by using an algorithm created by a query string or form parameters that are posted back to the server, for a duration of 60 seconds. Fragment caching is outside of the scope of this chapter, but if used properly, it can considerably increase the performance and scalability of your application.
Now that you have reviewed ASP.NET user controls, the following section takes a look at building a server control.
Building Your First Server Control
Building server controls is quite a bit different than building web controls because there is not a user interface that you can “drag and drop” controls to. This makes a lot of developers shy away from the topic, but given the proper knowledge, you can create some very powerful controls that encapsulate logic that can be reused in your enterprise applications.
Two methodologies are considered generally accepted practices when creating custom server controls:
- A class that inherits from an existing control class in ASP.NET
- A custom class that inherits from the
ControlorWebControlclass
The good news is that a lot of the base functionality has already been written for you, no matter what type of control you need to create. All custom server controls must be compiled into a Class Library project, the result of which is a .dll Assembly.
Let’s take a look at the first methodology: creating a class that inherits from an existing control class. Before writing any code, you need to add a special class to your Class (control) Library project that is provided by Visual Studio 2005, which will help you to easily create custom server controls. You can use the Web Custom Control item template, as illustrated in Figure 14.2.
Figure 14.2. Add a Web Custom Control to your project.

The Web Custom Control template adds a new class that inherits from the System.Web.UI.WebControls.WebControl class. Because you are creating a customized TextBox, you change the class definition to derive from the System.Web.UI.WebControls.TextBox class. The following example of a custom TextBox control only allows numeric input. The TextBox accepts any input, but if anything but a numeric value is entered, the background color changes to red and “0” is displayed in the TextBox control; otherwise, the TextBox displays the numeric value normally.14.2
Listing 14.2. Numeric Textbox Server Control


The logic that is defined in the control class is very simple; you quite simply need to override the base functionality of the Text property of the TextBox, most specifically the set statement. In the set statement, the value that is being set is attempted to be parsed into an Integer. If it parses (or if it is numeric), change the BackColor of the TextBox to the default color of white. Else, if the value doesn’t parse, change the BackColor property to red and reset the Text property to “0”.
At its root, the previous example is very simplistic in that all that is required to create the server control is to derive a class that is already implemented by the .NET Framework application programming interface (API). The following section takes a look at a more advanced example of a server control that derives from System.Web.UI.WebControls.WebControl.
Extending Server Controls
Deriving a class from System.Web.UI.WebControls.WebControl allows you to emit HTML that will function as a server control at runtime. This might be the scenario when you need functionality that isn’t provided by the default web controls (TextBox, Label, DropDownList, and so on), but can be done with HTML. For simplicity (these types of controls can get very complex), the following example creates a custom, multiline TextBox control that resizes itself vertically based on the content that is contained within the control. This functionality isn’t native to any of the controls in the .NET Framework, so you need to emit custom HTML that renders a TextArea control.14.3
Listing 14.3. Resizing TextBox Control


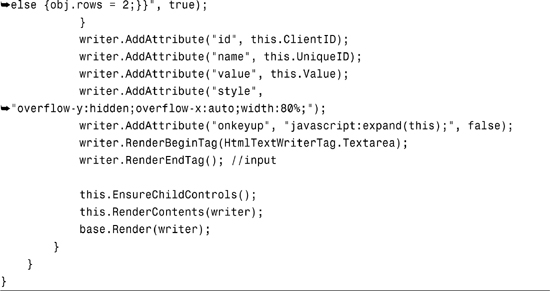
Note that this code snippet is incomplete, but the discussion continues in the next few sections to complete the code for the Server Control. Take a look at the Render method in the ExpandingTextBox class. This method is fired when the control gets rendered to the page, so this is where you need to create the HTML that is required to render your control. As you can see, you use the HtmlTextWriter object to pump HTML to the output stream of the response object, as well as register a client-side script block that provides the resizing functionality of the TextArea.
When the control gets rendered, it resizes itself, as illustrated in Figure 14.3.
Figure 14.3. Expanding TextBox control.

Managing ViewState
If you compile the preceding code sample into a custom control and add it to your page, the control is rendered and functions as expected (that is, it resizes itself). But alas, you are not without problems yet. Although the control functions, it loses its state when you post back to the server. Because you emitted a custom HTML control, the System.Web.UI.WebControls.WebControl class doesn’t provide the logic to save the control’s state to ViewState.
You must follow a few steps to have your control save to ViewState. Your class must implement the IPostBackDataHandler interface to be able to save back down to ViewState. This allows you to code against two events that are required for PostBacks: LoadPostBackData and RaisePostDataChangedEvent. The following code implements these methods:14.4
Listing 14.4. Saving ViewState


The code that is contained in the LoadPostData method checks the data that has been posted back to the server. If it has changed, the Value property is set and the method returns true (that is, the data has changed in the control). This is what actually commits the changed data to ViewState, so the functionality of this method is essential for your control to post back properly.
The LoadPostData method does not get fired automatically, however. You must first register the control with the page by calling the RegisterRequiresPostBack method inside of the PreRender event of the control. This registers the control to ViewState and causes the LoadPostData method to fire when the page posts back.
Summary
This chapter showed you how to create a custom server control that emits JavaScript to provide functionality that is not covered in the .NET Framework API, as well as how to handle posting data back to the server.