
Chapter 13
Building Workflows
IN THIS CHAPTER
Workflows in Microsoft Office SharePoint Server (MOSS) 2007 are built on top of the Windows Workflow Foundation (WF) and extend the base functionality to integrate seamlessly into the SharePoint 2007 infrastructure. Though you can build workflows with WF that extend into multiple systems, most workflows in MOSS are document -or list-centric. This chapter discusses the concepts of building workflows by stepping through an example provided by the SharePoint 2007 Software Development Kit (SDK).
Workflow as a Solution
Before you can begin building workflow solutions for SharePoint 2007, you must do several things to your development environment to ease the complexity of the Windows Workflow Foundation. This largely relates to installing a series of templates provided by the MOSS SDK.
When you install the .NET Framework 3.0 SDK on your development machine, only the Assemblies and supporting tools get installed. This doesn’t install any templates in Visual Studio 2005 that will help you develop workflows. There are, however, templates available for download that will make it much easier to design and develop workflows for both SharePoint 2007 and WF.
Note
It is important to note that you can create workflows with WF that do not utilize SharePoint 2007. It is a common misconception that workflows must be installed on your SharePoint 2007 server. This is not true because you can have workflows that integrate into any type of managed application—all without using SharePoint 2007.
The two templates that you should install are the “Visual Studio 2005 Extensions for Windows Workflow Foundation” and the SharePoint 2007 SDK. The following list provides links to these templates:
- Visual Studio 2005 Extensions for Windows Workflow Foundation: http://www.microsoft.com/downloads/details.aspx?familyid=5D61409E-1FA3-48CF-8023-E8F38E709BA6&displaylang=en
- SharePoint 2007 SDK: http://www.microsoft.com/downloads/details.aspx?familyid=6d94e307-67d9-41ac-b2d6-0074d6286fa9&displaylang=en
After these two building blocks are installed, you can begin to build custom workflows.
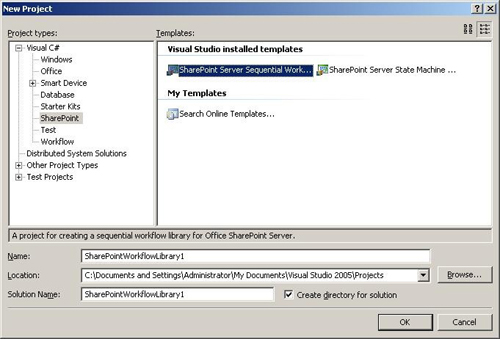
Figure 13.1 illustrates the templates that are installed with the Visual Studio 2005 Extensions for WF, and Figure 13.2 shows the templates that are installed with the SharePoint 2007 SDK (which extend the Visual Studio 2005 Extensions for WF).
Figure 13.1. Visual Studio 2005 Extensions for WF templates.
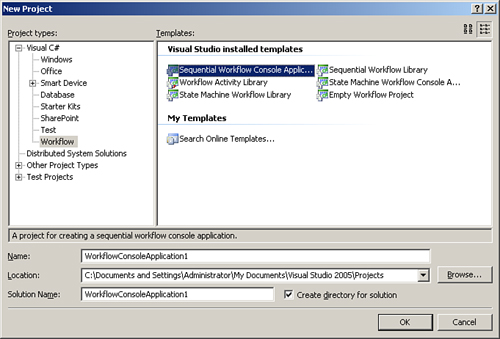
Figure 13.2. SharePoint 2007 SDK Visual Studio 2005 templates.
SharePoint Workflows
Workflow solutions that run within the context of SharePoint are typically document- or list-centric, which means that they are associated with some sort of document library or list and facilitate a process around items in the list. When a SharePoint workflow is processed, tasks are typically assigned to a user in response to something that has happened to an item in the list.
A sample workflow is a simple approval workflow. When an item is saved to a SharePoint list with an approval workflow association, the item is routed to an “approver,” where he can then either approve or reject the new item.
As you are thinking about workflows and their design, it is important to remove your coding hat for a moment. Workflows are typically human-based, so at the very high level, try to think about how the workflow will work as a process level and not as a code level. In the approval workflow sample, as items flow through the workflow, tasks are created for both the approver and possibly again for the submitter as list items flow through the process.
Note
As you will see later in this chapter, the workflow designer in Visual Studio 2005 is very good at first letting you design your workflow as a process diagram and then filling in the code later.
Workflow Objects
Before you learn how to design and develop workflows, it is important to understand the three objects that you will be creating: templates, associations, and instances.
Workflow Templates
Workflow templates are actually called Features and are what you will develop in Visual Studio 2005. Note that the term Feature will mean more to you later on in this chapter when the workflow template is deployed. Templates (or Features) define the workflow itself, how information is processed through the workflow, and any forms (.aspx or InfoPath forms) that are required by the workflow. Workflow templates are then installed on the server and associated with a site collection.
Workflow Associations
After a workflow template has been installed on your SharePoint server, it must be associated with a document library or a list. This means that items that are added to the list are assigned the workflow process defined by the template, assuming that the specified criteria have been met.
Workflow Instances
Workflow instances are the physical running instances of the workflow processes that have been associated with a list. They are different from associations because associations define the process that is to be assigned to list items, whereas a workflow instance is similar to an objected instance of an association that is dehydrated and rehydrated as the workflow process advances.
Building the Workflow
Building workflows is quite complex, so instead of introducing a new workflow template, this section explains the concepts of building a workflow using the HelloWorldSequential sample that is available in the MOSS SDK.
When learning how to code workflows in SharePoint 2007 and WF, you are typically consumed with the details of how to get the workflow up and running. It is important to remember that the workflows that you are building are used for human interaction—meaning that your users initiate the workflow and respond to tasks that are assigned to them during a workflow’s lifespan. You can take several paths to design and build your workflow; however, the road map that typically works best (for most people) looks like the following:
- Design the forms (InfoPath or ASPX) that your users will use to move data through a workflow.
- Model the workflow with Visual Studio 2005.
- Code the workflow.
- Deploy the workflow.
- Debug the workflow (locally).
Note
These steps are meant for you to use as a guideline. They are not set in stone and can be done in more than one way. Find a path that you are comfortable with and stick with it.
The next few sections describe each step that is required to get a workflow deployed to your SharePoint 2007 server. This chapter’s example is the HelloWorldSequential workflow example from the SharePoint 2007 SDK.
Designing the Forms
The first step in designing the workflow involves getting the data to SharePoint so that your workflow instance can be started. In this example, this is by way of an InfoPath form, but can also be from an ASPX file that is created in Visual Studio.
Figure 13.3 illustrates the InfoPath 2007 designer. Notice that each text box in the designer (Assignee, Instructions, and Comments) has been named appropriately. This is very important because when you receive the data from the text boxes into the workflow, you need a way to identify what data is being received.
Figure 13.3. Designing the ReviewInitiation InfoPath form.

In this example, there is one Submit button on the page. In the Submit buttons on your forms, you can choose to do any number of custom actions from the very simple to the extremely complex; however, in this example only two rules are applied: Submit the data using a data connection and close the form. This allows the user to fill out the form and when they click Submit, the data is sent to SharePoint and the form is closed (assuming that validation has been placed on the text boxes). Figure 13.4 illustrates the rules that are applied behind the form’s Submit button.
Figure 13.4. Rules behind the Submit button.

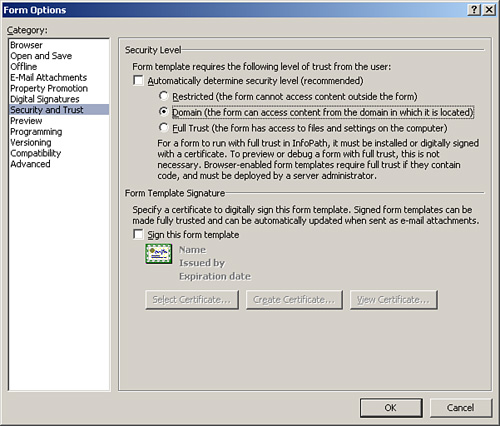
Next, you must give the form domain-level trust for it to access resources on the SharePoint server. Note that if you do not perform this task, your form will not work when you deploy your workflow. You can access the form’s security properties by clicking Tools, Form Options and then clicking on the Security and Trust subtab. Figure 13.5 illustrates setting domain-level trust on your InfoPath 2007 form.
Figure 13.5. Configuring domain-level trust.
After your form is set up and configured, you should publish the form to the same directory in which you plan to develop your Visual Studio 2005 solution.
Tip
When developing the workflow data collection forms in InfoPath, it is important to note that because your SharePoint 2007 workflows are document-centric, InfoPath 2007 actually integrates the forms into your Office 2007 documents or SharePoint 2007 lists without opening InfoPath separately. You can write your own forms; however, InfoPath is the simplest approach as a lot of the “plumbing” code is baked into the Office 2007 system.
The next section describes modeling the workflow in Visual Studio 2005.
Modeling the Workflow in Visual Studio 2005
Workflows are modeled by using the Visual Studio 2005 Extensions for Windows Workflow Foundation (link provided earlier in this chapter). After these extensions are installed, you will notice several new project templates when you create a new project. Figure 13.6 illustrates the new project templates.
Figure 13.6. Workflow project templates.

When you install the Office 2007 SDK, the SharePoint workflow project templates get installed. These templates are different than the traditional workflow project templates in that there are only two (SharePoint Server Sequential Workflow and SharePoint Server State Machine Workflow) and they include all of the references and setup/configuration that you need to develop workflows for SharePoint.
Note
A common misconception is that workflows must run in SharePoint. This is not true in that you can develop workflows with WF that run in any .NET 3.0 managed application. SharePoint 2007 just extends this functionality and makes it easy to apply workflows to a document or a list.
Figures 13.7 and 13.8 show the new controls that are available to create both SharePoint 2007 and Windows workflows.
Figure 13.7. SharePoint 2007 workflow.
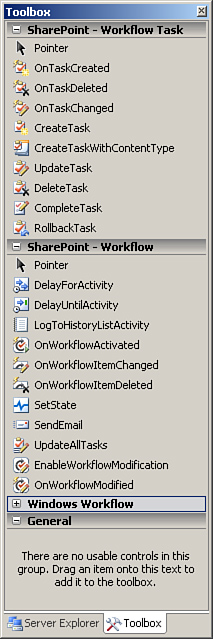
Figure 13.8. Windows workflows.

As you take a look at the HelloWorldSequential workflow project in the Office 2007 SDK, take a few minutes to look at the workflow designer in Visual Studio (Figure 13.9).
Figure 13.9. HelloWorldSequential workflow Project Workflow Designer.

As you can see, workflows are designed by using a flowchart-based designer. As you are designing the workflow, you need to think more about the business processes that are happening rather than the code that needs to be written behind the scenes to actually get the workflow to work.
Correlation Tokens
As you are stepping through the workflow and looking at the properties of each item in the workflow, notice one common property: CorrelationToken. This property is very important because it is used to specify the “context” for which each process of the workflow executes. It is used to identify each activity to determine the scope for which task is executed. It is possible for a workflow to use the same correlation token; however, it is not recommended because most workflows have multiple activities that need to commit as an individual unit or as a group.
Coding the Workflow
The code behind the workflow contains event handlers for each step in the workflow. In the HelloWorldSequential workflow example, each activity contains an event handler of the same name. If you follow through the flowchart, you can see the order in which each event handler will fire. The following set of steps is a description of what is happening in each event:
- The workflow first receives Extensible Markup Language (XML) data from the InfoPath in the
onWorkflowActivatedmethod and stores that data in local properties. - The task is assigned to someone in the
createTaskmethod and enters theWhileactivity. This loops until the user selects theisFinishedcheck box to complete the workflow. Note that this begins a newcorrelationToken. - As the data in the InfoPath forms are changed, the
Whileloop checks theisFinishedproperty. - When the user selects
isFinished, the task exits theWhileactivity and marks the task as complete. ThecorrelationTokenthat was created in step 2 ends here. - The custom code activity sets some history information on the workflow.
- The
logToHistoryListActivityactivity logs the history information to the list’s history. - Finally, an email is sent to inform the user of the status of the workflow.
Deploying the Workflow
When you are ready to deploy your workflow, several requirements must be met before you can start. First, you need to configure two XML files that describe your workflow: feature.xml and workflow.xml.
The following feature.xml and workflow.xml files describe the HelloWorldSequentialWorkflow Assembly:13.113.2
Listing 13.1. Feature.xml File


Listing 13.2. Workflow.xml File
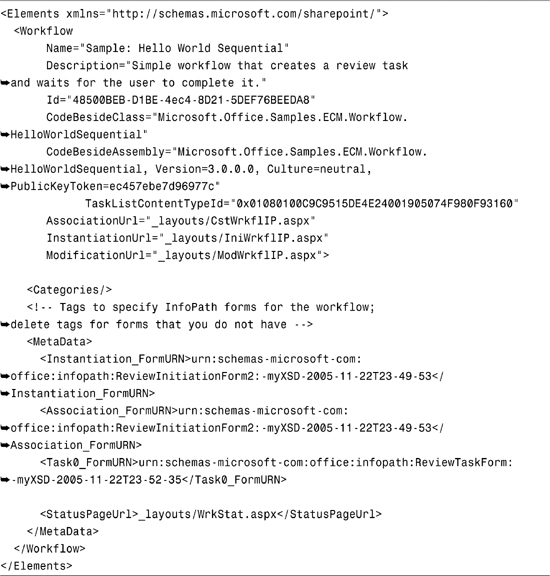
The feature.xml file describes the Assembly’s properties that will get installed as a workflow on your SharePoint server, whereas the workflow.xml file describes how your workflow will get processed (that is, the processing pages and a few basic Assembly properties).
Finally, you must deploy your workflow. It is easiest to create a batch file for installation because several steps are required:
- Copy the Assemblies to a common location.
- Copy the
feature.xmlandworkflow.xmlfiles to the common location. - Copy the
InfoPathFormsto the common location. GACyour Assemblies.- Install and activate the workflow by using the
stsadm.execommand-line utility.
The following is an excerpt of the install.bat file included with the SDK sample. You should note that steps 1 through 4 can be accomplished by copying and pasting using Windows Explorer. However, it is recommended that you include these steps in the batch file because it is easy to replicate installation either by deploying an update to the SharePoint server or deploying to a QA/Production server.13.3
Listing 13.3. Excerpt from Install.bat


Summary
Workflow is one of the most important facets of SharePoint 2007 because it allows you to create and customize workflows around your documents and lists. This chapter showed you how to create workflow solutions by discussing different scenarios for using them as well as the concepts of a working workflow solution.