
Distilling Quicken to its very essence
Setting up additional bank accounts
Adding, removing, and modifying categories
Understanding tags
Before you spend a bunch of time and money on Quicken, you have to understand the big picture. You need to know what Quicken can do. You need to know what you want to do. And, as a practical matter, you need to tell Quicken what you want it to do.
When you boil Quicken down to its essence, it does six things:
It lets you track your tax deductions.
This feature makes preparing your personal or business tax return easier for you or your poor accountant, Cratchit.
It lets you monitor your income and outgo either on-screen or by using printed reports.
Usually, this stuff is great fodder for discussions about the family finances. And, if you're running a business or investing in real estate rental properties, this income and expense information becomes more than just great conversation fodder — the information helps you better manage your business.
It lets you print checks (and sometimes other forms, too).
This device is mostly a timesaver, but it can also be useful for people who are neat freaks.
It lets you track the things you own (such as bank accounts, investments, and real estate) and the debts you owe (such as home mortgage principal, car loan balances, and credit card balances).
These things are really important to know.
It helps you make better personal financial planning decisions about such matters as retirement, your children's future college costs, and your savings and investments.
I think this stuff is really neat.
It gives you the opportunity to pay bills electronically and, in some cases, even do all your banking electronically.
This stuff is pretty neat, too. No, let me amend that. Online bill paying and banking are really neat. I do have some minor (very minor) reservations that I discuss in Chapter 6, which deals with online banking in depth.
To track your tax deductions, make a list of the deductions you want to track. To do so, pull out last year's tax return. Note which lines you filled in. (Perhaps mortgage interest, property taxes, state income taxes, and charitable contributions?) This method works because there's a darn good chance that the tax deductions you claimed last year will also be the tax deductions you'll claim in the future.
I cover the Quicken categories, which you use to track your tax deductions, a little later in this chapter.
At our house, we (my wife, Sue, and I, your humble author) use Quicken to monitor our spending on the mundane little necessities of life: groceries, clothing, dog food, cable television, and, well ... you get the picture. To keep track of how much we spend on various items, we also use the Quicken categories.
Note
If you want to monitor a particular spending category, decide up front what the category should be before you begin recording your data.
Your list of spending categories, by the way, shouldn't be an exhaustive list of superfine pigeonholes, such as Friday-night Mexican food, Fast food for lunch, and so on. To track your spending on eating out, one category named something like Meals or Grub usually is easiest.
In fact, I'm going to go out on a limb. You can probably start with a dozen categories, more or less:
Car
Clothing
Entertainment and vacation
Groceries
Household expenses (besides food)
Insurance
Medical and dental
Rent (or mortgage payments)
Taxes
Utilities (electric, water, cable television)
Work expenses
If you want to, and over time, you can expand this list. Heck, you can create dozens and dozens of categories. My experience, though, is that you'll probably use only a handful of categories.
You can use Quicken to print checks. This little trick provides a couple of benefits: It's really fast if you have several checks to print, and your printed checks look very neat and darn professional.
To print checks, you need to do just two things. First, look through the check supply information that comes with Quicken, and pick a check form that suits your style. Then order the form. (The check forms that come with remittance advices — or check stubs — work well for businesses.)
Preprinted check forms aren't cheap. If you're using Quicken at home with personal-style checks (such as those that go in your wallet), using computer checks may not be cost effective. Even if you're using Quicken for a business, and you're used to buying those outrageously expensive business-style checks, you'll still find computer checks a bit more expensive.
I'm pretty much a cheapskate, so I don't use printed checks at home (although I do use them in my business). I should admit, however, that I also don't write very many checks.
Tip
By the way, I've "checked" around. Although you can order Quicken check forms from other sources (such as your local office supplies store), they're about the same price from Intuit (the maker of Quicken). If you want to order from Intuit, you can refer to the catalog that came in the Quicken packaging. You can also visit www.Quicken.com.
One other comment here about printing checks: If you're going to pay bills electronically, you don't need to print checks with Quicken. Oh, sure, you can print checks if you want. But you won't want to. Paying a bill electronically is easier and cheaper than paying a bill with a Quicken-printed check.
A general comment about printing other forms: If you run a business, and the business needs to produce invoices, you can use Quicken Home & Business and Quicken Rental Property Manager (two business-y flavors of Quicken) to produce invoice forms, too.
You must decide which bank accounts and credit cards you want to track. In most cases, you want to track each bank account you use and any credit card on which you carry a balance.
You may also want to track other assets and liabilities. Assets are just things you own: investments, cars, a house, and so on. Liabilities are things you owe: margin loans from your broker, car loans, a mortgage, and so on.
Shoot, I suppose that you could even track the things your neighbor owns — or perhaps just those things you especially covet. I'm not sure that this is a very good idea, though. (Maybe a healthier approach is to track just those things that you've borrowed from your neighbor.)
Your computer's computational horsepower makes it the ideal tool for doing complicated calculations. So maybe you're not surprised that Quicken comes with five powerful calculators that let you make smarter borrowing choices, better mortgage-refinancing decisions, more accurate savings and investment calculations, and extremely helpful retirement and college savings calculations. I believe that these financial planning tools are the most valuable features that Quicken offers. I'm just sorry that I have to wait until Chapter 10 to talk about them.
If you want, you can tell Quicken that it should do the work of paying some person or merchant electronically. In other words, at the same time that you describe some check to Quicken — you do so by entering stuff in a window — you can say to Quicken, "I not only want you to record this check for me, I also want you to pay it for me."
If your bank supports online banking, you may also be able to move money between your accounts and get up-to-date statements electronically. Ask your bank for details about this service if you're interested.
To perform this sort of online banking, you need to have an Internet connection, and you need to do a little bit of paperwork. But the Quicken Online Banking features can save you scads of time. And the features are easy to use. Basically, all you do is use Quicken in the usual way — which is what I talk about in the chapters that follow — and then click a couple of extra buttons.
When you first began working with Quicken — and this may have only been a few minutes ago or several years ago — you were prompted to set up an account. And you probably set up at least a checking account because this is probably your most active bank account. If you want to track any additional accounts — for example, a savings account — you must set them up, too.
To set up an additional checking, savings, or money market account, you give the account a name and then its balance as of a set date. Here's how:
Click the Setup tab.
Quicken displays the Setup tab window, shown in Figure 2-1.
Tip
You can collapse and expand the different areas on the Setup tab by clicking the small button marked with a plus symbol or a minus symbol that's just left of the area label. For example, to collapse and expand the Customize Quicken area on the Setup tab, click the button that's just to the left of Customize Quicken. If the button shows a minus symbol, clicking the button collapses the Customize Quicken setup area. If the button shows a plus symbol, clicking the button expands the previously collapsed Customize Quicken setup area.
Click the Add Checking Account or Add Savings Account button.
The Add Account buttons appear a little way down the Setup tab page, so you may need to scroll down a bit. When you click this button, Quicken displays the Account Setup dialog box, shown in Figure 2-2.
Identify the financial institution and then click Next.
To identify where you're banking, enter your institution's name in the Enter The Name Of Your Financial Institution Or Select From A List By Clicking The Buttons Above text box. Alternatively, you can select the I Do Not Want To Enter My Financial Institution radio button if you want to go fast or skip the intrusive questioning.
Indicate whether you want to connect to your bank online, and then click Next.
When Quicken asks whether you want to download account activity and balance information directly from your bank or enter the information manually, indicate that you don't have a username and password, unless you already know how to use online banking, and then on the next screen indicate that you want to just enter transactions manually. (Quicken asks the "manual versus online" questions if you select a financial institution that allows for online banking.)
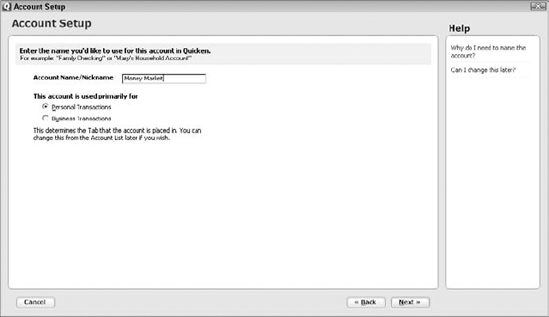
Name the account, and then click Next.
When Quicken displays the first Tell Quicken About This Account dialog box (see Figure 2-3), move the cursor to the Account Name/Nickname text box and type a name in that box. Click Next after you do this. You're almost done.
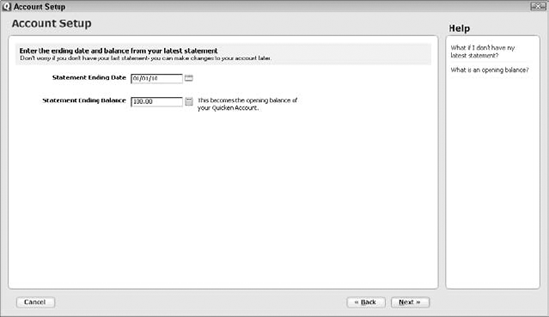
Enter the account balance date.
When Quicken displays the Statement Date and Balance dialog box shown in Figure 2-4, enter the date that you're going to start keeping records for the bank account with Quicken. (Quicken wants you to start your record keeping for an account on a bank statement date because on a bank statement date, you have a really good balance from the bank.) Move the cursor to the Statement Ending Date text box and type the month number, a slash, the day number, a slash, and the year number. If you start on July 16, 2010, for example, type 07/16/2010. Or, if this is way too complicated for you, click the button at the end of the Statement Ending Date text box so that Quicken displays a pop-up calendar. Then click the date. Use the << and >> buttons to move back and forth a month at a time.
Note: If you want to keep your transaction records for tax purposes, of course, it makes sense to track whatever accounts you can from the first of the year, assuming that you have all the necessary statements or your own records of all the transactions.
Click inside the Statement Ending Balance text box and enter the bank account balance.
Use the number keys to enter the balance. The folks at Intuit, by the way, really want you to use the balance from your bank statement. If you have terrible financial records — for example, you haven't reconciled your account since Bill Clinton left office — this idea is probably good advice. If you have neat, accurate financial records, go ahead and use your check register balance.
Tip
If you do use the bank statement balance as your starting balance, be sure to enter all the transactions that cleared or will clear after the bank statement balance date. (This should make sense, right? If a check or deposit isn't reflected in the bank statement figure, you must enter it with its correct date into Quicken.)
Click Next and then the Done button.
Quicken re-displays the Setup tab.


In Quicken, you work with one account at a time. The logic is simple: You record income and expenses for a particular account — a specific checking account, savings account, and so on. That makes sense, right?
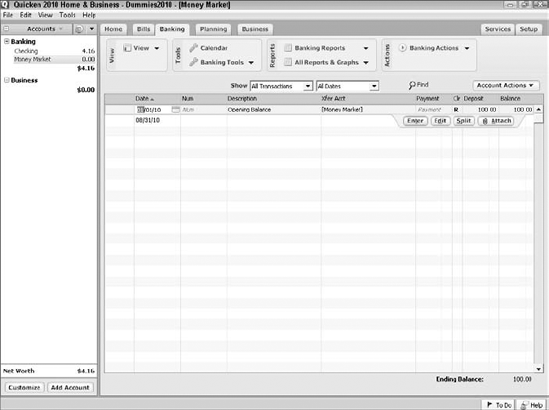
Here's the next thing you want to know about using these accounts: In general, you work with an individual account by using the register window, as shown in Figure 2-5. I talk about using the register window a lot more in the chapters that follow, but in a nutshell, you enter account transactions in the register. Entering transactions in a register is the basic, Quicken record-keeping task.
Here's the next thing you need to know about working with a particular Quicken account. You use the Accounts bar, which appears along the left edge in the Quicken program window (see Figure 2-5) to tell Quicken which account you want to work with in a register window.
To use the Quicken Accounts bar, you click its hyperlinks. In other words, select the account you want by clicking the account name. Quicken displays the register window for that account.
Tip
You can collapse and expand the Accounts bar by clicking the small button marked with a plus symbol or a minus symbol that's just left of Accounts. If the button shows a minus symbol, clicking the button collapses the Accounts bar. If the button shows a plus symbol, clicking the button expands a previously collapsed Accounts bar.
Quicken supplies categories to, well, categorize your spending. For example, you would probably use the Rent category to categorize all the checks you write to pay rent.
The predefined categories list may be just what you want. Then again, it may not. Table 2-1 shows the all-inclusive category list.
Warning
Your category list may vary somewhat from the one shown in Table 2-1. Quicken may customize your starting category list based on your answers to questions it asks on the Quicken Setup tab. I talk about the Quicken Setup tab briefly in Chapter 1.
Take a minute to look through the category list. If you find categories you don't need, cross them off the list in the book. You can delete them from Quicken in a minute or so. If you need categories you don't see, add them at the bottom of the list. You can add them in about two minutes or so.
To track a certain income or spending item for income tax purposes — wages, property taxes, and so on — you need a Quicken category.
To track a certain income or spending item because you're just interested in knowing how much you spend on it (for example, renting DVDs), you need a Quicken category.
To budget by categories (because you need a category for any income or spending item that you want to budget), you need a Quicken category.
Table 2-1. The Category List
Categories | Descriptions |
|---|---|
Income Categories | |
Bonus | Bonus money you receive |
Consulting | Money earned in a consulting practice |
Div Income | Dividend income from stocks and mutual funds |
Interest Inc | Interest income from bank accounts, CDs, and similar items |
Late Fee | A late fee you've charged some delinquent customer or tenant |
Net Salary | The net payroll check amount you deposit into a bank account |
Other Inc | Other income that doesn't fit better in some other category |
Other Inc, Biz | Other business income that doesn't fit better elsewhere |
Rents Received | Rent income from tenants |
Royalties Received | Typically oil and gas royalty income that should be reported on Schedule E |
Salary | Salary income |
Salary Spouse | Salary income of your hardworking spouse |
Sales | Business income from sales of products or services |
Security Deposit Forfeitures | Security deposits you didn't want to keep but must to pay for tenant damages |
Tax Refund | That check you get back from the taxman if you withhold more than you owe |
Ads | Advertising expenses for a business |
Advertising | Rental property advertising |
Association Dues | Property association dues, such as for landlords, condo dwellers, and homeowners in some neighborhoods |
Auto | Automobile expenses |
Gas | Auto fuel |
Registration (Non-Taxable) | Non-tax-deductible auto registration, plates, or license tags |
Registration (Taxable) | Tax-deductible auto registration, plates, or license tags |
Auto and Travel | Auto, truck, and travel expenses of landlords |
Service | Auto service |
Bank Charge | Banking fees |
Biz Insurance | General insurance for a business |
Biz Misc | Miscellaneous general business expenses that don't fit better in some other category |
Biz Supplies | Office supplies, shop supplies, and anything else that's a supply |
Biz Taxes | A catchall business taxes category |
Licenses | A category within the category for tracking business licenses, such as you pay to the state or local government for the privilege of doing business |
Local | Another category within the category for tracking business taxes — this time for general local taxes, such as franchise or excise taxes. Ugh. |
Property | A final category within the category for tracking a business's property taxes |
Biz Travel | Travel and transportation expenses for a small business |
Biz Utilities | Another catchall category — this time for utility expenses like water, electricity, telephone, and so on |
Internet, Biz | Business Internet expenses for connectivity and, heck, Web hosting |
Telephone, Biz | Your business land and cellular phone lines |
Car | Business car and truck expenses you want to track as tax deductions |
Miscellaneous cash purchases | |
Charity | Charitable donations |
Cleaning and Maintenance | Cleaning and maintenance costs of rental properties |
Clothing | Clothing |
Commissions | Sales commissions paid by a business |
Credit Card Payment | For when you've said, "charge it" |
Dining | Dining out |
Discounts | Returns and refunds to a business's clients and customers |
Dues and Subscriptions | Professional and industry dues and business periodical subscriptions incurred by a business |
Education | Education |
Entertainment | Entertainment |
Gifts | Gift expenses |
Groceries | Groceries |
Health & Fitness | The money you spend on the fitness club you so rarely visit and similar amounts |
Household | Miscellaneous household expenses |
Insurance | Insurance |
Interest Exp | Interest expense |
IRA Contrib | Individual Retirement Account contribution |
IRA Contrib Spouse | Spouse's Individual Retirement Account contribution |
Legal-Prof. Fees | Money a real estate investor pays its attorney, accountant, and similar professional clingers-on |
Loan | Loan payments you make on personal, consumer credit loans, such as for a car |
Management Fees | Property management fees paid by a landlord |
Meals & Entertainment | Meals and entertainment expenses paid for by a small business |
Medical | Medical expense |
Misc | Miscellaneous |
Mortgage Interest | Mortgage interest on real estate rental properties |
My Kids | Expenses of the biggest investment you'll ever make — your kids |
My Pets | Pet-related expenses. Duh. |
I'm not sure what this category is for. Sorry. | |
Not Sure, Biz | An expense category you use for a business expense when you don't know how to categorize the expense. Your accountant will love it if you put as many transactions as possible into this category. |
Not Sure, Rental | An expense category you use for a rental expense when you don't know how to categorize the expense |
Office | General office expenses of a business |
Other Expenses | Rental property expenses that don't fit elsewhere and which you've had the good grace to not throw into the Not Sure category |
Other Interest Expense | Loan interest expense for a rental property other than mortgage interest expense |
Postage and Reproduction | A business's printing expenses |
Prof and Legal Fees | A business's legal and accounting expenses |
Rent | Housing rent |
Rental Insurance | Insurance expenses of a rental property |
Rental Utilities | Utilities expenses of a rental property |
Repairs | Rental repairs expenses |
Savings Deposit | Not really a category ... really just a way to track (crudely) money you're withdrawing to put into some other savings account |
Supplies | Supplies expense related to a rental property |
Tax | Taxes you pay in general |
Fed | Federal income tax you pay |
Medicare | Medicare tax you pay |
Other | Miscellaneous taxes you pay |
SDI | State disability insurance you pay |
Soc Sec | Social Security tax you pay |
State | State income tax you pay |
Tax Spouse | Taxes your spouse pays in general |
Fed | Federal income tax spouse pays |
Medicare | Medicare tax spouse pays |
Miscellaneous taxes spouse pays | |
SDI | State disability insurance spouse pays |
Soc Sec | Social Security tax spouse pays |
State | State income tax spouse pays |
Taxes | Okay, this is confusing. Taxes refers to taxes paid on a rental property. Don't confuse with the Tax or Tax Spouse categories. |
Travel | Personal travel and vacation expenses |
Utilities | Water, gas, electric, and other stuff like this |
Cable TV | Cable television |
Garbage and Recycling | Hauling away your junk |
Gas and Electric | Gas and electricity |
Internet | Internet access fees |
Telephone | Telephone |
Water | Water |
You surely didn't buy Quicken so that you could spend all day Saturday sitting at your computer instead of taking the kids to the zoo. I realize this and want to make Quicken easier for you to use. To do so, I figure I should tell you which Quicken features you can ignore if you're feeling a bit overwhelmed. Subcategories are among those things I think that you can ignore.
"Subcategories?" you ask. "Yikes! What are they?"
Subcategories are categories within categories. If you look at the Taxes expense category in Table 2-1, for example, you'll notice a bunch of categories that follow the Tax category and are slightly indented: Fed (federal tax), Medicare (Medicare tax), Other (miscellaneous taxes), Property, SDI (state disability insurance), Soc Sec (Social Security tax), and State (state tax).
When you use subcategories, you can subcategorize a transaction that pays, for example, taxes; you can further break down this category into subcategories such as federal income tax, Medicare tax, and Social Security tax. If you want to see a list of the ways you've spent your money, Quicken summarizes your spending both by category and, within a category, by subcategory. On a Quicken report, then, you can see this level of detail:
No doubt about it: Subcategories are useful tools. But they make working with Quicken a little more complicated and a little more difficult. As a practical matter, you usually don't need them as you start off. If later on you want to track a spending category in fine, granular detail, you can go ape on the subcategory thing then, okay? For these reasons, I'm not going to get into subcategories here.
If you get excited about the topic of subcategories later — after you have the hang of Quicken — you can peruse the Quicken documentation for more information.
Tip
If you do want to use the Quicken subcategories, don't delete the subcategories shown in Table 2-1. If you don't want to use the subcategories, go ahead and delete them. (I tell you how to remove categories in "Removing categories you loathe," later in this chapter.)
Category groups, which were known as supercategories in a previous version of Quicken, combine categories into sets that you can use in reports and in your budgeting. Sure, they're sort of cool, but you don't need to worry about them if you're just starting with Quicken.
If you're dying to know more about category groups, you can refer to the Quicken online help. Quicken Help works like Help in other Windows programs. If you don't know Windows all that well — or at least not well enough to comfortably use Help — see Appendix A.
I have just four tips for categorizing:
Cross off any category you won't use.
If you don't pay state income taxes in the state you live in, for example, get rid of the state tax category. Extra, unneeded categories just clutter your list. I think it's great if you can get down to just a handful of categories.
Don't be afraid to lump together similar spending categories.
Take your utilities expense, for example. If you pay water, natural gas, electricity, and sewer, why not use a single Utilities category? If you pay different utility companies for your water, natural gas, electricity, and sewer, you can still see what you spend on just electricity, for example, even with a single catchall category for utilities.
Be sure to categorize anything that may be a tax deduction.
Categorize alimony, educational, medical, and dental expenses; state and local income taxes; real estate taxes; personal property taxes; home mortgage interest and points; investment interest; charitable contributions; casualty and theft losses; moving expenses; unreimbursed employee expenses; and all those vague, miscellaneous deductions. (By the way, the foregoing is a pretty complete list of itemized deductions in the United States at the time this book was written.)
Don't sweat this category stuff too much.
In spite of the preceding three tips, don't let these category lists or the work of customizing them scare you. If you want to spend a few minutes cleaning up the list, hey, that's great. If not, or if you're starting to get anxious, just skip ahead to Chapter 3.
You should now be ready to fix any category list problems. Basically, you need to do three things: add categories, remove categories, and change category names and descriptions.
Adding individual categories is a snap. Here's all you have to do:
Choose Tools

Quicken displays the Category List window (shown in Figure 2-6). This window lists the categories available and the accounts you've set up. Careful readers may notice that the categories shown in Figure 2-6 include those shown in Table 2-1.
Click the New button in the Category List window.
The New button, by the way, is the first button on the upper right. Quicken dutifully displays the Set Up Category dialog box (shown in Figure 2-7). You probably aren't surprised that you use this puppy to describe the new category.
Enter a short name for the category.
Move the cursor to the Name text box and type a name. Although you can use up to 15 characters, use as short of a name as possible to clearly identify the category. Why? Because you use this category name every time you want to tag a transaction to fall into the category.
Enter a description for the category.
Move the cursor to the Description text box and then describe the category. Quicken uses the category description on reports that show the category. If you don't add a description, Quicken just uses the category name. You don't need a description, obviously, if your category name is, well, adequately descriptive.
(Optional) Identify the category group.
If you disregarded my earlier suggestion to not worry about category groups, open the Group drop-down list box and select the appropriate group.
Indicate whether the category is an income category or an expense category.
Select the appropriate Income, Expense, or Subcategory Of option button — just select the appropriate option button with your furry little friend, the mouse. If you've totally blown off my admonition not to use subcategories just yet, use the dialog box's drop-down list to indicate into which income or expense category a new subcategory falls.
Indicate whether the category tracks an amount you will use on an input line on next year's tax return.
By line, I mean the actual tax form line — such as the line on the U.S. 1040 form that tracks alimony.
Move the cursor to the Tax-Related check box and then select the check box if the category is tax-related or deselect the check box if the category isn't tax-related. Just to clear up any confusion, vacationing in Hawaii probably isn't a tax deduction — even if your neighbor promises that it is. Then identify the form and line by opening the Tax Line Item drop-down list box and selecting one of its entries.
Click OK.
Quicken adds the new category in the Category List window (refer to Figure 2-6) and then redisplays the window. Now that you understand the stuff in the Category List window, note that it shows the category name, its type, notations concerning the category's tax-reporting status, and, golly darn, even its description and group. (The tax information about on which tax return line a category gets reported appears only if the Show Tax Line Item choice under the option button is checked.)


Quicken keeps lists of categories that are standard for people in certain situations, including Quicken users who are married, homeowners, real estate investors, and business owners.
To use these situational lists as a source of new categories, follow these steps:
Choose Tools
Quicken displays the Category List window (refer to Figure 2-6).
Click the Add Categories button.
Quicken displays the Add Categories dialog box. This window lists the categories that may be useful in certain situations.
Select one of the situational lists.
Open the Available Categories drop-down list box — you can do this simply by clicking the box — and select the situational list of categories you want to display: standard, married, homeowner, business, children, investment, or rents and royalties. Quicken displays the categories from the situational list selected.
Select the categories you want to add.
Click the categories in the Categories list that you want to add. Quicken marks the categories you select with a check. You can, by the way, mark all the categories shown in the situational list by clicking the Mark All button. You can unmark all the "marked" categories by clicking the Clear All button.
Add the selected categories.
After you mark the categories you want to add, click the Add button. Quicken adds the categories to the Categories To Add list. To complete the addition of the categories, click Add.
Removing categories takes only a couple of keystrokes. With the Category List window displayed, follow these steps:
Click the category you want to remove and then choose the Delete button that appears.
If no transactions are in the category, Quicken displays a message that asks you to confirm your decision.
If you want to remove the selected category, click OK.
Otherwise, press the Esc key or click the Cancel button.
You can change a category name, its type, its description, and its tax-related setting if you later discover you made some mistake, such as misspelling a word in a description.
Display the Category List window (refer to Figure 2-6).
Use the arrow keys or click with your mouse to select the category you want to change and then click the Edit button.
Quicken displays a dialog box that has text boxes and option buttons describing the selected category's information: its name, description, type, and tax-related settings.
Make the changes you want by replacing text box contents or changing option button settings. Click OK to save your changes and return to the Category List window.
A quick, related point: If you select a category and then click the Merge button — the button appears to the right of the category information — Quicken displays a Merge Category dialog box, which you use to re-categorize transactions in the selected category. The dialog box provides a drop-down list box you use to select the new category you want to use. The dialog box also provides a check box you can check if you want to delete the category after moving transactions out of it.
Using categories isn't the only way that you can summarize your financial records. Quicken provides a second tool, called tags, which lets you summarize transactions in addition to the way you summarize transactions with categories. (In previous versions of Quicken, tags were known by another name: classes.)
Now, typically, tags are not something you need to worry about — especially if you're just using Quicken to regain control over your personal finances. However, tags can be very useful if you're using Quicken in a business or if you're investing in rental real estate.
For these reasons, I want to quickly describe how you set up tags.
To set up a tag (or several tags), take these steps:
Display the Tag List window.
To do this, choose Tools
Click the New button in the Tag List window.
Quicken displays the New Tag dialog box (shown in Figure 2-8).
Enter a short name for the tag.
Move the cursor to the Name text box and type a name. Use as short of a name as possible to clearly identify the tag. You use this tag name every time you want to tag a transaction. (If you're using tags to identify real estate rental properties — which is probably their most common use — you might want to use the street name as the tag: Winston as the tag for the duplex on Winston Street, Roosevelt as the tag for the cottage on Roosevelt Avenue, and so on.)
Tip
The reason real estate investors tag transactions is this: By tagging each income or deduction transaction with, for example, the property name, Quicken easily produces a profit and loss statement for each property using the categories and tags to slice and dice the data.
Enter a description for the tag.
Move the cursor to the Description text box and then describe the tag. Quicken uses the tag description on reports that show the tag. If you don't add a description, Quicken just uses the tag name. You don't need a description, obviously, if your tag name is, well, adequately descriptive.
Tip
The technical editor, David (who's also a CPA), wants me to tell you that you should just ignore the Copy Number box. He's probably right. But, if you're just dying to know what this box does, click the Tell Me More link.
Click OK.
Quicken adds the new tag in the Tag List window and then redisplays the window. And that is that.
