
In This Chapter
Setting up a business using Quicken
Working with your customers
Bookkeeping whistles and bells in Quicken Home & Business
Doing payroll using Quicken
The preceding chapters of this little book talk about using Quicken for your personal bookkeeping. But you may be interested to know that Quicken also does just a truly excellent job at small business accounting, too.
If you want to use Quicken for small business accounting, you need to do just a couple of things: First, you want to make sure you're working with the Home & Business version or the Quicken Rental Property Manager version of Quicken, because both these flavors of Quicken supply an extra menu of seriously useful business bookkeeping commands. Second, and this is only my humble opinion, you want to skim through this chapter's discussions so you get the business bookkeeping stuff setup right.
Tip
If you're not already working with Quicken Home & Business, you can upgrade to Home & Business by choosing the Add Business Tools or Add Rental Property Tools command on the Help menu. If that option isn't available or doesn't make sense, contact Intuit by visiting the www.quicken.com Web site.
To use Quicken for a small business bookkeeping, you need to describe each business you or your spouse operates. For example, if you work as a one-person consultant, and your spouse runs a landscape design business, you need to tell Quicken a little bit about both businesses. Quicken needs this information so it can separately track each business and can produce invoices for each business.
To describe your business to Quicken, you need to give the business's name and identify the owner. Here's how you do this:
Choose the Manage Business Information command.
Display the Business tab, click the Business Tools button, and choose the Manage Business Information command. Quicken displays the Manage Business Information window.
Tip
If you don't have a Business tab, either you need to choose View

Click the Add button.
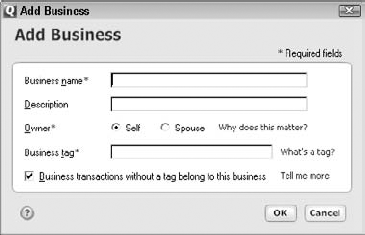
Quicken displays the Add Business dialog box (see Figure 15-1).
Enter your firm's name in the Business Name text box.
Optionally, you can also enter a brief description in the Description box, which appears just below the Business Name text box.
Identify the business owner.
Use the Owner option buttons, Self and Spouse, to indicate who owns the business — you or your better half.
Create a tag for the business.
You want the tag to be a memorable yet short acronym or abbreviation you can use to mark transactions as connected to a particular business. For example, say your family does operate two businesses: a consulting business and a landscape design business. You might use the tags "Cons" (for consulting) and "Land" (for landscape design).
(Optional) Specify this business is the default business.
You can tell Quicken that a particular business is the default business — in other words, that Quicken should assume a business transaction relates to this business unless you tell Quicken otherwise. To do this, check the Business Transactions Without A Tag Belong To This Business box.
Save your business description.
Quicken returns you to the Manage Business Information window, which now lists your newly described business venture. If you need to add more businesses, repeat Steps 2 through 7. Click Done to close the Manage Business Information window.
Tip
The Manage Business Information window provides two useful buttons I should briefly mention: Delete and Edit. You can click the Delete button to remove the selected business description. And you can click the Edit button to display the Edit Business dialog box, which allows you to change the selected business's description.
You need to add your business's name and address to the business invoice template that Quicken produces. To do this, display the Business tab, click the Business Actions button, and then choose the Invoices and Estimates

I'm not going to discuss the Forms Designer window in more detail, but you may want to poke around the window a bit. You can use the window's buttons and boxes to customize with abandon the invoice form that Quicken produces. Note, too, that you may need or want to create and customize multiple invoice templates — such as if you are using Quicken for more than one business or such as when you want to use distinctly different invoices for different customers, products, or services. You can create a new invoice template by clicking the Forms Designer window's Layout button and then choosing New on the menu that Quicken displays.
The stuff that appears on invoices — product or service descriptions, standard prices, and so forth — needs to be provided up-front to Quicken by setting up invoice items.
Suppose, for example, that you're using Quicken to keep the books for a one-person consulting business, and that you bill your consulting services by the hour, charging people $125 an hour. To describe this standard invoice information, you would set up a "consulting" item, using the following steps:
Choose the View All Invoice Items command.
Display the Business tab, click the Business Actions button, and then choose the Invoices and Estimates
Click the New button.
Quicken displays the New Item dialog box (see Figure 15-3).
Name the item you're creating.
For example, you might name an item for consulting services "consult." You just need to use an item name that's descriptive enough that you remember the item details when you see the item name.
Use the Category/Tag box to specify which income category should be used to account for the item and, when you're running multiple businesses, which tag should be used to identify the business. For example, you might want a "consult" item (which bills for professional services) to get categorized using a "Service Revenue" income category while you might want a "client costs" item (which bills for costs you've incurred on behalf of a client) to get categorized using a "Reimbursed Expenses" income category.
If you've set up two different businesses, consulting and landscape design, and use the tags "cons" and "land" to differentiate, you would append the "/cons" tag to the category you specify for consulting business invoice items. And you would append the "/land" tag to the category you specify for landscape design business invoice items. Note that you precede the actual tag name with a slash (/) symbol to tell Quicken that you're using a tag.
Describe the item in more detail, please.
Use the Description text box to provide the text you want to automatically appear on the invoice for the item. You can (and probably should) be quite descriptive here. Of course, you can add more text to the invoice and edit the invoice item descriptions later on when you actually create the invoice. But Quicken automatically enters the item description for you. You therefore want to make Quicken type up any long, detailed descriptions.
Flag any subtotal items.
Okay, here's a weird thing about items that appear on an invoice. Anything that you want to put in the body of your invoice is an item. Obviously, the services and products you sell need to be set up as items. But other stuff that you want to put on the invoice — shipping charges, discounts, markups, and so on — also need to be set up as items.
After you understand this weirdness, things become more clear (hopefully) about subtotal items. The Subtotal Of The Preceding Items check box, if marked, tells Quicken that the item simply adds up the preceding items shown on the invoice. Probably, by the way, the right item name and description for a subtotal item is subtotal (for the item name) and Subtotal or Total (for the item description).
If you indicate an item is a subtotal, by the way, you don't provide a category or tag. But that makes sense: Quicken grabs the category and tag information from the individual "real" items getting subtotaled — not the subtotal item.
(Optional) Add a blank line after the item.
To tell Quicken to add a blank line on invoices after an item, check the Print Extra Blank Line box.
Use the Per Item Rate to specify a default price for the item. In the case where you're setting up an item for a service, for example, you might enter the hourly billing rate into the Per Item Rate box.
Identify items subject to sales tax.
If an item is subject to sales tax — in other words, if you're supposed to charge sales tax on the item — check the Taxable box.
Give the percentage for any percentage-based items.
You may not need percentage items for your invoices. But if you regularly bill people for items that get calculated as a percentage of some other item on the invoice, you use a percentage item.
Percentage items calculate an amount for your invoice by multiplying a percentage against the previous item. For example, if the previous item shown on an invoice equals $1000, a 10 percent "percentage" item adds another $100 to the invoice.
Note that when you check the Percentage box, the value you enter into the Per Item Rate is not a dollar amount but a percentage value. You enter 10 percent, for example, as 10.
When you finish describing an item, click the New Item dialog box's OK. Quicken returns you to the Customize Invoice Items window. To add more items, repeat the preceding steps. Or click the Customize Invoice Item window's Done button.

You can invoice customers, record their payments, and monitor unpaid amounts after you've described your business, finalized your invoice form(s), and created an item list.
Quicken needs you to set up a Customer Invoices account to track the invoices you create. But this isn't difficult to do. Simply display the Business tab, click the Business Actions button, and choose the Invoices and Estimates
If you answer "yes," Quicken asks if it's okay to use a name like "Customer Invoices." When you click the "Sure, I don't care what you name the account" button, Quicken then sets up the account for you. When Quicken sets up the Customer Invoices account, it also sets up a sales tax payable account to track any sales taxes you collect from customers.
I'm not going to talk a bunch more about the Customer Invoices account, but let me make just three quick points:
The Customer Invoices account is a regular Quicken account — sort of like a bank account. You will see the Customer Invoices account listed, for example, in the Accounts bar and on the Account List window.
You can enter or edit transactions directly by viewing the account in a register window (the same sort of register window I describe in detail in Chapter 4). Typically, you won't work directly with the register, however, because Quicken provides easy-to-use tools for recording customer invoices and payments (as described a bit later in this section).
The Unpaid Invoices List is an easy way to see which customer invoices are open (often these are the only invoices you truly care about). To display this list, display the Business tab, click the Business Tools button, and then choose the Unpaid Invoices List command.
To invoice a customer, follow these steps:
Choose Create Invoice command.
Display the Business tab, click the Business Actions button, and choose the Invoices and Estimates
Identify the customer and provide the address, if necessary.
If you're invoicing a customer for the first time, type his or her name into the Customer box in the upper-left corner of the Invoice window. Quicken will copy the company name to the Bill To box. You can then complete the address by adding the street information, city, state, and ZIP code.
If you're invoicing a customer for the second or subsequent time, open the Customer box and select the customer from the list that Quicken displays.
Tip
You can add customers on the fly — which is what I describe in the preceding step — and which means you only briefly describe your customers with sketchy vagueness. Alternatively, you can also go hog wild and describe each and every customer in painstaking detail. To go the painstaking detail route, choose the Business
Tag the transaction.
If you're using Quicken to track more than one business and you've (very rightly) created a tag for each business, enter the appropriate tag into the Business Tag box.
Provide the Date, Invoice Number, and Purchase Order Number information.
Use the Date box to indicate the invoicing date (typically the invoice date is the actual date you create the invoice). Use the Due Date box to specify when you expect payment. Use the Invoice # box to give the invoice a unique number. Finally, if you're billing on purchase order numbers, use the P.O. Number box to provide the customer his or her purchase order number.
Describe the individual items you're invoicing the customer for.
To enter an invoice item, click the Item column for the line you want to add and then select an item from the list Quicken displays. Quicken adds the category and description information you provided for the item — but you can edit these if you want. Next, specify the item quantity and verify the rate.
You can initially fit ten items onto an invoice, but if you need more room, click the Add Lines button.
Add sales tax if applicable.
If items on the invoice are subject to sales tax, enter the sales tax rate into the Tax box. Quicken then calculates the sales tax for you by multiplying the sales tax percentage against each of the taxable items on the invoice.
Note: Quicken tracks the sales tax you've collected using a liability account. Quicken shows the liability account in the Tax Account drop-down list box at the bottom of the window.
(Optional) Add customer messages or memo descriptions to the invoice.
If you want to add a message to the invoice, enter the message in the Customer Message box.
If you want to record a bit of extra information about the invoice — information that won't appear on the invoice — enter that into the Memo box.
Save the invoice.
You can save the invoice and close the Invoice window by clicking Save and Done. Or, you can save the invoice and redisplay an empty Invoice window so you can create another invoice by clicking Save and New.

You can print invoices as you create them. Simply click the Print button on the Invoice window. The Print button looks like a printer and appears in the lower-left corner of the window. When you click the Print button, Quicken displays the Print Invoice dialog box. Click its OK button to print the invoice.
You can also print invoices in batches. To use batch printing, first create your batch of invoices (obviously). Next, display the Business tab, click the Business Tools button, and then choose the Print Invoices/Invoices List command. When Quicken displays the Invoices List, verify that the invoices you want to print are marked with a check, click the Print button so that Quicken displays a menu of print commands, and then choose the List command. Quicken displays the Print dialog box. Click its OK button to print the selected invoices.
Tip
The Print Invoice and Print dialog boxes provide a bunch of buttons and boxes you can use to control how Quicken prints your invoices. If you have questions about how these printing options work, refer to Chapter 5. Chapter 5 describes how to print checks and check registers, but the process for printing those items closely resembles the process for printing invoices.
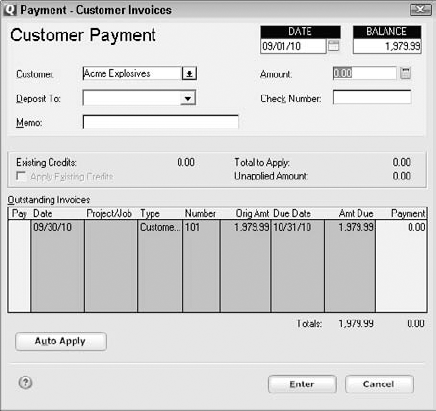
To record a customer payment, follow these steps:
Choose the Receive Customer Payment command.
Display the Business tab, click the Business Actions button, and choose the Invoices and Estimates
Select the customer.
Open the Customer box and select the customer for whom you want to record a payment. After you select the customer and move to the next box, Quicken displays a list of any unpaid invoices the customer owes.
Describe the payment.
You should enter the payment amount into the Amount box. That, I'm sure, represents a big surprise.
You should probably also record the payment date using the Date box and the customer's check number using the Check Number box.
Select the bank account into which you'll deposit the check.
This is easy. Open the Deposit To drop-down list box and select the bank account.
Identify the open invoices the customer is paying.
Quicken attempts to guess at which unpaid invoices the customer is paying, marking the invoices with a check. Often Quicken guesses correctly, but verify that the correct invoice shows a check mark. You can mark and unmark invoices by clicking the check mark.
If a payment pays partial amounts of unpaid invoices, you can click the Payment column in the Outstanding Invoices list and then edit the amount.
Record the payment.
After you describe the payment and apply it to the correct open invoices, click the Enter button. Quicken records the payment and updates the invoice open balance(s).
Quicken provides commands and windows for issuing credits and for making refunds to customers.
To record a credit — a credit is essentially a backwards invoice that says you owe your customer money rather than the other way around — display the Business tab, click the Business Actions button, and choose the Invoices and Estimates
To refund money to a customer because of an earlier credit memo, display the Business tab, click the Business Actions button, and choose the Invoices and Estimates
Quicken Home & Business (which is what I've spent the earlier paragraphs of this chapter talking about) provides a handful of additional business bookkeeping tools. I'm not going to describe these tools in any detail in this book because I don't think you'll use the tools. Nevertheless, I do want to give you a quick overview.
If you're really alert and have good eyes, you'll have noticed a Project/Job box in some of the figures of this chapter and on some of the Quicken Home & Business windows. Just a quick note to explain: Most small businesses probably bill customers. But you can find yourself, in some industries, billing jobs or projects that are in turn owned or managed by a customer. If this sounds like your situation, you'll want to use the Customers
Three customer-invoicing commands (available on the Business tab when you click the Business Actions button and choose the Invoices and Estimates command) deserve a quick description: Create Estimates, Create Finance Charge, and Print Statements.
The Create Estimates command allows you to create a dummy invoice you can give to a customer as a preliminary cost estimate of a job or service. The Estimate window, not surprisingly, mirrors the Invoice window. In fact, if you ultimately need to invoice the customer for something you've previously estimated, you display the Business tab, click the Business Tools button, and choose the Estimates List command. When Quicken displays the Estimates List window, select the estimate from the window that Quicken displays, and click the Convert button.
The Create Finance Charge command allows you to assess a finance charge on a past due invoice. In essence, when you use the command, Quicken creates an invoice for the customer with a single item on it for the finance charge.
The Print Statements command lets you print customer statements, which show the open invoices for a customer at a specific point in time. If you have customers for whom you need a statement, you'll obviously need to use this command.
If you display the Business tab, click the Business Actions button, and choose the Bills and Vendor command, Quicken displays a menu of commands that let you create a simple accounts payable system for tracking your unpaid bills from vendors.
I'm not going to describe these commands here. You really shouldn't need to set up an accounts payable system for a small business except in the special case where someone has foolishly decided your business should use accrual-based accounting rather than cash-basis accounting. (If that is your situation — my apologies, but you need to get help from the nabob who sent you down the accrual-based accounting path.)
Tip
If you just record expenses by writing checks — this is the way that Chapters 4 and 5 describe — you essentially keep your books using cash-basis accounting. Cash-basis accounting usually works best for small businesses. It delays your income tax expenses, and it keeps your bookkeeping simpler.
Quicken Home & Business provides a handy utility you can use to keep a log of your business auto or truck usage. As you're probably tired of hearing your accountant say, you need to keep such a log in order to prove your business vehicle usage.
I'm not going to describe the Vehicle Mileage Tracker here, though. You'll find the tool very straightforward to use. Simply display the Business tab, click the Business Tools button, choose the Mileage Tracker command, and poke around a bit.
A lot of people who own small businesses or who have a household employee (nannies, for example) need to deal with payroll. Although Quicken Home & Business doesn't provide you payroll tools, I still want to provide you with some quick-and-dirty instructions about how to handle simple payroll situations with Quicken. Oh, sure. It won't be fancy. But I promise you it'll be fast and cheap.
To do payroll in Quicken, you need to set up a couple of payroll expense categories. Fortunately, doing so is not particularly difficult.
Warning
I'm going to describe how you do this task for purposes of U.S. federal income and payroll taxes. If you employ people in a state that has a state income tax — California, say — you may also have to deal with state payroll taxes. But you can track and process these the same way you process the federal taxes. (Some counties and cities even have income taxes, but these should also work the same way.)
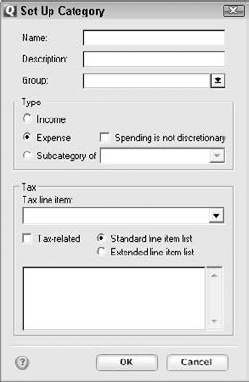
You need to set up a payroll expense category for taking the wages you pay employees. Here's all you do:
Choose Tools
Quicken, with no hesitation, displays the Category List window.
Click the New button.
Quicken displays the Set Up Category dialog box (see Figure 15-6).
Enter Wages as the category name by moving the cursor to the Name text box and typing Wages.
If you told Quicken during the setup that you'll use Quicken to track a business, Quicken may have automatically set up the Wages category.
(Optional) Enter a description of the category.
If you want, you can type a description in the Description text box.
In the Type section, click the Expense option button.
This choice tells Quicken that you're setting up an expense category.
Describe the tax characteristics of this category.
If you're preparing payroll for a business, select the Tax-Related check box.
If you're preparing payroll for a household employee — like a nanny, say — don't select the Tax-Related check box. This little check box merely tells Quicken to include this category on the Tax Summary report. Household employee payroll expenses aren't tax deductible — as you probably know.
Optionally, you can select the tax form from the Tax Line Item drop-down list box on which this category should be reported for U.S. federal tax purposes.
Click OK.
Quicken adds the category to the category list and redisplays the Category List window.
You also need to set up a payroll tax category to track payroll taxes that the employer pays, including the company's share of Social Security taxes, the company's share of Medicare taxes, and any other employer payroll taxes (such as federal unemployment tax or the equivalent state employer taxes).
To set up a payroll tax expense category, follow the same steps I give you for setting up a wages expense category (in the preceding section). You can name the category payroll taxes, or taxes-payroll, or something else that's even more clever.
You also need to do a couple other things if you want to do payroll the right way in the U.S. of A.
First, you need to file an SS-4, or Request for Employer Identification Number form, with the Internal Revenue Service (IRS) so that you can get an Employer Identification Number. You can get this form by calling the IRS or by visiting the IRS Web site (www.irs.gov).
In one of its cooler moves, the IRS allows you to apply for and receive an Employer Identification Number right online. Visit the www.irs.gov Web site and then click the Apply For An Employer Identification Number (EIN) link located on the left side of the page.
You need to do two things before you can figure out how to handle all those taxes. First, you need your employees to fill out W-4 forms to let you know what filing status they'll use and how many withholding allowances, or personal exemptions, they'll claim. You can get blank W-4 forms from the www.irs.gov Web site, too.
You also need to get a Circular E Employer's Tax Guide publication. The Circular E publication is the pamphlet that tells you how much you should withhold in federal income taxes, Social Security, and Medicare from employees' salaries based on what they say about their filing statuses and the number of withholding allowances they claim on the W-4 forms mentioned in the preceding paragraph.
After you set up the two needed expense categories within Quicken and after you collect the necessary tax information, you're ready to pay someone.
Determining how much to pay your employees should be pretty easy. Does Raoul make $15 per hour? Did he work 40 hours? Then you owe him $600 because $15 times 40 equals $600. Is Betty's salary $400 per week? Then you owe her $400 for the week.
Your next step — after you know how much you're supposed to pay Raoul and Betty — is to figure out what Uncle Sam says you must withhold.
To determine this amount, you need both Raoul's and Betty's W-4s to find out their filing statuses and personal exemptions. Then just flip to the page in the Circular E that describes withholding for persons claiming those filing statuses and weekly pay.
If Raoul is single and claims just one personal exemption, for example, you need to flip to the page that shows appropriate withholding amounts for single people receiving weekly payroll checks. That page shows a table that will clearly indicate what you're supposed to withhold from Raoul's check for federal income taxes. For example, the table might say that a single person making $600 a week who claims one withholding allowance should have $79 withheld for federal taxes.
And Betty? Remember that fictional Betty's pay is $400 per week. If Betty's filing status is married, she is filing jointly, and has three personal exemptions, you'd need to need to flip to the page in the Circular E that shows withholding amounts for a married person filing a joint return when the person claims three withholding allowances. Pretend just for the sake of illustration that the Circular E says you're supposed to withhold $18 each week from Betty's check.
You determine Social Security and Medicare amounts by multiplying the gross wage figure by a set percentage. Social Security is 6.2 percent of the gross wages up to roughly $100,000. The Medicare tax is 1.45 percent of the gross wages with no wage limit. Be sure to check your faithful Circular E if you think limits come into play for a particular employee. Note, too, that as I'm writing this, Congress is tinkering with the tax laws again. But, of course, Congress is always tinkering with the tax laws.
Table 15-1 summarizes the payroll calculations based on the example developed in the preceding paragraphs.
Does Table 15-1 make sense? If it doesn't, quickly skim through the preceding four or five paragraphs. All I've really done in the table is reorganize some information, calculate the Social Security and Medicare taxes, and show how Raoul's and Betty's gross pay gets nickeled and dimed by the various taxes they owe.
If you have other taxes and deductions to make and you know how the federal income taxes, Social Security taxes, and Medicare taxes work, you won't have any problem working with other taxes — whatever they are.
State income tax withholding, for example, works like the federal income tax withholding. (Of course, you need to get the state's equivalent to the Circular E guide.)
In general, you treat other taxes and the amounts the employee pays similarly.
Warning
In fact, the only thing that you need to be careful about is what affects your employees' gross pay for income taxes but not their Social Security taxes — things such as 401(k) deductions and certain fringe benefits. If you have these kinds of things to deal with and you need help, just ask your accountant. (Providing general answers that will work for everyone who reads this paragraph is just too difficult — and actually kind of dangerous, too. Sorry.)
After you make the tax deduction and net wages calculation, you're ready to record the check. Suppose that you're going to record the check by using the Write Checks window. After you display the window, follow these steps:
Enter the date of the payroll check in the Date field.
Enter the payroll check number in the Num field.
Enter the employee name in the Payee field.
Categorize the payroll tax as wages (see Figure 15-7).
Specify the expense category as Wages.
To record the payroll check, click Record Check.
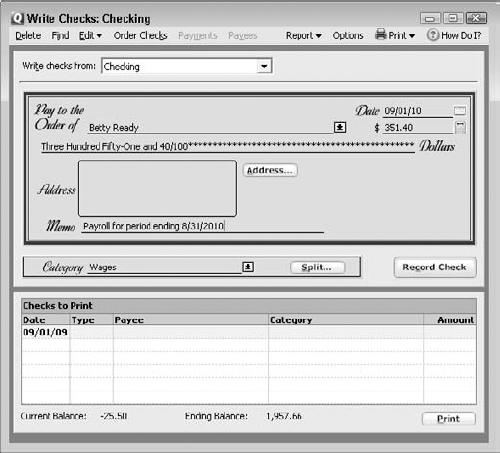
You did it! You recorded a payroll check. Maybe it wasn't all that much fun, but at least it wasn't very difficult. (Chapter 5 describes how to print checks, just in case you're interested.)
Make no mistake. Uncle Sam wants the money you withhold from an employee's payroll check for federal income taxes, Social Security, and Medicare. Uncle Sam also wants the payroll taxes you owe — such as matching Social Security and Medicare taxes and federal unemployment taxes.
Every so often, then, you need to pay Uncle Sam the amounts you owe.
Making the payments for these taxes is easy.
To remit the payroll taxes you withhold from an employee's check, follow these steps:
Get an 8109 tax deposit coupon from the IRS.
You should call the IRS a few weeks before you need the coupons. Sometimes, note, the IRS will send you a yellow booklet of tax deposit coupons automatically.
Tip
You can usually get the IRS to rush you several blank coupons if you're running a little late.
Fill out the coupon by adding your name, address, and employer identification number.
This will be easy. Write your name in the space provided. Write in the amount. You'll also need to indicate what type of deposit you're making and for what quarter:
941: Deposits of income taxes, Social Security, and Medicare taxes are 941 deposits.
940: Deposits of federal unemployment taxes are 940 deposits.
Write a check equal to the payroll taxes that you withheld from the employee's check.
Make the check payable to the local bank. Categorize the check as falling into the Wages expense category. In the example case of Betty, where the withholding includes $18 of income taxes, $24.80 of Social Security taxes, and $5.80 of Medicare taxes, you would write a check for $48.60 payable to the local bank. Again — and sorry to be so anal about this — you need to categorize the check in the Wages expense category.
Warning
Do not categorize the check that remits the employee's portion of his or her taxes as falling into the payroll tax category. That would be a mistake. And, yes, I know: It seems like payroll tax expense would be the right category. The withheld taxes are tax expenses of the employee, however — not tax expenses of the employer. The money represents a wage expense to the employer.
Note
Betty's true earnings were $400: the $351.40 net payroll check plus the $48.60 of payroll-related and income taxes that she owed but that you, the employer, withheld.
Bring the check you've written and the 8109 coupon to the bank.
Hand them both to the teller. Pretend like you know what you're doing. And whatever you do, stay cool and smile.
And that's it.
You have to match any Social Security and Medicare taxes paid by the employee. To record the payment of these payroll taxes, you follow a similar set of steps as in the preceding section. Find or get another 8109 tax deposit coupon and fill it out. Write a check equal to the payroll taxes you owe as the employer. (In the example case of Betty, where the withholding included $24.80 of Social Security taxes and $5.80 of Medicare taxes, you would write a check for $30.60 payable to the local bank.) Then bring the check and the 8109 coupon to the bank.
Note
When you pay the employer's payroll taxes — such as the matching Social Security and Medicare taxes — you want to categorize the check as a payroll tax category. This money absolutely does represent a payroll tax expense to the employer.
Let me make a handful of suggestions about making tax deposits easier and less painful. On the subject of tax deposits, let me also tell you that my fast-but-fancy payroll method has a weakness you should know about.
Here's my first tip. In the preceding discussion, I suggested you use one check and one 8109 coupon to pay the employee's taxes and another check and another 8109 coupon to pay the employer's taxes.
Specifically, I described how to write a $48.60 check categorized as a wage expense and then how to write a $30.60 check categorized as a payroll tax expense. But you could, in fact, save yourself a bit of fiddle-faddling by writing one check for $79.20 that combines both payments. If you do this, just be sure to split the transaction with $48.60 categorized as a wage expense and $30.60 categorized as a payroll tax expense.
In the running example in this chapter, I describe how to deal with payroll taxes for a single employee.
I feel sort of dumb saying this, but you would (of course) often have more than one employee. And in that case, you would probably combine the payroll tax deposits for all the employees.
Tip
If you do have multiple employees, you probably want to consider using either a small business accounting system, such as QuickBooks, or an outside payroll service bureau. Most of the payroll calculations and bookkeeping will be pretty easy, but figuring out what you owe in terms of payroll tax deposits can be a bit messy if you have more than one employee to pay at a time.
The system I describe in the preceding paragraphs doesn't keep track of what you owe in payroll tax liabilities (the withheld taxes, the company's matching of Social Security tax, and so on). And that's bad, obviously. You shouldn't just foolishly ignore any of your business or personal debts, of course. If you just quickly deposit your payroll taxes (immediately after every payroll), you should be fine.
The IRS provides an alternative to writing checks and filling out 8109 coupons. You can sign up for an online payment system — EFTPS — that tells the U.S. Treasury to just grab money directly from your checking account. (For you word nerds out there, Electronic Federal Tax Payment System is this system's full name.)
The EFTPS service is really convenient and slick. (I use it for my business payroll.) To use EFTPS, you simply fill out an on-screen window that resembles the 8109 coupon.
You can get more information about this service and even sign up for it at the www.eftps.gov Web site.
While I'm talking about federal payroll tax deposits, I should cover another general — but very useful — rule related to when you need to make the deposit: If your accumulated payroll taxes are less than $1,000, you can pay the taxes the next time you're supposed to remit payroll taxes: the next payroll date, the next month, or whatever. (This is called the De Minimis rule — named after the Congresswoman Dee Minimis, I think.) Don't rely on this rule, however, without first checking with the IRS or your tax advisor.
Warning
Some businesses are either now, or will shortly be, required to electronically remit payroll tax deposits directly to the U.S. Treasury. The IRS should tell you when that's the case. Sign up for EFTPS if you need to do this.
At the end of every quarter, you need to file a quarterly payroll tax return. (Specifically, you must file a Form 941 — which is a form you fill out to say how much you paid in gross wages, how much you withheld in federal taxes, and how much you owe for employer payroll taxes.)
If you don't own a business but have household employees — such as a nanny — you file a Form 942. You fill out this form to say how much you paid in gross wages, withheld in federal taxes, and owe in payroll taxes.
To get the gross wages totals and the balances in each of the payroll tax liability accounts, print a Cash Flow report for the quarter you need to report. You can do this by choosing Reports
Specify the range of dates as the start and end of the quarter for which you're preparing a quarterly report. Then click OK. Quicken produces a Cash Flow report, which you can easily use to fill out the quarterly payroll tax return.
You'll also need to report on the 941 tax form how much money you withheld from the employee's checks for federal withholding. You can do this manually (by looking through their payroll records) or algebraically (by comparing whatever the 941 or 942 shows as the total Social Security and Medicare taxes amount with the total payments made to the IRS). The difference between what you paid in total 8109 payroll deposits and what you paid in total payments to the IRS for payroll taxes should equal the federal withholding amount.
However, you know what? If your accountant fills out the 941 or 942 for you, you don't even need to read the stuff in the preceding three sections. Your accountant won't have any problem completing the quarterly payroll tax return by using the Quicken report, and, in fact — I kid you not — will probably even enjoy it.
Tip
Even if you want to do payroll returns yourself in the future, have your tax accountant prepare the first return. You can then use that as a template for correctly preparing any future returns.
At year end, you need to file some annual returns — like the 940 federal unemployment tax return and the W-2 and W-3 wage statements. (You'll need to prepare these by hand. Perhaps to protest all the work that small businesses have to do in order to comply with tax laws, you could prepare these forms by hand, using a cheap ballpoint pen. Just an idea.)
As a practical matter, as long as you're doing payroll for a single employee, the only thing that's different about filling out these reports is that you need to use a Cash Flow report that covers the entire year — not just a single quarter. So you need to enter the range of dates in the Cash Flow report dialog box as January 1 and December 31.
The 940 annual return is darn easy if you've been wrestling with the 941 or 942 quarterly returns. The 940 annual return works the same basic way as those more difficult quarterly tax returns. You print the old payroll report, enter a few numbers, and then write a check for the amount you owe.
Note
You need to prepare annual state unemployment summaries before preparing the 940. The 940 requires information from the state returns.
For the W-2 statements and the summary W-3 (which summarizes your W-2s), you just print the old Cash Flow report. Then, carefully following directions, enter the gross wages, the Social Security and Medicare taxes withheld, and the federal income taxes withheld into the appropriate blanks.
If you have a little trouble, call the IRS. If you have a lot of trouble, splurge and hire someone to do it. Again, any experienced bookkeeper can do the job for you.
Yeah. I haven't talked about state payroll taxes — at least not in any great detail. I wish I could provide this sort of detailed, state-specific help to you. Unfortunately, doing so would make this chapter about 150 pages long. It would also cause me to go stark-raving mad.
However, you still need to deal with the state payroll taxes. State payroll taxes follow the same basic mechanics you apply to federal payroll taxes. For example, state income tax works the same way federal income tax works, employer-paid state unemployment taxes work the same way employer-paid federal unemployment taxes work, and employee-paid state taxes work the same way employee-paid Social Security and Medicare taxes work.
If you're tuned in to how federal payroll taxes work in Quicken, you really shouldn't have a problem with the mechanics of the state payroll taxes.