
Installing and setting up Quicken
Setting up your bank (or other) accounts if you're a first-time user
Providing a Quicken overview
Solving setup problems
If you've never used Quicken, begin here. This chapter tells you how to install Quicken (if you haven't already) and how to start the program for the first time. You also find out how you go about setting up Quicken accounts to track banking activities — specifically, the money that goes into and out of a checking or savings account.
If you've already begun to use Quicken, don't waste any time reading this chapter unless you want the review. You already know the stuff it covers.
By the way, if you have Windows, I assume that you know a little bit about it. No, you don't have to be some sort of expert. Shoot, you don't even have to be all that proficient. You do need to know how to start Windows applications (such as Quicken). It also helps immensely if you know how to choose commands on menus and how to enter stuff in windows and dialog boxes. If you don't know how to do these kinds of things, flip to Appendix A. It provides a quick-and-dirty overview of how you work in Windows. Read the stuff in the appendix, or at least skim it, and then come back to this chapter.
Note
When I say Windows, I mean a recent version of Windows — something Microsoft is either currently selling or has sold in the last few years. Quicken 2010 won't run on Windows 3.1 or Windows 95, so if you want to run the latest version, I'm afraid it's time to upgrade. By the way, for the computer I used to write this book, I used Windows Vista.
You install Quicken the same way that you install any program in Windows. If you already know how to install programs, you don't need any help from me. Stop reading here, do the installation thing, start your newly installed Quicken program, and then start reading the next section, "Finishing Setup If You've Used Quicken Before."
If you need help installing Quicken, here are the step-by-step instructions. Installing Quicken from a CD-ROM is as easy as one, two, three, four:
Insert the CD-ROM into the CD-ROM drive.
In a short amount of time, Quicken should display the Quicken 2010 installation window. I'm not going to show this window in a figure. There's really nothing in the window to talk about. The window just reads
Welcome.Note: If nothing happens when you put the CD-ROM into the CD-ROM drive, don't panic! First, try removing the CD and then putting it in again. If Windows still doesn't recognize the CD, you need to tell Windows that it should install your Quicken program. In many versions of Windows (but not necessarily with your version), you do this with the Windows Control Panel by using the Programs tool. To do this, refer to your Windows user guide or a good book about your version of Windows (such as Windows Vista For Dummies, written by Andy Rathbone).
Click Next.
Quicken then displays a window that asks you a few questions:
Whether you accept the Quicken license agreement.
Where you want to install Quicken. You should accept the installation's program suggestion. (The installation program suggests a Quicken subfolder in your Program Files folder.)
Whether it's okay to uninstall the previous version of Quicken if there is a previous version of Quicken installed on your computer. You may also be asked whether it's okay with you if Quicken gets any program updates and if you're okay with the Quicken program sending Intuit information about how you use Quicken.
Answer these questions by clicking the appropriate buttons. Click Next to move to the next question. Then click the Install button when you answer the last question.
Quicken installs itself. This process takes a few minutes. Along the way, you see several other screenfuls of messages, including marketing information about the features new to Quicken and some progress reports on the installation itself.
Tip
When in doubt about some installation option, just accept the default suggestion by pressing Enter.
After the installation is complete, Quicken displays an
installation completemessage.Click Done.
Congratulations. You're done.
After you install Quicken, you need to start it to finish the setup process. If you told the installation program to launch Quicken 2010, you should see the Quicken program window on your screen. If you didn't tell the installation program to launch Quicken, you need to start Quicken.
Note
The easiest way to start Quicken is to double-click the Quicken shortcut icon that (post installation) appears on your Windows desktop. The Quicken program window appears, almost like magic.
Tip
Quicken might ask whether it can download program updates over the Internet. You can just say yes if it asks you this question.
If you've used a previous version of Quicken, the Quicken program might show option buttons to indicate what you want to do next: Open the found data file. (Alternatively, you can indicate that you want to open some other data file.) You're done. You're ready to begin Quicken-ing.
Tip
The Quicken setup process can usually tell whether you've used Quicken before. The setup process knows where the Quicken installation program usually puts the Quicken program and data files, and the installation program will look there. If you've used Quicken before but Quicken can't see this, two possibilities exist: The first possibility is that you put the Quicken data file someplace weird. (If that's the case, hopefully, you remember the weird place you hid the Quicken data file. But if not, see the later section, "The mysterious case of the missing Quicken data files," at the end of this chapter.) The second possibility is that you didn't do anything with the Quicken data file but that the data file has somehow gone missing. (If that's the case, hopefully you backed up the Quicken data file to a CD or to some other disk from which you can restore the data file.)
If Quicken can't figure out whether you've used the Quicken program before, it displays a friendly welcome message (not shown), which asks if you're a new Quicken user or if you're already a Quicken user.
If you're a new Quicken user, Quicken asks whether it's okay to use the default location for the data file (you should agree to this) and then automatically sets up a data file for you (you don't need to worry about it). Quicken next prompts you to register. (You might as well do this. The registration takes only a few minutes. All you do, in a nutshell, is provide your name and address, a bit of information about how you use Quicken, and your e-mail address.)
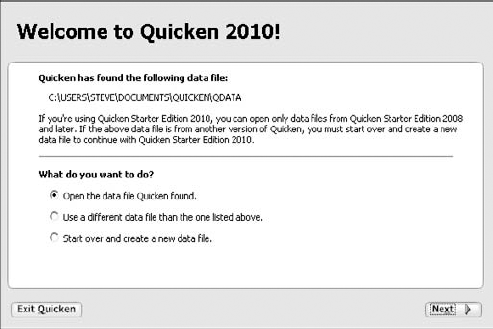
If you've used Quicken before, select the I Am Already A Quicken User option. Quicken then displays another Get Started With Quicken 2010 window, shown in Figure 1-1, that asks whether you want to open a Quicken file located on this computer, restore a Quicken data file you've backed up to CD or disk, or start over and create a new data file.
If you indicate that you want to open another Quicken data file located on the computer, Quicken displays a dialog box that asks where that file is. If you indicate that you want to grab a backup copy of the Quicken file, Quicken displays a dialog box that asks where that file is. Presumably, if either of these situations is your case, you'll know where the data file or backup copy of the data file is.
After the data file is set up, Quicken starts the Home page (see Figure 1-2). The Setup Center walks you through the steps for setting up Quicken. (You can find out much more on this process in the next section.)

The first time you start Quicken 2010, the program shows a Home page that includes a big Get Started button in (roughly) the middle of the screen.
Clicking the Get Started button allows you to provide information about your bank account and its current balance. Figure 1-3 shows the window that collects the first part of this information, but just so you don't get confused, here are the precise steps you take:

Identify the financial institution — usually a bank — by typing your institution's name in the text box provided.
As you type, Quicken displays a list of financial institutions that match what you've typed so far. The more you type, the shorter the list of possible matching institutions. If you see your bank or whatever listed, select it. When you click the Next button, Quicken displays the next Quicken Setup Center window, which simply enough asks whether you want to download transactions and account balance information directly from your bank's Web site.
Tell Quicken whether you want to download transactions directly from your bank or enter transactions manually.
If your bank provides Internet access to your bank account — and many banks do — Quicken knows. And as a result, Quicken will, in a polite but firm way, suggest that you save yourself a whole lot of headache by just grabbing data from the bank's Web site. I'm going to suggest, however, that you maintain your account manually. You have plenty of time later to find out how online banking works. (Online banking is really cool, though. See Chapter 6 for more information.) To indicate that you'll manually set up your account, click the No I Don't Have A User Name And Password option, select Next, and then select the Continue I'll Enter My Transactions Manually option button. Note that Quicken may not get into this online banking stuff if Quicken can tell that your bank doesn't support online banking.
Tell Quicken the name you want to use for the checking account.
You do so by typing a name in the Account Name/Nickname text box, shown in Figure 1-4. Furthermore, if given the choice, click one of the option buttons that appears below the Account Name/Nickname text box to indicate whether you're using the bank account primarily for business finances, personal finances, and so on. By the way, as far as the account name goes, you can be as general or as specific as you want. But brevity is a virtue here, so be concise: Quicken uses your account name to label stuff within the Quicken window and on Quicken reports. If you use a long account name, the name may not always fit on reports and screens.
Enter the ending bank statement date by referring to your bank statement.
After you provide Quicken with a name and general description of the account's transactions, click Next, and Quicken displays another account setup dialog box (shown in Figure 1-5) that asks about the account's ending statement date and ending statement balance. Enter the date of your last bank statement into the Statement Ending Date text box. This date, by the way, is forward from which you will start using Quicken. Enter the date in MM/DD/YYYY or MM/DD/YY fashion.
"Geez, Steve," you're now saying to yourself, "what's MM/DD/YYYY fashion?" Okay. Here's an example: If your bank statement is dated July 7, 2010, type 07/07/2010, or you can type 070710.
Enter the ending bank statement balance by referring to your bank statement.
This balance is whatever appears on your bank statement. This balance is also the amount of money in your account on the date you begin your financial record keeping. If you have $4.16 in your checking account, type 4.16 in the Statement Ending Balance text box.
After you type the bank statement balance, click the Next button to continue moving through the Account Setup.
Ultimately, you'll see a window that provides buttons you can click to start using Quicken and to add additional bank accounts and even credit card accounts.
If you have several other bank accounts that you want to set up within Quicken, you should repeat the preceding steps for each account. Just click the button that refers to you adding another bank account.


Okay, from my perspective, after you've described your bank account(s), you're ready to start using Quicken. With Quicken, the key thing you want to do is track your bank account or accounts so you can monitor and measure your income and your outgo. And so that you know how much money you have in an account.
The folks at Intuit, however, allow you to provide the Quicken program with a lot more information about your financial affairs. For example, the Intuit gang lets you describe in detail your income sources, your regular expenditures, any of your investments, your other assets, debts such as car loans and mortgages, and the real reason you had a crush on Millicent Peabody in third grade.
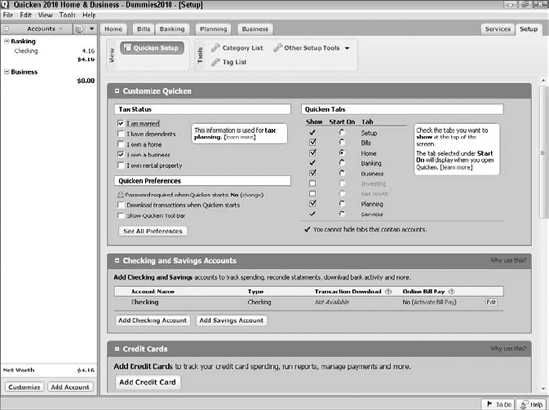
To tell Quicken all about your financial life, click the Setup tab (which appears in the upper-right corner of the Quicken Home page). When you do, Quicken displays the buttons and boxes shown in Figure 1-6. The Tax Status area asks for information about your family status, including whether you're married and whether you have dependents. This area also asks which bookkeeping activities you plan to use Quicken for: personal, small business, rental property, and so on. To provide Quicken with more information about how you'll use the software, answer the questions as best you can by checking the boxes. If you don't know how to answer some question, don't worry about it. Go ahead and skip the question.
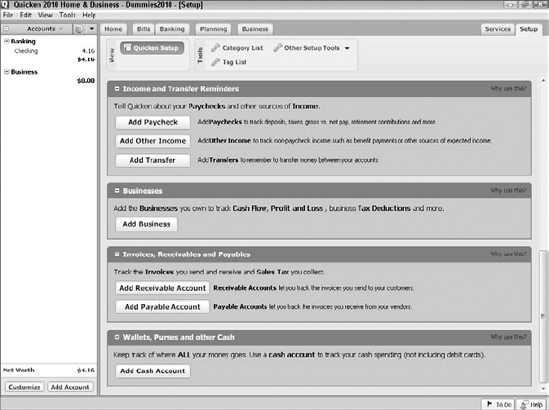
I talk more about this stuff in future chapters. Don't worry. But just so I don't leave you drifting, let me also mention that people who want to go hog wild can scroll down through the Setup Center's buttons and boxes. Figure 1-7 for example, shows some buttons and boxes that appear beneath the buttons used for setting up bank accounts, which I just talked about.
To provide more information to Quicken — such as information about your income — click a button like the Add Paycheck or Add Other Income button. After you click one of these sorts of buttons, Quicken displays a series of dialog boxes that ask for the gory details. If you click the Add Paycheck button, for example, Quicken asks for the name of your employer and for the details of your paycheck.
Tip
You don't need to know much about the mechanics of the Quicken interface — the way its windows work — to begin working with Quicken, especially in any chapters in this book in which I cover the basics. I provide plenty of detailed instructions, but I have a couple of quick comments now.
The second time you start Quicken — and every subsequent time — things work pretty much the same way as the first time. Double-click the Quicken icon on your desktop. Or, if you like doing things the hard way, click Start and then choose All Programs
Quicken doesn't use document windows the way that some other Windows applications do. Quicken basically turns document windows into pages that you leaf through by clicking the links, or hyperlinks, that appear in an Accounts bar along the left edge of the program window. In Figure 1-7, for example, you see links for Banking and Business. (You may see different hyperlinks on your monitor if you're using a different version of Quicken and additional hyperlinks for Investing, Rental Property, and Property and Debt if you've set up Quicken differently.)
Quicken arranges all its features — whistles, bells, or whatever else you want to call them — using navigation QuickTabs that appear near the top edge of the window. For example, if you look closely at Figure 1-7, you will see tabs labeled Home, Bills, Banking, Planning, Business, and so on.
If you're still confused, click the buttons and bits of text in the area of the Quicken window that I'm talking about. You'll clearly see how things work.
I want to quickly go over a handful of annoying setup problems new Quicken users may encounter. If you have Quicken set up and are ready to roll, skip this stuff.
You can use the existing old Quicken files if you're working with a new version of Quicken. In fact, if the Quicken installation program can find a version of old Quicken files on your computer, it gives you the option of just skipping all the Quicken Express Setup stuff. In this case, you just begin using your existing files. (I mention this point earlier in this chapter, in fact.)
If you've been using Quicken for Macintosh, however, you have to export your data from the Macintosh before you can read it in the Windows version. And I can think of about a million things more fun to do than exporting Quicken data from a Mac to Windows. See the section in Chapter 17 on importing data from an old accounting system for a brief discussion on the procedure and some suggestions for better ways to spend your time.
If Quicken doesn't find the old files, you need to open the specific files. But if you have this problem, you should be able to solve it yourself. What has happened, if you find yourself in this boat, is that you've moved or messed around with the Quicken files with some other program, such as Windows. If you did that, presumably you had a reason. And more to the point, you should know where you put the files.
Suppose that you're moving from Microsoft Money to Quicken. The question of the hour is this: Can you reuse your old or existing Money files in Quicken? The answer is, "Yes, sort of."
First of all, the Quicken File menu includes an Import command that lets you import files from Microsoft Money 2007 or 2008. So far, so good.
Further, if you've got an older version of Microsoft Money you want to convert data from, you can download a program called Data Converter from the Quicken support Web site. Data Converter converts Microsoft Money data files from Microsoft Money 2003 and later versions to the Quicken 2004, 2005, 2006, 2007, and 2008 file format. Quicken 2010 should easily then convert one of these old-format Quicken files to the Quicken 2010 file format. So, theoretically, you can move old Microsoft Money data files to Quicken.
Practically, however, moving financial information from Quicken to Money or vice versa doesn't seem to work all that well. Transactions seem to get lost. Account balances get messed up. People ruin their lives. Well, maybe that last comment is a slight exaggeration. But, no kidding: Migrating is problematic. If you do want to move from one program to another, I suggest making sure that you have a really good reason for doing so and that you allow yourself enough time to track down and correct any errors. The Data Converter is available from https://quicken.custhelp.com — use the search term Microsoft Money after you select your Quicken version.