
Practical Monitoring Solutions
Having devoted a couple of chapters to the basic principles involved, it’s now time to see how they can be applied in a real situation. The procedure that follows is more or less the same as we adopt during a typical Studio SOS visit.
Before touching anything, the first thing to do is to play some familiar commercial recordings over the monitor system and simply listen. Is the stereo imaging good? Are the speakers wired out of phase? Is the bass end even? We also check out the choice of speakers to ensure they are suitable for the room. In smaller rooms, large speakers with an extended bass response can cause problems that practical basstrapping solutions can’t address in the space available. In such cases the most pragmatic approach is to use smaller speakers with a nominal bass response extending only down to maybe 60 or 70Hz, and to site them as close to the mix position as is practical. In most home studios, a two-way speaker with a woofer diameter between five and eight inches is appropriate.
We also check that the speaker’s configuration switches and EQ controls are set correctly for their position (halfspace or quarter-space compensation, bass and HF lift and cut, etc.) and that the gain structure is sensible from the interface output through any monitor controller and on to the speaker’s input.
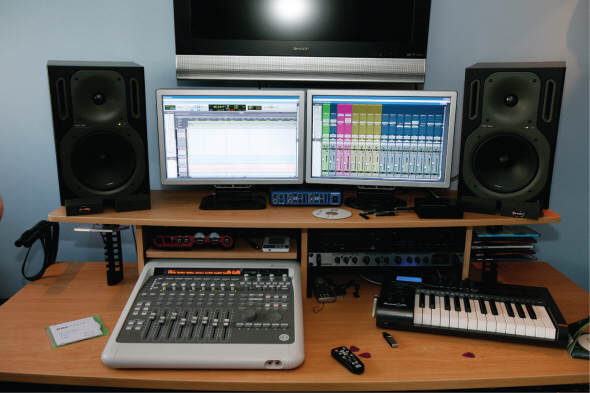
In many home studios, the most pragmatic approach is to use small speakers with a limited bass response, and to site them as close to the mix position as is practical.
Gain Structure
Audio systems work best when the audio signal level through the electronics is both well above the inherent noise floor and comfortably below the clipping level, and the concept of ‘gain structure’ is all about achieving that happy state of affairs. The volume control in the monitor section of a mixing console, computer interface, or on a dedicated monitor controller is designed to work best when used around its nominal ‘0’ position, which is when the knob is pointing around the two o’clock mark on most systems. The volume control provides precise level adjustment around this region, with accurate matching between the left and right channels.
Volume controls are usually designed to work best when used around their nominal ‘0’ position, offering the most precise level adjustment and accurate matching between the left and right channels.
If the gain structure is misadjusted so that the control has to be used at very low settings, the electronics are at risk of introducing distortion and the sudden development of a fault could easily result in damaging volumes to ears and speakers! It is also likely that the level matching between channels will be very poor, with the stereo image shifting from side to side as the control is adjusted. Conversely, if the level control has to be used flat-out all the time, the system may be noisier than it should be.
To optimise the gain structure, turn the level controls on the loudspeakers to their minimum sensitivity and replay music at a normal level from the computer. Set the volume control on the mixer, interface or monitor controller to its reference position and then adjust the level controls on the two loudspeakers to produce a comfortable listening level, making sure that the two level controls are set to roughly the same position. Finally, switch the music to mono and check that the stereo image collapses to a well-defined narrow image exactly midway between the two speakers. You may need to adjust the input level of one of the loudspeakers slightly to get this precisely right.
A comfortable listening level is a subjective thing, of course. It needs to be loud enough to hear the detail of a recording, but not so loud that you risk hearing damage. If you have to raise your voice to talk to someone close to you, it’s too loud! Professional studios often calibrate the reference speaker level to ensure consistent mix balances between different sessions and different studios, and that is generally a good idea. However, the ‘industry standard’ reference level of 85dB(C) SPL at the listening position (when replaying pink noise with an average (RMS) level of –20dBFS) is often far too loud for a typical home studio.
If your speakers are connected out of phase, the cones on the monitors will be moving in opposite directions when the same signal is applied to both, causing most of the bass end to vanish.
Room size plays an important part in the perception of volume, and we’d recommend setting a reference level somewhere between 75 and 80dB(C) depending on room size and the amount of acoustic treatment in place. The actual level chosen as ‘the reference’ isn’t critical – what’s important is the ability to reset the listening volume to that standard setting when starting or comparing mixes to ensure consistent balances. If you set a standard listening level with the monitor volume control at the nominal ‘0’ position, you can still turn things up briefly to listen to quiet details (or to blow the cobwebs out!) when necessary, but you’ll also be able to work at a consistent level when you carry on working on a mix day after day.
Speaker Phasing
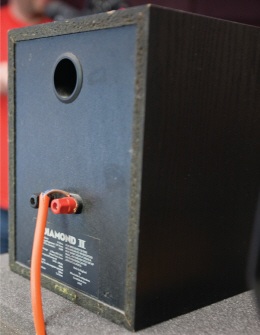
If the speakers are wired out of phase, the speaker cones on the two monitors will be moving in opposite directions when the same signal is applied to both. Most of the bass end will vanish due to phase cancellation, and if you’re sensitive to such things, you’ll also experience an uncomfortable itching sensation in your ears as you approach the point exactly midway between the two speakers. It feels a bit like your ears are being sucked out! (Some people find this situation extremely unpleasant, while others barely notice it). If you are using passive loudspeakers with a separate power amplifier, the most common cause is simply an accidental reversal of the two wires connecting one of the speakers, either at the speaker end, or the amp end. With active speakers the cause is usually an incorrectly wired, balanced signal cable.
If active monitors sound like they are out of phase with each other, the chances are that one of the balanced input cables has its hot and cold connections reversed.
If the stereo imaging is poor or confused-sounding, with central sources being inadequately defined or blurred, the usual culprit is something nearby generating strong reflections. A common cause is reflection from computer screens or other hardware placed between and in front of the speakers, but it can also be caused by reflections of the desk or the room’s side walls or ceiling. If the room boundaries are causing the problem, poor imaging can usually be fixed fairly easily using properly positioned absorbers. We touched upon that in the last chapter ]and will be going into more detail later. If the studio isn’t set up symmetrically along the centre axis of the room you should endeavour to get your monitors and listening position as close to this ideal as possible before proceeding – even if you need to offset it slightly later on to help smooth out bass problems.
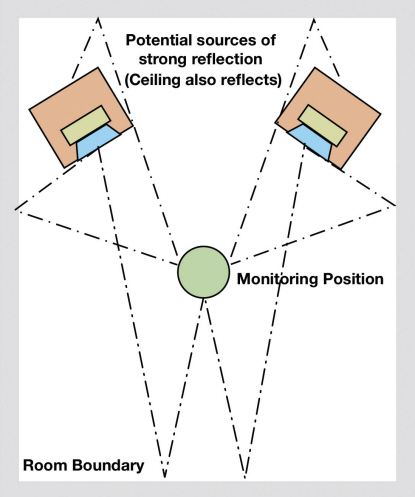
Although there will also be reflection from objects in the room, the side and rear walls and the ceiling are always the most significant sources of reflection.
Suitable Monitors
Some speakers simply aren’t very good at producing solid, stable stereo images. You should generally pick a speaker designed specifically for studio monitoring, and select one on the basis of accuracy rather than a propensity to flatter the music being played. While flattery may be acceptable and even desirable in a consumer sound system, it doesn’t do anybody any favours in the studio. We have come across studios where hi-fi speakers have been used instead of monitors and we’ve even seen people trying to mix on their band’s PA speakers – but neither is a good idea!
Studio monitors are available as either active or passive models – the difference is that passive designs require an external power amplifier while active types have their power amplification built into the cabinet. Both are capable of excellent performance if designed and set up well, but in most cases active speakers are more convenient and negate the need to find a suitable power amplifier. One point to be aware of, though, when using active monitors is that you will need to arrange some means of controlling the overall volume. Analogue or digital mixing consoles invariably have a ‘control room’ volume control in their monitoring section, but in a mixer-less computer-based system you may not always find a monitor volume control on your audio interface or soundcard. Adjusting the volume in software isn’t an ideal solution either since the signal quality can be degraded except when the level is turned up full. There’s also no fast way to turn off the sound if your system crashes, outputting white noise to your speakers at digital full-scale level!
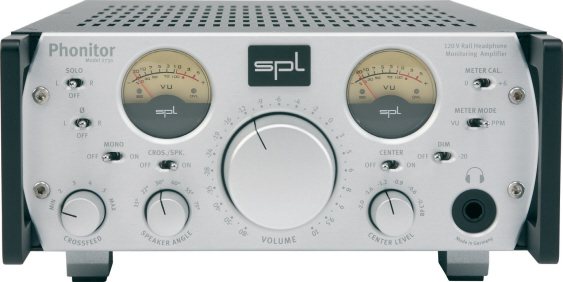
The neatest solution is to use a separate analogue monitor controller – a hardware unit, offering level control, source switching, the ability to feed two or more different pairs of monitors, and usually a headphone output. Other useful features might include a mono button, and a ‘dim’ button for dropping the speaker level when you want to talk or answer the phone without disturbing your reference listening level setting on the main volume control.
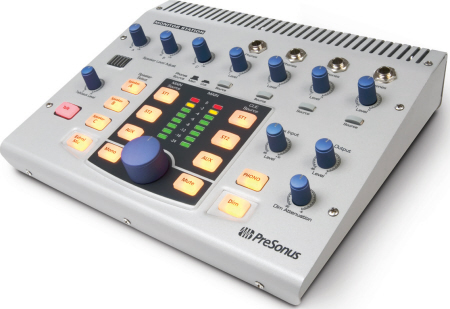
If you choose active monitors, it is a good idea to also budget for a monitor controller — adjusting the volume in software isn't an ideal solution as it may be impossible to turn off the sound if your system crashes.
If you choose passive monitors it is important to team them with a well-specified power amplifier that has a power rating slightly higher than the upper end of the manufacturer’s recommended range for that speaker. Having insufficient power on hand is likely to compromise the sound by running into distortion when you turn up the volume. Whilst distortion is clearly a bad thing for accurate monitoring, it can also damage tweeters extremely quickly, so in most cases having a little excess power available is far better than not having enough.
Speaker Positioning
After our initial listening tests we check the speaker mounting arrangements and also their alignment. In general, the two speakers and the listening position should all form the corners of an equilateral triangle, with the tweeters aimed towards the engineer’s head in both the vertical and horizontal planes. However, it is worth checking the speaker manufacturer’s own recommendations, as some designs are intended to be aimed slightly behind the listening position, or even to point straight down the room.
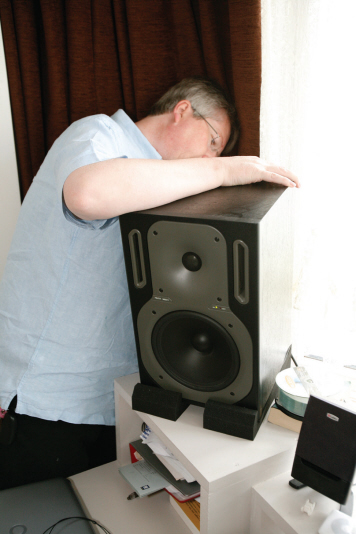
The moving cones within a speaker don’t just create sound, they also cause the cabinet to move and vibrate in a way that can degrade the sound or cause other things to vibrate in sympathy, so it is very important that these unwanted vibrations are controlled. If the speakers are mounted on floor stands, they should be fixed solidly to the stand using something like Blu-tak, and the stands properly levelled and made secure on the floor, using spikes to penetrate any carpet present. However, if the speakers are to be mounted on a desk or shelf we have found it is generally much better to use foam isolating pads, as these keep the speakers stable but prevent vibrations reaching the desk where they might set off sympathetic resonances or other unwanted rattles and vibrations. We also check that speakers with rear bass ports or passive radiators are not positioned closer than six inches from a wall (and ideally more).
We mentioned earlier that foam pads can work better with a thick ceramic floor tile or metal plate fixed to the top. Having a solid platform reduces the amount of energy transmitted through the foam but more importantly it adds weight and stability to the speaker cabinet. Whenever a speaker cone moves forwards, the cabinet tries to move in the opposite direction, according to Newton’s laws of motion, so adding mass and damping helps limit this movement. If the cabinet moves in a reaction to each bass note, it takes the tweeter with it, which introduces a form of modulation that can colour the sound. The less the cabinet moves, the less the sonic colouration and the tighter the sound generally. Commercial platforms made with steel tops often have an integrated non-slip rubber mat on top but you can use non-slip kitchen matting on your DIY floor tile versions. This matting also works well on speaker stands as an alternative to Blu-tak.

A DIY speaker platform – the Blu-tak ensures that the speaker does not slip on the surface of the himass layer.
If the bass response sounds uneven, with some boomy notes and some sounding very weak, the usual cause is unhelpful room modes, but improvements can often also be made just by repositioning the speakers. Moving them forward or back, or side-to-side, a few inches can make a surprisingly big difference. The trick is to move the speakers, run the chromatic sine-wave test outlined in Chapter One, then see if the result is better or worse before making further moves. This technique has proven to be a life-saver on many Studio SOS jobs where all other attempts to create a more even bass response have failed.
We believe that you’ll invariably get the best results by having the speakers fire down the length of the room unless the room is at least 15 feet wide, and during the course of our Studio SOS visits we’ve had to disassemble more than one studio and turn it through ninety degrees to enable us to get acceptable results. In some cases a bad layout had been chosen by the studio owner simply because that’s as far as their cables would reach! Buying (or better still, making) a few new cables is not a big price to pay to get your studio working at its best.
Where the studio is setup in a typical domestic room constructed with lightweight plasterboard walls, you should be able to get a reasonably even low end from modestly sized monitors without having to resort to installing much, if any, bass trapping, as this type of structure naturally absorbs some low frequencies and lets a lot straight through. However, if trapping is required then corner traps are the most effective solution where space is limited, as we saw in Chapter Two, and it is fairly easy to make your own if you don’t want to buy commercial foam corner wedges or ready-made panel traps. There is no need to worry about installing too much bass trapping because you won’t accidentally kill the low end! Bass trapping doesn’t affect the amount of bass coming from your loudspeakers, it just stops that bass from reflecting around the room and interacting with the direct sound, which is what causes the unwanted peaks and nulls at different frequencies. So bass trapping doesn’t reduce the bass, but rather your bass end becomes much more even and consistent.
We often get asked if a subwoofer is appropriate in a small studio. Our general view is that a sub that generates very deep low frequencies will often just emphasise the modal problems caused by room geometry, and so often does more harm than good. Also, cheap subwoofers produce a lot of harmonic distortion that masks the midrange detail of the main monitors, so they can easily make a system sound worse even at higher frequencies! However, so-called 2.1 systems that combine very small main monitors with a dedicated subwoofer are increasingly popular and do have some advantages. Amongst these is that in a very small room you may not be able to reposition conventional speakers to achieve the flattest bass response without severely compromising other aspects of the setup. However, with a 2.1 system you may be able to place the stereo speakers to achieve good stereo imaging, away from walls and corners, while also positioning the separate subwoofer somewhere that gives the most even bass response.
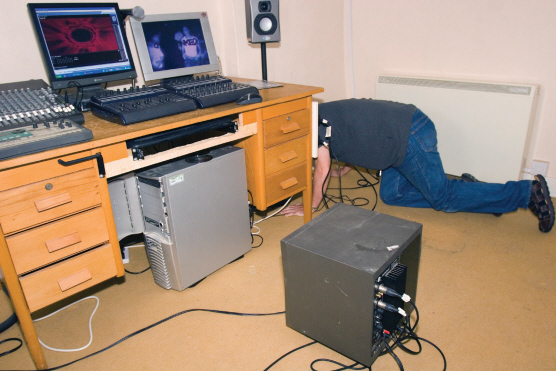
One way of finding the best location for a sub is to place it on the floor where you would normally be sitting, and then crawl around the floor, so your ears are at the same height as the sub, until you find the position where the bass response is most even – that's where you should put the sub!
Unfortunately, people often place a subwoofer for convenience rather than where it actually works best. We’ve found subwoofers to be very position-sensitive and, as a rule, they definitely shouldn’t be positioned exactly midway between two walls as that excites the room modes more than if the sub is slightly off centre. Even though bass is largely nondirectional, the sub should still be placed in front of the listener because the inherent harmonic distortion will generate higher frequencies that can be located, and the combination can start to sound disembodied if the subwoofer is placed off to the side or behind the listening position. We’ve come across situations where the user has put the sub on a partly enclosed shelf, in a makeshift box, or in the centre of the room – and in all cases we had to move it to a more appropriate position to achieve a more uniform bass response. Subs shouldn’t be placed in confined spaces that are likely to resonate, and more often than not they work best sitting on the floor somewhere close to the front wall, though if this isn’t physically possible you’ll probably find an acceptable spot towards the front of one of the side walls.
One commonly employed technique for finding the best location for a sub is to first place the subwoofer on the floor right where the engineer’s chair normally sits, and then to play some well recorded music with a lot of different bass notes (the bass-note test sequence described in Chapter One would work well, too, with its playback looped). You then crawl around the edges of the room with your ears at subwoofer height, listening for a spot where the bass sounds most even. Once a suitable location has been found, move the subwoofer there and check that the response is still even when you are at the usual listening position. You can then start the process of optimising the subwoofer’s level, phase and cut-off frequency to blend its contribution into the main satellite speakers. This positioning technique invariably gets good results and we have used it successfully many times. The idea is simple – to swap the positions of the listener and the sub while searching for the most even-sounding spot – and it works! Of course, it’s very easy to say ‘optimise the subwoofer’s level, phase and cut-off frequency’ but a very common problem we find is that users often turn the subwoofer level up much too high. The idea of the sub is to underpin those low octaves that the main satellite speakers can’t quite manage, so its contribution should only be noticed by its absence when you switch it off! It might be good fun to have your trousers flapping in the breeze and your internal organs rearranged by excessive amounts of low-frequency energy, but it won’t do your mixes any favours! If in doubt, set the subwoofer level too low rather than too high, and if the manufacturer offers a calibration procedure, follow it!
Simple Subwoofer Calibration
A simple calibration procedure that works with most subwoofers is to first set its phase, then the cut-off frequency, and finally the level. Not all subwoofers have all three controls, so some experimentation and compromise is often required. Since the subwoofer is unlikely to be placed under the satellite speakers its sound contribution may have further to travel to the listening position, and usually a phase control is provided to compensate for that. The easiest way to find the optimum setting is to play a sine wave note at a frequency that both the satellite speaker and subwoofer can reproduce – typically somewhere between 80Hz (E2) and 120Hz (B2) – and then adjust the phase control to find the position where the sound is loudest – which indicates that the contributions from the sub and satellites are all arriving in phase at the listening position.
Next, using the chromatic sine wave sequence again playing just over the satellite speakers, identify the few notes below which the level starts to fall off significantly. Then, playing the same sequence over the subwoofer, adjust the cut-off frequency control until the level falls off rapidly above those same notes. Don’t get bogged down over this too much – it’s only a rough setting at this stage.
Finally, playing some full-range music over the complete sat/sub monitoring system, adjust the level control so that the subwoofer is just reinforcing the lowest notes. At this stage you may need to fine-tune the cut-off frequency and level controls slightly – they will tend to interact with each other – to optimise the integration of the subwoofer with the satellites. The aim is to be completely unable to tell when the satellites hand over to the subwoofer, and to only notice what the subwoofer is doing when you switch it off!
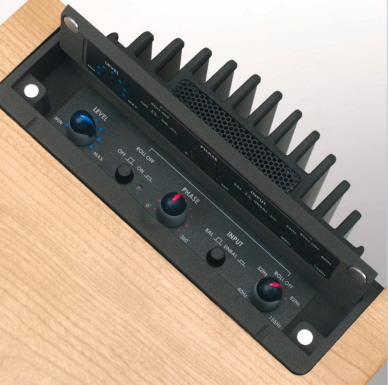
Set phase first, then adjust cutoff frequency and level – you may also have to experiment with different placements.
Fixing the Imaging
Chapter Two explained the role of acoustic absorbers and how they can benefit your room acoustics, so the next stage is to figure out the best places to put them. Before doing this though, it is important to appreciate that you can easily overdamp a room, which not only makes it sound oppressive but also disturbs the even decay time we’ve been trying to achieve. As a very general rule, we’d recommend not covering more than around 20% of the available wall space with mid/high absorbers. Some of the studios of the 1970s with mineral wool covering all the walls sounded dreadful. That’s because if you apply too much broadband absorption, the room will start to sound coloured due to the inescapable fact that simple absorbers don’t absorb all frequencies equally, typically offering very little absorption at bass frequencies. Where mid and high frequencies are concerned, our primary aim is to achieve a listening position free from strong first reflections.
Mirror Points
The most important areas to treat are the so-called mirror points – those areas of reflective surface that bounce the sound from the monitors directly back to your listening position. You can find these by getting someone to hold a real mirror flat against the wall when you are seated in your usual monitoring position, as described in Chapter One. At any point where you can see a reflection of either monitor speaker in the mirror, you need to place an absorber. The main mirror points in a typical rectangular room will be on either side of you, slightly forward of where you sit, and also on the wall behind the speakers. In a typical bedroom or garage studio, you may find that one square metre of suitably positioned absorber per wall is enough. In general use the thickest acoustic absorbers you can accommodate, and ideally leave air gaps behind the foam if at all possible as this makes the traps more efficient at lower frequencies. You may remember that we suggested that if mounting foam on board, then select a board with generous perforations where possible because with solid MDF or plywood boards any benefits of leaving an air gap behind the trap are lost.
There will also be an area on the ceiling, roughly halfway between your monitors and your ears, where an absorber could be helpful. If you don’t want to stick foam to the ceiling, build a lightweight wooden frame to hold a sheet of foam or mineral wool and suspend it on wires or chains from cup hooks or plasterboard fittings screwed into the ceiling, which is far less intrusive than using glue. Hang your absorber roughly 100 to 200mm below the ceiling to increase its low-frequency efficiency. If there are lights above the ceiling panel, consider fitting LED lamps to avoid heat build-up.

Any non-absorbent surface on which you can place a mirror and see your speakers reflected is a potential source of reflected sound.
Commercial acoustic panels are available in both square (typically 600x600mm) and rectangular (600x1200mm) forms, and we’re often asked whether it’s best to hang rectangular acoustic panels vertically or horizontally. The answer is that it depends on the room size and layout as well as the aesthetics – there is no right or wrong way! In larger rooms, you can also double up on the panel area.
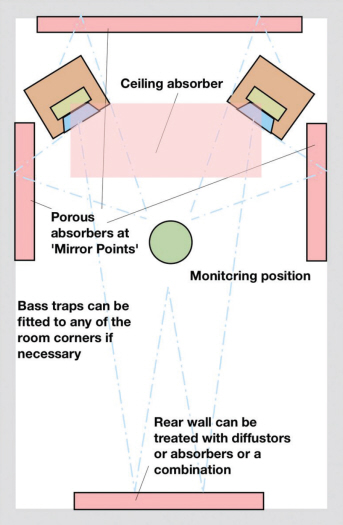
A room with all the primary reflection points treated.
We’ve come across many situations where the ideal sidewall absorber placement has coincided with entrance doors, cupboard doors or windows. One solution is to make up a removable lightweight foam absorber that hangs from a hook on the back of the door or cupboard. Self-adhesive plastic hooks are usually fine for this and you can stick an old CD onto the back of the foam panel to hang over the hook. Acoustic foam can be fixed using the recommended spray contact adhesive, but be warned that once fixed to a hard surface it puts up a real fight if you try to remove it at a later date, and you’ll probably end up with a layer of foam still stuck to the wall! Often it is safer to fix the foam to an MDF or plywood panel, or easier still an old CD, that you then hang on a picture hook. Spray adhesive designed for acoustic foam is the best option, though regular contact adhesive can be used for fixing small items, such as CDs, to the back of a panel. Better grades of carpet adhesive also work but we’ve found that some brands don’t grip strongly enough, and some can dissolve the foam – so always try a small area first!
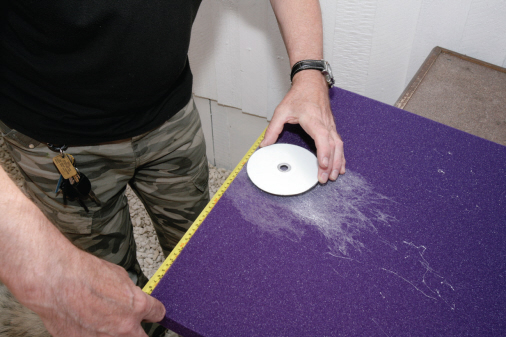
Gluing an unwanted CD to the back of a foam tile allows you to hang it on a picture hook so that it can be placed temporarily and removed without damaging the wall.
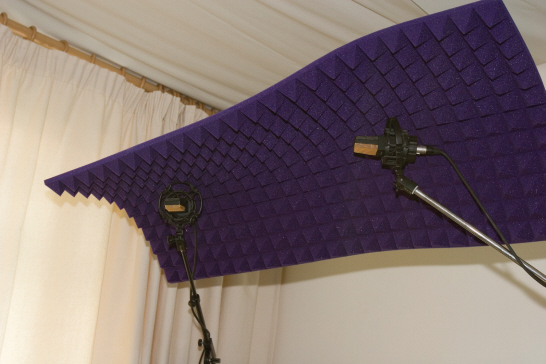
If a mirror point coincides with a window, then heavy curtains are the simplest answer, although we’ve also had good results making a removable foam absorber panel which could be hung up or balanced on the window ledge only when mixing. Vertical blinds set at a 45-degree angle can also be useful in breaking up reflections. Movable panels are useful in small studios anyway as during tracking you can use them to improve the acoustics around an instrument or amplifier when recording with microphones.
In some rooms perfect symmetry simply isn’t possible, as we’ve sometimes found in bedroom studios we’ve visited. All you can do in such cases is to try to make the listening area as symmetrical as possible from a mid- and high-frequency point of view, and this can often be achieved by hanging a temporary foam panel to one side or other of the monitoring position when mixing. For example, if your desk is close to a wall on your left, then prop up a temporary foam panel on your right to make something resembling another similarly treated wall. Another easy temporary fix is to hang a foam panel wherever necessary from a boom mic stand using a couple of those woodworking clamps that look like giant clothes pins.
TIP : If you accidentally get some spray adhesive on the surface of acoustic foam or other furnishings, you can often remove it before it dries by dabbing at it with the sticky side of Gaffa or duct tape.
If you can’t permanently mount any sound absorption in your studio room, you can always improvise some temporary absorbers when you are actually working.
Rear Walls
In very small rooms you may also need to place absorbers on the wall behind you, but how best to treat the rear wall depends largely on the size of the room. The basic idea is to prevent strong reflections from the back wall bouncing back to the listening position.
In a commercial studio the room is often large enough that diffusers can be used to scatter sound that hits the rear wall, which has the advantage of keeping the sound energy in the room (helping to prevent it from sounding oppressively dead), but without causing any strong reflections. However, where the rear wall is closer than about six feet from the back of your listening chair there is insufficient space for pure diffusion to work effectively, so using absorbers or a combination of scattering and absorbers, offers the best practical solution.
Although a little more costly to build, a full-range absorber is the most effective treatment, which you can create by hanging barrier mat 200mm or so from the wall and then putting a layer of foam or mineral wool in front, making sure that the barrier mat hangs freely. If you’re proficient at DIY, you can build a simple wooden frame to accommodate the trap and then finish off the front using acoustic foam or fabric. However, make sure that the frame includes plenty of strong cross-members as experience has shown that studio visitors invariably try to lean on fabric-covered traps, which can do a lot of damage!
The cheapest, simplest and most pragmatic solution for small and medium-sized rooms is often to combine absorption with some crude scattering diffusion provided by shelves full of irregularly sized books, CDs, software boxes and unused equipment. The ubiquitous studio sofa (or even a bed and mattress) makes a reasonably helpful absorber (ideally covered in fabric rather than leather or vinyl, as the latter reflect high frequencies), and you may even be able to stuff its underside with mineral wool to make it more effective as a bass trap. Exposed parts of the rear wall may then be treated with areas of acoustic foam or other DIY absorbers.
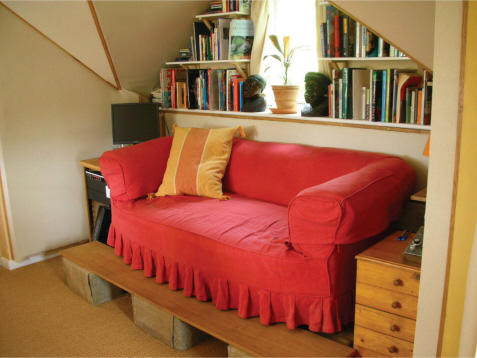
The most pragmatic solution for the rear wall of many small home-studio rooms is simply to rely on the degree of scattering diffusion provided by shelves full of irregularly sized books, CDs, software boxes and unused equipment.
Of course, you have to be realistic about what can be achieved in a small project studio and often some acoustic problems remain that you simply have to work around. A case in point is the cube-shaped room where nothing you do is likely make the centre of the room usable as a monitoring position, especially if the walls are solid rather than drywall, because by the time you have installed enough bass trapping to tackle the problem you probably wouldn’t be able to get into the room anymore! So, even if you sit in the middle while tracking you will need to push your chair out of that central ‘dead zone’ to make meaningful mix decisions, and working with headphones might actually be the better solution.
TIP : In temporary studios, such as those set up in student bedrooms, hanging a piece of foam or a folded duvet behind the engineer’s head may be all that is needed to tame rear wall reflections.
Checking your mixes on headphones is a good idea, even in a well-treated room.
Having said that, the basic room treatment we’ve described can still make a hugely noticeably improvement to both the overall focus and stereo imaging of the sound, and if you keep comparing your mix-in-progress with commercial tracks in a similar style played over the same system you’ll almost certainly be able to produce good results. Double-checking your mixes on headphones is also good practice. It can be a good idea no matter what kind of monitoring you have, but it is especially beneficial if you know your usual monitoring environment is not entirely trustworthy.
TIP : If you know that your monitoring is inaccurate at low frequencies, avoid applying EQ to frequencies below 80Hz or thereabouts unless you can check the results on headphones and other people’s sound systems. If you’re using samples for the drums and bass instruments, it is safer to trust that the sample designers have got the bass balance about right than to attempt EQ adjustment in a poor monitoring environment. The danger is that you’ll inadvertently be equalising to compensate for room response anomalies, rather than genuine deficiencies of the track!
Monitoring Do’s and Dont’s
DO arrange your monitoring setup as symmetrically as possible.
DO put your speakers on rigid stands or, if mounted on a desk, isolating pads.
DO place acoustic absorbers at the mirror points.
DO move your monitor position to achieve the most even bass.
DO scatter or absorb reflections from the wall behind you.
DO continually compare your mixes with commercial mixes in a similar style.
DON’T allow objects to get between you and the monitor speakers.
DON’T site monitors too close to room corners or back walls.
DON’T sit in the exact centre of a square or rectangular room.
DON’T sit close to walls or corners when monitoring.
DON’T use too much broadband absorption or the sound of the room may suffer.
DON’T rely too much on your monitors in a small room – double-check the mix on headphones and on as many third-party sound systems as possible.