13. Extending Your Project Using Adobe Flash Builder
Using Flash Catalyst and Adobe Flash Builder, designers and developers work together to create the perfect mix of artwork, interactivity, usability, and data. Art is joined to data, which then becomes art.
This lesson explores a few ways that you can extend your Flash Catalyst project using Flash Builder, and offers a few tips for preparing a project file (FXP) for handoff to a developer. Developing in Flash Builder goes beyond the scope of this course, but for those who have Flash Builder installed, we’ve included the steps to opening a Flash Catalyst project in Flash Builder, updating an existing project, and importing a Flash Catalyst project library.
In this lesson, you’ll learn how to do the following:
• Extend an application by connecting it to data and web services
• Prepare the application for handoff to a developer using Flash Builder
• Import a Flash Catalyst project into Flash Builder
• Compare and integrate code between two projects
• Import a Flash Catalyst project library into Flash Builder
This lesson will take about 45 minutes to complete. Copy the Lesson13 folder into the lessons folder that you created on your hard drive for these projects (or create it now), if you haven’t already done so. As you work on this lesson, you won’t be preserving the start files; if you need to restore the start files, copy them from the Adobe Flash Catalyst CS5 Classroom in a Book CD.
![]()
Extend the reach and functionality of your Flash Catalyst projects with Adobe Flash Builder. Create a dashboard for managing a database, searching for records, and running reports. Link a photo gallery to an unlimited portfolio of images. Collect user information, process forms, and a whole lot more.
Adobe Flash Builder
As wonderful as it is, Flash Catalyst has its limitations as a standalone RIA production tool. After all, it’s an interaction design tool, not a development environment. When your application needs to retrieve data at runtime from a web server, web service, or third-party API (application programming interface), use Flash Builder.
Adobe Flash Builder 4 (formerly Flex Builder) is an integrated development environment (IDE) for developing cross-platform data-centric content. It provides features that are aimed at those who are developing RIAs using ActionScript and the Flex framework.
Note
An integrated development environment (IDE) is a software application that provides comprehensive tools to computer programmers for software development.
Extending the application
Although you can use Flash Catalyst to publish fully functional applications, or microsites, many RIAs require additional development, such as binding a component to a data source or web service. That’s where Flash Builder comes in. Remember, the applications you create with Flash Catalyst are Flex applications. A Flex developer can open your projects in Flash Builder and pick up right where you left off.
The following are a few examples of ways that a developer can extend the capabilities of your Flash Catalyst project using Flash Builder.
Bind components to a data source
Create a Data List component in Flash Catalyst and use design-time data to define the appearance and behavior of the list. Then, have your developer bind the component to a data source using Flash Builder. When the application runs, your data list includes every record in the data source. The data is kept separate from the application, so the data can change at any time without redesigning or republishing the application.
Tip
In addition to displaying lists of text and images, your Flash Catalyst project can be a dashboard to provide insight into a corporate database, or perhaps your application will provide a new front-end to an existing ColdFusion or PHP application.
Using Flash Builder, you can connect the application to several service types:
• BlazeDS
• ColdFusion
• HTTP
• LCDS
• PHP
• WSDL (Web Service)
• XML

Create, Read, Update, and Delete (CRUD)
Use Flash Catalyst to design a data management control center to view, edit, add, and delete records in a database. For example, you can use a wireframe Data List component to build the data grid, and then add controls to accomplish tasks, such as add new records, submit changes, or cancel. A developer can use Flash Builder to implement the CRUD functionality by binding the controls you design in Flash Catalyst to web services.
Provide a keyword search
You can connect your application to a data source and then let users search for specific records by entering keywords in a search field that you design. A developer can implement the feature using Flash Builder.
Collect user input
Flash Catalyst is an excellent tool for designing user input controls, including text input fields, radio buttons, check boxes, and the button used to submit a form. Design your forms using Flash Catalyst and then have your developer add the code to collect, store, and circulate the information by email.
Validate user input
You can assign rules to the fields in a form; determine which information is required and optional; test a password and either grant entrance or display an error message. Test the user entry in a ZIP code text input field and display an error message if the entry doesn’t have exactly five numerals. These types of interactions cannot be implemented in Flash Catalyst. But you can use Flash Catalyst to design the fields and error states. The developer implements the logic for these interactions using Adobe Flash Builder.
Add a combo box
Improve the usability of a form by adding a combo box control. A combo box is a combination of a drop-down list and a single-line text input field, allowing users to either type a value directly into the control or choose from a list of existing options that you specify. You can design a combo box using a custom component, or let your developer add a combo box control using Flash Builder.
Use sliders to set values
You can use Horizontal and Vertical Slider components to select a value by moving a slider thumb between the end points of the slider track. The current value of the slider is determined by the relative location of the thumb between the end points of the slider, corresponding to the slider’s minimum and maximum values. Once you add a slider in Flash Catalyst, a developer can add the desired functionality using Adobe Flash Builder.
Create printer controls
Design a print button using custom artwork in Flash Catalyst. Your developer can add the code used to initiate print commands and options.
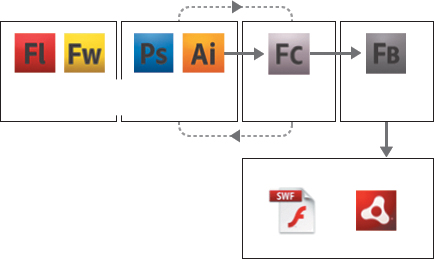
Exploring designer-developer workflows
Technically speaking, Flash Catalyst and Flash Builder are not “integrated.” However, they are designed to work together.
Every project created in Flash Catalyst can be opened in Flash Builder. A Flex developer completes the project using Flash Builder, while maintaining all the pixel-perfect layout and interactions you’ve designed in Flash Catalyst.
There are several possible workflows that designers and developers can use to collaborate during RIA design and development. Most fall into two general categories: linear and iterative.
Linear workflow
In a linear workflow, you will create your project in Flash Catalyst and then pass it off to the developer to use in creating the application, with little or no iteration. The following is one example of a linear workflow:
- Create your artwork in a Creative Suite tool.
- Import it into Flash Catalyst and use the features in Flash Catalyst to add states, animation, and interactivity.
- Save your project as an FXP file.
- Provide the FXP file to the person who will be responsible for implementing the additional functionality in the application. This could be yourself or a developer on the production team.
- Import the Flex Project (FXP) file into Flash Builder.
- In Flash Builder, define calls to remote operations that will fetch data at runtime.
- Publish the completed project from Flash Builder.
Iterative workflow
It’s possible that you’ll need to make changes to the visual design of the application or its components following the export from Flash Catalyst and import into Flash Builder. But, it’s not possible to re-open a Flex project in Flash Catalyst once you’ve imported it into Flash Builder. If you think you’ll need to make changes to the artwork used in the component skins, or elsewhere in the application, you can use the following approach:
- Open the original project file (FXP) in Flash Catalyst. Use the same file you originally imported into Flash Builder.
- Use Save As to create a new version of the project file (FXP) using a new name.
- Make the necessary design changes to the new project file in Flash Catalyst.
- In Flash Builder, import the updated FXP file as a new copy of the project.
- Copy edited code in the new project to the original project using the Flash Builder Compare feature. By comparing the original and edited projects, you can identify and copy code between projects.
Preparing files for a developer
As you design and create your Flash Catalyst project, keep in mind that you have an internal client—your Flex developer. The following tips will help you create a well-organized Flash Catalyst project that’s prepared for a smooth transition into Flash Builder.
Meet with your development team early
A little planning goes a long way. When designing a Flash Catalyst project for Flash Builder, meet with your developer first to discuss which Flash Catalyst components and properties to use. If you’ve created a design specification, provide that to your developer along with the Flash Catalyst project file.
Use data lists and design-time data
If your application presents a list of items (images or text) from an external data source, you do not need to add every item to the component in Flash Catalyst. Instead, add a few design-time data items as a prototype. Be sure to include enough to demonstrate the desired look and behavior of the component. For example, if the list is meant to scroll, include enough data to activate the scroll bar. A nice thing about creating your data lists in Flash Catalyst is that the states of your repeated item are preserved in Flash Builder. The Normal, Over, and Selected states look and behave the same for every record.
Name everything
Use descriptive names for all layers and objects in the Layers panel. Give unique and identifiable names to all page states, components, and component states. Give all library assets unique names that your developer can recognize. Your developer will thank you for it.
Delete unused assets
In just about every project, you’ll end up with at least a few unused assets. Using the Library panel in Flash Catalyst, remove any components, images, media, and optimized graphics that aren’t being used in the project. The less clutter you bring into Flash Builder the better. Removing these assets also keeps your file to a more manageable size.
Opening a Flash Catalyst project in Flash Builder
Let’s take a look at the main steps for getting a Flash Catalyst project into Flash Builder. We’ll start by viewing a final Flash Catalyst project file (FXP) and importing the file into Flash Builder. After that, we’ll import an edited version of the project and use the Compare feature to integrate the changes between the old and new projects.
Review the final Flash Catalyst project file (FXP)
A Flash Catalyst project is a Flex project. To make sure your developer is working with the most recent copy of the project file (FXP), it’s always a good idea to open the file, review the elements that need further development, and resave the file before handing it over to a developer.
Let’s open a finished copy of the Restaurant Guide application. We’ll take a look at what needs to be completed in Flash Builder.
- Start Flash Catalyst, browse to the Lesson13 folder on your hard drive, and open the Lesson13_Restaurants.fxp file.
- Choose File > Run Project.
The application includes a list of restaurants. You can use the left and right scroll arrows to see more restaurants. This is a Data List component displaying design-time data. A developer can connect this to a data source, thereby extending the list to an unlimited number of restaurants stored in a database. As the restaurant information changes, the list remains current without the need to redesign or republish the application.

- Click any restaurant and choose Reviews.
The application includes another data list with sample design-time customer reviews. The reviews need to be replaced by real reviews.

- Click Post Review.
Nothing happens. This feature requires that users add new reviews, or records, to the database. This can be implemented using Flash Builder.
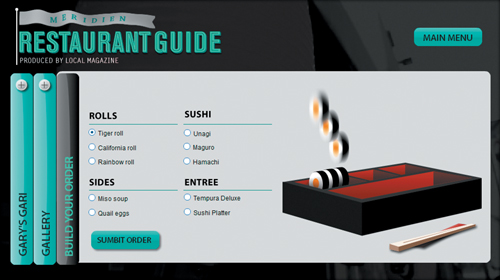
- Click Build Your Order (on the right side of the window).
Users can fill out a form and submit their order. This feature can be implemented using Flash Builder.
- Close the browser and return to Flash Catalyst.
Normally, you would save any last minute changes that you’ve made, but this file is already complete and ready to import into Flash Builder.
- Close the project and exit Flash Catalyst.
Import the FXP into Flash Builder
To bring your design into Flash Builder, you will start Flash Builder and import the FXP file. You’ll have the option to import a file or a project folder. You want to import the FXP file that you created and saved in Flash Catalyst.
You need to have Adobe Flash Builder installed to complete this exercise.
- Start Flash Builder.
- Choose File > Import Flex Project (FXP).
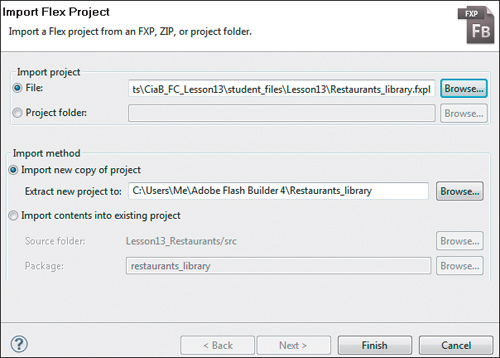
The Import Flex Project dialog box opens. The entire project is stored in a single file, so we’ll leave the File option selected.
Note
When importing an FXP project created with Adobe Flash Catalyst, the imported project can contain references to fonts that are not available on your system. The Import wizard provides the option to fix font references using CSS. If you select this option, Flash Builder imports the Flash Catalyst style sheet Main.css. Main.css contains references to the fonts used in the project.
- Browse to the Lesson13 folder on your hard drive, select the Lesson13_Restaurants.fxp file, and click Open.
The path to the file is added to the dialog box. Flash Builder will create a new project and import the code and assets that Flash Catalyst generated during the interaction design phase of the project.

- Click Finish.
The new Flex project is created.
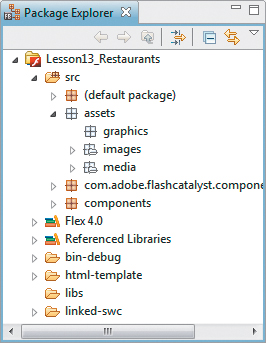
- In the Package Explorer (on the left), expand the project and then expand the src and assets folders.
The project includes any assets (graphics, images, and media) that you added to the project in Flash Builder.
Note
If you import the same FXP or FXPL file again, a new project is added with the same name, followed by the number 2. If you add it again, the name is followed by 3, and so on. To remove these files, you need to delete the project by selecting it in the Package Explorer and choosing Edit > Delete > Yes. You must also delete the project folder at the location you specified when you imported the file.
- Expand the images folder to view the images in the project.
- Collapse the images folder, and expand the media folder to see the media for the project.
- Collapse the media folder, and expand the components folder to see the Flex components that were created in Flash Catalyst.

- Collapse the components and assets folders.
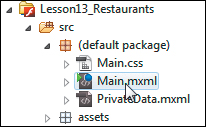
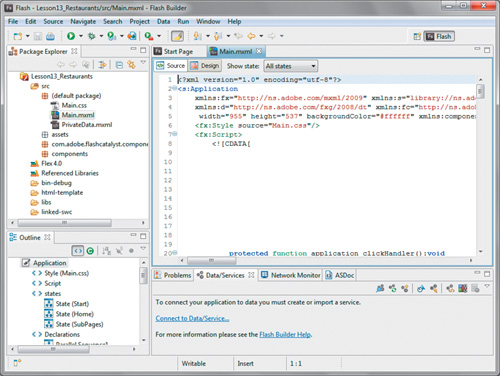
- Expand the default package folder, and double-click the Main.mxml document to open it.
You can see that Flash Catalyst was creating Flex code automatically, which is what makes this integration between applications so easy.
This is the main application file. It defines the layout for each of the states, any transitions between those states, and any interactions that you defined at the application level. This file does not contain the definition for any components that you defined within Flash Catalyst; these can all be found in the components package.
You can now use the Source and Design views in Flash Builder and the Data/Services panel to define calls to remote operations that will fetch data at runtime.
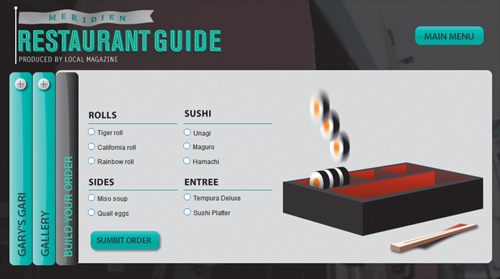
- Choose Run > Run Main.
The Flex application runs in a browser. This should look very familiar because it’s the same application you viewed from within Flash Catalyst. Notice that as you roll over the different restaurants in the list, they all have the same opacity. We’ve created an edited version of the application where the Normal state of the repeated item is slightly transparent, making these items appear brighter when rolling over them or when they’re selected. Next, we’re going to open the edited version of the application in Flash Builder and learn how to incorporate the changes from the edited project.
- Close the browser, and close the Main.mxml document tab.
- Keep the project open in Flash Builder for the next exercise.
Import an edited FXP file into Flash Builder
If you need to modify the artwork or interaction design in your Flash Catalyst project after working with it in Flash Builder, you’ll need to create a new FXP file. Make a copy of the original Flash Catalyst project file and give it a new name. Edit the new file and import the updated FXP into Flash Builder.
For this example, we’ve already created an updated FXP file. Let’s see what happens when you open that file in Flash Builder.
- In Flash Builder, choose File > Import Flex Project (FXP).
The Import Flex Project dialog box opens. The File option is selected, and that’s what you want.
- Browse to the Lesson13 folder on your hard drive, select the Lesson13_Edit.fxp file, and click Open.
The path to the file is added to the dialog box. Flash Builder will create a new project and import the edited version of the code and assets.
- Click Finish.
The new project, Lesson13_Edit, is added to the Package Explorer. With both projects open in Flash Builder, you can compare and update any code that has changed.

- Leave both projects open for the next exercise.
Compare and integrate code between projects
You can use the Flash Builder Compare feature to incorporate the changes from the edited Flash Catalyst project into the original copy of the project in Flash Builder.
- In the Package Explorer, right-click Lesson13_Edit and choose Compare Project With Version > Lesson13_Restaurants.
Flash Builder compares all the files contained within both projects and provides a list of files in which there are differences.
- In the Structure Compare pane of the Compare tab, expand the src folder, expand the components folder, and double-click the RepeatedItem4.mxml document to open it.
The two versions of the RepeatedItem4.mxml document open side by side. The compare tool provides a visual preview of the differences between the original and the new file so that you can determine whether a change should be incorporated into the project. Any differences in the code are highlighted. In this case, the opacity in the Normal state of the repeated item has changed, as shown in Line 30 of the code.
You can use the toolbar to step through the changes and to copy changed code from the left to right window, or from right to left as appropriate.

- Click the Copy All From Left To Right icon.
- Close the Compare tab.
A message asks if you want to save the change you made to the code.
- Click Yes to save the changes.
- In the Package Explorer, double-click to open the Main.mxml file for the Lesson13_Restaurants project.
- Choose Run > Run Main to open the project in a browser.
The edits we made in Flash Catalyst show up in the original Flash Builder project. Now the restaurants in the data list begin slightly dimmed (due to the change in opacity), and when you roll over them, they appear brighter. If you select a restaurant and then return to the Main Menu, the selected item appears brighter than the others.
- Close the browser and return to Flash Builder.
- Close the Main.mxml document tab.

Importing a Flash Catalyst library file (FXPL)
An FXPL contains only the component skins, item renderers, custom components, and supporting assets that you’ve defined in your project and not the main application MXML document. This makes the Flash Catalyst Library Package ideal for sharing a set of reuseable component designs across multiple Flash Catalyst projects and makes it possible to deliver updated sets of component skins in a single package for use in Flash Builder.
Import the FXPL
When you import a Flash Catalyst Library Package (FXPL) into Flash Builder, a Flex Library project is created. This type of project contains code that has been designed for use with one or more Flex applications.
- In Flash Builder, choose File > Import Flex Project (FXP).
The Import Flex Project dialog box opens. The File option is selected, and that’s what you want.
- Browse to the Lesson13 folder on your hard drive, select Restaurants_library.fxpl, and click Open.
The path to the file is added to the dialog box. You have the option of importing the library as a new project or importing the contents of the library directly into an existing project.
- Click Finish to import the library package as a new Library project in Flash Builder.
The Flex Library project, Restaurants_library, is added to the Package Explorer. You can now associate this library with any existing application.

Associate the FXPL with your application
Now that you’ve imported the Flash Catalyst Library Package (FXPL) as a new Flex Library project in Flash Builder, you can associate the library and its assets with one or more Flex projects.
- Select Lesson13_Restaurants in the Package Explorer and choose File > Properties.
- Select Flex Build Path in the left pane.
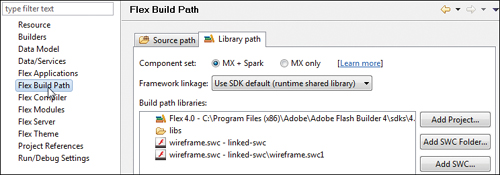
- On the Library Path tab, click Add Project.
The Add Project Library dialog box shows any Flex Library projects you have open.
- Select Restaurants_library and click OK.
The Restauraunts_library is added to the list of build path libraries. When you compile the application, the relevant code from the Library project will be included automatically in your compiled SWF file.
The components package containing all the component skins, as created by Flash Catalyst, is now available for use within your Flex application, and you can associate skins with appropriate components using the skinClass attribute on the component tag or in a CSS document.
Tip
When additional component skins become available or existing skins are updated, you can import a new FXPL file and replace the existing Flex Library project. The new component skins are available within your Flex application. For this approach to work, avoid making changes to the files within the components package in Flash Builder.
Congratulations. You’ve reached the end of this course on Adobe Flash Catalyst CS5. We’ve covered a lot of information, but when you think about the potential for designing rich Internet applications using Flash Catalyst, we’ve really just scratched the surface.
Now it’s time to take what you’ve learned and combine it with a little more practice and some imagination. Before you know it, you’ll be quickly turning your favorite design ideas into fully functioning web and desktop applications. Have fun.
Review questions
1 What are some reasons you would bring your Flash Catalyst project into Flash Builder for further development?
2 What service types can you connect to in Flash Builder?
3 What does CRUD functionality refer to?
4 What are some things that you can do to make your Flash Catalyst file (FXP) easier to work with in Flash Builder?
5 Which file do you open in Flash Builder to run the application?
6 If you need to make changes to the Flash Catalyst document after development has begun in Flash Builder, what should you do?
7 How can you add components that you’ve designed in Flash Catalyst to a project in Flash Builder?
Review answers
1 Although you can use Flash Catalyst to publish fully functional applications, or microsites, many RIAs require additional development, such as binding a component to a data source or web service.
2 BlazeDS, ColdFusion, HTTP, LCDS, PHP, WSDL (Web Service), and XML.
3 Create, Read, Update, and Delete. You can use Flash Catalyst to design a data management control center used to view, edit, add, and delete records in a database. A developer can use Flash Builder to map CRUD functionality to data service calls, and then apply them to the controls you design in Flash Catalyst.
4 Use design-time data in a Data List component. Use descriptive names for pages, states, layers, and assets in the library. Delete assets from the library if they’re not used in the application.
5 Open the Main.mxml file, and choose Run > Run Main.
6 Save a backup copy of the original FXP document. Edit the copy and import the copy into Flash Builder as a new project. Use the Compare feature in Flash Builder to compare changes to the code and update the project.
7 In Flash Catalyst, export the project library. Then, import the library as a new Flex Library project in Flash Builder and associate it with the application by adding it to the application’s list of build path libraries.