
7. Creating Transitions and Action Sequences
We’ve come to expect a lot from our online experience. With the introduction of high-quality streaming video and motion graphics, the boundaries between film, television, and the web are fuzzier than ever. As an application designer, your audience has come to expect similar production quality. We can learn a lot from film and television. Talk to any film or video producer and they’ll tell you that much of what shapes our viewing experience are the subtle things we’re not even aware of—lighting, ambient sound, and of course transitions. Placing smooth animated transitions between the pages and states of your application can change the entire user experience.
In this lesson, you’ll learn how to do the following:
• Preview default transitions
• Add smooth transitions between states
• Fine-tune transition timing and other properties
• Add special effects to transitions
• Add and modify action sequences
• Preserve the fidelity of transitions as you edit the project
This lesson will take about 45 minutes to complete. Copy the Lesson07 folder into the lessons folder that you created on your hard drive for these projects (or create it now), if you haven’t already done so. As you work on this lesson, you won’t be preserving the start files; if you need to restore the start files, copy them from the Adobe Flash Catalyst CS5 Classroom in a Book CD.
![]()

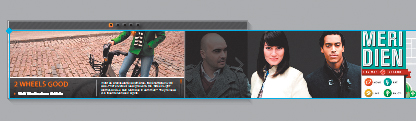
Reproducing film-like transitions in web applications used to be a very time-consuming, specialized task for computer animators. But with the introduction of Flash Catalyst, you can now produce smooth, professional-looking animated transitions with just a few clicks of the mouse.
Transitions and action sequences
Transitions are animations that play once as the user moves from one page or component state to another. Transitions are made up of special effects called actions that define the transition. For example, transitions can include simple fades, as well as animated effects like rotating objects in 3D or resizing images.
Action sequences are interactions that trigger one or more actions. Action sequences can be added to components or groups. Action sequences occur within a single state, so they can play over and over. For example, you may have an object that animates each time a user moves the pointer over it.
The types of actions, or effects, that are available include:
• Play, pause, or stop a video
• Control the playback of a SWF movie
• Set the component state
• Set the properties of an object
• Fade an object
• Add a sound effect
• Move, resize, or rotate an object
• Rotate an object in 3D
You work with transitions and action sequences in the Timelines panel.

Inspecting default transition effects
Anytime the content in one state differs from the content in another state, default transition effects are added to identify those changes. The default transition effects start out with durations of zero seconds, so they’re really more like placeholders. You bring them to life by increasing their duration.
You can view and edit transitions in the Timelines panel. The types of effects (Fade, Move, and so on) in each transition will vary depending on the objects in each state and how each object differs from one state to another.
Let’s start by taking a look at how the default transitions appear when you run the application. Knowing which content exists in each state will help you edit transitions more effectively.
- Start Flash Catalyst, browse to the Lesson07 folder on your hard drive, and open the Lesson07_Banner.fxp file.
The interactive banner application includes five page states, as seen in the Pages/States panel.
- Choose File > Run Project to view the project in a browser.
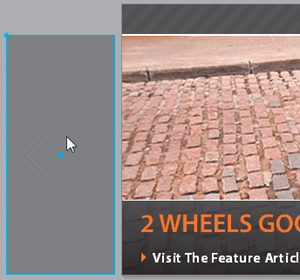
The first page includes background images and a semitransparent panel at the bottom. The panel includes graphics, a button, and scrolling text. This page also includes navigation buttons (at the top) and a side navigation button (on the right).

- Use the top or side navigation buttons to view each page in the application.
Each page includes a different set of images and a similar-looking panel at the bottom. The last two pages include a play/pause toggle button. These pages will include video.
Notice that as you move from one page to the next, the change happens very quickly. What you’re seeing (or not seeing) are the zero-second default transition effects.
- Close the browser and return to Flash Catalyst.
- Select the Image Slider layer in the Layers panel.
The Image Slider custom component is selected in the artboard.
- Use the Zoom Magnification box to change the zoom to 25%.
The Image Slider is a single-state custom component that combines the images for each page. In the Feature page, it’s positioned so that the Feature images are visible in the artboard, but the other images are out of view. In the Properties panel, the Image Slider is positioned at X:0 (left-aligned) and Y:36 (36 pixels from the top).

- Select the Design page in the Pages/States panel.
The Image Slider is positioned differently in the artboard to display the Design images.

- Select each page in the Pages/States panel, and notice which panel layers are visible or hidden. Also pay attention to the position of the Image Slider component in the artboard.
- Choose Edit > Deselect All to deselect the Image Slider.
- Change the artboard view to 66% magnification. If necessary, scroll the workspace so the artboard is visible.
- Open the Timelines panel at the bottom of the Design workspace.
The Timelines panel shows every transition in the application.
- Select Feature > Design in the State Transitions section of the Timelines panel.
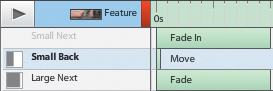
The Feature page is the start state of the transition, and the Design page is the end state. Default transition effects are added for each change that occurs between the start and end states. Default transitions have durations of zero seconds.

The default effects for this transition include five fades and one move:
• The Small Next and Small Back buttons start out hidden in the Feature page and become visible in the Design page.
• The Large Next button is visible in the Feature page, but hidden in the Design page.
• The Design panel fades in as the Feature panel fades out.
• The Image Slider, which is visible in both states, moves to a new position.
- Click the Play Transition button.
The transition is instantaneous, due to the zero-second effect durations.
Adding smooth transitions
Adding smooth transitions is easy. You simply change the duration of the effects from zero seconds to something a little longer, making the transition visible when you run the application.
- Make sure the Feature > Design transition is still selected in the State Transitions section of the Timelines panel.
- Click the small arrow beside the Smooth Transition button.
The Smooth Transition Options dialog box appears. These are the default settings that apply to all selected transitions when you click Smooth Transition. These settings persist after changing them. For this exercise, you are going to set them to the defaults.
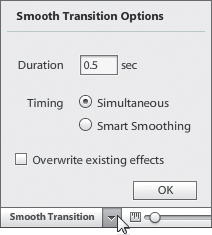
Duration sets the overall time of the transition from start to end.
Simultaneous applies smooth transitions to each effect equally, using the value you set in the Duration field. Each effect begins and ends at the same time.
Smart Smoothing adjusts the duration and delay (start time) of each effect, creating a series of staggered effects. The effects play at different times over the duration you specify. Flash Catalyst uses a logical order for effects, beginning with objects fading out. After objects fade out, all resize and move effects play, followed by objects fading in.
Overwrite Existing Effects applies the new settings to your existing transitions.
- Make sure the duration is set to .5 sec (a half second). Make sure the Simultaneous option is selected, and that Overwrite Existing Effects is not selected. Click OK.
The default transition effects are extended to .5 seconds, creating smooth transitions between the start and end states. A small green dot appears beside the transition to show that it has been modified.

- Click the Play Transition button at the top of the Timelines panel to see the smooth animated transition effects. Play the transition a few times to see the different types of effects.
Fade effects create the appearance of objects fading in or out of view. This is similar to a film dissolve between two scenes. The Image Slider begins in one position and moves to its end position, revealing a new set of images in the Design page.
Note
A Fade In transition begins when an object is hidden or not present in the start state and becomes visible or present in the end state. A Fade Out transition is the opposite. Sometimes Flash Catalyst can’t identify the effect perfectly, so it labels the Effect bar Fade.
You can quickly apply smooth transitions between every page state in the application.
- In the State Transitions section of the Timelines panel, click to select the Feature > Map transition (the second one in the list).
You can see in the Timeline that this transition also includes default zero-second transition effects.
- Hold down the Shift key, scroll to the bottom of the State Transitions list, and click the Future > Restaurants transitions (the last one in the list).
This selects every remaining transition in the application.

- Click Smooth Transitions in the Timelines panel.
Now every transition in the application includes smooth .5-second transition effects.
- Run the project in a browser and use the navigation buttons to view the smooth transitions between page states.
- Close the browser and return to Flash Catalyst.
Fine-tuning transitions
If you’ve applied smooth transitions using the Simultaneous option, your transition effects begin and end at the same time. The effects overlap, and one effect may overpower, hide, or detract from the others. You can fine-tune transitions by controlling when each effect begins and ends. This is done using a combination of duration and start time (delay). These two simple controls give you the power to choreograph complex animations, controlling the pace, flow, and tone of the entire user experience.
Adjust transition duration
Each transition has an overall duration. This is defined by the start of the first effect and the end of the last effect. You can adjust the duration of each individual effect by dragging its resize handle or by changing its duration value in the Properties panel.
- Select Feature > Design in the State Transitions section of the Timelines panel (the first transition in the list).
- Click the green Effect bar of the Move transition effect to select it.
This is the effect that moves the Image Slider to its new position in the Design page.

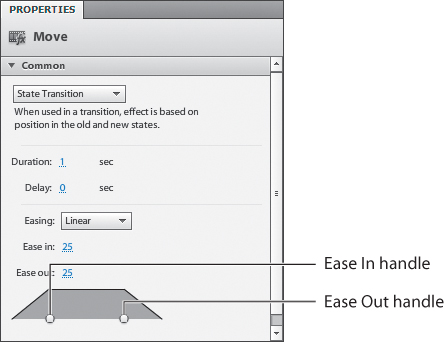
When a transition effect is selected, its Effect bar turns blue and its properties appear in the Properties panel. These include the duration of the transition, delay (when the transition begins), and easing. You’ll learn about easing transitions in a moment.

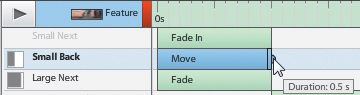
- Drag the Move Effect bar resize handle to the left to shorten the duration of the transition. Drag the handle to the right to lengthen the transition.
As you drag, a tool tip shows the new duration of the effect.

- In the Properties panel, set the Duration value to 1 second.
- Run the project and view the transition between pages 1 and 2.
The Image Slider takes longer to move between pages—1 second to be exact. Compare this to the timing of other transitions as you move from page to page.
- Close the browser and return to Flash Catalyst.
- Make sure the Move Effect bar is still selected (blue) in the Timeline.
- Click the Delete icon (
 ) at the bottom of the Timelines panel.
The duration returns to zero seconds. You can’t remove a default transition effect from the Timeline, but by changing its duration back to zero it becomes virtually non-existent.
- Choose Edit > Undo to restore the 1-second duration of the Move effect.
Change transition timing
Transition timing refers to its start and end times. You can control the start time of an effect by dragging its Effect bar in the Timeline or by changing its Delay value in the Properties panel.
- Drag the Effect bar (not the handle) of the Design Panel Fade In effect to the right.
As you drag the Effect bar, a tool tip shows the start and end times of the effect. This Start time is equal to the Delay value.

- In the Properties panel, set the Delay value to .5 seconds.
Now the Design panel will fade in when the Image Slider is halfway completed with its move.

Delaying the transition effect can make it difficult to see in the Timeline. You can fix this by adjusting the viewing scale in the Timeline.
- If necessary, drag the slider at the bottom of the Timelines panel to the left to compress the Timeline scale until you can see all the effects.

- Run the project and view the transition between pages 1 and 2.
Tip
You can repeat a fade effect to emphasize or draw attention to an object. To do this, select the Fade Effect bar in the Timeline, select Repeat in the Properties panel, and set the number of times you want the effect to repeat itself.
The Image Slider moves into place as the Feature panel fades out and the Design panel fades in.
- Close the browser and return to Flash Catalyst.
Ease transitions
When you apply easing to effects, you are changing how those effects behave over time. The default behavior is a constant rate of change or velocity of motion between the start and end of the effect. The object begins moving at full speed and maintains that speed until it stops abruptly at the end of the transition. This is unrealistic. In real life, an object needs some time to get up to speed and then slows down before coming to a stop. If an object stops suddenly, it may bounce back before settling into its final position.
You can achieve more realistic-looking movements by applying easing to your effects. Easing consists of two phases: the acceleration, or ease in phase, followed by the deceleration, or ease out phase.
Easing is added in the Properties panel, and there are several easing options:
• Default applies a constant rate of change from start to finish.
• Linear starts out slow, quickly easing into the effect. It then maintains a constant rate until just before the end of the effect when the rate slows down, easing out of the effect.
• Sine eases in, accelerates to a midpoint, and then immediately begins decelerating, or easing out.
• Power is similar to Sine because it eases in to a point and then begins easing out. But with the Power option, you can also set the Exponent property. A higher exponent value creates greater acceleration and deceleration.
• Elastic causes a moving object to snap back and jiggle once it reaches its destination.
• Bounce causes the moving object to reach its destination and then bounce backward before settling into its final position.
Let’s apply easing:
- Click to select the Move Effect bar for the Image Slider in the Timeline.
- In the Properties panel, open the Easing pop-up menu and choose Linear.

The Linear easing properties are added in the Properties panel. You can change the amount of easing (in or out) by entering new values or by dragging the handles below the diagram.
- Click the Play Transition button.
The Image Slider accelerates, moves along at a constant speed, and then decelerates to its final stopped position.
- Apply the Bounce easing property to the Image Slider Move effect, and then click the Play Transition button to see how this looks.
Adding and changing effects
As you’ve seen, default effects are added to each state transition based on the presence, visibility, or properties of objects in the start and end states. If you make changes to the objects in the start or end states, the default transitions update automatically.
You cannot remove the default transition effects, but in some cases you can add more than one effect to the same object. For example, if an object fades or moves, you can add an additional effect that causes the object to rotate.
Swap one effect for another
To swap one effect for another, you need to change the presence, visibility, or properties of the object in either the start or end state of the transition. For example, to change a fade to a move, you make the object visible in both states (removing the fade), and then place the object in different start and end positions (adding the move).
To see how this works, let’s change the Small Back button transition from a Fade In to a Move effect so that it slides into view from the left of the artboard.
- Make sure the Feature page is selected in the Pages/States panel and the Feature > Design transition is still selected in the State Transitions section of the Timelines panel.
The Back/Next Btns layer is locked. When an object is locked in the Layers panel, it is also locked in the Timeline. To change or apply new effects to an object, you need to unlock it.

- In the Layers panel, unlock and expand the Back/Next Btns layer.
The Small Back button is hidden in the Feature page and visible in the Design page, creating the Fade In effect.

- In the Layers panel, show the Small Back button in the Feature page.
The Small Back button now appears in both the start and end states, so the Fade In transition disappears from the Timeline.

- In the Layers panel, click Small Back to select the navigation button in the artboard.
The Small Back button (semitransparent rectangle) is selected in the artboard. You know it’s selected because it’s surrounded by a blue outline and has a small blue square in the center.

- Hold down the Shift key, and drag the Small Back button to the left until it’s off the artboard.
Holding down the Shift key as you drag left or right prevents the object from moving up or down. As soon as you drag the object to a new position in the start (or end) state of the transition, a new Move effect is added to the transition automatically. The new transition has a duration of zero seconds.
- In the Timeline, click the new Move effect to select it. Then drag its resize handle or use the Properties panel to change its duration to .5 seconds.
- Run the project to view the effect in a browser.
The Small Back navigation button (on the left) slides into view as you move to the Design page.
- Close the browser and return to Flash Catalyst.
Add multiple effects to the same object
You may want to apply more than one change to an object during the same transition. There are two ways to do this. You can make additional changes to the object in the start or end state of the transition, or add new effects from the Add Actions menu in the Timelines panel.
- In the Layers panel, hide the Small Back row in the Feature page state.

A Fade In effect is added to the Small Back button in the transition. This object now has two effects applied to it: a fade and a move.
This will look better without the fade, so let’s go ahead and remove it.
- Select the Fade In Effect bar for the Small Back object (the one you just added).
- Click the Delete icon () at the bottom of the Timelines panel.
The Fade In Effect bar is still there. To remove this effect, you need to make its visibility identical in both states.
- In the Layers panel, show the Small Back row in the Feature page state.
The effect is removed from the transition in the Timeline. The Small Back button will move but not fade.
You can also add effects from the Add Action menu at the bottom of the Timelines panel.
- Select the Restaurants page in the Pages/States panel.
This page includes a pause/play toggle button. The same button appears in the Future page, but in a different position.

- In the State Transitions section of the Timelines panel, select the Restaurants > Future transition.
In this transition, the Toggle Button object starts in one position in the Restaurants page and moves to a new position in the Future page.
- Unlock the Toggle Button object in the Layers panel.
- In the Timelines panel, click the Toggle Button transition to select it.

The Add Action button at the bottom of the Timelines panel becomes active.
- Click Add Action to open the pop-up menu, and choose Rotate 3D.

A Rotate 3D Effect bar is added to the Timeline and its properties appear in the Properties panel. You can adjust the duration and timing of this effect, just like other transitions. You can choose to rotate the object in three dimensions. The default setting is to rotate the object 360 degrees (one rotation) around a vertical axis.

- Click the Play Transition button in the Timeline to preview the new transition effects.
Now the toggle button rotates as it slides into its new position in the Future page. Sometimes the best way to get the exact effect you want is to experiment with different settings in the Properties panel.
- Experiment by changing the properties for the Rotate 3D effect in the Properties panel. After setting a new property, click the Play Transition button to see the effect of each change.
- Run the project and view the new effects in a browser.
The toggle button moves and rotates in 3D when you go from the Restaurants page to the Future page.
- Close the browser and return to Flash Catalyst.
Adding action sequences
Whereas a transition is used to define one or more effects that occur as the application transitions from one state to another, an action sequence is used to apply one or more effects to an object in a single state. For example, you can use an action sequence to move an option around the artboard and cause it to rotate, change color, and fade, all while in the same state.
An action sequence is a type of interaction, so it can be triggered by a user event, such as clicking a button, or it can be triggered automatically when the application starts. Because an action sequence occurs within a single state, it can play over and over. For example, an object can animate each time a user moves the pointer over it.
Add an action sequence interaction
Action sequences can be added to components or grouped objects in the Interactions panel.
- Select the Future page in the Pages/States panel.
- Select the orange play/pause toggle button in the artboard.
- In the Interactions panel, click Add Interaction.
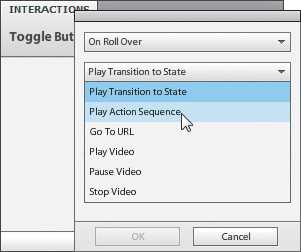
- Click On Click to open the pop-up menu, and choose On Roll Over.
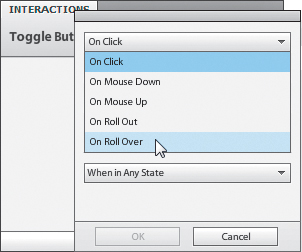
- Click Play Transition To State to open the pop-up menu, and choose Play Action Sequence.
Note
To add an action sequence to a component or group within another component, double-click the parent component to edit it in Edit-In-Place mode.
- Click OK.
An empty action sequence is added to the Timeline. You can now add one or more effects from the Add Actions menu.
Edit an action sequence in the Timeline
After adding an empty action sequence interaction, you can edit it in the Timelines panel by adding one or more effects.
- Select the Toggle Button On Roll Over action sequence in the Timelines panel.

- Click Add Action to open the pop-up menu, and choose Rotate 3D.
The Rotate 3D effect is added to the Timeline for the action sequence.

- Run the project to preview the action sequence in a browser. Navigate to the Restaurants (page 4) or Future (page 5) pages and roll over the play/pause toggle button to see the button rotate. The effect can play repeatedly because the effect occurs in one state at a time. The effect plays in any state where the Toggle Button object is visible.
Tip
You can add additional effects to the same action sequence by selecting the action sequence in the Timelines panel and then adding effects from the Add Action menu.
Flash Catalyst helper effects
In some cases, making changes to objects that are currently part of a transition can negatively affect the appearance of the transition. Flash Catalyst adds additional “helper” effects to adjust for your changes and correct the transition automatically. The added effects appear as yellow Effect bars and a message appears in the Heads-Up Display (HUD) to let you know that Flash Catalyst has added the extra effects to preserve the fidelity of your transitions.
Here’s an example of what you will see in the HUD:
"This group has children with different properties in other states. Extra effects were added to your timelines to make them play correctly."
Some examples of edits that may require helper effects include:
• Grouping objects after they’ve been used in a move transition effect.
• Moving a group (or its children on one side of a transition).
Follow these rules to preserve the fidelity of transitions with helper effects:
• If you change the Delay value of a transition, change the Delay value for the yellow Effect bar to match. The original Effect bar and the yellow Effect bar must stay in sync.
• Do not manually change the duration of a yellow Effect bar. Flash Catalyst will adjust the yellow Effect bar duration if necessary.

Review questions
1 What causes Flash Catalyst to add a default transition effect to the application?
2 How do you change the default settings for smooth transitions?
3 What does the Simultaneous smooth transition option do?
4 How do you change the duration of a transition effect?
5 What effect property lets you control the acceleration and deceleration of an object as it moves from start to finish during a transition?
6 How do you add multiple effects to the same object in a transition?
7 What is the difference between a transition and an action sequence?
Review answers
1 When an object in one state is not present or visible or has different properties (position, opacity, and so on) in another state, a transition effect is added between the two states.
2 You change the default settings for smooth transitions by clicking the arrow beside the Smooth Transition button in the Timelines panel. This opens the Smooth Transition Options dialog box.
3 The Simultaneous smooth transition option applies smooth transitions to each effect equally, using the value you set in the Duration field. Each effect begins and ends at the same time.
4 You can change the duration of a transition effect by dragging the Effect bar resize handle, or by changing the Duration value in the Properties panel.
5 You can achieve more realistic-looking movements by applying easing to your effects. Easing consists of two phases: the acceleration, or ease in phase, followed by the deceleration, or ease out phase. When you apply easing to effects, you are changing how those effects behave over time.
6 To add additional effects to an object in a transition, you can make additional changes to the object in the start or end state of the transition, or add new effects from the Add Actions menu in the Timelines panel.
7 Transitions are effects that play between two states. An action sequence is an interaction that plays within a single state. You can add an interaction to components or grouped objects to trigger one or more effects. Action Sequence interactions can be played over and over because they exist within the same state.