Chapter 10. Performing Color Correction
Lesson overview
In this lesson, you’ll learn how to do the following:
• Use the Levels effect to correct the color in a shot.
• Replace the sky with a different image.
• Use the Auto Levels effect to introduce a color shift.
• Correct a range of colors using Synthetic Aperture Color Finesse 3.
• Apply the Photo Filter effect to warm portions of an image.
• Remove unwanted elements with the Clone Stamp tool.
This lesson will take approximately an hour to complete. Copy the Lesson10 folder into the Lessons folder that you created on your hard drive for these projects (or create it now), if you haven’t already done so. As you work on this lesson, you’ll preserve the start files. If you need to restore the start files, copy them from the Adobe After Effects CS5 Classroom in a Book DVD.
![]()

Most shots require some degree of color correction. With Adobe After Effects, you can transform a dull, lifeless shot into a bright, sharp clip in no time.
Getting started
As the name implies, color correction is a way of altering or adapting the color of the captured image. Color correction is performed to optimize source material, to focus attention on a key element in a shot, to correct errors in white balance and exposure, to ensure color consistency from one shot to another, or to create a color palette for a specific visual look desired by a director. In this lesson, you will improve the color of a video clip that was shot without the proper white balance setting. You’ll apply a variety of color-correction effects to clean up and enhance the image. Finally, you will remove an unwanted portion of the shot with the Clone Stamp tool.
First, you’ll preview the final movie and set up your project.
- Make sure the following files are in the AECS5_CIB/Lessons/Lesson10 folder on your hard disk, or copy them from the Adobe After Effects CS5 Classroom in a Book DVD now:
• In the Assets folder: Albertson_Hall.mov, storm_clouds.jpg
• In the Sample_Movie folder: Lesson10.mov
- Open and play the Lesson10.mov file to see what you will create in this lesson. When you’re done, quit QuickTime Player. You may delete the sample movie from your hard disk if you have limited storage space.
When you begin this lesson, restore the default application settings for After Effects. See “Restoring default preferences” on page 3.
- Press Ctrl+Alt+Shift (Windows) or Command+Option+Shift (Mac OS) while starting After Effects. When asked whether you want to delete your preferences file, click OK. Click Close to close the Welcome screen.
After Effects opens to display an empty, untitled project.
- Choose File > Save As.
- In the Save As dialog box, navigate to the AECS5_CIB/Lessons/Lesson10/Finished_Project folder.
- Name the project Lesson10_Finished.aep, and then click Save.
Importing the footage
You need to import two footage items for this lesson.
- Choose File > Import > File.
- Navigate to the AECS5_CIB/Lessons/Lesson10/Assets folder, Shift-click to select the Albertson_Hall.mov and storm_clouds.jpg files, and then click Open.
- Choose File > New > New Folder to create a new folder in the Project panel, or click the Create A New Folder button (
 ) at the bottom of the panel.
 - Type Movies to name the folder, press Enter or Return to accept the name, and then drag the Albertson_Hall.mov item into the Movies folder.
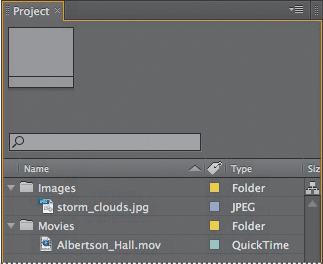
- Create another new folder, and name it Images. Then drag the storm_clouds.jpg item into the Images folder.
- Expand the folders so that you can see their contents.
Creating the composition
Now, you will create a new composition based on the Albertson_Hall.mov file.
- Drag the Albertson_Hall.mov item onto the Create A New Composition button (
 ) at the bottom of the Project panel. After Effects creates a new composition named for the source file and displays it in the Composition and Timeline panels.
 - (Optional) Choose Composition > Composition Settings to check the composition’s aspect ratio and duration. This is an NTSC DV composition that is approximately 5 seconds long. Click Cancel to close the Composition Settings dialog box.
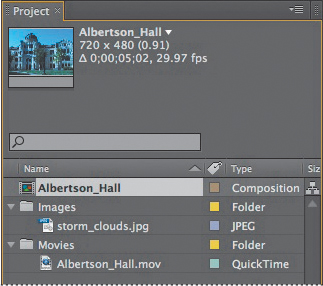
- Drag the Albertson_Hall composition to an empty area of the Project panel to move it out of the Movies folder.
- Drag the current-time indicator across the time ruler to preview the shot. There is an unappealing blue cast to the entire image. You’ll correct that first.
- Choose File > Save to save your work.
Adjusting color balance
After Effects provides several tools for color correction. Some may do the job with a single click, but understanding how to adjust colors manually gives you the greatest freedom to achieve the look you want. You’ll use the Levels effect to darken the shadows, remove the blue cast, and make the image pop a little more.
- Press the Home key, or move the current-time indicator to the beginning of the time ruler.
- Select the Albertson_Hall.mov layer in the Timeline panel.

- Press Enter or Return, rename the layer Building, and then press Enter or Return to accept the new name.
- With the Building layer selected, choose Effect > Color Correction > Levels (Individual Controls).
The Levels (Individual Controls) effect may be a little intimidating at first, but it can give you great control over your shot. It remaps the range of input color or alpha channel levels onto a new range of output levels, functioning much the same as the Levels adjustment in Adobe Photoshop.
The Channel menu specifies the channel to be modified, and the histogram shows the number of pixels with each luminance value in the image. When the selected channel is RGB, you can adjust the overall brightness and contrast of the image. That’s a good place to start.
- In the Effect Controls panel, make sure RGB is selected in the Channel menu. Then click the triangle next to RGB to expand its properties.
- Enter 2 for the Input Black value, slightly darkening the shadows. The Input Black slider under the histogram moves accordingly.
- Enter 0.85 for the Gamma value, increasing the contrast so that it pops a little more. The Gamma value represents the midtones.

To correct the blue cast, you must first determine what areas are supposed to be gray (or white or black) in the image. In this shot, the building is supposed to be a neutral color.
- Move the cursor over the concrete areas of the building, and note the RGB values in the Info panel. The values change as you move the cursor.

In a region near the door, the RGB value is R=70, G=95, B=125. To determine what the values should be, divide 255 (the highest possible RGB value) by the highest of the values in the sample. That gives you 255 divided by 125 (the blue value near the door), or 2.04. To equalize the colors so that blue is no longer prominent, you need to multiply 2.04 by the original red and green values (70 and 95, respectively). The new values are 142.8 for red and 193.8 for green.
- In the Effect Controls panel, expand the Red and Green properties.
- For the Red Input White value, enter 142.8; for the Green Input White value, enter 193.8.

The blue cast is gone, revealing a much more realistic scene.
For each channel, the Input settings increase the value, while the Output settings decrease the value. For example, lowering the Red Input White value adds red to the highlights in the shot, and increasing the Red Output White value adds red to the shadows or dark areas in the shot.
Performing the math lets you zero in on the appropriate settings quickly. If you prefer, you could experiment with the settings to find the best values for your purpose.
- Hide the Levels properties in the Effect Controls panel.
Replacing the background
This shot was taken on a clear day with a cloudless sky. To add a little drama, you’ll key out the sky and replace it with storm clouds.
Keying out an area with the Color Range effect
The Color Range effect keys out a specified range of colors. This key effect is especially useful where the color to be keyed is unevenly lit. The current sky ranges in color from light blue to dark blue—a perfect candidate for the Color Range effect.
- Press the Home key, or move the current-time indicator to the beginning of the time ruler.
- With the Building layer selected in the Timeline panel, choose Effect > Keying > Color Range.
Changing the background color of the composition can help you spot any keying errors.
- Choose Composition > Composition Settings. Click the Background Color box, and select red (R=255, G=0, B=0). Click OK to close each dialog box.

- In the Effect Controls panel, choose RGB from the Color Space menu.
- Select the Key Color eyedropper, next to the Preview window in the Effect Controls panel. Then, in the Composition panel, click a midtone blue color in the sky to sample it. The keyed-out area appears red in the Composition panel, and black in the Preview window in the Effect Controls panel.

- Select the Add To Key Color eyedropper in the Effect Controls panel, and then click another area of the sky in the Composition panel.
- Repeat step 6 until the entire sky has been keyed out.

Even with the sky keyed out, a slight fringe of color remains around the building. You can remove that fringe by choking the matte.
- Hide the Color Range properties in the Effect Controls panel.
- Choose Effect > Matte > Matte Choker.
- In the Effect Controls panel, lower the Geometric Softness 1 value to 2 and increase the Geometric Softness 2 value to 2.5.

- Hide the Matte Choker properties in the Effect Controls panel, and save your work so far.
Adding a new background
With the original sky keyed out, you’re ready to add the clouds to the scene.
- Click the Project tab to display the Project panel. Then drag the storm_clouds.jpg item from the Project panel to the Timeline panel, placing it below the Building layer.
- Select the storm_clouds.jpg layer, press Enter or Return, rename the layer Clouds, and press Enter or Return again.

- Click the Video switch (
 ) for the Building layer to hide it. Now you can fully see the storm clouds layer. You need to scale and reposition the clouds to fit the sky area of the image.
 - With the Clouds layer selected in the Timeline panel, press the S key to display its Scale property.
- Decrease the Scale values to 60, 60%.

- Make sure the Clouds layer is selected in the Timeline panel, and press P to display its Position property.
- Change the Position values to 360, 145.

- Press P to hide the Position property.
Color-correcting the clouds
Although the storm clouds are dramatic, the contrast of the image and the color cast don’t really match the building. You’ll use the Auto Levels effect to correct that.
The Auto Levels effect automatically sets highlights and shadows by defining the lightest and darkest pixels in each color channel as white and black, and then redistributing intermediate pixel values proportionately. Because Auto Levels adjusts each color channel individually, it may remove or introduce a color cast. In this case, with the default settings applied, Auto Levels introduces a blue color cast that makes the clouds more intense.
- With the Clouds layer selected in the Timeline panel, choose Effect > Color Correction > Auto Levels.

- Turn on the Video switch (
 ) for the Building layer so you can see the building with the clouds.
 - Choose File > Save to save your work.
Removing unwanted elements
The color is looking great, but you’re not quite done. The director wants you to remove the lamppost that appears directly in front of the doors to the building, as she believes it’s distracting. You’ll use the Clone Stamp tool to paint out this unwanted element of the scene. Cloning in After Effects is similar to cloning in Photoshop, but you can clone across the entire timeline, rather than in a single image.
Because the lamppost doesn’t move, you can touch up a single frame and apply it to the entire movie.
- Press the Home key, or move the current-time indicator to the beginning of the time ruler.
- Double-click the Building layer in the Timeline panel to open it in the Layer panel. You can paint only on individual layers—not the composition as a whole.
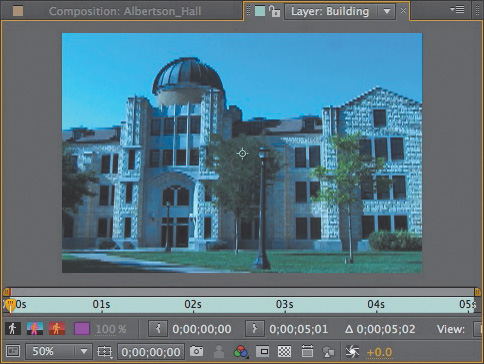
- Zoom in to see the area around the doors clearly.
- Select the Clone Stamp tool (
 ) in the Tools panel.
The Clone Stamp tool samples the pixels on a source layer and applies the sampled pixels to a target layer; the target layer can be the same layer or a different layer in the same composition.
When you select the Clone Stamp tool, After Effects opens the Brushes and Paint panels.
- In the Brushes panel, select a hard, 5-pixel brush.
- In the Paint panel, choose Constant from the Duration menu. The Constant setting applies the Clone Stamp effect from the current time forward. Because you’re starting at the beginning of the composition, the changes you make will affect every frame in the composition.

- In the Layer panel, position the cursor to the right of the top of the lamp post. Alt-click (Windows) or Option-click (Mac OS) to designate a source point for cloning.
- Click on the lamppost to clone an area, and then continue clicking to remove the entire lamppost.
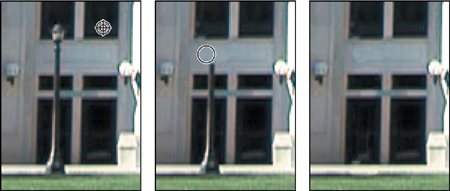
- When the lamppost is gone, select the Selection tool, and then close the Layer panel, returning to the Composition panel.
Correcting a range of colors
You’ve corrected the overall color for the scene, but you can also enhance a specific area as a secondary color correction. In this shot, the color correction caused the grass in front of the building to look like a mature bluegrass instead of a welcoming green lawn. To shift the grass to green, you will use the Synthetic Aperture Color Finesse 3 effect, a third-party plug-in that installs with After Effects and offers the capability to isolate a color range and adjust only those colors.
Note
Synthetic Aperture Color Finesse 3 is a powerful color-correction plug-in. Once you’re familiar with it, you can use it to perform a wide variety of color corrections.
Color Finesse 3 applies its effect to the original layer, ignoring any effects. Because you’ve already performed some color correction, you’ll precompose the layer to include the results of the effects you’ve already applied.
- Select the Building layer in the Timeline panel, and then press Ctrl+D (Windows) or Command+D (Mac OS) to duplicate the layer.
- With the duplicate layer (Building 2) selected, choose Layer > Pre-compose.

- In the Pre-compose dialog box, name the new composition Grass Enhance, select Move All Attributes Into The New Composition, and click OK.
You’ve created the precomposed layer, so you’ll retain the color-correction effects you’ve applied. However, to avoid any issues with the cloning you performed to remove the lamppost, you’ll mask the grass area. The mask will ensure that only the grass is affected.
- With the Grass Enhance layer selected in the Timeline panel, select the Pen tool (
 ) in the Tools panel. Click around the grass area to create a mask.
 - With the Grass Enhance layer still selected in the Timeline panel, press the F key to display the Mask Feather property, and change the amount to 2, 2 pixels. Feathering blends the layers more naturally.

- Press the F key again to hide the Mask Feather property.
Now you’re ready to use Color Finesse 3.
- With the Grass Enhance layer selected, choose Effect > Synthetic Aperture > SA Color Finesse 3.
- In the SA Color Finesse 3 area of the Effect Controls panel, click Full Interface.
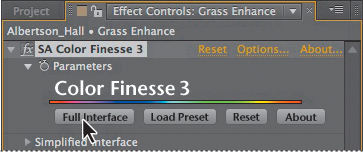
SA Color Finesse 3 opens in its own window.
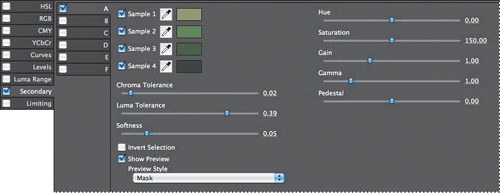
- Check the box in the Secondary tab to activate secondary color correction, and then click the Secondary tab itself to open its color-correction controls.
SA Color Finesse 3 enables you to perform up to six different secondary color-correction operations. You’ll need only one for this project, however.
- Check the box on the A tab, where you’ll perform the color correction.
- Using the four Sample eyedroppers, click to collect four color samples in the grass area. Try to sample various shades of green from light to dark; zoom in if necessary to help you select a range of hues.
Four samples don’t encompass the entire contrast range of the grass, but SA Color Finesse 3 has controls to refine the color selection.
- Still on the A tab, choose Mask from the Preview Style menu, and then select Show Preview. Now you can see the areas that are selected and those that are masked (shaded in red).
- Adjust the Chroma Tolerance, Luma Tolerance, and Softness sliders until all of the grass is selected. It’s okay if trees or shrubs are selected; the mask you applied earlier ensures that those adjustments will not appear in the final composition.
- Increase the Saturation amount to 150.

- Deselect Show Preview, and then click OK to apply the correction and to close the SA Color Finesse 3 window.
- Choose File > Save to save your work.
Warming colors with the Photo Filter effect
Finally, you’ll use the Photo Filter effect to warm up the entire shot and make it more inviting.
The Photo Filter effect mimics the technique of using a colored filter on a camera lens to adjust the color balance and color temperature of the light transmitted through the lens. You can choose a color preset to apply a hue adjustment to an image, or you can specify a custom color using the Color Picker or the eyedropper.
To apply the warming filter to all the elements in the shot, you’ll apply the Photo Filter effect to an adjustment layer.
- Click an empty area in the Timeline panel to deselect all layers.
- Choose Layer > New > Adjustment Layer. The new adjustment layer should be the top layer in the layer stack.
- With the Adjustment layer selected in the Timeline panel, choose Effect > Color Correction > Photo Filter.
- In the Effect Controls panel, choose Warming Filter (81) from the Filter menu.

- Choose File > Save.
If you’d like to output the composition, see Lesson 14, “Rendering and Outputting,” for details.
Congratulations. You’ve transformed the color of this composition and removed a distracting element.
Review questions
1 Why would you need to color-correct a shot?
2 What does the SA Color Finesse 3 effect do?
3 What effect can you use to warm up the colors in an image?
4 How can you clone an area across an entire timeline?
Review answers
1 Color correction is performed to optimize the source material, to focus attention on a key element in the shot, to correct errors in white balance and exposure, to ensure color consistency from one shot to another, or to create a color palette to match the visual look the director prefers.
2 SA Color Finesse 3 is a third-party plug-in installed with After Effects CS5. It performs a wide variety of color-correction effects, such as isolating a color range for enhancement. SA Color Finesse 3 affects the original layer, ignoring any effects that have already been applied to the layer.
3 You can use the Photo Filter color-correction effect to warm up the color of an image. The Photo Filter effect mimics the technique of using a colored filter over the lens of a camera to adjust the color balance and color temperature. Choose the Warming Filter in the Photo Filter Effect Controls panel to warm up the color of an image.
4 To ensure that cloning occurs across the entire timeline, move the current-time indicator to the beginning of the time ruler, and then choose Constant from the Duration menu in the Paint panel.

