
Manual port mapping, also called port forwarding, requires that you enter a fair amount of seemingly arcane information to get a computer on your local network receptive to incoming traffic from the greater Internet via your router. With respect to screen sharing, you use port mapping in two cases:
For any screen-sharing service, including Back to My Mac and screen sharing over iChat, if your router doesn't support automatic port mapping (as noted in Which Kind of Configuration?, earlier in this section).
For screen sharing with a direct connection.
Because all of Apple's services have fixed ports for remote access, if you use manual port mapping, you can run a given service on only one computer at a time on your network. However, if you use non-Apple VNC software, you can control the port for access for each computer, and conceivably allow screen sharing over VNC to every computer on your local network. I explain how this works in the sidebar The VNC Solution for Port Mapping, next page.
I first talk about using 2Wire DSL modems supplied by DSL companies (next page), and then I offer some Generic Advice on Configuring Port Mapping (a few pages ahead).
Many telephone companies—notably Qwest—choose to offer their DSL customers routers from 2Wire, some with integrated Wi-Fi and some that are Ethernet-only. While the routers are pretty advanced and have remarkably easy-to-understand configuration screens, 2Wire modems lack UPnP. A 2Wire spokesperson explained that their telecom clients consider UPnP to be too risky, and they offer alternatives.
Warning
For Windows systems, this may be true: malware can use UPnP to open up incoming access that makes it even easier for a compromised system to be used maliciously. There's no known exploit for Mac OS X that carries that same risk.
Follow these steps to configure the 2Wire router to do port mapping:
Connect directly to the 2Wire router via Wi-Fi (choose the router's network from the AirPort menu) or Ethernet (plug directly into the 2Wire router).
Note
Wi-Fi router connected to 2Wire requires extra step: If you're using your own Wi-Fi router connected to a 2Wire gateway (instead of a 2Wire gateway with built-in wireless), and you aren't set up so that the 2Wire's network-addressing-over-DHCP passes through the Wi-Fi router (bridging), you must connect your computer directly to the 2Wire gateway in order to configure it. After configuring the 2Wire gateway, you can reconnect your computer to your own Wi-Fi network.
In a browser window, enter
http://gateway.2wire.net?Warning
With my 2Wire router, if I enter the address without anything following it, the router consistently crashes. Adding a question mark (?) or pound sign (#) at the end seems to prevent this problem, which my ISP, Qwest, was unable to resolve for me.
The 2Wire router should intercept the address and connect your browser to the router's internal Web server.
If the domain name doesn't work, look up the router's local address: open System Preferences, click Network, and select the currently connected network interface in the list to the left:
Ethernet: Note the Router address (probably
192.168.0.1).AirPort: Click Advanced, click TCP/IP, and note the Router address.
Now try again: In your browser's Location field Enter
http://followed by the router address.If no password has been set on the router, now is a good time to set one. Click the System icon and then the System Password link beneath it.
Click the Firewall icon at the top of the screen (Figure B-3). Enter a password if you're asked for it at this point.
Click the Firewall Settings link to bring up the Edit Firewall Settings page.
From the Select a Computer menu (which is labeled with a big blue circle containing a 1) choose your computer. The names that appear (Figure B-4) should resemble the Bonjour name (Computer Name) set for your computer in the Sharing pane of System Preferences.
Under the item labeled with a white 2 in a blue circle, select Allow Individual Applications.
Each remote service you want to enable on a computer must be set up separately by following these steps; the sidebar, below, explains which ports you need to enter:
Click Add a New User Defined Application(s).
For Application Name, enter a name for the settings for that service; for example,
Back to My Mac(Figure B-5).Select TCP or UDP, as noted in the Ports sidebar, and enter the port number specified in the Port From field; the To field, used for a range of ports (from x to y) should be left blank. Leave all other fields blank as well.
Click Add Definition.
If there are multiple ports noted in the Ports sidebar, as there are with Back to My Mac and iChat, repeat Steps c and d for each port.
When you're done, click the Back button.
On the Edit Firewall Settings page:
Select, from the list at the left, the "application" you previously defined.
Click the Add Definition button in the middle.
The page reloads to show the filters in the Hosted Applications list (Figure B-6).
Repeat Steps a and b for each service that you want to assign to a computer.
Click Done.
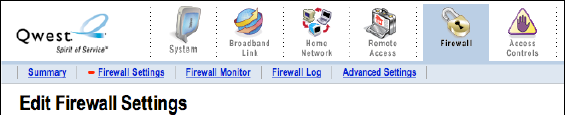

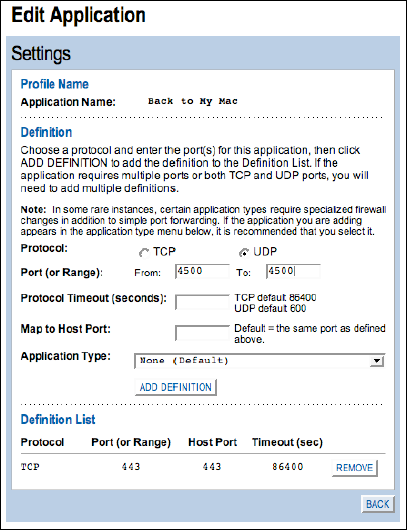
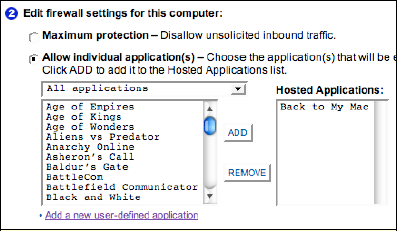
Figure B-6. Adding specific firewall exceptions is as simple as Command-clicking one or more items in the list at left, and clicking Add to put them in the list at right.
You can repeat Steps 6 through 10, omitting Step 8 if you've already defined the ports you want to map, for each computer on the network. Each service can assigned to just one computer.
With your 2Wire router configured, you can proceed to the section on screen sharing you left off at.
With any router other than the ones I've covered earlier in this section, you need to look for a place in the configuration software that lets you map a port on the router to a port on a local (private) computer. I also provide details here for configuring modern Apple Wi-Fi gateways, although they are the least likely routers you'll need to tweak by hand.
The only way for port mapping to work is if the computer you're trying to expose has a fixed private address. You can set a fixed private address in one of two ways: manually or using DHCP reservation.
Manually set a fixed address
Most routers have a DHCP configuration setting that lets you choose the range of local IP addresses that the router can assign, leaving others available for fixed, manual assignment. For instance, if you have a router that assigns 200 addresses starting at 192.168.0.2, you could assign your own addresses at 192.168.0.203 and higher.
You can use the Mac OS X's Network preference pane to your advantage to set a manual fixed address while still benefiting from DHCP's automated distribution of the router and DNS server settings:
Open System Preferences and click the Network preference pane.
Choose your network interface—the one your Mac uses to connect to the Internet—in the list at left.
Click Advanced, then click the TCP/IP button.
From the Configure IPv4 pop-up menu, choose Using DHCP with Manual Address.
Enter your manually-assigned IP address in the IPv4 Address field; for example,
192.168.0.203.Click OK, then click Apply.
To continue configuring your setup, skip to Map Ports with Any Router, next page.
Use DHCP reservation to set a fixed address
Some routers allow you to use DHCP reservation, which works much like standard DHCP except that you can designate a particular computer to always be assigned the same IP address; the router uses the network interface's unique identifier—its MAC, or Media Access Control, ID—or another parameter to keep track of particular computers. This setup allows you to ensure that the computer you want to access via Back to My Mac always has the same local address.
Check your router to see whether its configuration allows the use of either or both a computer's Bonjour name or the computer's MAC address. You typically set up DHCP reservation by entering the value associated with the computer and then choosing or entering its associated fixed IP address. You may need to restart the router after reserving DHCP-assigned addresses.
Here's how to find the values to enter:
Look for the Bonjour name in System Preferences, in the Sharing preference pane's Computer Name field.
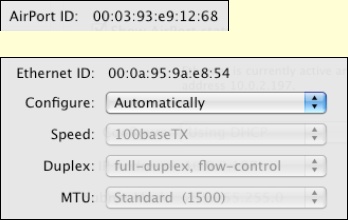
Look for the MAC address in System Preferences, in the Network preference pane. (The MAC address is unique for each piece of network hardware—an Ethernet port, a wireless card, etc.). In the Network preference pane, select your network interface, and click Advanced. Now:
For AirPort, note the AirPort ID at the bottom of the AirPort sub-pane (Top: an AirPort ID, Shown at the Bottom of the AirPort Sub-pane.Bottom: An Ethernet ID, Shown in the Ethernet Sub-pane.To Reach Either of the Above Sub-panes, Open the Network System Preference Pane, Select the Network Interface in Question, and Then Click Advanced).
For Ethernet, click the Ethernet button, and note the Ethernet ID at the top of the Ethernet sub-pane (Figure B-7).
Now that you've followed one of the procedures to set up a fixed address, the next step is to map the appropriate incoming ports on the router to the incoming ports on the privately addressed computer. To do this with a recent Apple base station, skip ahead a page to Map Ports with a Modern Apple Router. Otherwise, start by finding the port mapping section in your router's configuration software.
Typically, you choose:
The protocol type (TCP or UDP)
An incoming or source port number or range; this is a single number in two of the cases we need to map, and a range in the other
The destination port or ports, which in all the cases ahead are identical to the source ports (this is common)
The destination IP address, which is the one you just set through a manual entry or using DHCP reservation
With that in mind, you need to enable port mapping for the ports noted for each service in Ports for Enabling Remote Services. Some routers don't require that you specify UDP or TCP, in which case an UDP and TCP port is mapped for each port you enter. This is fine, even though it sounds messy.
With manual port mapping in place, you can proceed to the section on screen sharing where you left off.
The Apple Wi-Fi gateways released starting in 2007 have improved port mapping over older models. That includes the AirPort Extreme Base Stations released in 2007 and 2008, AirPort Express (2008 only), and Time Capsule (2008). Apple lets you enter multiple ports in a single entry, which is uncommon in router software.
Here's how to map your ports:
Launch AirPort Utility (found in
/Applications/Utilities).Select your gateway in the list at left, and click Manual Setup at the bottom of the window.
Click the Advanced icon at the top of the window, and then click the Port Mapping button.
For each service you want to add, repeat these steps:
Enter a list of UDP and TCP ports in the Public UDP Port(s) and Public TCP Port(s) fields, respectively (Figure B-8). Don't change the Services pop-up menu's setting.
For instance, using the info in Ports for Enabling Remote Services, a few pages previously, for iChat you would enter in the Public UDP Port(s) field:
5678, 16393-16402Enter the private IP address you set in Assign a Fixed Address to a Local Computer.
Enter the same ports, in the same order, in the Private UDP Port(s) and Private TCP Port(s) fields as you did in Step b.
Click the Continue button.
In the Description field, enter something appropriate (such as
iChat serviceif you are setting up port mapping for iChat).Click Done.
Click the Update button to restart the router with these new settings when you're finished entering port mappings.
