
Back to My Mac is a powerful new option in Leopard that allows secured, remote connections among computers that are operated by the same person. A .Mac account, required for use, ties the computers together. The feature allows both screen and file sharing over the Internet and local networks.
Back to My Mac seems like a simple feature on the surface, but it turns out to be rather complex to manage in all but the most straightforward circumstances. As a result, I've written a companion volume to this book called Take Control of Back to My Mac[2] that exhaustively explains how to get the service working and use it safely. In this section, I tell you enough to get started, however.
Note
After July 11, look for MobileMe!On June 9, 2008, Apple announced plans to change the name of the .Mac online service to MobileMe. MobileMe is slated to have new syncing features, to sync with the iPhone and iPod touch, and to have a new user interface. The Back to My Mac feature will remain the same, however. If you're reading this after the switchover on July 11, 2008, look for the MobileMe system preference pane, instead of one for .Mac.
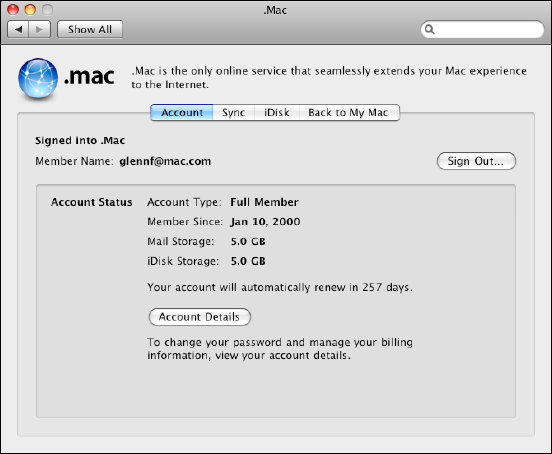
Back to My Mac is enabled through the .Mac preference pane:
Launch System Preferences, and select the .Mac preference pane.
Enter your account name in the Member Name field and password in the Password field.
Click Sign In.
If the login succeeds, the text in the pane updates to "Signed into .Mac," and the pane shows your account status (Figure 5-1). (If your login to .Mac doesn't work, visit http://www.mac.com and confirm that your password is correct. If you can't log in there, contact .Mac to get your password reset.)
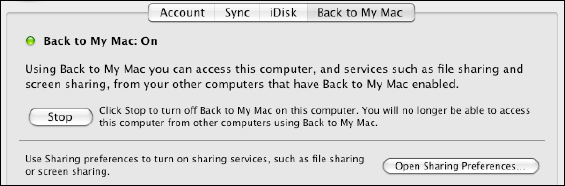
Click the Back to My Mac button.
If you see the status message "Back to My Mac: Off" in bold below the bar of buttons, click the Start button. The message changes from "Off" to "On" (Figure 5-2).
Evaluate the status message:
If you see a green dot (The Back to My Mac Sub-pane Lets You Turn Remote Access on and Off), skip to the next step.
If you see a yellow or red dot, read http://support.apple.com/kb/TS1626 to figure out what's wrong.
Click the Open Sharing Preferences button to switch to the Sharing preference pane.
In the Computer Name field, name your computer something distinctive; whatever you enter here is the name that will appear in the Shared list in the Finder-window sidebar on your other Back to My Mac—enabled Macs (and on other locally-connected Macs).
Warning
If any two or more of your computers in a Back to My Mac set have the same Computer Name, or share the same Local Name (derived from the Computer Name), Back to My Mac may be unable to connect one same-named computer to another. You can edit the Computer Name in its field, and click Edit below the field to set the Local Name separately from the Computer Name.
As soon as you enable Back to My Mac, you'll see all of your remote Back to My Mac computers in the Shared list in the sidebar of your Finder windows (Figure 5-3); local computers will already also be in the list. (If you don't see your Back to My Mac machines, see Displaying Shared Computers in the Sidebar, next page.)
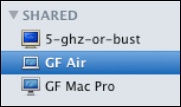
Figure 5-3. In a Finder window, the sidebar's Shared list shows locally accessible networked computers as well as Back to My Mac systems. In this case, 5-ghz-or-bust is a Samba file server running on an Airport Extreme Base Station, GF Air is a MacBook Air listed via Back to My Mac, and GF Mac Pro is a regular AFP server found via Bonjour. There's no way to tell the difference here between Back to My Mac, Bonjour accessible systems, or directly mounted remote computers!
Now this list can be rather confusing because it contains all other computers on your local network, all file servers that you've directly connected to, and every computer for which you have used your .Mac credentials and enabled Back to My Mac, even if the router or ISP via which that computer connects to the Internet doesn't allow a remote, incoming connection! It can be difficult to tell which are which.
That last category is the most troubling: Back to My Mac computers that appear, but can't be reached. Those computers show up because computers with Back to My Mac enabled register that fact with a .Mac account, but that registration doesn't include checking accessibility.
It's like publishing a list of redheads without confirming they actually have red hair; you're perplexed when you spot blondes and brunettes. Apple should add a tool to test a remote connection when Back to My Mac is enabled to determine which computers are truly reachable—or naturally auburn.
DISPLAYING SHARED COMPUTERS IN THE SIDEBAR
If you don't see your Back to My Mac counterpart computers in the Shared list, their display may be disabled. To enable the display of Back to My Mac computers in that list:
Click the Finder icon in the Dock.
Choose Finder > Preferences.
Click the Sidebar icon.
Check the Back to My Mac box.
[2] On the cover, click Check for Updates. On the resulting Web page, look for a link to get Take Control of Back to My Mac for only $5.