
You might not be able to get all the security, configuration options, or cross-platform compatibility you want from the VNC software that Apple distributes for Panther, Tiger, or Leopard. You have alternatives.
Mac OS X users have two straightforward choices for installing VNC (both client and server): Chicken of the VNC, and Vine Viewer. Chicken of the VNC is free for use as a client or server; Vine offers a free server, but charges $35 per copy (after an evaluation period) for its client software.
This free, open-source project stalled back in January 2006, and it hasn't had an update since then (http://sourceforge.net/projects/cotvnc). The current version is 2.0b4. However, in testing with the latest Leopard release as I write this—Mac OS X 10.5.3, I have no problem using either the program's server or client. That could change.
Chicken of the VNC—"What's the best server, Charlie?"—lets you create profiles to set up the default options for a remote system, including color depth, and the mapping of keys and mouse buttons across platforms. Profiles can also include a lengthy and obscure set of compression standards that a VNC client and server can decide among, in order to improve screen-sharing speed. The server is sending a bitmap, after all, so compressing that bitmap results in better performance.
The program includes a client option that allows a server to initiate a reverse connection, where the server can't be reached directly from outside the network, but the client has a publicly routable IP address. This option is complicated enough that I explain it separately in Reverse Connect from a VNC Server to a Client.
You can connect to a VNC server from Chicken of the VNC via Bonjour or via a direct connection. These instructions work for any version of Mac OS X that the program runs on. Here are the steps, which vary significantly at the beginning depending on if you use Bonjour or not:
If you are connecting via Bonjour:
If Chicken of the VNC > Use Bonjour is unchecked, select it to activate that option.
Choose Connection > Open Connection.
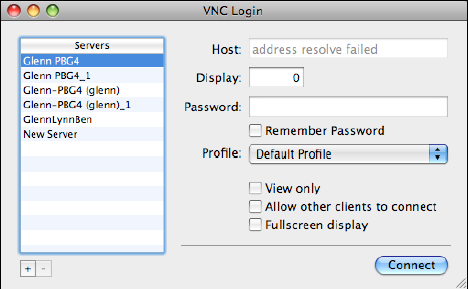
Bonjour hosts with VNC enabled appear in the Servers list at the left, along with any hosts you've created profiles for (Figure 8-4).
Choose a host from the list, enter the password, and choose your options. I explain the options in Step 3.
If you are connecting directly to a host name or IP address:
Choose Connection > New Connection.
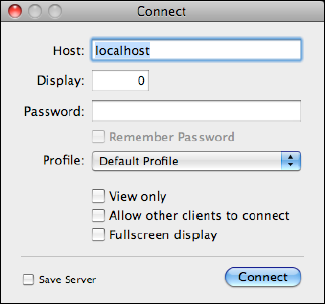
Enter the host name or IP address, and the password, and select other options, as described in Step 3 (Figure 8-5).
Figure 8-5. The Connect dialog appears when you choose Connection > New Connection and offers a variety of options for creating a custom remote session. Most of the options in this dialog are the same no matter how you are connecting, but the Save Server checkbox doesn't appear if you are connecting via Bonjour.
Regardless of how you connect, you have several common options that you can opt in or out of:
Host: This is either a host name, an IP address, or, in the case of Bonjour, an IP address that Chicken automatically determines, prefills, and won't let you change.
Display: This number is typically set to 0, but it can be numbered from 0 to 9, and it corresponds to ports 5900 to 5909 for remote access via a router you use to gain access to computers on a private network. (See The VNC Solution for Port Mapping.)
(A display in VNC terminology is a separately running user instance with its own desktop and input devices, something that Mac OS X doesn't support but a Unix or Windows terminal server would. It corresponds directly to ports because of how VNC is implemented.)
Password: The remote password.
Remember Password: When this box is checked, the password is stored.
Profile: You can set profiles for key mapping and screen bit depth, and choose to connect using one of those profiles from this pop-up menu.
View Only: This sets the VNC connection to observe rather than control the remote system.
Allow Other Clients to Connect: With this option checked, multiple remote VNC clients can connect to the same VNC server at the same time. When unchecked, you lock out other users.
Fullscreen Display: With this selected, the VNC client fills the screen, rather than displaying in a normal application window.
When you finish setting your options, click Connect.
Chicken of the VNC lacks most of the common VNC controls in a session window; you set these through profiles instead. The one available option is to enter or leave Fullscreen Mode, the shortcut for which is Command-Option-Control-Backtick (The Backtick key is the ' key or accent gauche, on the same key as the ~).
The Vine Viewer VNC viewer has been updated for Leopard, and includes technical support (http://www.redstonesoftware.com/products/vine/viewer, $35). It has pretty much the same options as Chicken of the VNC, but they are laid out differently. It adds a security option—an encrypted VNC connection via SSH (Secure Shell), which Apple calls Remote Access in the Sharing preference pane—that I highly recommend, and that might make it worth the $35 for typical remote users.
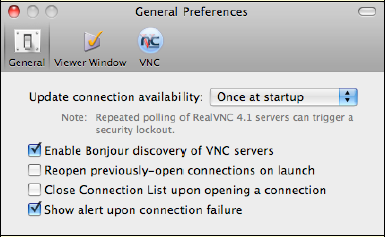
Vine doesn't offer connection profiles as in Chicken of the VNC; rather, you can choose Vine Viewer > Preferences to set options for all connections (Figure 8-6).
Here's a quick look at the most important options in each pane:
General: Check Enable Bonjour Discovery of VNC Servers.
Viewer Window: If you find that particular mouse and key settings aren't what you need, you can make changes here, including preventing a scroll wheel on a mouse from being sent as a remote scroll command (Mouse Scroll Wheel).
VNC: You'll find obscure VNC settings in this pane, including compression algorithm options. In this pane you can also you set the reverse connection option, which I discuss in Reverse Connect from a VNC Server to a Client.
The Connection List window, which appears at launch, shows all available servers that you've configured and connected to directly, or that are discoverable via Bonjour. Bonjour servers' names are shown in blue; others in black (Figure 8-7).
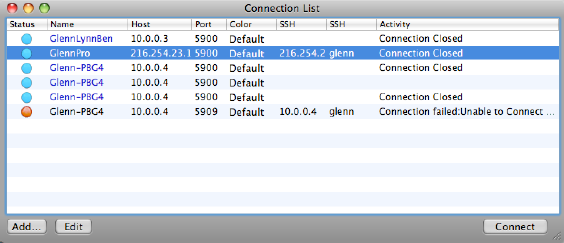
Figure 8-7. The Connection List in Vine Viewer shows discoverable VNC servers advertised by Bonjour (in blue), and connections you've configured (in black).
To connect via Bonjour, select a system and click Connect. If a password is required, you enter it at that time.
You can also configure a connection by clicking the Add button, which takes you through the same process noted next.
You can create a new direct connection, one that uses a host name or an IP address, through just a few steps, starting with filling out the details for a connection profile, and then using that profile to connect:
Choose Connection > Add Connection.
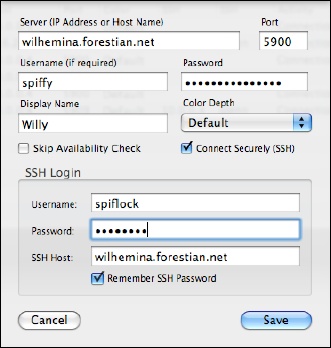
A dialog appears through which you create a connection profile (Figure 8-8).
Fill in the connection details:
Enter the host name or IP address in the Server field. The Port field can generally be left alone; the number will be higher than 5900 only if you've set multiple servers up and assigned them numbers. (See The VNC Solution for Port Mapping.)
Enter the user name (typically unused in VNC) and password.
The display name is the name used in the Connection List and title bar for the session window.
For the color depth, leave it set to the default, or set it lower or higher depending on your available bandwidth.
If you select Skip Availability Check, Vine Viewer will skip checking first to see if the machine responds before attempting to make a connection. If you frequently experience connection problems, leave this box unchecked to save you time troubleshooting whether the machine is available.
The Connect Securely (SSH) checkbox and "SSH Login" fields let you create an encrypted tunnel between your computer and the remote machine. You must have Remote Access enabled in the Sharing System Preferences pane to allow incoming SSH for this purpose.
Click Save.
In the main Connection List, select the connection profile you just created, and click Connect.
Note
SSH overcomes VNC weakness: As noted a couple times in this section, VNC's built-in protection is a bit weak and can be broken by a determined cracker. Using SSH protects the login and session contents with a method that's currently considered supremely reliable and secure. Vine's free Vine Server software lets you set VNC up to allow only secure SSH connections to further improve security.
Vine Viewer offers a smaller subset of options than Leopard's Screen Sharing application. A series of buttons along the top, which replicate commands in the Control menu, let you switch between controlling and observing a session; capture the screen to an image or a recorded movie; scaling to fit or appearing pixel-for-pixel the same; or filling the screen. A Refresh Screen button is useful for slower connections.