Chapter 9
Azure Cost Management
Overview
When deciding whether to use Microsoft Azure Cloud, one of the key determining factors for any organization is the anticipated cost of migrating and running their resources in a cloud environment over time. Every organization is cost conscious and must ensure their Azure spends are in line with their needs and provide the maximum return on investment (ROI).
The Azure Cost Management service helps organizations better understand their Azure spends by providing detailed cost breakdowns of all resources for which they are billed on a monthly basis. You can set up alerts to monitor your spends or budgets to curtail spending. You can also optimize your spends by getting a better understanding of how the costs are being incurred for each resource. Finally, Cost Management helps you set up billing information to ensure that internal resources in charge of ongoing payments are automatically sent bills on a monthly basis.
NoteYour Cost Management and billing configurations will depend on your subscription type. This chapter assumes you have a Pay-As-You-Go subscription. If you have a different type of subscription, you will need to work with your Microsoft representative or partner to obtain a better understanding of how to manage this for your environment.
Key features
Some of the key features of Cost Management are as follows:
Detailed analysis and breakdown of costs per resourceYou can use Cost Management to obtain a detailed breakdown of all resource- and subscription-level costs incurred during the previous month, previous quarter, or a custom time period. This helps you analyze spends and identify areas for optimization.
Budgeting and planning for spendsYou can use Cost Management to better understand your monthly, quarterly, and yearly spends based on resources and services. This can help you budget and plan spends for upcoming expansions or resource scaling activities.
Setting up alerts to track and monitor spendsYou can set up alerts in Cost Management to receive notifications when budgets are being reached or exceeded. This can help you plan, manage costs, and take proactive action to address issues that arise from unplanned spends.
Integration with third-party solutions for automated analysis and actionsYou can integrate Cost Management with third-party solutions to obtain an automated breakdown and analysis of workload spends that deviate from planned spends and areas for optimization to reduce spends.
Design and deployment concepts and considerations
Cost Management requires a concerted effort from various internal resources responsible for building and managing your Azure environment. In most environments, there is a tendency to look for ways over time to optimize or cut down cloud spends. Sometimes, however, there is pressure to take immediate action, which can result in unintended consequences, such as performance issues on critical workloads due to a drastic reduction in workload sizing. It is therefore a good practice to follow practical steps to regularly monitor and analyze costs so that workloads are optimized on a regular basis; this results in reduced pressure for urgent optimizations due to changing business environments.
Cost planning
Using a structured approach to plan your Azure spends can help prevent the arrival of a large unplanned bill at the end of the month. Planning involves identifying all the workloads you want to set up in the Azure environment and estimating the spends on these resources based on various factors, such as the following:
Region to host the resource
Redundancy level required for each resource
OS and features required for each resource
Resource uptime anticipated
Downtime acceptable in outages
Acceptable data loss limits
This is not an exhaustive list of factors; every environment is unique, and different organizations have various compliance and budgetary pressures. However, it provides a good starting point for planning.
TipIdentify other factors that are relevant to your organization and include those inputs in your planning decisions.
After you have identified all the factors that can affect your Azure design, you can use the Azure calculator at https://azure.microsoft.com/en-us/pricing/calculator to generate an estimate of monthly spends. Use this as a starting point to plan for design changes, budgeting, and future correlation against actual spends.
Budgets
Budgeting can help provide clarity for internal resources regarding approved spends and can influence the design choices they may need to make at the outset to align with the budgets.
Cost Management enables you to put budgets in place, to assign budgets to various users to spend on Azure resources based on approve spends, and to set thresholds to alert various resources, subscriptions, and business owners of charges that exceed budgetary limits. This enables you and your Azure admin to remain informed of any deviations and provides visibility into which workloads might be causing unplanned spends.
TipYou should implement manual or automatic processes to track and monitor spends on a regular basis to ensure they are in line with approved budgets. You should also implement manual or automatic processes to alert you to deviations and to identify the source of those as quickly as possible. This can reduce the impact of incorrect deployment decisions that might cause spending to exceed your targets.
Budgets walkthrough
The following section walks you through the process of setting up a budget and cost alerts using the Budgets tool in the Azure Portal.
Using The Azure Portal
To set up a budget and cost alerts using the Budgets tool in the Azure Portal, follow these steps:
Log in to the Azure Portal, type cost management + billingin the search box, and select it from the list that appears. (See Figure 9-1.)

FIGURE 9-1Search for Cost Management + Billing.
In the left pane, click the Cost Management option. Then click the Budgets option that appears underneath the Cost Management option. (See Figure 9-2.)
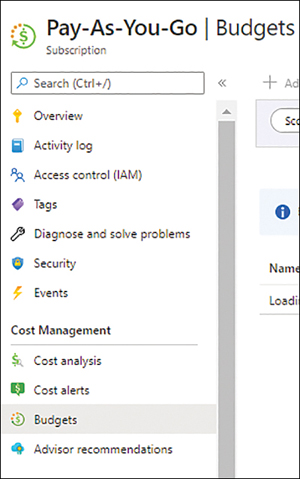
FIGURE 9-2Click the Budgets option.
In the right pane of the Budgets page, click the Add button. (See Figure 9-3.)

FIGURE 9-3Adding a budget and alert.
In the Create Budget dialog box (see Figure 9-4), enter the following information. Then click Next:
ScopeThis setting lists the subscription you are currently using. To set up a budget for a different subscription, click the Change Scope link, and choose the desired subscription when prompted.
FiltersClick Add Filter to apply any filters scope the budget view—for example, to apply the budget to specific resource groups or regions.
NameEnter a unique name for the budget.
Reset PeriodSpecify how frequently the budget should be reset.
Creation DateSpecify the budget’s creation date.
Expiration DateSet an expiration date for the budget.
AmountEnter the threshold at which an alert should be triggered.
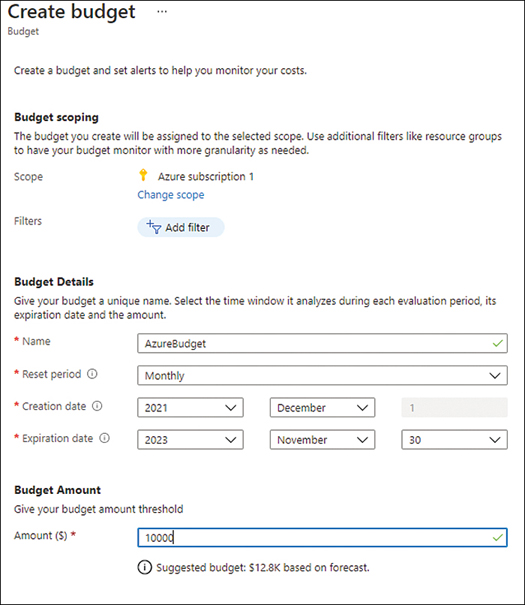
FIGURE 9-4Create a budget.
In the Set Alerts tab (see Figure 9-5), enter the following information. Then click Create:
TypeChoose the type of alert condition—either Actual or Forecasted.
% of BudgetEnter the minimum percent threshold to trigger alerts.
Action GroupSelect an existing action group. Alternatively, to create a new action group, click the Manage Action Group link and follow the prompts in the Create an Action Group wizard, as detailed in the section “Service Health walkthrough” in Chapter 8, “Azure service health.”
Alert RecipientsEnter the email address of each person you want to receive the alert.
LanguagesSelect the language in which to issue the alerts.

FIGURE 9-5The Set Alerts tab of the Create Budget dialog box.
Cost Analysis
The Cost Analysis tool (see Figure 9-6) provides a detailed breakdown of your billing across resources and subscriptions. It provides you with various filters and views to review spending patterns across the subscription and to obtain similar breakdowns across resource types, resource groups, timelines, and so on. Charges for resources from the Azure Marketplace are shown separately, making it easier to identify those costs.
NoteAt this time, Cost Analysis does not show charges for reservations, support, and applicable taxes.
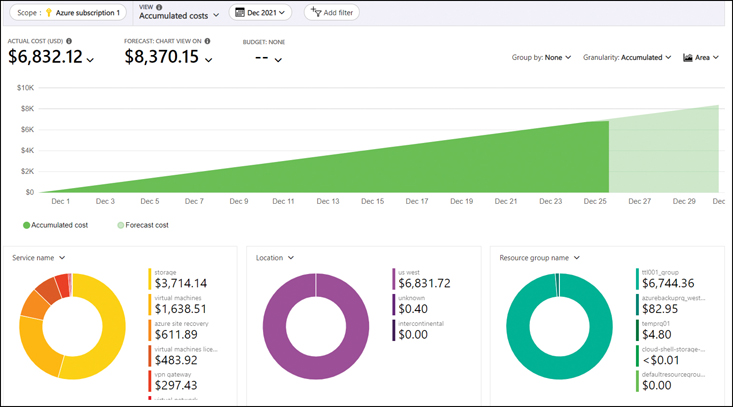
FIGURE 9-6Cost Analysis graphs.
You can export and analyze this data in various ways:
Export to Azure Storage accountYou can schedule the automated export of usage data to an Azure Storage account for further analysis. Collecting this data over time can help you use analysis tools such as Microsoft Excel and Power BI for cost comparison and analysis purposes.
Microsoft ExcelYou can analyze exported data within Microsoft Excel and filter and sort the data as needed. You can also drill down to specific resources, resource groups, and resource categories to obtain a better understanding of your spends.
Power BIWith Power BI, you can drill down to individual resources for a better understanding of budgets versus actual spends. Power BI is a great tool to analyze exported usage data for a deeper understanding and more thorough comparison of spends across various time periods.
Power BI Data ConnectorYou can set up Power BI Data Connector to automatically transfer data directly into Power BI on a daily basis. This allows for a more up-to-date spend analysis in an automated manner, which facilitates more accurate forecasting.
Usage APIsMicrosoft provides various APIs to automate the export and integration of data from Cost Analysis to third-party solutions for analysis.
TipYou can also set up Cost Analysis to automatically send data and reports to various individuals within your organization. For example, you might have them sent to personnel who have write access to the subscription and resource groups so they can identify areas of deviation that could explain unplanned charges.
TipYou can use audit logs for each resource to identify changes to the resource configuration that could have caused spends to spike.
View Cost Analysis data walkthrough
The following section walks you through the process of viewing Cost Analysis data in the Azure Portal.
Using The Azure Portal
To view Cost Analysis data in the Azure Portal, follow these steps:
Log in to the Azure Portal, type cost management + billing in the search box, and select it from the list that appears. (See Figure 9-7.)

FIGURE 9-7Search for Cost Management + Billing.
In the left pane, click the Cost Management option. Then click the Cost Analysis option that appears underneath the Cost Management option. (See Figure 9-8.)

FIGURE 9-8Click the Cost Analysis option.
The right pane shows a summary of the accumulated costs for the current month. (See Figure 9-9.)
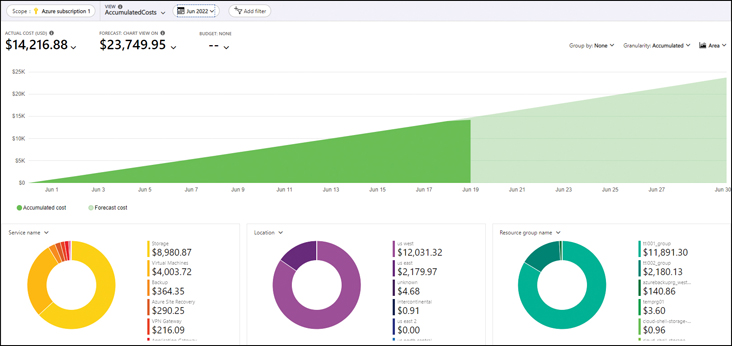
FIGURE 9-9Cost Analysis graphs.
To see a view from a different date range, click the Date Range drop-down list at the top of the page and choose the desired date range. (See Figure 9-10.)
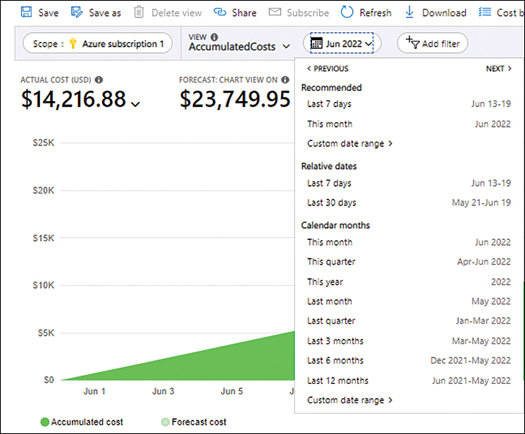
FIGURE 9-10Cost Analysis date range options.
To add a filter to the view, click Add Filter. Then use the left drop-down list that appears to choose a filter type. (See Figure 9-11.)

FIGURE 9-11Cost Analysis filters.
Click the right drop-down list to choose a subfilter. The subfilters in this drop-down list will differ depending on which filter type you choose. (See Figure 9-12.)

FIGURE 9-12Cost Analysis subfilters.
Verify that the view conveys the information you need. (See Figure 9-13.)
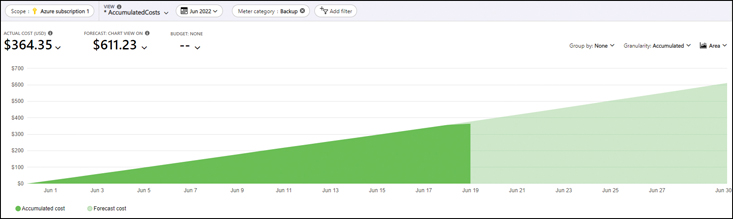
FIGURE 9-13Filtered Cost Analysis view.
To save this view, click the Save As button along the top of the Cost Analysis page.
In the Save As dialog box, type a name for the view in the Name box, select the Make This View Private check box if you want to create the view only for your own use, and click the Save button. (See Figure 9-14.)

FIGURE 9-14Saving your Cost Analysis view.
In addition to Save As, which you use to save a view for the first time or to save the current view as a new view, the bar along the top of the Cost Analysis page features the following buttons (see Figure 9-15):
SaveSave changes made to the current view.
Delete ViewDelete the current view.
ShareShare the current view with other users.
SubscribeObtain daily, weekly, or monthly updates to the view via email.
RefreshRefresh the current view with the up-to-date data.
DownloadDownload the data in the current view in CSV format.
Cost by ResourceChange the view with various filters.
Configure SubscriptionConfigure scheduled export of the view and AWS integration.

FIGURE 9-15Cost Analysis button options.
Schedule data exports walkthrough
The following section walks you through the process of scheduling the export of Cost Analysis data in the Azure Portal.
Using The Azure Portal
To schedule the export of Cost Analysis data in the Azure Portal, follow these steps:
Log in to the Azure Portal, type cost management + billing in the search box, and select it from the list that appears. (See Figure 9-16.)
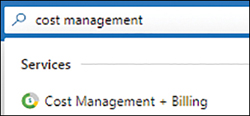
FIGURE 9-16Search for Cost Management + Billing.
In the left pane, click the Cost Management option. Then click the Cost Analysis option that appears underneath the Cost Management option. (See Figure 9-17.)
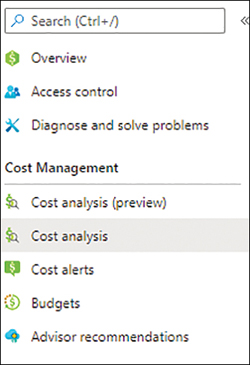
FIGURE 9-17Click the Cost Analysis option.
Click the Configure Subscription button along the top of the Cost Analysis page.
On the Configuration page, under Manage Your Cost, click Exports. (See Figure 9-18.)
Click the Schedule Export button. (See Figure 9-19.)

FIGURE 9-18The Configuration page.

FIGURE 9-19Schedule the export.
In the New Export dialog box (see Figure 9-20), enter the following information. Then click the Create Alert button:
NameEnter a unique name for the export operation, or rule.
MetricChoose the desired metric—Actual or Amortized Cost.
Export TypeChoose the export type, based on the desired time frame.
Start DateSelect or enter the start date for the automatic export operation.
File PartitioningEnable this if you are exporting a large dataset that might be better managed across multiple Excel files rather than a single large file.
StorageSelect the Use Existing or Create New option button.
If you choose Create New, you’ll see settings to specify the storage resource you want to use, including Subscription, Resource Group, Account Name, Location, Container, and Directory.
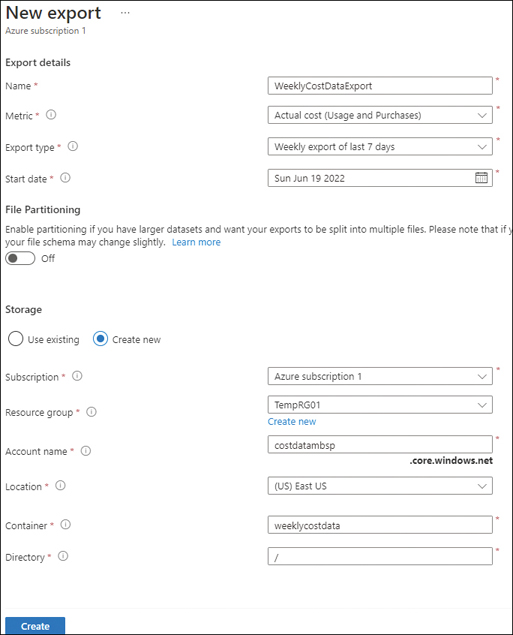
FIGURE 9-20New Export wizard.
Advisor recommendations
Cost Management has a recommendation engine that uses pre-programmed cost-optimization best practices to identify workloads that can be resized or reserved to save on charges, potentially saving your organization hundreds or thousands of dollars each year. It does this by taking into account the idle time and usage information captured for each resource. (See Figure 9-21.) When you receive a recommendation, Cost Management indicates the impact level of the recommendation. It also guides you to manually resize, redeploy, or reconfigure your resources to achieve the stated cost benefits in the future.
You can download the recommendations in CSV format for analysis, internal discussions, and approvals. You can also set up alerting to be made aware of new recommendations as they are identified and set up a recommendation digest to obtain a consolidated set of recommendations on a predetermined schedule. These can be sent to relevant stakeholders for their review and actions. Finally, you can use an API to export recommendations to third-party solutions for a consolidated view.

FIGURE 9-21Advisor recommendations.
Respond to a recommendation walkthrough
The following section walks you through the process of responding to a recommendation using the Azure Portal.
Using The Azure Portal
To respond to a recommendation using the Azure Portal, follow these steps:
Log in to the Azure Portal, type cost management + billing in the search box, and select it from the list that appears. (See Figure 9-22.)

FIGURE 9-22Search for Cost Management + Billing.
In the left pane, click the Cost Management option. Then click the Cost Analysis option that appears underneath the Advisor Recommendations option. (See Figure 9-23.)

FIGURE 9-23Click the Advisor Recommendations option.
Click a recommendation in the list that appears. (See Figure 9-24.)

FIGURE 9-24Click a recommendation.
The Recommendation Details page lists manual actions you can take to respond to the recommendation. (See Figure 9-25.)

FIGURE 9-25Actions to take to respond to the recommendation.
Click a link in the Recommended Action column to see more details about the recommendation for a particular resource. (See Figure 9-26.)

FIGURE 9-26See more details about a recommendation.
Back on the Recommendation Details page, do one of the following:
Manually perform the recommended action.
Select the check box next to a resource listed on the page and click the Postponebutton to indicate your intention to perform the recommended action at a later date.
Select the check box next to a resource listed on the page; click the Dismissbutton to dismiss the alert if it is not suitable for your environment or if you have recently performed manual changes in response to the recommendation, but the system has not yet updated the status of that recommendation. When you dismiss an alert, the recommendation engine will no longer display that recommendation.
Manage Advisor recommendations and create recommendation alerts walkthrough
The following section walks you through the process of managing Advisor recommendations and creating a recommendation alert using the Azure Portal.
Using The Azure Portal
To manage Advisor recommendations and create a recommendation alert using the Azure Portal, follow these steps:
Log in to the Azure Portal, type cost management + billing in the search box, and select it from the list that appears. (See Figure 9-27.)

FIGURE 9-27Search for Cost Management + Billing.
In the left pane, click the Cost Management option. Then click the Cost Analysis option that appears underneath the Advisor Recommendations option. (See Figure 9-28.)

FIGURE 9-28Click the Advisor Recommendations option.
In the Advisor Recommendations page (see Figure 9-29), click the Download as CSV button to download the recommendations in a CSV file, or click Download as PDF to download the recommendations in a PDF file.

FIGURE 9-29Managing Advisor recommendations.
To create an alert, click the Create Alert button. (Refer to Figure 9-29.)
In the Create Advisor Alerts dialog box (see Figure 9-30), enter the following information. Then click the Create Alert button:
SubscriptionSelect the subscription for which you want to set up the alert.
Resource GroupSelect the resource group for which you want to set up the alert.
Configured ByFor this example, select the Category and Impact Level option button.
CategoryChoose Cost.
Impact LevelSelect the impact level to use to filter the recommendation alert.
Action Group NameClick Select Existing and follow the prompts to select an existing action group. Alternatively, to create a new action group, click Create New and follow the prompts in the Create an Action Group wizard, as detailed in the section “Service Health walkthrough” in Chapter 8, “Azure Service Health.”
Alert Rule NameEnter a unique name for the alert rule.
DescriptionEnter a detailed description of the alert rule.
Enable Rule Upon CreationClick Yes.
Save Alert to Resource GroupSelect the resource group in which to save the alert.

FIGURE 9-30Create Advisor alerts.
Create a recommendation digest walkthrough
The following section walks you through the process of creating a recommendation digest using the Azure Portal.
Using The Azure Portal
To create a recommendation digest using the Azure Portal, follow these steps:
Log in to the Azure Portal, type cost management + billing in the search box, and select it from the list that appears. (See Figure 9-31.)

FIGURE 9-31Search for Cost Management + Billing.
In the left pane, click the Cost Management option. Then click the Cost Analysis option that appears underneath the Advisor Recommendations option. (See Figure 9-32.)

FIGURE 9-32Click the Advisor Recommendations option.
In the Advisor Recommendations page (see Figure 9-33), click the Create Recommendation Digest button.

FIGURE 9-33Create a recommendation digest.
In the Add an Advisor Recommendation Digest dialog box (see Figure 9-34), enter the following information. Then click Create:
SubscriptionSelect the subscription for which you want to create a recommendation digest.
FrequencyChoose how often you want to receive the recommendation digest.
Recommendation CategoryFor this example, leave this set to Cost.
LanguageChoose the language you want the recommendation digest to use.
Action Group NameClick Select Existing and follow the prompts to select an existing action group. Alternatively, to create a new action group, click Create New and follow the prompts in the Create an Action Group wizard, as detailed in the section “Service Health walkthrough” in Chapter 8, “Azure Service Health.”
Recommendation Digest NameEnter a unique name for the recommendation digest.
Enable Recommendation DigestClick Yes.

FIGURE 9-34Add an Advisor Recommendation Digest dialog box.