Chapter 3
Azure Migrate
Overview
Microsoft introduced Azure Migrate in November of 2017 to consolidate a set of Azure services to discover, assess, and migrate on-premises workloads to the Azure Cloud. Initially, the service was limited to assessing and migrating VMware virtual machines (VMs) to Azure. Over time, however, Microsoft added new features to the service to allow you to migrate a number of different workloads, including the following:
VMs
Web applications
Databases
Large amounts of data not associated with VMs, databases, or web apps
Virtual Desktop Infrastructure (VDI) running in on-premises or co-located datacenters or other cloud services such as Amazon Web Services (AWS) or Google Cloud Platform (GCP)
Azure Migrate service centralizes tools provided by Microsoft and integrated third-party solutions used for the discovery, assessment, and migration of workloads. Currently, third-party solutions include RackWare, Carbonite, and Cloudamize, among many others. Each solution provides different capabilities that are specialized in different workloads based on your individual needs. More importantly, Azure Migrate provides an integrated set of discovery, assessment, and migration tools from Microsoft itself that work seamlessly together for the migration of a majority of workloads. It is therefore important to identify which solution will work best in your environment before choosing which one to use.
NoteThis chapter focuses on the tools provided by Microsoft as part of the Azure Migrate service.
Key features
The key features of the Azure Migrate service are as follows:
Centralized migration serviceAzure Migrate consolidates all the different tools provided by Microsoft to discover, assess, and migrate workloads to Azure. This enables you to easily track, monitor, and manage all your migrations.
Support for different workloadsAzure Migrate provides the capability to assess and migrate workloads such as VMs, databases, web apps, data storage, and VDI.
Support for different source platformsAzure Migrate provides the assessment and migration capabilities of specific workloads hosted on different infrastructure platforms such as Hyper-V, VMware, and physical servers.
Support for different cloud platformsAzure Migrate provides the assessment and migration capabilities of specific workloads hosted on different cloud platforms such as Amazon Web Services (AWS) and Google Cloud Platform (GCP).
ExtensibilityYou can extend Azure Migrate functionality using offerings from third-party solution providers, also known as independent software vendors (ISVs). In other words, you can use tools that you are more comfortable with or have prior investments in to achieve your migration objectives.
Migration to different servicesAzure Migrate enables you to migrate your workloads to different Azure services such as Azure VMs, Azure SQL Database, Azure SQL Managed Instance, Azure App Service, Azure Virtual Desktop, and Azure Storage. So, you can optimize your migration and use cloud-native solutions to maximize your cloud investments.
The following sections discuss some of the various tools provided by Microsoft to assess and migrate your workloads.
Assessment tools
Assessment tools include the following:
Azure Migrate Discovery and Assessment ToolThis tool enables you to discover and assess on-premises physical servers and Hyper-V- or VMware-based VMs. It requires the deployment of a lightweight appliance on a VM or physical server in the on-premises environment to perform an agent-based or agentless assessment that sends continuous server metadata and performance data to Azure. It then generates readiness reports to provide you with clarity on:
Whether the on-premises workload meets the prerequisites for migration to Azure.
The estimated size and VM SKU the workload could use post-migration.
Associated dependencies with other servers that would need to be incorporated into the migration plan.
The estimated costs for running the workloads in Azure post-migration.
Data Migration AssistantYou can use this tool to assess on-premises SQL Server workloads for migration to Azure SQL Database, Azure SQL Managed Instance, or SQL Server hosted on Azure VMs. It can help identify potential migration roadblocks, migration approaches, and strategies based on the assessment to ensure the migration is as efficient as possible.
Web App Migration AssistantThis free tool enables you to assess on-premises websites and web apps for migration to Azure App Service. It provides tools to easily and automatically assess on-premises .NET, Java, and Linux web apps.
Migration tools
Migration tools include the following:
Azure Migrate Server Migration ToolThis tool enables you to migrate on-premises physical servers and Hyper-V- or VMware-based VMs to Azure VMs. It also supports the migration of VMs hosted in other cloud services such as AWS and GCP. You can perform data synchronization in different ways for each of the different source’s platforms:
Hyper-VYou can use provider agents installed on the Hyper-V host migration without requiring the deployment of agents on the VMs.
Physical serversPhysical servers include servers hosted in AWS, GCP, and standalone ESX hosts, along with servers in a traditional physical server infrastructure. Migration of physical servers requires the use of a replication appliance, which you deploy in the on-premises environment to sync the initial data and data changes to the Azure cloud.
VMwareYou can perform VMware migration using either an agentless or agent-based approach. The agentless approach uses the discovery and assessment appliance, whereas the agent-based approach requires the deployment of a replication appliance in the onpremises environment. VMware migration requires a vCenter appliance to be in place for integration; otherwise, for standalone ESX hosts, the migration must be performed using the same approach as physical servers, using a replication appliance.
Azure Database Migration ServiceThis tool enables you to automatically migrate various databases to Azure services, including Azure SQL Database, Azure SQL Managed Instance, SQL Servers running on Azure VMs, Azure Database for MySQL, Azure Database for PostgreSQL, and others with minimal downtime.
Web App Migration AssistantIn addition to providing assessment capabilities, this tool offers migration capabilities to move your on-premises .NET, Java, or Linux web apps to Azure App Service.
Azure Data BoxThis tool includes different products, such as Data Box, Data Box Disk, Data Box Gateway, and Data Box Heavy to migrate large amounts of data to Azure Storage.
Deployment concepts and considerations
Now that you have a sense of the various features and integrated tools provided by Microsoft within the Azure Migrate service, let’s discuss the Azure Migrate Discovery and Assessment Tool and the Azure Migrate Server Migration Tool.
Azure Migrate Discovery and Assessment Tool
One of the most important steps in any migration is to perform a discovery and assessment of your on-premises environment to gain better insight into your workloads and how effectively they will support migration to Azure. Based on the platform(s) on which your on-premises servers are hosted, and on the Azure service that you intend to migrate them to, you will need to use various tools for this discovery and assessment.
To perform discovery and assessment of on-premises Windows or Linux virtual machines hosted on Hyper-V, VMware, or physical servers, you deploy the Azure Migrate appliance that is part of the Azure Migrate Discovery and Assessment Tool. You can deploy the appliance using an Open Virtualization Appliance (OVA) template, Hyper-V VHD, or a PowerShell script, depending on the source platform. The appliance can perform discovery using the vCenter server or Hyper-V hosts set up during appliance configuration, and you can select the VMs that you would like to assess post-discovery. In the case of physical servers, you will need to define the administrative credentials and their IP address/hostnames for the appliance to query and connect to those servers to perform an assessment. VMs hosted in other solutions such as AWS or GCP will need to be set up for discovery and assessment similar to physical servers.
In each scenario, there is a set of Windows and Linux OS versions that are supported by the appliance for discovery and assessment. You will need to refer to Microsoft’s publicly available guidance on the latest supported release when you perform your build. This guidance changes based on the end of support or end of life of various Windows and Linux OS releases.
Hypervisor OS version support is also updated on a regular basis based on the OEM’s support guidelines. For example, at present, the appliance supports the use of Hyper-V hosts running on Windows Server 2019, Windows Server 2016, and Windows Server 2012 R2. Any version older than this—for example, Windows Server 2012 or Windows Server 2008 R2—is not supported.
TipCheck the supported hypervisor versions at the time of your build. If your current hypervisor is not patched or up to date, you will need to ensure that the prerequisites are met before attempting to use the appliance in your environment.
The appliance performs discovery of the following:
The metadata of the discovered servers with server details, including current OS and patch levels, CPU size, RAM, disk, network interfaces, and a host of other information based on the underlying hypervisor
Installed software, ASP .NET web apps, SQL Server instances, and databases
Dependencies among different on-premises servers that are in the scope of the discovery (identified through agentless dependency analysis)
For assessments that are more accurate, you can set up the appliance to gather performance data from the servers for a set period. This helps it to accurately identify the right size for the Azure VM and disk SKU for these servers. Based on the time period for which you perform the assessment, the appliance collects data points to gain deeper insights and assign a confidence rating to help you understand how suitable its size recommendations are for production use. This confidence rating will be low if the appliance hasn’t been able to collect performance data for a sufficient period of time (or at all).
NoteIf you do not perform performance-based assessments, the appliance will use the size information gathered during the metadata discovery of the servers to ascertain an appropriate size.
Data collected by the appliance—including the metadata of the discovered servers and the performance data—is transferred to Azure over HTTPS and stored in Azure Cosmos DB and Azure Storage with encryption, meaning it is encrypted both during transit and at rest.
Each appliance can support thousands of VMs—a limit that continues to scale upward as Microsoft releases newer versions. You can also deploy multiple appliances in an environment if a single appliance does not meet your needs. See the latest guidance available online to determine the number of servers and hosts supported by the appliance, as the limits differ between Hyper-V, VMware, and physical infrastructure environments, and could change depending on the appliance version that you deploy.
Dependency analysis
Now that you have a better understanding of discovery, let’s briefly understand dependency analysis and how it can help in your migrations. Dependency analysis identifies dependencies among discovered servers so you can better understand the impact of migrating those servers on other related servers in your environment. This enables you to do the following:
Take into account potential roadblocks and outages when planning and performing workload migrations.
Analyze and plan for groups of servers that need to be migrated together to ensure they continue to work correctly post-migration.
Identify dependencies of which you were unaware so you can remove them before the migration if they are no longer required.
Communicate with all stakeholders, including the ones responsible for dependent workloads, so they can come together for more cohesive planning and migration.
Azure Migrate supports two types of dependency analysis: agentless and agent-based. Agentless dependency analysis is supported only for VMware-based environments that use vCenter servers and is currently in preview at the time of this writing. For its part, agent-based dependency analysis currently covers a broader set of hypervisors and infrastructure. With the agent-based approach:
You must deploy the Microsoft Monitoring agent (MMA) and the dependency agent on every on-premises server for which you would like to perform dependency analysis.
Agents gather information about TCP processes and inbound/outbound connections for each process, including the source and destination server name, process, application name, ports, number of connections, latency, and data-transfer information.
Data is uploaded to Azure Cosmos DB and Azure Storage for analysis using Azure Log Analytics. Azure then uses Service Map to analyze the data, discover application components on Windows and Linux servers, and identify communication routes between servers and services to create a visualization map.
NoteIf you have servers that do not have internet connectivity, you will need to download and install an additional component called Log Analytics Gateway to capture the local data and upload it to Microsoft Azure. The gateway acts as an interface between your on-premises servers and Azure.
Azure Migrate Server Migration Tool
After you have successfully completed the discovery and assessment phase, you must begin migrating your workloads. First, though, you must develop a migration plan to cover all aspects of the migration. These include the following:
Pre-migration strategy and activities
Migration strategy
Roles and responsibilities
Post-migration Azure management strategies
Taking a planned approach will help you to ensure that you achieve success on all objectives of the migration project.
At a minimum, your migration plan should encompass the following areas. Depending on the size and complexity of your environment and organization, you may have to plan for other areas not covered here:
Server readinessEnsure that all servers are ready for migration to Azure per the assessment report generated using the Azure Migrate Discovery and Assessment Tool. Any servers not listed as ready for migration must be prepared before the migration plan is finalized.
End-of-support hardwareIt is a good practice to prioritize end-of-support hardware for migration so you do not need to invest in hardware on-premises to support those servers until the migration can be completed.
End-of-support softwareIt is a good practice to prioritize end-of-support software with extended support in Azure for migration. This can help you obtain extended security updates and support for the server OS. It can also help with legacy applications that cannot currently be hosted on newer OS.
Server sizeWhile it is easy to scale server size up and down in Azure, you should use the performance-based assessment option to gain deeper insights into your servers so you can size them more appropriately during their initial move.
Licensing analysisTake advantage of any licensing benefits on offer that can help you reduce your Azure spending. For example, applying Azure Hybrid Use Benefit can reduce the cost of running Windows VMs in Azure. Other OEMs such as Red Hat and SUSE may offer similar benefits, depending on your licensing contract.
Dependency assessmentPerform a dependency assessment in your environment to obtain a clearer idea of the interconnectivity of servers and services and to ensure outages are minimized during your migration.
Cost planningCosts associated with the Azure environment (based on the assessment reports) must be in line with your budget. Expect deviations, however, as certain services and components are charged based on usage, which the assessment report will not consider. These include networking, monitoring, and management components such as VPN gateways, firewalls, application gateways, bandwidth usage, VM backups, monitoring, and so on.
TestingThe Azure Migrate Server Migration Tool enables you to sync and test your servers in Azure by bringing them online in an isolated test environment. In this way, you can confirm that all your applications and services are working as needed in Azure, without affecting your current workloads.
Admin trainingIncorporate admin training into your migration strategy so your IT team is well prepared to manage the servers and associated Azure infrastructure post-migration.
The Azure Migrate Server Migration Tool is the primary tool for migrating on-premises servers to Azure VMs. The tool provides two migration options: agentless and agent-based.
Agentless migration is supported only for VMware (with vCenter integration) and Hyper-V-based migrations. For Hyper-V migrations, a replication provider is installed on the Hyper-V hosts to manage the agentless replication process. Using the agentless migration option is not recommended in scenarios where your servers are running in an IOPS-constrained environment. This is because agentless migration uses hypervisor-based snapshots to regularly identify and copy delta changes to Azure, which can degrade performance in environments where IOPS are already constrained.
Agent-based migration is appropriate for any type of migration, including VMware and Hyper-V-based VMs, physical servers, AWS and GCP VMs, XenServer-based VMs, and so on. This approach does not use the hypervisor technologies for replication, and hence can be used to synchronize any workload as long as the prerequisites for the agent are met. The Azure Migrate Discovery and Assessment Tool used to gauge server readiness for Azure will analyze these prerequisites.
In an agentless migration approach, the Azure Migrate Discovery and Assessment appliance handles the agentless replication of data to Azure. In an agent-based migration approach, a replication appliance must be deployed on-premises, and an agent deployed on every server that you will be replicating using this appliance.
The replication appliance has multiple components that work together to handle different tasks:
Communicate with the on-premises servers, gather replication-related data, and send it to Azure Storage.
Act as a replication gateway for the data transfer to Azure.
Perform data caching in case connectivity to Azure goes down.
Perform data compression and encryption before transfer to Azure.
Perform push installations of the mobility service agent software on the required servers so that data replication can be set up.
You can deploy the appliance either by using an OVA template or by downloading and installing the replication software on a physical server or VM. Be sure to confirm that the appliance prerequisites are in place before starting with any deployment.
Microsoft regularly updates the appliance and provides the updated installer in the Azure Migrate hub. You can automate updates to your appliance or perform them manually. Be sure that if you opt to update your appliance manually, you put in place a process to do this on an ongoing basis. Microsoft recommends always using the latest version of the replication software.
Networking
Azure Migrate supports replication using the public internet in all scenarios. Data is sent over an encrypted HTTPS channel to the Azure Storage endpoint that you configure. The replication appliance, assessment appliance, and Hyper-V hosts all require port 443 connectivity to various Azure URLs to be able to send outbound replication data to Azure. Check the updated list of these URLs provided by Microsoft to ensure that your servers have the necessary network access.
NoteData synchronization over private connections using a combination of Azure Private Link over ExpressRoute or VPN gateways has been introduced in preview in certain regions at the time of this writing. This might change by the time you decide to test or use the Azure Migrate service for your environment.
Scaling
In larger environments, discovery, assessment, and replication can be scaled up depending on the source platform and the replication approach you have chosen for your environment, as detailed here.
Discovery and assessment
In a Hyper-V environment, each Azure Migrate appliance used for discovery and assessment can connect to 300 Hyper-V hosts, and can discover and assess as many as 5,000 VMs. If more capacity is required, you can deploy additional Azure Migrate appliances based on the overall environment requirements.
In a VMware environment, each Azure Migrate appliance used for discovery and assessment can only connect to a single vCenter server and can discover and assess as many as 10,000 VMs. If more capacity is required, you can deploy additional Azure Migrate appliances based on the overall environment requirements.
In a physical server environment (including AWS, GCP, and other hypervisors), each Azure Migrate appliance used for discovery and assessment can discover and assess as many as 1,000 servers. If more capacity is required, you can deploy additional Azure Migrate appliances based on the overall environment requirements.
Replication and migration
You achieve agentless replication in a Hyper-V environment by deploying the Hyper-V replication provider service on the Hyper-V host. In scaling scenarios, there should generally not be an issue, as VMs will be replicated using the provider service installed on individual Hyper-V hosts. As more hosts with additional VMs are added, the installation of the provider agent on the host automatically scales up capacity. If a Hyper-V host is unable to handle the replication load for a subset of VMs, those VMs would need to be moved to alternate Hyper-V hosts for replication.
In agent-based Hyper-V replications, the VMs are treated as physical servers and require the deployment of a primary replication appliance. In a scaling scenario, you can add scale-out appliances to work with the primary configuration and replication server. Each appliance supports as many as 200 VMs for replication at a time; this limit is increasing with newer versions of the appliance.
Agentless VMware replication (with a single vCenter server) uses the migration appliance deployed for environment assessment. The primary migration appliance supports as many as 300 VMs at a time. In scaling scenarios, you can add scale-out migration appliances connected to the primary Azure Migrate appliance that you deployed in the environment. This approach can be used to migrate as many as 500 VMs concurrently based on current limitations.
Agent-based VMware replications require the deployment of a primary replication appliance. This appliance supports between 50 and 100 VMs at a time. In scaling scenarios, you can add scale-out replication appliances connected to the primary replication appliance. This approach can help you synchronize between 50 and 100 additional VMs per scale-out server.
Agent-based physical server migrations (including AWS, GCP, and other hypervisors) require the deployment of a primary replication appliance. This appliance supports between 50 and 100 VMs at a time. In scaling scenarios, you can add scale-out replication appliances connected to the primary replication appliance. This approach can help you synchronize between 50 and 100 additional VMs per scale-out server.
Azure Migrate walkthrough
The following section walks you through the process of setting up Azure Migrate, integrating it with a Hyper-V, and migrating a VM to Azure using the Azure Portal.
PrerequisitesTo build the base environment required to perform the steps in this walkthrough, you need a basic understanding of installing and configuring Hyper-V hosts, and of creating, configuring, and managing Hyper-V VMs.
ImportantBefore you begin, review all the prerequisites and ensure your Hyper-V hosts and VMs are updated and compatible for replication to Azure.
ImportantIf you are following along, you’ll want to select resources and unique resource names based on your environment for each of your deployments.
ImportantIf you are following along, delete any unwanted resources after you have completed testing to reduce charges being levied by Microsoft for these resources.
Using Azure Portal
Create Azure Migration Appliance
To set up Azure Migrate and migrate a VM using the Azure Portal, follow these steps:
Log in to the Azure Portal, type azure migrate in the search box, and select it from the list that appears. (See Figure 3-1.)

FIGURE 3-1Search for the Azure Migrate service.
Under Servers, Databases and Web Apps, click the Discover, Access and Migrate button. (See Figure 3-2.)

FIGURE 3-2The Migrate Your On-Premises Datacenter to Azure page.
Click the Create Project button. (See Figure 3-3.)

FIGURE 3-3The Create Project button.
In the Create Project page, enter the following information (see Figure 3-4) and click Create:
SubscriptionSelect the subscription you want to use to create the project.
Resource GroupSelect the resource group you want to use to create the project. Alternatively, click the Create New link and follow the prompts.
ProjectType a unique name for the project.
GeographySelect the country in which to create the project. Although you can select any country, it is recommended that you choose the country where you intend to host your workloads.
Connectivity MethodChoose Public Endpoint or Private Endpoint (as shown here).
NoteIf you choose Private Endpoint, you will be presented with additional options.

FIGURE 3-4Create Project page.
After the project is created, you will be prompted to set up the discovery process.
In the Azure Migrate: Discovery and Assessment page, click the Discover link. (See Figure 3-5.)
On the Discover page (see Figure 3-6), select the following options:
Discover Using ApplianceClick this to select it.
Are Your Servers VirtualizedChoose Yes, with Hyper-V from the drop-down list.
Name Your ApplianceEnter a unique name for your appliance.
Click the Generate Key button.
This generates a key file, which you will need later to register the appliance with this Azure Migrate project. Save this key in a safe location.

FIGURE 3-5Azure Migrate: Discovery and Assessment page.

FIGURE 3-6Discover wizard in the Azure Migrate Discovery and assessment service option.
Under Download Azure Migrate Appliance, select the VHD File option button and click Download.
When the download is complete, move or copy the downloaded VHD file to your Hyper-V host where you intend to deploy the appliance.
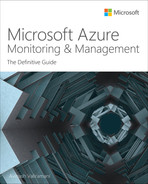
Open Hyper-V Manager and connect to the Hyper-V host to which you want to import.
Right-click the Hyper-V host in the pane on the left and choose Import Virtual Machine. (See Figure 3-7.)
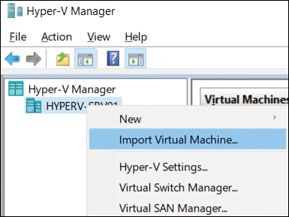
FIGURE 3-7Importing the VM in Hyper-V Manager.
On the Before You Begin page of the Import Virtual Machine wizard (see Figure 3-8), click Next.

FIGURE 3-8Before You Begin page.
In the Locate Folder page (see Figure 3-9), click Browse, and select the folder in which you saved the VHD file you downloaded earlier. Then click Next.

FIGURE 3-9Locate Folder page.
On the Select Virtual Machine page (see Figure 3-10), verify that the VM has a name similar to AzureMigrateAppliance_vXX.XX.XX.XX and click Next.

FIGURE 3-10Select Virtual Machine page.
On the Choose Import Type page (see Figure 3-11), select Register the VM In-Place (Use the Existing Unique ID) or Copy the VM (Create a New Unique ID) and click Next.

FIGURE 3-11Choose Import Type page.
On the Connect Network page (see Figure 3-12), select the virtual switch that will set up the VM in a network that provides internet connectivity once the appliance is online and click Next.

FIGURE 3-12Connect Network page.
On the Summary page (see Figure 3-13), check your settings and click Finish to import the VM.

FIGURE 3-13Summary page.
Configure Azure Migrate Appliance
After the VM has been created, connect to it in the Hyper-V console.
On the License Terms page (see Figure 3-14), read the license terms and click Accept.

FIGURE 3-14License Terms page.
On the Customize Settings page (see Figure 3-15), in the Password and Reenter Password boxes, enter a secure password for the built-in administrator account. Then click Finish.
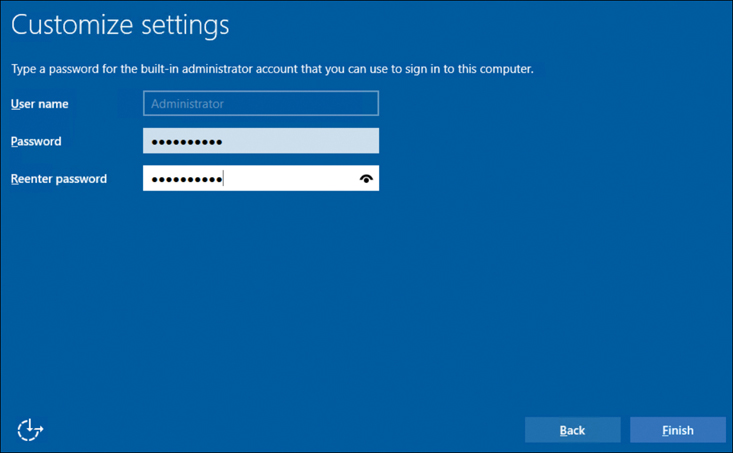
FIGURE 3-15Customize Settings page.
Use the password you just set up to log in to the VM.
The Microsoft Edge browser opens automatically and connects to the local web server on port 44368 to launch the Appliance Configuration Manager (see Figure 3-16). The manager checks to make sure certain prerequisites have been met. For example, it verifies connectivity to Microsoft Azure, ensures that the appliance is set with the correct date and time, and checks whether there are any updates available to install. If it detects any errors, you will need to rectify them and click the Rerun Prerequisites button before you can proceed.

FIGURE 3-16Appliance Configuration Manager wizard.
Under Register with Azure Migrate (see Figure 3-17), copy the key you generated earlier, paste it into the box, and click the Login button.

FIGURE 3-17Register with Azure Migrate section.
In the Continue with Azure Login pop-up box (see Figure 3-18), click the Copy Code & Login button.

FIGURE 3-18Continue with Azure Login pop-up box.
A new tab opens in Microsoft Edge that prompts you to enter the code you copied earlier (see Figure 3-19). Paste in the code and click Next.

FIGURE 3-19Microsoft Edge window.
On the Sign-In page (see Figure 3-20), sign in with a privileged account that has rights to your Azure subscription to connect using Azure PowerShell and register the appliance. Then click Next. Then, when sign-in is complete, close the browser window.

FIGURE 3-20Microsoft Azure PowerShell Sign-In page.
The Register with Azure Migrate section of the Appliance Configuration Manager shows that the appliance has been registered successfully. (See Figure 3-21.)

FIGURE 3-21Register with Azure Migrate section, with the appliance successfully registered.
In the Manage Credentials and Discovery Sources section of the Appliance Configuration Manager, under Step 1, click the Add Credentials button.
Enter the local administrative credential information for the first Hyper-V host to which the appliance should connect and discover VMs for migration to Azure:
Friendly name
Username (for each admin account)
Password (for each admin account)
Repeat the previous two steps as needed until you’ve entered the local administrative credential information for necessary Hyper-V hosts.
TipIf the Hyper-V hosts are registered in Active Directory, you can add a single domain account that has admin rights on all the Hyper-V hosts.
Under Step 2,click the Add Discovery Source button.
Enter the following information about the first Hyper-V host to which the appliance should connect for VM discovery (see Figure 3-22):
Source type
Mapped credentials
IP address/FQDN of the Hyper-V host
Port number for the management service

FIGURE 3-22Manage credential and discovery sources in the appliance configuration manager wizard.
Repeat the previous two steps until you’ve added all the Hyper-V hosts.
Click the Start Discoverybutton.
NoteDepending on the number of Hyper-V hosts you set up for discovery, the discovery process can take anywhere from 15 to 20 minutes to a few hours. When the discovery process is complete, you’ll see the success message shown in Figure 3-23.

FIGURE 3-23Discovery process result message.
When the discovery process is complete, you’re ready to assess the readiness of the discovered servers for migration to Azure.
Setup Assessment
Switch back to the Overview tab for the Azure Migrate project you created earlier.
Locate the Discover tab in the Assessment Tools section, under Azure Migrate: Discovery and Assessment. The Discovered Servers section of this tab shows how many VMs were discovered. (See Figure 3-24.)

FIGURE 3-24The Discover tab under Azure Migrate: Discovery and Assessment.
Under Discovered Servers, click the numeral that represents the number of servers found in discovery.
On the Discovered Servers page (see Figure 3-25), click Create Group.

FIGURE 3-25Discovered servers.
On the Create Group page (see Figure 3-26), enter the following information, select the VMs you want to include in your assessment, and click Create:
Discover SourceSelect the servers discovered by the Azure Migrate appliance.
Group NameEnter a unique name for the group.
Group PurposeSelect I Want to Use This Group to Create Azure VM Assessments from the drop-down list.
Appliance NameSelect the appliance you created earlier from the drop-down list.

FIGURE 3-26Create Group page.
After the group has been created, click the Assess button on the group’s page. (See Figure 3-27.)
FIGURE 3-27OnpremisesVMs group page.
On the Create Assessment page (see Figure 3-28), enter a unique name for the assessment, choose Azure VM from the Assessment Type drop-down list, and click Create.

FIGURE 3-28Create Assessment page.
View Assessments Results
The results of the assessment appear on the Assessments page (see Figure 3-29). The initial analysis will likely have a low confidence rating. If you wait for a more thorough assessment, you will likely receive a higher confidence rating and a more accurate assessment of the VM’s compute, memory, and storage requirements.

FIGURE 3-29View Assessments page.
To view the specifics of the assessment, click the entry for the assessment in the Assessments page.
The assessment report opens. The Overview tab of the assessment report (see Figure 3-30) shows an initial assessment of the VM’s readiness for migration to Azure, and monthly cost estimates for the different VM components, including compute and storage (broken up by storage type).
TipYou can recalculate the assessment when a few days or weeks have passed since the initial assessment to obtain a more accurate report.
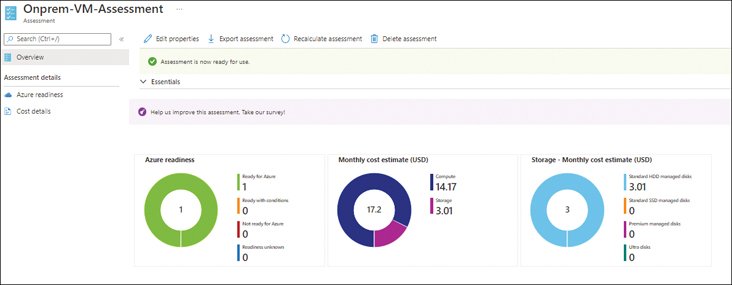
FIGURE 3-30OnPrem-VM-Assessment page.
Click the assessment report’s Azure Readiness tab to view details about the VMs that are part of the assessment, including the following information (see Figure 3-31):
The Azure VM readiness state of each VM
The recommended Azure VM size
The suggested tool to use to migrate the VM to Azure
The current OS running on the VM
The VM boot type
The number of disks attached to the VM on-premises

FIGURE 3-31Azure Readiness tab.
Click the assessment report’s Cost Detailstab to view monthly cost estimates for each of the VMs that are part of the assessment, including the following information (see Figure 3-32):
The recommended Azure VM size (this is the same as shown on the Azure Readiness tab)
The different Azure managed disks that each VM will require
A monthly compute cost estimate (USD) for each VM
A monthly storage cost estimate (USD) for each VM

FIGURE 3-32Cost Details tab.
With the discovery and assessment complete, you’re ready to replicate the VMs to Azure.
Setup Replication Appliance
In the Overviewtab for the Azure Migrate project, in the Migration Tools section, under Azure Migrate: Server Migration, click Discover. (See Figure 3-33.)

FIGURE 3-33Azure Migrate: Server Migration.
On the Discover page (see Figure 3-34), enter the following information and click Create Resources:
Are Your Machines Virtualized?Select Yes, with Hyper-V.
Target RegionSelect the region you want to use as your target region.
Confirm That the Target Region for Migration Is “West US 2”Select this check box to confirm that the target region you selected is correct.

FIGURE 3-34Discover page.
Azure Migrate creates the required back-end resources. (This might take a few minutes.) After the resources are created, you’ll see the options shown in Figure 3-35.

FIGURE 3-35Download appliance.
Under Prepare Hyper-V Host Servers, click the Download link to download the Hyper-V replication provider software installer.
Still under Prepare Hyper-V Host Servers, click the Download button to obtain a copy of the registration key. Store this key in a safe location.
Switch to the Hyper-V host that you want to integrate with the Azure Migrate service and run the installer you just downloaded.
NoteYou will perform the following steps on each of the Hyper-V hosts that you want to integrate with the Azure Migrate service for VM migrations.
The Azure Site Recovery Provider Setup (Hyper-V Server) wizard starts.
On the Microsoft Update tab (see Figure 3-36), leave the On option button selected (use Microsoft Update to check for available updates during the install process) and click Next.

FIGURE 3-36Microsoft Update.
On the Provider Installation tab (see Figure 3-37), click Browse to locate and select the folder in which you want to install the software. Then click Install.

FIGURE 3-37Provider Installation tab.
When the installation is complete, click Register. (See Figure 3-38.)

FIGURE 3-38Click the Register button.
The Microsoft Azure Site Recovery Registration wizard starts.
On the Vault Settings tab (see Figure 3-39), click Browse, locate and select the registration key you downloaded in step 50, and click Next.
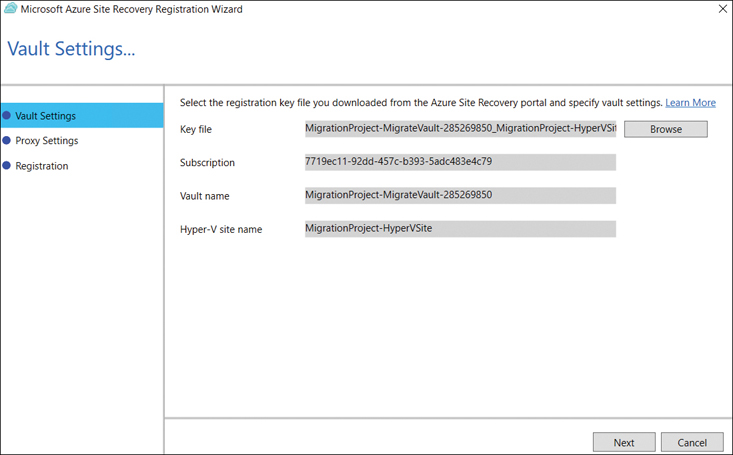
FIGURE 3-39Vault Settings tab.
On the Proxy Settings tab (see Figure 3-40), select either the Connect Directly to Azure Site Recovery Without a Proxy Server or the Connect to Azure Site Recovery Using a Proxy Server option button, depending on your needs, and click Next.

FIGURE 3-40Proxy Settings tab.
The Microsoft Azure Site Recovery Registration wizard automatically registers the Hyper-V host. The Registration tab shows the progress of the operation. (See Figure 3-41.)

FIGURE 3-41Registration tab.
When registration is complete, click Finish. (See Figure 3-42.)

FIGURE 3-42Successful registration.
Switch back to Discover page in the Azure Portal. (See Figure 3-43.) Under Finalize Registration, next to Registered Hyper-V Hosts, you’ll see the number of Hyper-V hosts connected to your project. When all your hosts have been connected, click Finalize Registration.

FIGURE 3-43Finalize Registration.
After you have successfully registered all the necessary Hyper-V hosts, you’re ready to start the replication process.
Start VM Replication
In the Overview tab for the Azure Migrate project you created earlier, in the Migration Tools section, under Azure Migrate: Server Migration, click Replicate. (See Figure 3-44.)

FIGURE 3-44Migration Tools section.
In the Source Settings tab of the Replicate wizard (see Figure 3-45), open the Are Your Machines Virtualized? drop-down list and select Yes, with Hyper-V. Then click Next.

FIGURE 3-45Source Settings tab of the Replicate wizard.
In the Virtual Machines tab (see Figure 3-46), open the Import Migration Settings from an Assessment drop-down list and do one of the following:
Choose the assessment you selected earlier. If you opt for this approach, all the relevant VMs and assessment results will be applied throughout the rest of this wizard.
Choose No, I’ll Specify the Migration Settings Manually.This example uses this option, because it enables you to review all the configuration settings you want to implement.

FIGURE 3-46 Virtual Machines page.
In the Virtual Machines box, enter all the VMs you want to replicate to Azure. Then click Next.
In the Target Settings tab (see Figure 3-47), enter the following information and click Next:
SubscriptionSelect the subscription you want to use as the target environment.
Resource GroupSelect the resource group to use.
Replication Storage AccountSelect the storage account to use to store the replication logs.
Virtual NetworkSelect the virtual network to use post-migration.
SubnetSelect the subnet to use for the VM.
Availability OptionsSelect the availability options that you would like to set for the VM.
Azure Hybrid BenefitIf your Microsoft license supports this benefit, click Yes, and select the I Confirm I Have an Eligible Windows Server License… check box.

FIGURE 3-47 Target Settings tab.
In the Compute tab (see Figure 3-48), enter the following information and click Next:
Azure VM NameEnter a unique name for the VM in Azure. (This can be the same name as the one the VM currently has in the on-premises environment.)
Azure VM SizeSelect the VM SKU to assign post-migration or select Automatically Select Matching Configuration to allow Azure to choose one based on the VM assessment or current size.
OS TypeChoose Windows or Linux.
OS DiskSelect the disk that is hosting the operating system for the VM.

FIGURE 3-48 Compute tab.
In the Disks tab (see Figure 3-49), under Disks to Replicate, select the disks you want to replicate to Azure. Alternatively, select All Selected to replicate all disks associated with the VM. Then click Next.

FIGURE 3-49 Disks tab.
In the Tags tab (see Figure 3-50), enter any tags you would like to associate with the VMs, and click Next.

FIGURE 3-50 Tags tab.
In the Review + Start Replication tab (see Figure 3-51), review your settings and click Review + Start Replication.

FIGURE 3-51 Review + Start Replication tab.
In the Enable Replication page (see Figure 3-52), monitor the replication jobs for each VM you set up in the earlier steps to make sure they complete successfully.

FIGURE 3-52 Enable replication job.
In the Overview tab for the Azure Migrate project you created earlier, in the Migration Tools section, under Azure Migrate: Server Migration, click Overview. (Refer to Figure 3-44.)
Select each of the replicating VMs, one at a time, to view its Overview tab. This shows the status of the VM. (See Figure 3-53.) When the VM has synced completely with Azure, its status is listed as Protected.

FIGURE 3-53 Overview page for the OnpremVM01 VM.
Test Migration
When a replicated VM’s status has switched to Protected, you can perform a test migration for it.
NoteYou will perform the following steps on each of the Hyper-V hosts for which you want to test migration before you perform the final migration to Azure.
In the replicated VM’s page, click the Test Migration button. (See Figure 3-54.)

FIGURE 3-54 Click the Test Migration button.
On the Test Migration page (see Figure 3-55), open the Virtual Network drop-down list and choose the virtual network in which you want to set up the test VM. Then click OK.

FIGURE 3-55 Test Migration page.
In the Test Failover page (see Figure 3-56), monitor the progress of the test failover job to make sure all the job steps complete successfully.
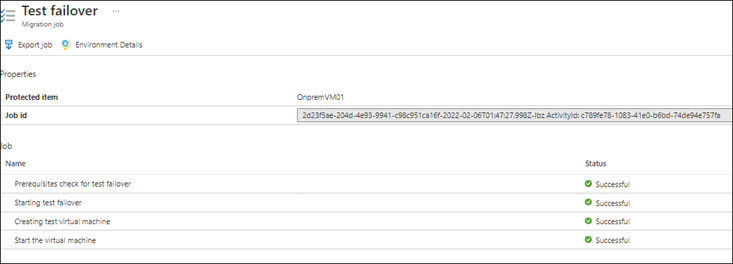
FIGURE 3-56 Test Failover page.
When the failover job is complete, the on-premises VM(s) appear in the Virtual Machines page with a -test suffix.
Select the VM and log in to it using the IP provided in the Overview tab. (See Figure 3-57.)
NoteIf you have not yet set up connectivity to the VM network, assign a public IP to the VM so you can access it over the internet for testing. (This is covered in Book 1 of this series, Microsoft Azure Compute: The Definitive Guide, in Chapter 1, “Azure Virtual Machines.”)

FIGURE 3-57 Virtual Machines and the page for the page test VM.
Confirm that all your data and applications are available as required and perform any testing you like.
When you finish testing, you need to clean up the test VM.
Cleanup Test Migration
In the Overview tab for the VM that is being replicated (see Figure 3-58), click Clean Up Test Migration.

FIGURE 3-58 OnpremVm01 page.
In the Test Migrate Cleanup dialog box (see Figure 3-59), type any notes from the test that you would like to record in the Notes box. These could include the test participants, test outcomes, issues encountered, or changes to incorporate in future tests or after testing the replication configuration.

FIGURE 3-59 Test Migrate Cleanup Notes.
Select the Testing Is Complete. Delete Test Failover Virtual Machines check box and click OK to initiate the cleanup job.
From the Test Failover Cleanup page (see Figure 3-60), monitor the cleanup job to ensure it completes successfully.

FIGURE 3-60 Test Failover Cleanup page.
When testing is complete, you are ready to migrate the VM to Azure.
Perform Migration to Azure
In the Overview tab for the Azure Migrate project you created earlier (see Figure 3-61), in the Migration Tools section, under Azure Migrate: Server Migration, click Migrate.

FIGURE 3-61 Migrate option under Azure Migrate: Server Migration.
On the Migrate page (see Figure 3-62), enter the following information and click OK.
Shutdown Machines Before Migration to Minimize Data LossSelect Yes.
Virtual MachinesSelect the VMs to migrate.

FIGURE 3-62 Migrate page.
In the Planned Failover page (see Figure 3-63), monitor the progress of the migration job to confirm it completes successfully.
NoteIf any errors occur, analyze and fix any highlighted issues and rerun the failover process.

FIGURE 3-63 Planned Failover page.
When the migration is complete, the on-premises VM(s) appear in the Virtual Machines page with the name you set earlier. You can now turn off replication for that VM.
Select the VM and log in to it using the IP provided in the Overview tab.
NoteAgain, if you have not yet set up connectivity to the VM network, assign a public IP to the VM so you can access it over the internet for testing. (Refer to Chapter 1 in Book 1 of this series.)
In the replicating VM’s Overview tab (see Figure 3-64), click Stop Replication.

FIGURE 3-64 OnpremVM01 Overview tab.
In the Stop Replication page (see Figure 3-65), open the Remove Replication Settings drop-down list and choose Stop Replication and Remove Replication Settings. Then click OK.

FIGURE 3-65 Stop Replication page.
In the Disable Replication page (see Figure 3-66), monitor the progress of the job to ensure it completes successfully.

FIGURE 3-66 Disable Replication page.
Repeat the steps in this section for all the other VMs you want to migrate to Azure.
Best practices
Following are some general best practices regarding assessing and migrating servers to Azure VMs using the Azure Migrate service:
Perform discovery and assessmentDiscovery and assessment are important phases in any migration. They can help IT clearly identify and plan for a migration, taking into account potential roadblocks such as lack of server readiness depending on the server OS, hypervisor version, and so on. Even the initial as-is assessment report provides a baseline understanding of the anticipated VM size and disk type to use for the migrated servers.
Generate performance-based assessments for servers intended for migration to AzureThis can help you to identify more accurate size and disk parameters before setting up replication for the servers.
Perform dependency analysisIn larger complex environments, performing dependency analysis can significantly reduce errors and downtime during migrations because it enables you to better plan and execute migrations for interconnected workloads. Dependency analysis can also help in smaller and mid-size environments if there are numerous applications and databases hosted across multiple servers.
Ensure confidence ratings for assessments are highConfidence ratings are based on the number of data points that Azure Migrate is able to gather using the Azure Migrate on-premises appliance. The higher the confidence rating, the more accurate the server, disk capacity, and performance planning you can perform. Be sure to run the performance-based assessments for a period of at least a week, if not longer, to gather more data points for a better analysis.
Review licensing options and benefitsDifferent OEM licensing agreements can help you significantly reduce the cost of your server workloads post-migration. Be sure to review and understand what options are available with your existing licensing to take advantage of these benefits. Reach out to your OEM, if possible, to get deeper insights on what options are available for your organization.
Conduct detailed planning workshops with all business, application, and IT stakeholdersThis enables you to plan and execute the migration in a collaborative manner. These workshops can help ensure internal alignment and reduce the risk of migration failure due to known but unaccounted for considerations due to a lack of collaborative planning.
Test migrationsAzure Migrate enables you to test migrations in an isolated Azure environment. Use this capability to ensure that interconnectivity between your servers and services is working in the Azure cloud. This can help you to plan for changes in the on-premises environment before the migration to identify, address, and possibly automate any areas of manual intervention such as IP address references in configuration files.