
Chapter 11 Threads and Fasteners
11-1 Introduction
This chapter explains how to draw threads, washers, keys, and springs. It explains how to use fasteners to join parts together and design uses for washers, keys, and springs.
Throughout the chapter, it will be suggested that blocks and wblocks be created of the various thread and fastener shapes. Thread representations, fastener head shapes, setscrews, and both internal and external thread representations for orthographic views and sectional views are so common in technical drawings that it is good practice to create a set of wblocks that can be used on future drawings in order to avoid having to redraw a thread shape every time it is needed.
See Chapter 3 for an explanation of the Block command.
11-2 Thread Terminology
Figure 11-1 shows a thread. The peak of a thread is called the crest, and the valley portion is called the root. The major diameter of a thread is the distance across the thread from crest to crest. The minor diameter is the distance across the thread from root to root.

Figure 11-1
The pitch of a thread is the linear distance along the thread from crest to crest. Thread pitch is usually referred to in terms of a unit of length, such as 20 threads per inch or 1.5 threads per millimeter.
11-3 Thread Callouts (Metric Units)
Threads are specified on a drawing by drawing callouts. See Figure 11-2. The M preceding a drawing callout specifies that the callout is for a metric thread. Holes that are not threaded use the ø symbol.

Figure 11-2
The number following the M is the major diameter of the thread; for example, an M10 thread has a major diameter of 10 millimeters. The pitch of a metric thread is assumed to be a coarse thread unless otherwise stated. The callout M10 × 30 assumes a coarse thread, or 1.5 threads per millimeter. The number 30 is the thread length in millimeters. The “×” is read as “by,” so the thread is called a “ten by thirty.”
The callout M10 × 1.25 × 30 specifies a pitch of 1.25 threads per millimeter. This is not a standard coarse thread size, so the pitch must be specified.
Figure 11-3 shows a list of preferred thread sizes. These sizes are similar to the standard sizes shown in Figure 9-32. A list of other metric thread sizes is included in the online Appendix.

Figure 11-3
Whenever possible, use preferred thread sizes for designing. Preferred thread sizes are readily available and are usually cheaper than nonstandard sizes. In addition, tooling such as wrenches is readily available for preferred sizes.
11-4 Thread Callouts (English Units)
English unit threads always include a thread form specification. Thread form specifications are designated by capital letters, as shown in Figure 11-4, and are defined as follows:
UNC—Unified National Coarse
UNF—Unified National Fine
UNEF—Unified National Extra Fine
UN—Unified National, or constant pitch threads

Figure 11-4
An English unit thread callout starts by defining the major diameter of the thread, followed by the pitch specification. The callout .500 – 13 UNC means a thread whose major diameter is .500 inch, with 13 threads per inch, manufactured to the Unified National Coarse standards.
There are three possible classes of fit for a thread: 1, 2, and 3. The different classes specify a set of manufacturing tolerances. A class 1 thread is the loosest, and a class 3, the most exact. A class 2 fit is the most common.
The letter A designates an external thread, B an internal thread. The symbol × means “by,” as in 2 × 4, or “two by four.” The thread length (3.00) may be followed by the word LONG to prevent confusion about which value represents the length.
Drawing callouts for English unit threads are sometimes shortened, as shown in Figure 11-4. The callout .500–13UNC–2A × 3.00 LONG is shortened to .500–13 × 3.00. Only a coarse thread has 13 threads per inch, and it should be obvious whether a thread is internal or external, so these specifications may be dropped. Most threads are class 2, so it is tacitly accepted that all threads are class 2 unless otherwise specified. The shortened callout form is not universally accepted. When in doubt, use a complete thread callout.
A partial list of standard English unit threads is shown in Figure 11-5. A more complete list is included in the online Appendix. Some of the drill sizes listed use numbers and letters. The decimal equivalents to the numbers and letters are listed in the online Appendix.

Figure 11-5
11-5 Thread Representations
There are three ways to graphically represent threads on a drawing: detailed, schematic, and simplified. Figure 11-6 shows the three representations.

Figure 11-6
Detailed representations look the most like actual threads, but are time consuming to draw. Creating a wblock of a detailed shape will help eliminate this time constraint.
Schematic and simplified thread representations are created by drawing a series of straight lines. The simplified representation uses only two hidden lines and can be mistaken for an internal hole if it is not accompanied by a thread specification callout. The choice of which representation to use depends on individual preferences. The resulting drawing should be clear and easy to understand. All three representations may be used on the same drawing, but in general, only very large threads (those over 1.00 in., or 25 mm) are drawn for the detailed representation.
Ideally, thread representations should be drawn with each thread equal to the actual pitch size. This is not practical for smaller threads and not necessary for larger ones. Thread representations are not meant to be exact duplications of the threads, but representations, so convenient drawing distances are acceptable.
To Draw a Detailed Thread Representation
Draw a detailed thread representation for a 1.00-inch-diameter thread that is 3.00 inches long. See Figure 11-7.

Figure 11-7
 Set Grid = .5 and Snap = .125.
 Draw a 4.00-inch centerline near the center of the screen.
 Zoom the area around the centerline.
 Draw a zigzag pattern .375 above the centerline using the 0.125 snap points. Start the zigzag line .50 from the left end of the centerline.
 Access the Array command.
The Array dialog box will appear.
 Select the Rectangular option.
 Click the Select objects button, and then select the zigzag pattern.
 Set the Row value for 1 and the Column value for 12.
 Set the Row offset for 0.0000.
 Set the Column offset for 0.25; then select the OK button.
 Mirror the arrayed zigzag line about the centerline.
 Draw vertical lines at both ends of the thread and two slanted lines between the thread’s roots and crests, as shown.
 Array both slanted lines, using the same array parameters used for the zigzag line: 12 columns .25 apart.
 Save the thread representation as a block and wblock named DETLIN. Define the insertion point as shown. Creating blocks is explained in Chapter 3.
Another technique for drawing a detailed thread representation is to draw a single thread completely and then use the Copy or Array command to generate as many additional threads as are necessary.
It is recommended that you save all thread wblocks on a separate disk. This disk will become a reference disk that you can use when creating other drawings that require threads.
Figure 11-8 shows a metric unit detailed thread representation. It was created by the procedure outlined. Grid was set at 10, Snap was set at 2.5, and the distance from the centerline to the zigzag pattern was 10. Draw and save the metric detailed thread representation shown in Figure 11-8 as a wblock named DETLMM.

Figure 11-8
To Create an Internal Detailed Thread Representation in a Sectional View
Figure 11-9 shows how to create a 1.00-inch internal detailed thread representation from the wblock DETLIN of the external detailed thread created previously.

Figure 11-9
- Use Insert, and locate the detailed wblock on the drawing screen at the indicated insert point. In this example, the thread is to be drawn in a vertical orientation, so the block is rotated 90° when it is inserted. The same scale size is used for the wblock as was drawn for a 1.00-inch diameter thread.
- The thread created from wblock DETLIN is longer than needed, so explode the block and then erase the excess lines.
- Define the hatch pattern as ANSI31, and apply hatching to the areas outside of the thread, as shown.
To Create a Schematic Thread Representation
Draw a schematic representation of a 1.00-inch-diameter thread. See Figure 11-10.

Figure 11-10
- Set Grid to .50 and Snap to .125.
- Draw a 4.00-inch centerline near the middle of the drawing screen.
- Draw the outline of the thread, including a chamfer, using the dimensions shown.
The chamfer was drawn in this example by using the 0.125 snap points, but the Chamfer command could also have been used.
The 1.00 diameter was chosen because it will make it easier to determine scale factors for the wblock when inserting the representation into other drawings.
- Draw three vertical lines as shown.
- Use the Array, Rectangular command to draw 11 vertical lines across the thread. The distance between the 11 lines (COLUMNS) is .25.
A distance of –.25 would create lines to the left of the original line.
- Save the representation as a wblock named SCHMINCH. Define the insertion point as shown.
Figure 11-11 shows a metric unit version of a schematic thread representation in a sectional view. The procedure used to create the representation is the same as that explained previously, but with different drawing limits and different values. The major diameter is 20, and the spacing between lines is 2.5 and 5, as shown. Draw and save the representation as a wblock named SCHMMM.

Figure 11-11
To Create an Internal Schematic Thread Representation
Figure 11-12 shows a 36-millimeter-diameter internal schematic thread representation. It was developed from the wblock SCHMMM created previously.

Figure 11-12
- Set Grid = 10
Snap = 5
Limits = 297,210
Zoom = ALL
- Insert the wblock SCHMMM at the indicated insertion point.
The required thread diameter is 36 millimeters. The wblock SCHMMM was drawn with a diameter of 20 millimeters. This means that the block must be enlarged by using a scale factor. The scale factor is determined by dividing the desired diameter by the wblock’s diameter.
36/20 = 1.8
The wblock must also be rotated 90° to give it the correct orientation.
- The inserted thread shape is longer than desired, so first explode the wblock and then use the Erase, Trim, and Extend commands as needed.
- Draw the sectional lines, using Hatch ANSI31.
- Save the drawing as a wblock if desired.
To Create a Simplified Thread Representation
The simplified representation looks very similar to the orthographic view of an internal hole, so it is important to always include a thread callout with the representation. In the example shown, a leader line was included with the representation. See Figure 11-13. The leader serves as a reminder to add the appropriate drawing callout. If the leader line is in an inconvenient location when the wblock is inserted into a drawing, the leader line can be moved or simply erased.

Figure 11-13
- Set Grid = .5
Snap = .125
- Draw a 4.00 centerline near the center of the screen.
- Draw the thread outline, using the given dimensions.
- Draw the hidden lines, using the given dimensions.
- Save the thread representation as a wblock named SIMPIN. Define the insertion point as shown.
Figure 11-14 shows an internal simplified thread representation in a sectional view. Note how hidden lines that cross over the sectional lines are used. The hatch must be drawn first, and the hidden lines added over the pattern. If the hidden lines are drawn first, the Hatch command may not add section lines to the portion between the hidden line and the solid line that represents the edge of the threaded hole.

Figure 11-14
11-6 Orthographic Views of Internal Threads
Figure 11-15 shows top and front orthographic views of internal threads. One thread goes completely through the object, the other only partially.

Figure 11-15
Internal threads are represented in orthographic views by parallel hidden lines. The distance between the lines should be large enough so that there is a clear distinction between the lines; that is, the lines should not appear to blend together or become a single, very thick line.
Circular orthographic views of threaded holes are represented by two circles: one drawn by using a continuous line and the other drawn by using a hidden line. The distance between the circles should be large enough to be visually distinctive. The two circles shown should both be clearly visible.
Threaded holes are created by first drilling a tap hole and then tapping (cutting) the threads with a tapping bit. Tapping bits have cutting surfaces on their side surfaces, not on the bottom. This means that if the tapping bit were forced all the way to the bottom of the tap hole, the bit could be damaged or broken. It is good design practice to make the tap hole deep enough so that a distance equivalent to at least two thread lengths (2P) extends beyond the tapped portion of the hole.
Threaded holes that do not go completely through an object must always show the unused portion of the tap hole. The unused portion should also include the conical point. See Chapter 5.
If an internal 0.500–13 UNC thread does not go completely through an object, the length of the unused portion of the tap hole is determined as follows:
Inches/Thread
= Pitch length = 1.00/13
= .077 inch
Therefore,
2P = 2(.077) =. 15 inch
The distance .15 represents a minimum. It would be acceptable to specify a pilot hole depth greater than .15, depending on the specific design requirements.
If an internal M12 ×1.75 thread does not go completely through an object, the length of the unused portion of the tap hole is determined as follows:
2(Pitch length) = 2(1.75) = 3.50 mm
11-7 Sectional Views of Internal Thread Representations
Figure 11-16 shows sectional views of internal threads that do not go completely through an object. Each example was created from wblocks of the representations. The hatch pattern used was ANSI32. Each example includes both a threaded portion and an untapped pilot hole that extends approximately 2P beyond the end of the tapped portion of the hole.

Figure 11-16
When drawing a simplified representation in a sectional view, draw the hidden lines that represent the outside edges of the threads after the section lines have been added. If the lines are drawn before the section lines are added, the section lines will stop at the outside line. Section lines should be drawn up to the solid line, as shown.
11-8 Types of Threads
Figure 11-17 shows the profiles of four different types of thread: American National, square, acme, and knuckle. There are many other types of threads. In general, square and acme threads are used when heavy loading is involved. A knuckle thread can be manufactured from sheet metal and is most commonly found on a lightbulb.

Figure 11-17
The American National thread is the thread shape most often used in mechanical design work. All threads in this chapter are assumed to be American National threads unless otherwise stated.
11-9 How to Draw an External Square Thread
Figure 11-18 shows how to draw a 4.00-inch-long external square thread that has a major diameter of 5.25 and 2 threads per inch. The procedure is as follows:
- Set Grid = .50
Snap = .125
- Draw two 5.00-long horizontal lines 2.00 apart, and draw a 4.50 centerline between them.
- Draw a rhomboid centered about the centerline according to the given dimensions.
In this example, P = .5, so .5P = .25.
- Use the Array, Rectangular command to create eight columns (2 threads per inch) .50 apart.
- Draw slanted lines 1–2 and 3–4.
- Zoom the upper right portion of the thread as needed.
- Draw a horizontal line .25 (.5P) from the outside edge of the thread as shown.
- Draw line 5–6 from the intersection of the horizontal line drawn in step 7 with line 1–2, labeled point 5, to the intersection of the toothline 1–6 and the thread’s centerline.

Figure 11-18
- Trim the horizontal line to create line 5–7, and trim line 1–2 below point 5.
- Array lines 1–5, 5–6, and 5–7 by using Array, Rectangular with eight columns –.25 apart.
The minus sign will generate a right-to-left array.
- Repeat steps 7 through 10 for the lower portion of the thread. Array eight columns, +.25 apart. The plus sign generates a left-to-right array.
- Erase any excess lines, and add any necessary shaft information to the drawing.
- Save the drawing as a wblock named SQIN, using the indicated insertion point.
11-10 How to Draw an Internal Square Thread
Figure 11-19 shows an external 2.25 × 2 square thread. The drawing was developed from wblock SQIN created in Section 11-9. The wblock was rotated to the correct orientation. Erase and Trim were used to fit the thread within the required depth. No scale factor was needed.

Figure 11-19
11-11 How to Draw an External Acme Thread
Draw a 2.25 × 2 × 4.00-long external acme thread. The procedure is as follows. See Figure 11-20.

Figure 11-20, Part 1

Figure 11-20, Part 2
- Set Grid = .5
Snap = .125
- Draw a 5.00-long horizontal centerline.
- Draw two .5-long horizontal lines 1.125 above and below.
These lines establish the major diameter of the thread.
- Draw a single acme thread, using the given dimensions. Use Zoom to help create an enlarged working area. The first thread should start at the right end of the short horizontal line above the centerline.
The width dimensions are taken along the horizontal centerline of the individual thread. Each side of the thread is slanted at 14.5° [.5(29)]. In this example, P = .5, so .5P = .25, and .25P = .125.
- Use the Array command, and draw eight columns (two threads per inch) .5 apart to develop the top portion of the thread.
- Copy and move the top portion of the thread to create the lower portion.
Do not use Mirror. The lower portion of the thread is not a mirror image of the upper portion.
- Erase and extend lines as necessary along the lower left portion of the thread to blend the thread into the shaft.
- Draw two slanted lines between the thread’s root lines at the left end of the thread.
- Array the lines drawn in step 8 so that there are eight columns, .5 apart.
- Draw two slanted lines across the thread’s crest lines at the left end of the thread.
- Array the lines drawn in step 10 so that there are eight columns, .5 apart.
- Draw a vertical line at each end of the thread, establishing the thread’s 4.00-inch length.
- Erase and trim the excess lines from the left end of the thread.
- Copy and trim a crest-to-crest line to complete the left end of the thread.
 Save the drawing as a wblock named ACMEIN, using the indicated insertion point.
11-12 Bolts and Nuts
A bolt is a fastener that passes through a clearance hole in an object and is joined to a nut. There are no threads in the object. See Figure 11-21. Note that there are no hidden lines within the nut to indicate that the bolt is passing through. Drawing convention allows for nuts to be drawn without hidden lines.

Figure 11-21
Threads on a bolt are usually made just long enough to correctly accept a nut. This is done to minimize the amount of contact between the edges of threads and the inside surfaces of the clearance holes. The sharp, knifelike thread edges could cut into the object, particularly if the application involves vibrations.
It is considered good design practice to specify a bolt length long enough to allow at least two threads to extend beyond the end of the nut. This ensures that the nut is fully attached to the bolt.
Bolt drawings can be created from wblocks of threads. Remember that a block must be exploded before it can be edited.
11-13 Screws
A screw is a fastener that assembles into an object. It does not use a nut. The joining threads are cut into the assembling object. See Figure 11-22.

Figure 11-22
Screws may or may not be threaded over their entire length. If a screw passes through a clearance hole in an object before it assembles into another object, it is good design practice to minimize the number of threads that contact the sides of the clearance hole.
It is also considered good design practice to allow a few (at least two) unused threads in the threaded hole beyond the end of an assembled screw. If a screw were forced to the bottom of a tapped hole, it might not assemble correctly or could possibly be damaged.
Figure 11-22 shows a schematic thread representation of a screw correctly mounted in a threaded hole.
There is a distance of 2P (two threads) between the end of the screw and the end of the threaded portion of the hole. There should also be a 2P distance between the end of the threaded hole and the end of the pilot hole, plus the conical point of the tap hole, as described in Section 11-6.
Threads are usually not drawn in a threaded hole beyond the end of an assembling screw. This makes it easier to visually distinguish the end of the screw.
Figure 11-23 shows a screw assembled into a hole drawn by using the detailed, schematic, and simplified representations in a sectional view. An orthographic view of a screw in a threaded hole is also shown.

Figure 11-23
The top view shown in Figure 11-23 applies to all three representations and the orthographic view.
11-14 Studs
A stud is a threaded fastener that both screws into an object and accepts a nut. See Figure 11-24. The thread callouts and representations for studs are the same as they are for bolts and screws.

Figure 11-24
11-15 Head Shapes
Bolts and screws are manufactured with a variety of different head shapes, but hexagon (hex) and square head shapes are the most common. There are many different head sizes available for different applications. Extra-thick heads are used for heavy-load applications, and very thin heads are used for applications where space is limited. The exact head size specifications are available from fastener manufacturers.
This section shows how to draw hex and square heads according to accepted average sizes that are functions of the major diameters of both the bolt and the screw. It is suggested that hexagon and square head drawings be saved as wblocks for both inch and millimeter values so that they can be combined with the thread wblocks to form fasteners.
To Draw a Hexagon-Shaped (Hex) Head
Draw front and top orthographic views of a hex head based on a thread with an M24 major diameter. See Figure 11-25.

Figure 11-25
- Set Limits = 297,210
Grid = 10
Snap = 5
- Draw a vertical line and two horizontal lines according to the given dimensions.
The two horizontal lines are used to locate the center of the head in the top view and the bottom of the head in the front view.
- Use Polygon, and draw a hexagon distance across the flats equal to 1.5D, where D is the major diameter of the thread.
In this example, a radius of 18 was used to draw the hexagon. 1.5D = 1.5(24) = 36 is the distance across the flats of the hexagon. Use the Polygon command to circumscribe a six-sided polygon around a circle of radius 18.
- Offset a line .67D from the lower horizontal.
This line defines the thickness of the head. The head thickness is 0.67D, where D is the major diameter of the thread. In this example D = 24, so 0.67D = 0.67(24) = 16.08, which can be rounded off to 16.
- Draw projection lines from the corners of the hexagon in the top view into the front view.
- Zoom in the front view portion of the drawing if necessary. Draw two 60° lines from the corners of the front view as shown so that they intersect on the vertical centerline.
Use Osnap Intersection to accurately locate the corner points. The line from the left corner uses an input of @50,–60; the line from the right corner uses the input @50,–120.
- Draw a circle whose center point is the intersection of the two 60° lines drawn in step 6 and the vertical centerline, and whose radius equals the distance from the center point to the line at the top of the front view.
- Trim the circle so that only the arc between the inside projection lines remains.
- Draw two 60° lines as shown, using the inputs @20, –120 and @20, –60.
- Draw two circles centered about the intersection of the slanted lines drawn in steps 6 and 8. The radius of each circle equals the distance from the center point to the intersection of the circle drawn in step 7 and the inside projection lines labeled point 1.
- Trim and erase as needed.
- Draw two lines from the intersections of the smaller arcs with the outside edge of the head. The input for the lines is @10,30 and @10,150.
These lines could have been generated by the Chamfer command.
- Trim the chamfer lines to the top of the head.
- Use Zoom All, and draw a circle that is circumscribed within the hexagon, as shown.
- Save the drawing as a wblock named HEXHEAD, using the indicated insertion point.
To Draw a Square-Shaped Head
Draw front and top orthographic views of a hex head on the basis of a thread with a 1.00-inch major diameter. See Figure 11-26.

Figure 11-26
- Set Grid = .50
Snap = .25
- Draw two horizontal lines and a vertical line, using the given dimensions.
The intersection of the top horizontal line and the vertical line will be the center point of the top view, and the lower horizontal line will be the bottom edge of the head.
- Use Draw, Polygon and Modify, Rotate (45°) to create a square oriented as shown.
The distance across the square equals 1.50D, or 1.50 inches. This means that the radius for the polygon is .75.
- Offset a line .67 (.67D) from the lower horizontal line.
The offset distance is equal to the thickness of the head.
- Project the corners of the square in the top view into the front view.
- Zoom the front view, and draw four 60° lines from the head’s upper corners and the intersection of the centerline and the top surface of the head, as shown. The inputs for the lines are @1.5,–120 and @1.5,–60. Use Osnap Intersection to ensure accuracy.
- Use Draw, Circle, Center, Radius, and draw two circles about the center points created in step 6. Trim the excess portions of the circle.
- Trim and erase any excess lines.
- Add the 30° chamfer lines as shown. The line inputs are @.5,150 and @.5,30. Use Osnap Intersection to accurately locate the intersection between the arc and the vertical side line of the head.
- Trim any excess lines.
- Zoom the drawing back to its original size, and draw a circle in the top view tangent to the inside edges of the square.
- Save the drawing as a wblock named SQHEAD, using the insertion point indicated.
11-16 Nuts
This section explains how to draw hexagon- and square-shaped nuts. Both construction methods are based on the head shape wblocks created in Section 11-15.
There are many different styles of nuts. A finished nut has a flat surface on one side that acts as a bearing surface when the nut is tightened against an object. A finished nut has a thickness equal to .88D, where D is the major diameter of the nut’s thread size.
A locknut is symmetrical, with the top and bottom surfaces identical. A locknut has a thickness equal to .5D, where D is the major diameter of the nut’s thread size.
To Draw a Hexagon-Shaped Finished Nut
Draw a hexagon-shaped finished nut for an M36 thread. See Figure 11-27.

Figure 11-27
- Set Limits = 297,210
Grid = 10
Snap = 2.5
- Construct a vertical line that is intersected by two horizontal lines 32 millimeters apart.
The thickness of a finished nut is 0.88D. In this example, 0.88(36) = 31.68, or 32.
- Use Insert, and insert the HEXHEAD wblock created in Section 11-15.
The wblock HEXHEAD was created for an M24 thread, so the X and Y scale factors must be increased to accommodate the larger thread size. The scale factor is determined by dividing the desired size by the wblock size. In this example, 36/24 = 1.5. The scale factor is 1.5. Respond to the command prompts as follows:
Command: INSERT
The Insert dialog box will appear.
- Type or select HEXHEAD; press Enter.
- Select the indicated insertion point.
- Specify an X and Y scale of 1.5 and a 0 rotation angle; select OK.
Specify insertion point or [Scale X Y Z Rotate PScale PX PY PZ
PRotate]:
- Press Enter.
If you have not created a wblock, refer to Section 11-15 and draw a hexagon-shaped head.
- Explode the wblock.
- Move the front view of the nut so that the top surface aligns with the top parallel horizontal line.
- Erase the bottom line of the front view of the nut, and extend the vertical line to the lower horizontal line. Erase the top horizontal line in the front view.
- Use Offset to draw a horizontal line 2 millimeters below the bottom of the nut.
This line defines the shoulder surface of the nut. Any offset distance may be used as long as the line is clearly visible. The actual shoulder surface is less than 1 millimeter deep and would not appear clearly on the drawing.
The shoulder surface has a diameter equal to 1.5D [1.5(36) = 54] or, in this example, 54.
- Offset the centerline 27 (half of 54) to each side, and trim the excess lines.
- Save the drawing as a wblock named FNUTHEX. Define the insertion point as shown.
To Draw a Locking Nut
Draw a locking nut for an M24 thread. See Figure 11-28. The HEXHEAD wblock was originally drawn for an M24 thread, so no scale factor is needed.

Figure 11-28
- Set Limits = 297,210
Grid = 10
Snap = 5
- Draw a vertical line and two horizontal lines according to the given dimensions.
The 6 distance is half the 0.5D [0.5(24) = 12] thickness distance recommended for locknuts. Locknuts are symmetrical, so half of the nut will be drawn and then mirrored.
- Insert the HEXHEAD wblock at the indicated insert point.
- Explode the wblock.
- Move the front view of the hex head so that it aligns with the horizontal line, as shown.
- Trim and erase the lines that extend beyond the lower horizontal line.
- Mirror the remaining portion of the front view about the lower horizontal line, and then erase the horizontal line.
- Draw a circle of diameter D in the top view, as shown.
- Save the drawing as a wblock named LNUTHEX, using the indicated insertion point.
The procedure explained previously for hexagon-shaped finish nuts and locknuts is the same as that for square-shaped nuts. Use the wblock SQHEAD in place of the HEXHEAD wblock.
11-17 Sample Problem SP11-1
Draw and specify the minimum threaded hole depth and pilot hole depth for an M12 × 1.75 × 50 hex head screw. Assemble the screw into the object shown in Figure 11-29. Use the schematic thread representation and a sectional view.

Figure 11-29
The SCHMMM wblock was originally drawn for an M20 thread, so a scale factor is needed. The scale factor to reduce an M20 diameter to an M12 is 12/20 = 0.6.
- Insert the SCHMMM wblock and insert it at the indicated point. Use a .6 X and Y scale factor.
- Explode the block, and trim any excess threads.
- Insert the HEXHEAD wblock as indicated. The HEXHEAD wblock was also created for an M20 thread, so the scale factor is again .6.
The thread pitch equals 1.75, so 2P = 3.5. This means that the threaded hole should be at least 50 + 3.5, or 53.5, deep to allow for two unused threads beyond the end of the screw.
The unused portion of the pilot hole should also extend 2P beyond the end of the threaded portion of the hole, so the minimum pilot hole depth equals 53.5 + 3.5 = 57.
The diameter of the tap hole for the thread is given in a table in the online appendix as 10.3. For this example, a diameter of 10 was used for drawing purposes. If required, the value of 10.3 would be given in the hole’s drawing callout.
- Draw the unused portion of the thread hole and pilot hole, as shown. Omit the thread representation in the portion of the threaded hole beyond the end of the screw, for clarity.
11-18 Sample Problem SP11-2
Determine the length of a .750–10UNC square head bolt needed to pass through objects 1 and 2 as shown in Figure 11-30. Include a hexagon-shaped locknut on the end of the bolt. Allow at least two threads beyond the end of the nut. Use the closest standard bolt length, and draw a schematic representation as a sectional view.

Figure 11-30
This construction is based on the wblocks SCHMINCH, HEXHEAD, and LNUTHEX created in Sections 11-5, 11-15, and 11-16. If no wblocks are available, refer to these sections for an explanation of how to create the required shapes.
The wblocks SCHMINCH, HEXHEAD, and LNUTHEX were created for a major diameter of 1.00 inch, so the scale factor needed to create a major diameter of .750 is .75.
- Insert the SCHMINCH wblock at the indicated point. Use an X and Y scale factor of .75. Rotate the block −90° to the correct orientation.
The wblock SCHMINCH is not long enough to go completely through the objects, so a second wblock is inserted below the first.
- Insert the SQHEAD wblock at the indicated point. Use an X and Y scale factor of .75.
- Insert the wblock LNUTHEX at the indicated point. Use an X and Y scale factor of .75.
- Explode the wblocks.
- Trim the excess lines within the nut.
- Calculate the minimum length for the bolt.
The total depth of objects 1 and 2 equals 1.250 + 1.625 = 2.875.
The thickness of the nut equals .88D, or .88(.75) = .375.
The pitch length of the thread equals 1.00/10 = .1, so 2P = .2.
The minimum bolt length equals 2.875 + .375 + .200 = 3.450.
From the table of standard bolt lengths in the online appendix, the standard bolt length that is greater than 3.45 is 3.50, so the bolt callout can now be completed:
0.750 - 10 UNC-2 A × 3.50 LONG
The completed drawing with the appropriate bolt callout is shown in Figure 11-30.
11-19 Standard Screws
Figure 11-31 shows a group of standard screw shapes. The proportions given in Figure 11-30 are acceptable for general drawing purposes and represent average values. The exact dimensions for specific screws are available from manufacturers’ catalogs. A partial listing of standard screw sizes is included in the online appendix.

Figure 11-31
The given head shape dimensions are all in terms of D, the major diameter of the screw’s thread. Information about the available standard major diameters and lengths is included in the online appendix.
The choice of head shape is determined by the specific design requirements. For example, a flat head mounted flush with the top surface is a good choice when space is critical, when two parts butt against each other, or when aerodynamic considerations are involved. A round head can be assembled by using a common blade screwdriver, but it is more susceptible to damage than a hex head. The hex head, however, requires a specific wrench for assembly.
11-20 Setscrews
Setscrews are fasteners used to hold parts like gears and pulleys to rotating shafts or other objects in order to prevent slippage between the two objects. See Figure 11-32.

Figure 11-32
Most setscrews have recessed heads to help prevent interference with other parts. Many different head styles and point styles are available. See Figure 11-33.

Figure 11-33
Setscrews are referenced on a drawing by the following format:
THREAD SPECIFICATION
HEAD SPECIFICATION POINT SPECIFICATION
SET SCREW
.250 − 20 UNC-2 A 1.00 LONG
SLOT HEAD FLAT POINT
SET SCREW
The words “LONG,” “HEAD,” and “POINT” are optional.
11-21 Washers
There are many different styles of washers available for different design applications. The three most common types of washers are plain, lock, and star. Plain washers can be used to help distribute the bearing load of a fastener or used as a spacer to help align and assemble objects. Lock and star washers help absorb vibrations and prevent fasteners from loosening prematurely. All washers are identified as follows:
Inside diameter × Outside diameter × Thickness
Examples of plain washers and their callouts are shown in Figure 11-34. A listing of standard washer sizes is included in the online Appendix.

Figure 11-34
To Draw a Plain Washer (See Figure 11-35.)
- Draw concentric circles for the inside and outside diameters.
- Project lines from the circular view, and draw a line that defines the width of the washer.
- Use Offset to define the thickness.

Figure 11-35
Figure 11-36 shows two views of a lock washer. As the lock washer is compressed during assembly, it tends to flatten so that the slanted end portions are not usually included on the drawing. The drawing callout should include the words “LOCK WASHER.”

Figure 11-36
Figure 11-37 shows an internal and an external tooth lock-type washer. They may also be called star washers.

Figure 11-37
These washers are best drawn by first drawing an individual tooth, then using Array to draw a total of 12 teeth. Because there are 12 teeth, each tooth and the space between it and the next tooth require a total of 30°—that is, 15° for the tooth and 15° for the space between each tooth.
11-22 Keys
Keys are used to help prevent slippage in power transmission between parts—for example, a gear and a drive shaft. Grooves called keyways, or keyseats, are cut into both the gear and the drive shaft, and a key is inserted between, as shown in Figure 11-38.

Figure 11-38
There are four common types of keys: square, Pratt & Whitney, Woodruff, and gib head. Each has design advantages and disadvantages. See Figure 11-39. A list of standard key sizes is included in the online appendix.

Figure 11-39
Square keys are called out on a drawing by specifying the length of one side of the square cross section and the overall length, Pratt & Whitney and Woodruff keys are specified by numbers, and gib head keys are defined by a group of dimensions. See the online appendix for the appropriate tables and charts of standard key sizes.
Keyways are dimensioned as shown in Figure 8-78. Note that the depth of a keyway in a shaft is dimensioned from the bottom of the shaft. Because material has been cut away, the intersection between the shaft’s centerline and top outside edge does not exist. It is better to dimension from a real surface than from a theoretical one. The same dimensioning technique also applies to the gear.
11-23 Rivets
Rivets are fasteners that hold adjoining or overlapping objects together. A rivet starts with a head at one end and a straight shaft at the other. The rivet is then inserted into the object, and the headless end is “bucked” or otherwise forced into place. A force is applied to the headless end that changes its shape so that another head is formed, holding the objects together.
There are many different shapes and styles of rivets. Figure 11-40 shows five common head shapes for rivets. Aircraft use hollow rivets because they are very lightweight. A design advantage for the use of rivets is that they can be drilled out, and removed or replaced, without damaging the objects that they hold together.

Figure 11-40
Rivet types are represented on technical drawings by a coding system. See Figure 11-41. The lines used to code a rivet must be clearly visible on the drawing. Because rivets are sometimes so small and the material that they hold together so thin that it is difficult to clearly draw the rivets, companies draw only the rivet’s centerline in the side view and identify the rivet by a drawing callout.

Figure 11-41
11-24 Springs
The most common types of springs used on technical drawings are compression, extension, and torsional. This section explains how to draw detailed and schematic representations of springs. Springs are drawn in their relaxed position (not expanded or compressed). Phantom lines may be used to show several different positions for springs as they are expanded or compressed.
Springs are defined by the diameter of their wire, the direction of their coils, their outside diameter, their total number of coils, and their total relaxed length. Information about their loading properties may also be included. The pitch of a spring equals the distance from the center of one coil to the center of the next coil.
As with threads, the detailed representations of springs are difficult and time consuming to draw, but the Array command shortens the drawing time considerably. Saving the representation as a wblock also helps avoid the necessity of having to redraw the representation for each new drawing.
Ideally, the distance between coils should be exactly equal to the pitch of the spring, but this is not always practical for smaller springs. Any convenient distance between coils may be used that presents a clear, easy-to-understand representation of the spring.
To Draw a Detailed Representation of an Extension Spring
Draw an extension spring 2.00 inches in diameter with right-hand coils made from 0.250-inch wire. The spring’s pitch equals .25, and the total length of the coils is 3.00 inches. See Figure 11-42.

Figure 11-42
Because the pitch of the spring equals the wire diameter, the coils will touch each other.
- Set Grid = .5
Snap = .25
- Draw the rounded shape of one of the coils.
The distance between the lines equals the diameter of the spring wire. The diameter of the rounded ends also equals the diameter of the wire. The coil’s offset equals the spring’s pitch.
- Array the coil shape.
A rectangular array was used with one row, and 12 columns .25 apart.
- Draw two concentric circles at the left end of the spring so that the larger circle’s diameter equals the spring’s diameter. The vertical centerline of the circles is tangent to the left edge of the first coil.
- Draw a line across the thread offset a distance equal to one pitch. The endpoints of the line are on snap points.
- Trim the excess portion of the circles, and fillet the circles as shown.
- Trim the excess portion of the slanted line, and cut back the end of the circles so that there is a noticeable gap between the first coil and the end of the circles. The gap distance is determined by eye.
- Copy, rotate, and move the circular end portion to the right end of the spring.
- Draw a slanted line across the farthest right coil, as shown.
- Trim and extend the lines as necessary, and add the FILLET .25R as shown.
- Save the drawing as a wblock named EXTSPRNG.
To Draw a Detailed Representation of a Compression Spring
Draw a compression spring with six right-hand coils made from .25-inch-diameter wire. The pitch of the spring equals .50 inch. The diameter of the spring is 2.00 inches. See Figure 11-43.

Figure 11-43
- Set Grid = .50
Snap = .25
- Draw the rounded shape of the first left coil, as shown. The diameter of the rounded ends of the coil equals the diameter of the spring’s wire.
- Array the coil shape.
In this example, a rectangular array was used to draw one row, and six columns .50 inch apart.
- Draw two slanted lines as shown.
These lines represent the back portion of the coil. They are most easily drawn from a snap point next to the rounded portion of the coil shape (this point would be the corner point of the coil if the coil were not rounded) to a point tangent to the opposite rounded end of the coil.
- Trim and array the slanted lines as shown.
Use a rectangular array with one row, and six columns .50 inch apart.
- Draw the right end of the spring so that it appears to end just short of the spring’s centerline. Any convenient distance may be used.
- Draw the left end of the spring using Copy, and copy one of the existing slanted lines. Use Zoom, if necessary, to align the copied line with the coil. Draw the left end of the spring so that it appears to end just short of the centerline.
- Save the drawing as a wblock named COMPSPNG.
Figure 11-44 shows schematic representations of a compression and an extension spring. The distance between the peaks of the slanted lines should equal the pitch of the spring.

Figure 11-44
11-25 Tool Palettes
AutoCAD includes a Tool Palette that has, among other features, a set of fastener blocks. (See Section 3-21 for an explanation of Blocks.) The Tool Palette is accessed by using the Tool Palettes tool located on the Palettes panel under the View tab. See Figure 11-45.

Figure 11-45
To Create a Shoulder Screw
- Click the Tool Palettes tool on the Palettes panel under the View tab.
The Palettes dialog box will appear.
- Select the Mechanical tab.
A listing of available blocks will appear.
- Click the Shoulder screw – Imperial block icon.
The shoulder screw block will appear on the screen. Use the mouse wheel to increase the viewing size of the screw. The shoulder screw will automatically be saved as a Block.
Remove the Tool Palettes box by clicking the large X in the upper right corner of the box.
- Use the Erase tool and erase the shoulder screw block.
Like any other block, the shoulder screw block can be scaled or edited.
To Change the Scale of a Tool Palette Block
- Click the Insert tool on the Block panel under the Home tab.
See Figure 11-46.

Figure 11-46
- Change the X and Y scale factors to 2.00 and the rotation angle to 90°.
The Z scale need not be changed, as this is a 2D (two-dimensional) drawing; that is, only the X and Y axes are being used. See Figure 11-47.
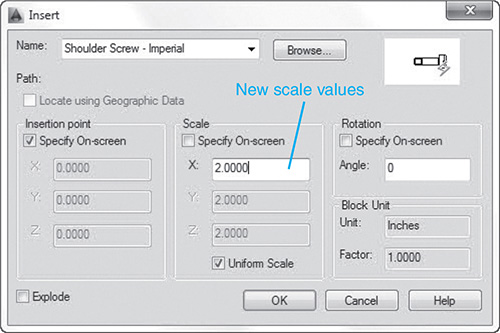
Figure 11-47
- Click OK.
Figure 11-48 shows the original shoulder screw next to the scaled one. Centerlines were added with the Osnap Midpoint option. The Insert dialog box can be used to change the screw’s proportions—that is, to scale the X direction to one value and the Y direction to a different value.

Figure 11-48
To Modify the Block
The shoulder screw block can be modified by using the Explode tool located on the Modify panel under the Home tab. See Figure 11-49.

Figure 11-49
- Access the Explode tool and click the shoulder screw block.
There will be no visible change in the block’s appearance, but it is now composed of individual lines that can be erased or edited.
- Use the Move tool, and move the threaded portion of the screw.
See Figure 11-50.

Figure 11-50
- Use the Extend tool, and increase the thread length of the screw. Extend the centerline by adding a vertical line to the left and beyond the end of the screw. Extend the center to the vertical line, and erase the vertical line.
The new view will show a shoulder screw with a longer thread.
The proportions of the screw may be changed by using either the scale values on the Insert dialog box or the Explode tool and then reproportioning the screw.
11-26 Exercise Problems
EX11-1
Create wblocks for the following thread major diameters:
1.00-in. detailed representation
1.00-in. schematic thread representation
1.00-in. simplified thread representation
100-mm detailed representation
100-mm schematic thread representation
100-mm simplified thread representation
EX11-2
Draw a .750–10UNC–2_ × ____ LONG thread. Include the thread callout.
External –3.00 LONG.
Internal to fit into the object shown in Figure EX11-2.
Use a detailed representation.
Use a schematic representation.
Use a simplified representation.

EX11-3
Draw a .250–28UNF22_ × ____ LONG thread. Include the thread callout.
External –1.50 LONG.
Internal to fit into the object shown in Figure EX11-2.
Use a detailed representation.
Use a schematic representation.
Use a simplified representation.
EX11-4
Draw an M36 × 4 × ___ LONG thread. Include the thread callout.
External –100 LONG.
Internal to fit into the object shown in Figure EX11-2.
Use a detailed representation.
Use a schematic representation.
Use a simplified representation.
EX11-5
Draw an M12 × 1.75 × ___ LONG thread. Include the thread callout.
External –40 LONG.
Internal to fit into the object shown in Figure EX11-2.
Use a detailed representation.
Use a schematic representation.
Use a simplified representation.
EX11-6
Draw a 2.75 × 2 × 5.00 inch-long external square thread.
EX11-7
Draw a 50 × 2 × 100 millimeter-long external square thread.
EX11-8
Draw a 3 × 1.5 × 6 inch-long external acme thread.
EX11-9
Draw an 80 × 1.5 × 200 millimeter-long external acme thread.
For Exercise Problems EX11-10 through EX11-13, draw the bolts, nuts, and screws assembled into the object shown in Figure EX11-2. If not given, determine the length of the fasteners, using the tables given in this chapter or in the online appendix. Include the appropriate drawing callout.
EX11-10
.500–13UNC × ____ LONG HEX HEAD BOLT. Include a finished nut on the end of the bolt.
5/8(.625)–18UNF × 1.5 LONG HEX HEAD SCREW. Specify the diameter and length of the tap hole.
Draw a detailed representation.
Draw a schematic representation.
Draw a simplified representation.
Draw an orthographic view.
Draw a sectional view.
EX11-11
M24– ____ LONG HEX HEAD BOLT. Include a finished nut on the end of the bolt.
M16–30 LONG HEX HEAD SCREW. Specify the diameter and length of the tap hole.
Draw a detailed representation.
Draw a schematic representation.
Draw a simplified representation.
Draw an orthographic view.
Draw a sectional view.
EX11-12
M30 × ____ LONG SQUARE HEAD BOLT. Include two locknuts on the end of the bolt.
M12 × 1.4 × 24 LONG SQUARE HEAD SCREW. Specify the diameter and length of the tap hole.
Draw a detailed representation.
Draw a schematic representation.
Draw a simplified representation.
Draw an orthographic view.
Draw a sectional view.
EX11-13
1.25–7UNC × ____ LONG SQUARE HEAD BOLT. Include two locknuts on the end of the bolt.
.375–32UNEF × 1.5 LONG SQUARE HEAD SCREW. Specify the diameter and length of the tap hole.
Draw a detailed representation.
Draw a schematic representation.
Draw a simplified representation.
Draw an orthographic view.
Draw a sectional view.
EX11-14
Redraw the sectional view shown in Figure EX11-14. Include a drawing callout that defines the threads as M12. Specify the depth of the threaded hole, and the diameter and depth of the tap hole.

EX11-15
Redraw the drawing shown in Figure EX11-15. Add a drawing callout for the bolt and nut according to the given thread major diameters. Use only standard bolt lengths as defined in the online Appendix.
.375–24UNF–2A × ________ LONG
M16 × 2 × ________ LONG

EX11-16
Draw a front sectional view and a top orthographic view according to the given drawing and table information. Include the setscrews in the indicated holes. Include the appropriate drawing callout for each setscrew.
FOR INCH VALUES:
- 0.250–20UNC–2A × 1.00
SLOT HEAD, FLAT POINT
SET SCREW
- .375–24UNF–2A × .750
HEX SOCKET, FULL DOG
SET SCREW
- #10–28UNF–2A × .625
SQUARE, OVAL
SET SCREW
- #6–32UNC–2A × .50
SLOT, CONE POINT
SET SCREW
FOR MILLIMETER VALUES:
- M12 × 20
SLOT HEAD, FLAT POINT
SET SCREW
- M16 × 2 × 30
SQUARE HEAD, HALF DOG
SET SCREW
- M6 × 20
HEX SOCKET, CONE
SET SCREW
- M10 × 1.5 × 20
CUP, SLOT
SET SCREW

EX11-17
Draw a front sectional view and a top orthographic view according to the following drawing and table information:
Use inch values.
Use millimeter values.
EX11-18
Redraw the drawing that follows as a sectional view. Select and include the drawing callouts for the nut and washer according to the given bolts. Specify the bolt lengths according to standard lengths listed in the online Appendix.
.625–11UNC–2A × ____ LONG HEX HEAD BOLT
M16 × 2 × ____ LONG HEX HEAD
.500–20 UNF × _____ LONG SQUARE HEAD
M20 × ______ SQUARE HEAD
.438-28 UNEF × ________ LONG HEX HEAD
M12 × 1.25 × ________ LONG HEX HEAD
.750–10 UNC × ________ LONG HEX HEAD
M24 × 3 × ________ LONG HEX HEAD

EX11-19
Draw a front sectional view and a top orthographic view according to the given drawing and table information. Add fasteners to the labeled holes according to the information here. Include the appropriate drawing callouts. Use only standard sizes as listed in the online Appendix.
FOR INCH VALUES:
- Nominal diameter = .250, UNC
Square head bolt and nut
A washer between the bolt head and part 23
A washer between the nut and part 24
- .375–24UNF–2A × 1.00
SLOT, OVAL
SETSCREW
- Nominal diameter = .375, UNF
Flat head screw, 1.25 LONG
FOR MILLIMETER VALUES:
- Nominal diameter = 12, coarse
Square head bolt and nut
A washer between the bolt head and part 23
A washer between the nut and part 24
- M10 × .5 × 20
SQUARE HEAD, FULL DOG
SET SCREW
- Nominal diameter = 12, fine
Flat head screw, 20 LONG

EX11-20
Redraw the sectional view that follows, and include the appropriate bolts and nuts at locations W, X, Y, and Z so that the selected bolt heads sit flat on their bearing surfaces. Select the bolts from the standard sizes listed in the online appendix.

EX11-21
Redraw the given drawing based on the information that follows. Include all bolt, nut, washer, and spring callouts. Use only standard sizes as listed in the online appendix.
FOR INCH VALUES:
Major diameter of bolt = .375 coarse thread.
Add the appropriate nut.
Washer is .125 thick and allows a minimum clearance from the bolt of at least .125.
Compression springs are made from .125-diameter wire and are 1.00 long. They have an inside diameter that always clears the bolt by at least .125.
Parts 1 and 2 are 1.00 high and 4.00 wide.
Locate the bolts at least 1.00 from each end.
FOR MILLIMETER VALUES:
Major diameter of bolt = 12 coarse thread.
Add the appropriate nut.
Washer is 3 thick and allows a minimum clearance from the bolt of at least 2.
Compression springs are made from 4-diameter wire and are 24 long. They have an inside diameter that always clears the bolt by at least 3.
Parts 1 and 2 are 25 high and 100 wide.
Locate the bolts at least 25 from each end.

EX11-22
Figure EX11-22 shows two identical blocks that are to be held together by a bolt and a nut. Two washers are also used. Specify the appropriate fastener, nut, and washer for the following block sizes:
Block and nominal hole sizes:
1.50 × 1.50 × 0.75 inches; Ø.375 inch
20 × 20 × 12 mm; Ø8 mm
2.00 × 2.00 × 0.625 inches; Ø.500 inch
30 × 30 × 15 mm; Ø10 mm

EX11-23
Figure EX11-23 shows three parts that are to be held together by six screws. Given the part sizes, specify the six fasteners needed to assemble the parts.
