
Although a storyboard can have many view controllers, each storyboard file has exactly one initial view controller. The initial view controller acts as an entry point into the storyboard. You are going to add and configure another view controller to the canvas and set it to be the initial view controller for the storyboard.
Open Main.storyboard. From the object library, drag a View Controller onto the canvas (Figure 5.3). (To make space on the canvas, you can zoom out by Control-clicking on the background, using the zoom controls at the bottom of the canvas, or using pinch gestures on your trackpad.)

You want this view controller to display an MKMapView – a class designed to display a map – instead of the existing white UIView.
Select the view of the View Controller – not the View Controller itself! – and press Delete to remove this view from the canvas. Then drag a Map Kit View from the object library onto the view controller to set it as the view for this view controller (Figure 5.4).

Now select the View Controller and open its attributes inspector. Under the View Controller section, check the box next to Is Initial View Controller (Figure 5.5). Did you notice that the gray arrow on the canvas that was pointing at the Conversion View Controller is now pointing to the View Controller? The arrow, as you have probably surmised, indicates the initial view controller. Another way to assign the initial view controller is to drag that arrow from one view controller to another on the canvas.

There is a quirk that would cause problems if you were to build and run the app right now. (Try it, if you like.) MKMapView is in a framework that is not currently being loaded into the application. A framework is a shared library of code that includes associated resources such as interface files and images. You briefly learned about frameworks in Chapter 3, and you have been using a couple of frameworks already: UIKit and Foundation are both frameworks.
So far, you have been including frameworks in your app by using the import keyword, like so:
import UIKit
Now you need to import the MapKit framework so that the MKMapView will load. However, if you import the MapKit framework using the import keyword without including any code that uses that framework, the compiler will optimize it out – even though you are using a map view in your storyboard.
Instead, you need to manually link the MapKit framework to the app.
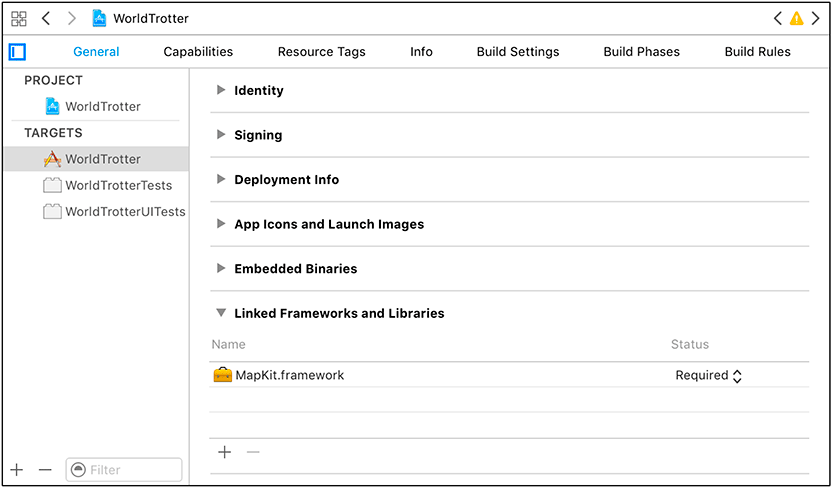
With the project navigator open, click on the WorldTrotter project at the top of the list to open the project settings. Find and open the General tab in the settings. Scroll down to the bottom and find the section labeled Linked Frameworks and Libraries. Click on the + at the bottom and search for MapKit.framework. Select this framework and click Add (Figure 5.6).
Now you can build and run the application. Because you have changed the initial view controller, the map shows up instead of the view of the ConversionViewController.
As mentioned above, there can only be one initial view controller associated with a given storyboard. You saw this earlier when you set the View Controller to be the initial view controller. At that point, the Conversion View Controller was no longer the initial view controller for this storyboard. Let’s take a look at how this requirement works with the root level UIWindow to add the initial view controller’s view to the window hierarchy.
UIWindow has a rootViewController property. When a view controller is set as the window’s rootViewController, that view controller’s view gets added to the window’s view hierarchy. When this property is set, any existing subviews on the window are removed and view controller’s view gets added to the window with the appropriate Auto Layout constraints.
Each application has one main interface, a reference to a storyboard. When the application launches, the initial view controller for the main interface gets set as the rootViewController of the window.
The main interface for an application is set in the project settings. Still in the General tab of the project settings, find the Deployment Info section. Here you will see the Main Interface setting (Figure 5.7). This is set to Main, which corresponds to Main.storyboard.
