
When you initialize a view programmatically, you use its init(frame:) designated initializer. This method takes one argument, a CGRect, that will become the view’s frame, a property on UIView.
var frame: CGRect
A view’s frame specifies the view’s size and its position relative to its superview. Because a view’s size is always specified by its frame, a view is always a rectangle.
A CGRect contains the members origin and size. The origin is a structure of type CGPoint and contains two CGFloat properties: x and y. The size is a structure of type CGSize and has two CGFloat properties: width and height (Figure 3.5).

When the application is launched, the view for the initial view controller is added to the root-level window. This view controller is represented by the ViewController class defined in ViewController.swift. We will discuss what a view controller is in Chapter 5, but for now, it is sufficient to know that a view controller has a view and that the view associated with the main view controller for the application is added as a subview of the window.
Before you create the views for WorldTrotter, you are going to add some practice views programmatically to explore views and their properties and see how the interfaces for applications are created.
Open ViewController.swift and delete any methods that the template created. Your file should look like this:
import UIKit

class ViewController: UIViewController {

}
(UIKit, which you also saw in Chapter 1, is a framework. A framework is a collection of related classes and resources. The UIKit framework defines many of the UI elements that your users see, as well as other iOS-specific classes. You will be using a few different frameworks as you go through this book.)
Right after the view controller’s view is loaded into memory, its viewDidLoad() method is called. This method gives you an opportunity to customize the view hierarchy, so it is a great place to add your practice views.
In ViewController.swift, override viewDidLoad(). Create a CGRect that will be the frame of a UIView. Next, create an instance of UIView and set its backgroundColor property to blue. Finally, add the UIView as a subview of the view controller’s view to make it part of the view hierarchy. (Much of this will not look familiar. That is fine. We will explain more after you enter the code.)
class ViewController: UIViewController {

    override func viewDidLoad() {
        super.viewDidLoad()

        let firstFrame = CGRect(x: 160, y: 240, width: 100, height: 150)
        let firstView = UIView(frame: firstFrame)
        firstView.backgroundColor = UIColor.blue
        view.addSubview(firstView)
    }

}
To create a CGRect, you use its initializer and pass in the values for origin.x, origin.y, size.width, and size.height.
To set the backgroundColor, you use the UIColor class property blue. This is a computed property that initializes an instance of UIColor that is configured to be blue. There are a number of UIColor class properties for common colors, such as green, black, and clear.
Build and run the application (Command-R). You will see a blue rectangle that is the instance of UIView. Because the origin of the UIView’s frame is (160, 240), the rectangle’s top-left corner is 160 points to the right and 240 points down from the top-left corner of its superview. The view stretches 100 points to the right and 150 points down from its origin, in accordance with its frame’s size (Figure 3.6).

Note that these values are in points, not pixels. If the values were in pixels, then they would not be consistent across displays of different resolutions (i.e., Retina versus non-Retina). A point is a relative unit of a measure; it will be a different number of pixels depending on how many pixels are in the display. Sizes, positions, lines, and curves are always described in points to allow for differences in display resolution.
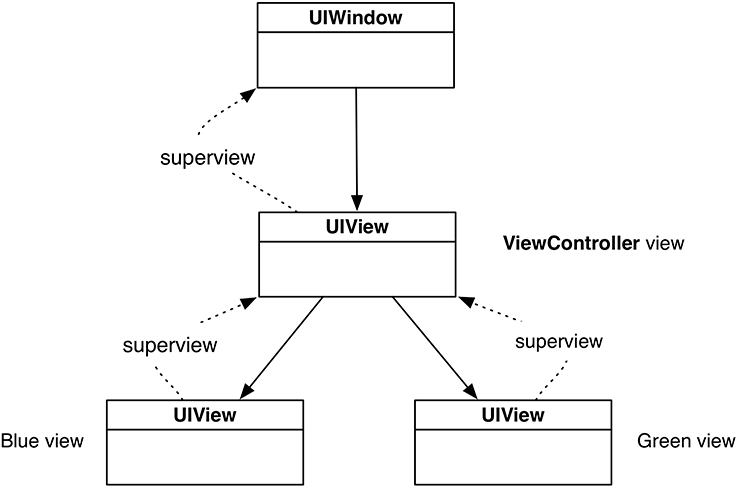
Figure 3.7 represents the view hierarchy that you have created.

Every instance of UIView has a superview property. When you add a view as a subview of another view, the inverse relationship is automatically established. In this case, the UIView’s superview is the UIWindow.
Let’s experiment with the view hierarchy. First, in ViewController.swift, create another instance of UIView with a different frame and background color.
override func viewDidLoad() {
    super.viewDidLoad()

    let firstFrame = CGRect(x: 160, y: 240, width: 100, height: 150)
    let firstView = UIView(frame: firstFrame)
    firstView.backgroundColor = UIColor.blue
    view.addSubview(firstView)

    let secondFrame = CGRect(x: 20, y: 30, width: 50, height: 50)
    let secondView = UIView(frame: secondFrame)
    secondView.backgroundColor = UIColor.green
    view.addSubview(secondView)
}
Build and run again. In addition to the blue rectangle, you will see a green square near the top-left corner of the window. Figure 3.8 shows the updated view hierarchy.
Now you are going to adjust the view hierarchy so that one instance of UIView is a subview of the other UIView instead of the view controller’s view. In ViewController.swift, add secondView as a subview of firstView.
... let secondView = UIView(frame: secondFrame) secondView.backgroundColor = UIColor.greenview.addSubview(secondView)firstView.addSubview(secondView)
Your view hierarchy is now four levels deep, as shown in Figure 3.9.

Build and run the application. Notice that secondView’s position on the screen has changed (Figure 3.10). A view’s frame is relative to its superview, so the top-left corner of secondView is now inset (20, 30) points from the top-left corner of firstView.

(If the green instance of UIView looks smaller than it did previously, that is just an optical illusion. Its size has not changed.)
Now that you have seen the basics of views and the view hierarchy, you can start working on the interface for WorldTrotter. Instead of building up the interface programmatically, you will use Interface Builder to visually lay out the interface, as you did in Chapter 1.
In ViewController.swift, start by removing your practice code.
override func viewDidLoad() {super.viewDidLoad()let firstFrame = CGRect(x: 160, y: 240, width: 100, height: 150)let firstView = UIView(frame: firstFrame)firstView.backgroundColor = UIColor.blueview.addSubview(firstView)let secondFrame = CGRect(x: 20, y: 30, width: 50, height: 50)let secondView = UIView(frame: secondFrame)secondView.backgroundColor = UIColor.greenfirstView.addSubview(secondView)}
Now let’s add some views to the interface and set their frames.
Open Main.storyboard. At the bottom of the canvas, make sure the View as button is configured to display an iPhone 7 device.
From the object library, drag five instances of UILabel onto the canvas. Set their text to match Figure 3.11. As shown, space them out vertically on the top half of the interface and center them horizontally.

Select the top label so you can see its frame in Interface Builder. Open its size inspector – the fifth tab in the utilities area. (The keyboard shortcuts for the utilities tabs are Command-Option plus the tab number. The size inspector is the fifth tab, so its keyboard shortcut is Command-Option-5.)
Under the View section, find Frame Rectangle. (If you do not see it, you might need to select it from the Show pop-up menu.) The values shown are the view’s frame, and they dictate the position of the view onscreen (Figure 3.12).

Build and run the application on the iPhone 7 simulator. The interface on the simulator will look identical to the interface that you laid out in Interface Builder.
Let’s make the interface look a little bit better by customizing the view properties.
In Main.storyboard, select the background view. Open the attributes inspector and give the app a new background color: Find and click the Background dropdown and click Other.... Select the second tab (the Color Sliders tab) and choose RGB Sliders from the dropdown. In the box near the bottom, enter a Hex Color # of F5F4F1 (Figure 3.13). This will give the background a warm gray color.

You can customize attributes common to selected views simultaneously. You will use this to give many of the labels a larger font size as well as a burnt orange text color.
Select the top two and bottom two labels by Command-clicking them in the document outline. Make sure the attributes inspector is open and update the text color: Under the Label section, find Color and open the pop-up menu. Select the Color Sliders tab again and enter a Hex Color # of E15829.
Now let’s update the font. Select the 212 and 100 labels. Under the Label section in the attributes inspector, find Font and click on the text icon next to the current font. In the popover that appears, make the Size 70 (Figure 3.14). Select the remaining three labels. Open their Font pop-up and make the Size 36.

Now that the font size is larger, the text no longer fits within the bounds of the label. You could resize the labels manually, but there is an easier way.
Select the top label on the canvas. From Xcode’s Editor menu, select Size to Fit Content (Command-=). This will resize the label to exactly fit its text contents. Repeat the process for the other four labels. (You can select all four labels to resize them all at once.) Now move the labels so that they are again nicely aligned vertically and centered horizontally (Figure 3.15).

Build and run the application on the iPhone 7 simulator. Now build and run the application on the iPhone 7 Plus simulator. Notice that the labels are no longer centered – instead, they appear shifted slightly to the left.
You have just seen two of the major problems with absolute frames. First, when the contents change (like when you changed the font size), the frames do not automatically update. Second, the view does not look equally good on different sizes of screens.
In general, you should not use absolute frames for your views. Instead, you should use Auto Layout to flexibly compute the frames for you based on constraints that you specify for each view. For example, what you really want for WorldTrotter is for the labels to remain the same distance from the top of the screen and to remain horizontally centered within their superview. They should also update if the font or text of the labels change. This is what you will accomplish in the next section.