Configuring Routers to Interoperate with an ACS Server
This section covers the detailed commands required for a router to use a central authentication server such as ACS. From the earlier discussion, you know that both the ACS server, which will have the usernames and passwords available to it, and the router that will be communicating with the ACS server need to be configured for them to work together. This section examines the router component.
The good news is that most of what you learned in the preceding chapter about AAA on the router still applies here. The biggest difference on the router is that in method lists, the router can be told to use the local database (which you now know is the running config on the local router) for verification of a username and password, or the router can be told to check with an ACS server to ask that server whether or not the username and password are valid.
On the router, you could use the CLI or Cisco Configuration Professional (CCP) for the configuration. Because you should know both (and you might need both depending on the certification environment), both methods are covered here. You first learn about the CLI version, followed by CCP. In this section, the configuration is based on a router that has not yet been set up for any type of AAA. Comments about each of the commands and what their purpose is are included. A few of these may be a review, too, because of the preceding chapter, but a little repetition will help reinforce these concepts.
Another key factor in any implementation is to have a plan, before beginning to configure the router. So, here is the plan. We want the router to implement the following:
![]() For administrators/users who are accessing the router via the vty lines, regardless of whether they are using Telnet or Secure Shell (SSH), the router should check with a TACACS+ server (the ACS server using TACACS+ to communicate with this router) for the authentication check (username/password).
For administrators/users who are accessing the router via the vty lines, regardless of whether they are using Telnet or Secure Shell (SSH), the router should check with a TACACS+ server (the ACS server using TACACS+ to communicate with this router) for the authentication check (username/password).
![]() Authenticated users need to be authorized to have access to a command-line interface (CLI) (EXEC) session, including the privilege level they should be placed into. The authorization check should be done by the router referring to the ACS server, using TACACS+.
Authenticated users need to be authorized to have access to a command-line interface (CLI) (EXEC) session, including the privilege level they should be placed into. The authorization check should be done by the router referring to the ACS server, using TACACS+.
Example 3-1 shows the configuration to implement these objectives.
Example 3-1 Using the CLI to Configure IOS for Use with ACS
! This command enables the configuration of the rest of the AAA
! If it is in the configuration, it doesn't need to be put in again.
! On most IOS systems, the default has aaa new-model disabled.
R1(config)# aaa new-model
! This authentication method list, when applied to a line such as the VTY
! lines will tell the router to prompt the user who is accessing that line
! for a username and password in order for that user to login.
! When the user supplies the username and password at the login prompt
! the router will send the credentials to a configured TACACS+ server
! and then the server can reply with a pass or fail message.
! This command indicates "group tacacs+" as the first method
! as there could be more than one server configured. If no ACS server
! responds
! after a short timeout the router will then try the second method in the
! method list which is "local" which means the router will then check the
! running
! config to see if there is a username and matching password
R1(config)# aaa authentication login AUTHEN_via_TACACS group tacacs+ local
! This next authorization method list, when applied to a line, will cause
! the router
! to check with the AAA server to verify that the user is authorized
! to gain access to the CLI. The CLI represents an Exec Shell.
! Not only can the ACS indicate to the router whether or not the user is
! authorized
! but it can also indicate what privilege level the user is placed into.
! Both the username and password will need to be created on the ACS server
! for the previous authentication method, and the authorization
! for a CLI will also need to be configured on that same ACS server.
! This authorization list will use one or more configured ACS servers
! via TACACS+, and if there are no servers that respond, then the router
! will check locally regarding whether the command is authorized for this
! user based on privilege level of the user, and privilege level of the
! command being attempted.
R1(config)# aaa authorization exec Author-Exec_via_TACACS group tacacs+ local
! It is important to note that before we apply either of these method lists
! to the VTY lines, we should create at least one local user as a backup
! in the event the ACS server is unreachable, or not yet configured.
! In the example below it will create a user on the local database of the
! router
! including a username, password as well as a privilege level for that user. It
! is highly recommended that you use strong passwords when configuring any user or
! device credentials.
R1(config)# username admin privilege 15 secret cisco
! Next we need to create a least one ACS server that the router should try
! to use
! via TACACS+. This is the equivalent of creating a server group of one.
! The password is used as part of the encryption of the packets, and
! whatever
! password we configure here, we also need to configure on the ACS server.
R1(config)# tacacs-server host 192.168.1.252 key cisco123
! Verifying that the IP addresses reachable is a test that can be done
! even before the full ACS configuration is complete on the AAA server
R1(config)# do ping 192.168.1.252
Type escape sequence to abort.
Sending 5, 100-byte ICMP Echos to 192.168.1.252, timeout is 2 seconds:
!!!!!
Success rate is 100 percent (5/5), round-trip min/avg/max = 8/13/28 ms
! Next, for the authentication method list and authorization method list
! to be used we would need to apply them. In the example below
! we are applying both method lists to the first five VTY lines.
R1(config)# line vty 0 4
R1(config-line)# authorization exec Author-Exec_via_TACACS
R1(config-line)# login authentication AUTHEN_via_TACACS
! users connecting to these vty lines will now be subject to both authentication
! and authorization, based on the lists that are applied to these lines
With the authentication and authorization method lists created and applied, you could attempt to log in through one of the five vty lines, and here is what you would expect: You should be prompted for username and password, the router should not be able to successfully contact the ACS server (because you have not configured the ACS part of it yet on that server), and then after a short timeout, the router would use the second method in each of its lists, which indicates to use the local database for the authentication and the authorization. Because you do have a local user with a password and a privilege level assigned to that user, it should work. By enabling a debug, and attempting to log in, you can see exactly what is happening, as shown in Example 3-2. If you are not connected to the device via the serial console, use the terminal monitor command to be able to see the debug messages in your screen.
R1# debug tacacs
TACACS access control debugging is on
! Telnet to an IP address on the local router.
R1# telnet 10.0.0.1
Trying 10.0.0.1 ... Open
TPLUS: Queuing AAA Authentication request 102 for processing
TPLUS: processing authentication start request id 102
TPLUS: Authentication start packet created for 102()
TPLUS: Using server 192.168.1.252
TPLUS(00000066)/0/NB_WAIT/6812DC64: Started 5 sec timeout
User Access Verification
! Timing out on TACACS+ regarding authentication because no server is responding
TPLUS(00000066)/0/NB_WAIT/6812DC64: timed out
TPLUS(00000066)/0/NB_WAIT/6812DC64: timed out, clean up
TPLUS(00000066)/0/6812DC64: Processing the reply packet
! Now moving to the local database on the router
Username: admin
Password: cisco
! Timing out on TACACS+ regarding authorization due to no server responding.
TPLUS: Queuing AAA Authorization request 102 for processing
TPLUS: processing authorization request id 102
TPLUS: Protocol set to None .....Skipping
TPLUS: Sending AV service=shell
TPLUS: Sending AV cmd*
TPLUS: Authorization request created for 102(admin)
TPLUS: Using server 192.168.1.252
TPLUS(00000066)/0/NB_WAIT/6812DC64: Started 5 sec timeout
TPLUS(00000066)/0/NB_WAIT/6812DC64: timed out
TPLUS(00000066)/0/NB_WAIT/6812DC64: timed out, clean up
TPLUS(00000066)/0/6812DC64: Processing the reply packet
! After timing out, the router again uses its local database for
! authorization and appropriate privilege level for the user.
! If we exit, and change the debugs slightly, and do it again, it will give
! us yet another perspective.
R1# debug aaa authentication
AAA Authentication debugging is on
R1# debug aaa authorization
AAA Authorization debugging is on
Telnet
R1# telnet 10.0.0.1
Trying 10.0.0.1 ... Open
AAA/BIND(00000067): Bind i/f
! Notice it shows using the authentication list we assigned to the VTY
! lines
AAA/AUTHEN/LOGIN (00000067): Pick method list 'AUTHEN_via_TACACS'
! Not shown here, but indeed the ACS server is timing out, due to not yet
! being configured, which causes the second entry in the list "local" to be
! used.
User Access Verification
Username: admin
Password: cisco
! Now the authorization begins, using the method list we configured for the
! lines
AAA/AUTHOR (0x67): Pick method list 'Author-Exec_via_TACACS'
R1#
AAA/AUTHOR/EXEC(00000067): processing AV cmd=
AAA/AUTHOR/EXEC(00000067): processing AV priv-lvl=15
AAA/AUTHOR/EXEC(00000067): Authorization successful
R1#
!
So, what has happened so far? Table 3-3 describes the steps to configure the router for ACS.

Now that we have implemented the policy using the CLI, let’s take a look at implementing a nearly identical policy but this time using CCP to implement it.
For this configuration, we have removed all AAA-related method lists and have left only the command aaa new-model as a starting point. The intent of this configuration using CCP is to familiarize you with the locations inside the graphical user interface (GUI) for you to configure the method lists for authentication and authorization and how to apply those to the vty lines.
In the configuration section of CCP, having selected the router that you want to configure, go to Configure > Router > AAA > AAA Servers and Groups > Servers, click the Add button, and provide the relevant information about your ACS server, as shown in Figure 3-1.

You then click OK and any other confirmation buttons that are presented to apply this configuration to the router. Now that the router knows the IP address of the ACS server, and which protocol to use and the secret key used to encrypt the packets it sends to the server, the next step is to create the method lists. Just like at the CLI, you create one method list for authentication of logins and a second method list for authorization of the EXEC session. Each method list specifies that the ACS server should be used first, and if for whatever reason the ACS server fails to respond, the second method the router should use is the local configuration (the running config).
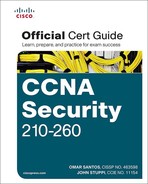
To create the method list for authentication, in CCP you go to Configure > Router > AAA > Authentication Policies > Login, click Add, and specify the details of the authentication method list, including its name and the methods from top to bottom that this method list will call on. The dialog looks similar to what Figure 3-2 shows.
From within the pop-up window, the Add button enables you to add the individual methods to be used by this method list. There is also the option of moving the methods up or down based on the order you want this method list to call on. As before, you would click the OK button and any other confirmation buttons you are prompted with until the configuration is delivered to the router.
Now that your authentication method list is created, you can see this list and any other authentication lists that have been created on this same screen, as shown in Figure 3-3. This includes the methods, in order, from left to right.

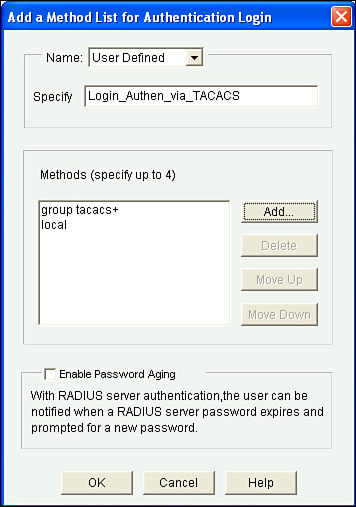
Now that you have created your authentication method list, you also need to create an authorization method list based on your policy. Again for this example, we are implementing the same exact policy we did earlier from the command line. To create the authorization method list, go to Configure > Router > AAA > Authorization Policies > EXEC Command Mode and click Add, as shown in Figure 3-4.

Using a similar process as you did with the first method list, you choose User Defined (meaning that you are not going to set this method as the global default, but instead are only creating a method list that will not be used until this method list is associated somewhere else in the configuration, such as configured on a vty line). In addition to naming the authorization method list, you also click the Add button from this pop-up to select the individual methods to be used. Just as before, you click the OK button and any other confirmation buttons presented until CCP finally delivers the configuration to the router, at which point you can see a summary of your authorization method list, as shown in Figure 3-5.
At this point, with a method list configured for authentication and a second method list configured for authorization, it is time to put those method lists to work. Now what does that mean? Currently, those method lists are just wasting space in the configuration. If you want those method lists to be used, you need to specifically apply those methods lists. Based on the policy, you want the method list for authentication and the method list for authorization to both be applied to the vty lines of the router.
To apply the method lists, we leave the AAA section and go to Configure > Router > Router Access > VTY. From there, click Edit and use the drop-down box to select the method lists that we want to use. The only method lists that exist for authentication and authorization are the ones that you create. In this case, we select the authentication and authorization method lists that we previously created, as shown in Figure 3-6.

You click OK and then click any confirmation buttons presented until CCP deploys the configuration to the router. Once it deploys the configuration, it shows you a summary of how your vty lines are configured, as shown in Figure 3-7.

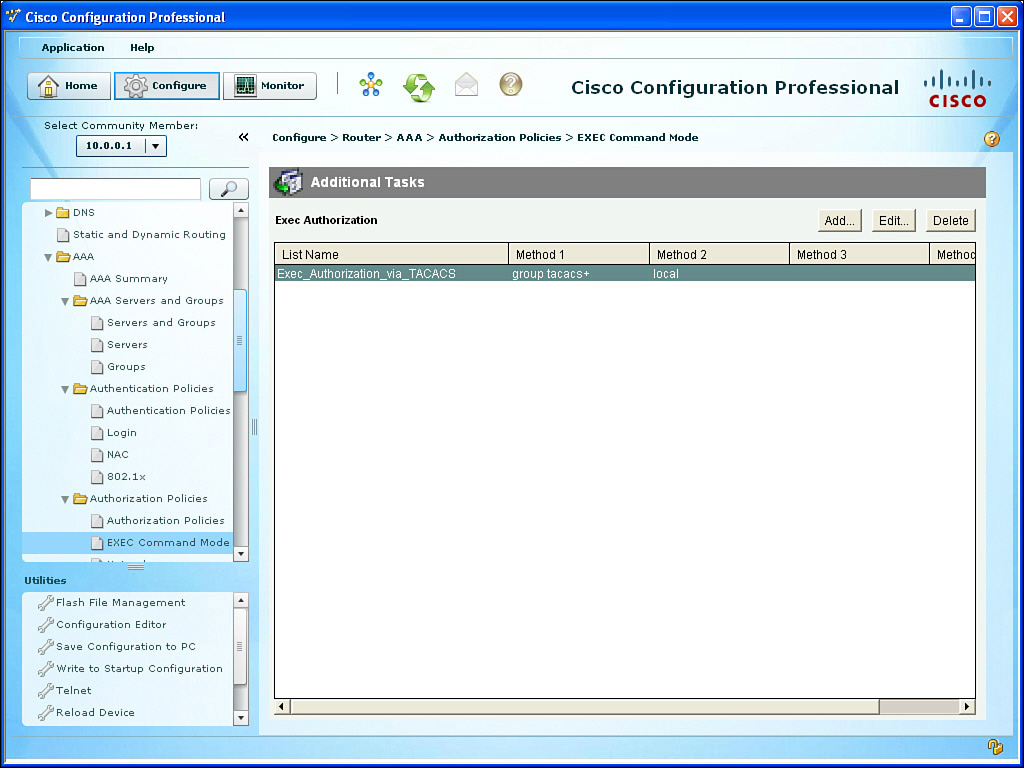
At this point in the configuration, you might actually cause yourself some grief if you accidentally log out. If you are connected via the console port, you might be okay because you have not applied the method list to the console port. But if you are connected remotely using Telnet or Secure Shell (SSH), which both use the logical vty lines, you might not be able to reconnect if the ACS server is not reachable (because it is not configured yet) and the router falls back to the local configuration, and that is where the problem is. We have not yet created a local user in this demonstration. The secret is to make sure there is at least one locally configured user with administrative privileges (privilege level 15) so that you can always get back into the router. You saw earlier how to create a user account from the CLI. You should also do the equivalent here in CCP. To create a local user, go to Configure > Router > Router Access > User Accounts/View and click Add, as shown in Figure 3-8.
This user account should have a difficult password, and you might want to consider not giving this username a name that might be recognized or guessed at by a would-be attacker. After you’ve added the information, including the privilege level 15 access, click OK and any other confirmation pop-up confirmation messages until CCP delivers the configuration to the router.
So, now you have seen how to configure the router portion for AAA integration within ACS server using TACACS+. The second part of getting AAA working between an ACS server and a router is to configure the ACS portion. And that is what you do in the next section.