Applying the Configuration
With all of that in mind, let’s start the configuration on R1. Using CCP, select R1 from the drop-down menu and navigate to Configure > Security > VPN > Site-to-Site VPN. From there, you verify that the Create a Site-to-Site VPN option is selected, and then click the Launch the Selected Task button, as shown in Figure 6-4.

Next, you are prompted to either use Quick Setup or the Step by Step Wizard. Quick Setup uses the defaults for IKE Phase 1 and IKE Phase 2 that are built in to CCP. If you want to customize the policies, choose the Step by Step Wizard, as shown in Figure 6-5, and then click Next.

From the interface drop-down list, select the interface on R1 that will be facing the Internet (this is also the interface facing toward its peer, R2), and configure the IP address of the peer (the reachable address over the Internet). In this case, R2’s outside address is 43.0.0.2. Select the option for authenticating using a PSK and configure the key. (This needs to be the same key on both sides. For this example, we use the PSK of cisco123 for the IKE Phase 1 authentication.) After entering the data, review it to make sure it is accurate, as shown in Figure 6-6, and then click Next to continue.

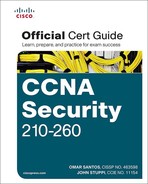
You are next asked for the IKE Phase 1 proposals you want to use. If you want to use the default, that is fine as long as you use it on both sides (both routers use the same policy) and it matches what you want to use for the IKE Phase 1 policy. We decided (earlier, you and I) that we would use MD5 for hashing, PSK for authentication, DH group 2, a 6-hour lifetime, and AES 128-bit key for encryption. After looking at the defaults, shown in Figure 6-7, you click Add to create a new IKE Phase 1 policy.
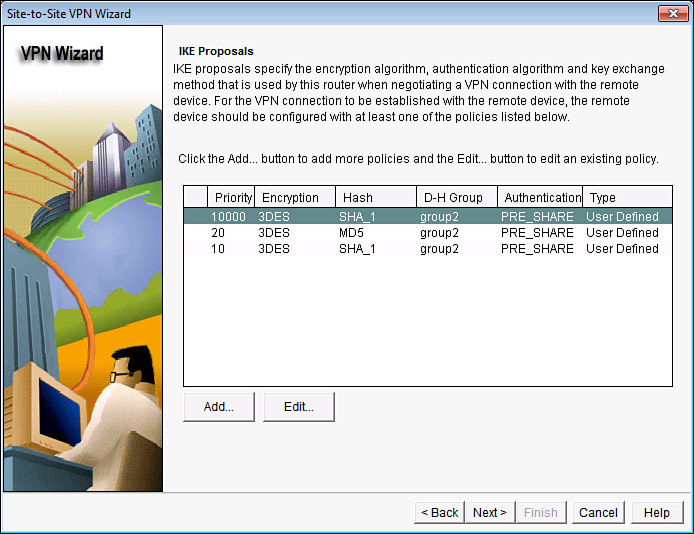
After clicking the Add button, you put in your desired IKE Phase 1 policies, as shown in Figure 6-8, and click OK.
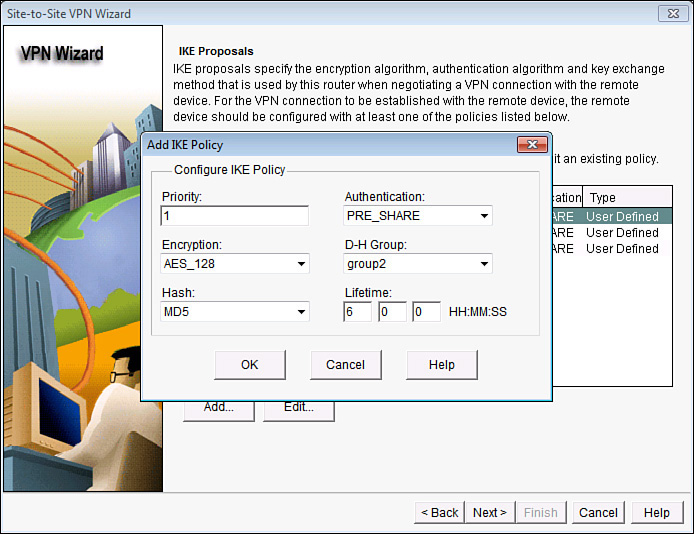
After creating your new IKE Phase 1 policy, you still need to select it (highlight it) before clicking Next. The CCP creates its default policy by default, along with your new policy. After highlighting the new policy (priority 2 in the example, as shown in Figure 6-9), click Next to continue.
The next screen that appears looks similar to the first, but this box has the title Transform Set near the top. A transform set refers to the methods of encryption and hashing that you want to use for the IKE Phase 2 tunnels. We do not want to use the defaults, but rather we want to follow our plan of using AES-256 and SHA for the IKE Phase 2 tunnels. (We could have used the same exact protocols, but I wanted you to see the distinction between the options we have for either tunnel independently.) Figure 6-10 shows the default transform set.

By clicking Add, you can specify the IKE Phase 2 policies of your choice. Remember that whatever you choose here, you also need to configure on the other router, as well. Figure 6-11 shows an example of creating a new transform set.

After entering the new information for your transform set, click OK, and then verify your new transform set is selected before clicking Next to continue, as shown in Figure 6-12.

The wizard then asks what traffic should be encrypted. Because we are on R1, we should focus only on outbound traffic that should be encrypted. (It is R2’s responsibility to make sure that the correct inbound traffic to R1 from R2 is encrypted). To do this, we use an access list as the classifier or identifier of what traffic should be encrypted. R1’s and R2’s classifying access control lists (ACL) should be symmetrical, in that if R1 says to encrypt all packets that are from 10.0.0.0/24 and going to 172.16.0.0/24, R2 should say that it will encrypt all packets from 172.16.0.0/24 that are destined for 10.0.0.0/24. That is what is meant by having symmetrical access lists on the VPN peers in a site-to-site VPN. (It is just a bad coincidence that we also use the word symmetrical to describe algorithms like AES that these peers will be using.) An ACL that has been created to identify which traffic should be encrypted is called a crypto ACL. Note that a crypto ACL is not applied directly to any interface, but instead it is referenced by a policy called a crypto map (discussed soon). The crypto map is directly applied to an interface.
From R1’s perspective, we should “protect,” which means use IPsec on packets with a source address from the 10.0.0.0/24 network and that also have a destination address in the 172.16.0.0/24 network. So, we fill in the wizard as shown in Figure 6-13 and click Next to continue.

Packets that are not matched for IPsec protection will be forwarded as normal packets, without any IPsec encapsulation or encryption applied. When you click the Next button, a summary displays of the IKE policies (IKE Phase 1) and transform sets (IKE Phase 2) that it will implement on the router. Note that CCP likes to implement the default IKE Phase 1, along with the custom IKE Phase 1 policy, so both will end up in the configuration. The policy also specifies the authentication method we selected earlier in the wizard (PSK), and which network’s traffic should be protected. (The traffic to protect is from the outbound perspective. In this case, R1’s outbound traffic is from the 10.0.0.0/24 to the 172.16.0.0/24 network.) Figure 6-14 shows this summary table. If everything is correct, click Finish to deliver the configuration to the router.

Based on your preference settings, CCP may show you the CLI equivalent of the configuration it is about to deploy or may just deploy it when you click Finish. You can control these settings in the preference settings for CCP.