
Adding a Zoom View Field to Images
In this example you will use a custom AngularJS directive to replace the <img> element and provide an automatic zoom view field that is displayed next to the image on the page. When you click on the image, the zoom view field will be updated with a zoomed-in portion of the image.
The purpose of this exercise is to show you how AngularJS custom directives can extend HTML with new elements that have a rich set of features. This example also illustrates another time when you will want to use the full version of jQuery rather than jQuery lite to get the size of the image and position of the mouse within the image.
The folder structure for this example is as follows:
■ ./server.js: Node.js web server that serves the static project files.
■ ./images: Folder that contains the images used in the examples.
■ ./ch11: Project folder.
■ ./ch11/zooming.html: AngularJS template for the project.
■ ./ch11/zoomit.html: AngularJS partial template that contains the image and zoom view field element definitions.
■ ./ch11/js/zooming.js: AngularJS application supporting the custom tabs directives.
The code in Listing 11.7 implements the zooming.js AngularJS application that defines the custom AngularJS directive called zoomit. The zoomit directive is restricted to elements only using restrict: 'E'. Also note that the src attribute from the template definition is injected into the scope.
The functionality for the zoomit directive is in the controller function. Notice that an object is created called zInfo that contains the background-image and background-position properties. The zInfo scope value will be used to set the ng-style attribute for the zoom view field in the zoomit.html partial template in Listing 11.8. Setting the background-image and background-position attributes adds the image to the background and positions the zoom.
The imageClick() function suppresses the default click behavior and then gets the event.target element as a jQuery object. This is where we need the full version of jQuery to the height, width, and current offset of the image on the page. We can then calculate the percentage from the left as posX and from the top as posY of the mouse click and set the background-position style appropriately.
Listing 11.7 zooming.js: AngularJS Application That Defines a Custom AngularJS Directive Called zoomit That Implements an <img> Element with a Zoom View Field
01 angular.module('myApp', [])
02 .controller('myController', ['$scope', function($scope) {
03 }])
04 .directive('zoomit', function() {
05 return {
06 restrict: 'E',
07 scope: { src: '@'},
08 controller: function($scope) {
09 $scope.zInfo = {
10 "background-image": "url(" + $scope.src + ")",
11 "background-position": "top right"
12 };
13 $scope.imageClick= function(event){
14 event.preventDefault();
15 //Using full jQuery to get offset, width and height
16 var elem = angular.element(event.target);
17 var posX = Math.ceil((event.pageX - elem.offset().left) /
18 elem.width() * 100);
19 var posY = Math.ceil((event.pageY - elem.offset().top) /
20 elem.height() * 100);
21 $scope.pos = posX + "% " + posY + "%";
22 $scope.zInfo["background-position"] = posX + "% " +
23 posY + "%";
24 };
25 },
26 link: function(scope, element, attrs) {
27 },
28 templateUrl: 'zoomit.html'
29 };
30 });
The code in Listing 11.8 implements the zoomit.html partial template that adds the <img> element and a <div> element, which will have the zoomed image as a background. Notice that the ng-click method is set to the imageClick() function in the scope and passes the $event. Also notice that ng-style is set to zInfo in the scope.
Listing 11.8 zoomit.html: AngularJS Partial Template That Implements the <img> and <div> Elements for the Image and Zoom View Field
01 <div>
02 <img src="{{src}}"
03 ng-click="imageClick($event)"/>
04 <div class="zoombox"
05 ng-style="zInfo"></div>
06 </div>
Listing 11.9 contains the AngularJS template code that provides the styles for the zoom view field and image. Notice that the <zoomit> element is added just like any other and that the src attribute is set just as with an <img> element. Also note that the full jQuery library is loaded before the AngularJS library.
Figure 11.3 shows the images with their view fields on a web page. As you click on a particular point in the image, the zoom view field is updated.
Listing 11.9 zooming.html: AngularJS Template That Styles and Implements the <zoomit> Custom AngularJS Directive
01 <!DOCTYPE html>
02 <html ng-app="myApp">
03 <head>
04 <title>Magnify</title>
05 <style>
06 .zoombox {
07 display: inline-block;
08 border: 3px ridge black;
09 width: 100px; height: 100px; }
10 img {
11 height: 200px;
12 vertical-align: top; }
13 </style>
14 </head>
15 <body>
16 <h2>Image Zoom Window</h2>
17 <div ng-controller="myController">
18 <zoomit src="/images/flower.jpg"></zoomit>
19 <hr>
20 <zoomit src="/images/arch.jpg"></zoomit>
21 </div>
22 </body>
23 <script src="http://ajax.googleapis.com/ajax/libs/jquery/1.11.1/jquery.min.js"></script>
24 <script src="http://code.angularjs.org/1.3.0/angular.min.js"></script>
25 <script src="js/zooming.js"></script>
26 </html>
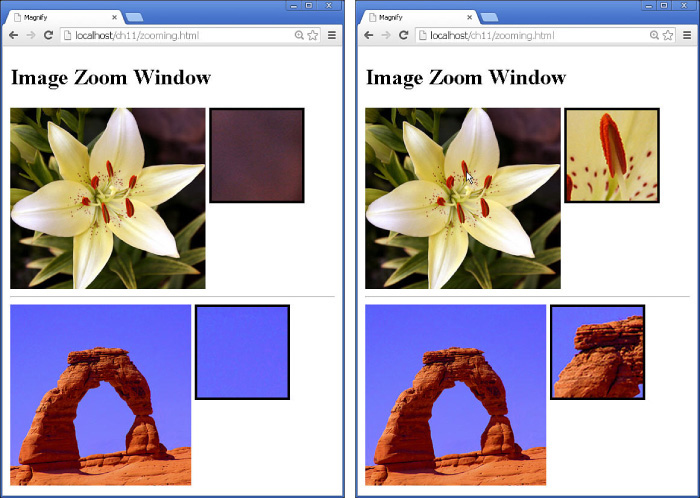
Figure 11.3 Implementing a custom AngularJS directive that provides an image with a zoom view finder.