Directives That Bind Page Events to Controllers
AngularJS templates enable you to bind browser events to controller code. This means you can handle user input from the scope’s perspective. You can then implement handlers for browser events directly to the appropriate scope. The event directive works very much like the normal browser event handlers, except that they are directly linked to the scope context.
Table 6.4 lists the directives that bind page and device events to the AngularJS model. Each of these directives enables you to specify an expression, which is typically a function defined in the scope, as discussed in Chapter 5, “Using AngularJS Templates to Create Views.” For example, the following is a function named setTitle in the scope:
$scope.setTitle = function(title){
$scope.title = title;
};

You can bind the setTitle() function in the scope directly to an input button in the view by using the following ng-click directive:
<input type="button" ng-click="setTitle('New Title')">
You can pass the JavaScript Event object into the event expressions by using the $event keyword. This enables you to access information about the event as well as stop propagation and everything else you normally can do with a JavaScript Event object. For example, the following ng-click directive passes the mouse click event to the myClick() handler function:
<input type="button" ng-click="myClick($event)">
The following sections provide some examples of using the AngularJS event directives to interact with events coming from the browser.
Using the Focus and Blur Events
The AngularJS ngBlur and ngFocus directives are useful to track when form elements go in and out of focus. For example, you might want to execute some code in the controller when a particular input element goes in and out of focus—say, to manipulate the input before updating the model. The code in Listings 6.9 and 6.10 illustrate an example of using the ngBlur and ngFocus directives to set values in the scope based on entering and leaving text inputs.
The code in Listing 6.9 implements a controller that defines an inputData object to store the values from two <input> elements. The focusGained() function will be called when an input comes into focus and will use the input parameter to set the value for that input in inputData to an empty string. The focusLost() function will accept the event and the input as inputs and will use the event object to get the value of the target element and update the corresponding property in inputData.
The code in Listing 6.10 is an AngularJS template that implements the two <input> elements and assigns the focusGained() and focusLost() handlers to the ng-focus and ng-blur attributes. Figure 6.4 shows the basic example in action. Note that when you click on an input element the value stored in inputData is set to an empty string, and when you leave the input element the value is updated.
Listing 6.9 directive_focus_events.js: Implementing a Controller with Scope Data and Event Handlers to Support Blur and Focus Events from the View
01 angular.module('myApp', []).
02 controller('myController', function($scope) {
03 $scope.inputData = { input1: '',
04 input2: '' };
05 $scope.focusGained = function(input){
06 $scope.inputData[input] = '';
07 };
08 $scope.focusLost = function(event, input){
09 var element = angular.element(event.target);
10 var value = element.val();
11 $scope.inputData[input] = value.toUpperCase();
12 };
13 });
Listing 6.10 directive_focus_events.html: An AngularJS Template That Implements the ngFocus and ngBlur Directives
01 <!doctype html>
02 <html ng-app="myApp">
03 <head>
04 <title>AngularJS Focus Event Directives</title>
05 </head>
06 <body>
07 <div ng-controller="myController">
08 <h2>Focus Event Directives</h2>
09 Input 1:<br>
10 <input type="text"
11 ng-blur="focusLost($event, 'input1')"
12 ng-focus="focusGained('input1')"><br>
13 Input 2:<br>
14 <input type="text"
15 ng-blur="focusLost($event, 'input2')"
16 ng-focus="focusGained('input2')"><hr>
17 Input Data: {{inputData|json}}<br/>
18 </div>
19 <script src="http://code.angularjs.org/1.3.0/angular.min.js"></script>
20 <script src="js/directive_focus_events.js"></script>
21 </body>
22 </html>

Handling Keyboard Events on AngularJS Elements
The most common keyboard event directives that you will use are the ngKeydown and ngKeyup events that are triggered when a keyboard key is pressed and released, respectively. Keyboard events are useful for interacting more closely with users as they type on the keyboard. Probably the most common keyboard interaction is to apply some action when a user presses the Enter key on the keyboard. The code in Listings 6.11 and 6.12 illustrate the usage of the ngKeydown and ngKeyup directives.
The code in Listing 6.11 implements a controller that provides the model and keyboard handler functions for the key-down and key-up events. The storedString variable is used to store the value of a text input whenever the user presses Enter while typing in the input. The keyInfo variable stores the keyCode for the last key pressed, and the keyStrokes array records the previous keyCodes for keys pressed. Inside the keyPressed() function, we check to see whether the keyCode is 13, meaning Enter was pressed, and if so we record the storedString and reset the other variables.
The code in Listing 6.12 is the AngularJS template that assigns the ng-keydown and ng-keyup directives to an <input> element. When ng-keydown is triggered the keyState variable in the scope is updated, and when ng-keyup is triggered the keyPressed() handler is called. Figure 6.5 shows the AngularJS web page in action. Note that as you type each character in the text input the model is updated, and when Enter is pressed the word is stored and the keystrokes are reset.
Listing 6.11 directive_keyboard_events.js: Implementing a Controller with Scope Data and Event Handlers to Support Key-Down and Key-Up Events from the View
01 angular.module('myApp', []).
02 controller('myController', function($scope) {
03 $scope.storedString = '';
04 $scope.keyInfo = {};
05 $scope.keyStrokes = [];
06 $scope.keyState = 'Not Pressed';
07 $scope.keyPressed = function(event){
08 if (event.keyCode == 13){
09 var element = angular.element(event.target);
10 $scope.storedString = element.val();
11 element.val(''),
12 $scope.keyInfo.keyCode = event.keyCode;
13 $scope.keyStrokes = [];
14 $scope.keyState = 'Enter Pressed';
15 } else {
16 $scope.keyInfo.keyCode = event.keyCode;
17 $scope.keyStrokes.push(event.keyCode);
18 $scope.keyState = 'Not Pressed';
19 }
20 };
21 });
Listing 6.12 directive_keyboard_events.html: An AngularJS Template That Implements the ngKeydown and ngKeyup Directives
01 <!doctype html>
02 <html ng-app="myApp">
03 <head>
04 <title>AngularJS Keyboard Event Directives</title>
05 </head>
06 <body>
07 <div ng-controller="myController">
08 <h2>Keyboard Event Directives</h2>
09 <input type="text"
10 ng-keydown="keyState='Pressed'"
11 ng-keyup="keyPressed($event)"><hr>
12 Keyboard State:<br>
13 {{keyState}}<hr>
14 Last Key:<br>
15 {{keyInfo|json}}<hr>
16 Stored String:<br>
17 {{storedString}}<hr>
18 Recorded Key Strokes:<br>
19 {{keyStrokes}}
20 </div>
21 <script src="http://code.angularjs.org/1.3.0/angular.min.js"></script>
22 <script src="js/directive_keyboard_events.js"></script>
23 </body>
24 </html>

Handling Mouse Events in the AngularJS Elements
AngularJS provides several mouse event directives that enable you to easily enhance your AngularJS applications with mouse interactivity. The most common mouse event directive that you will use is ngClick when the mouse is clicked. However, you also have several other mouse events that can come in very handy to create richly interactive components. The code in Listings 6.13 and 6.14 illustrate the usage of the ngClick, ngMouseenter, ngMouseleave, ngMousedown, ngMouseup, and ngMousemove directives.
The code in Listing 6.13 implements a controller that provides the model as well as mouseClick() and mouseMove() handler functions to handle the click and mouse movement events. The real-time mouse positioning information while the mouse is moving over the element is stored in the mouseInfo structure. Each time the mouse is clicked over the element, the click position is stored in lastClickInfo.
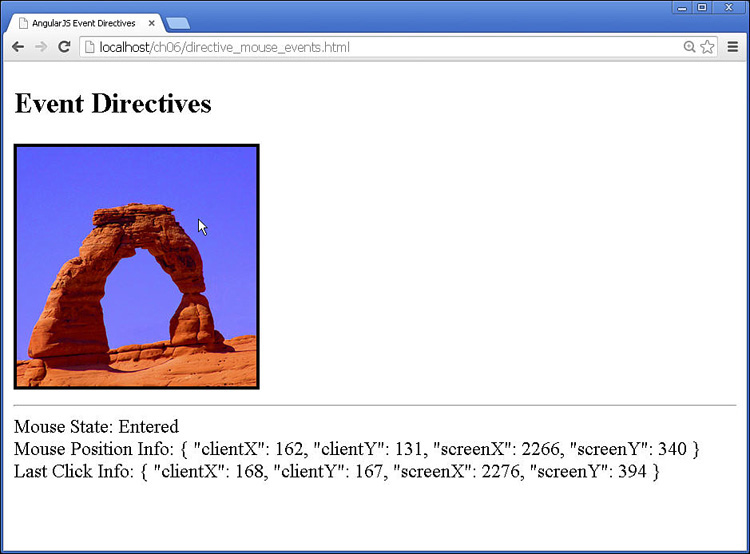
The code in Listing 6.14 is the AngularJS template that assigns the mouse event directives to an <img> element and displays the mouseInfo and lastClickInfo structures. Figure 6.6 shows the AngularJS application working. Notice that the mouse state changes as you enter, leave, and click on the image. Also notice that the position information is updated as you move over and click on the image.
Listing 6.13 directive_mouse_events.js: Implementing a Controller with Scope Data and Event Handlers to Support Mouse Click and Movement Events from the View
01 angular.module('myApp', []).
02 controller('myController', function($scope) {
03 $scope.mouseInfo = {};
04 $scope.lastClickInfo = {};
05 $scope.mouseClick = function(event){
06 $scope.lastClickInfo.clientX = event.clientX;
07 $scope.lastClickInfo.clientY = event.clientY;
08 $scope.lastClickInfo.screenX = event.screenX;
09 $scope.lastClickInfo.screenY = event.screenY;
10 };
11 $scope.mouseMove = function(event){
12 $scope.mouseInfo.clientX = event.clientX;
13 $scope.mouseInfo.clientY = event.clientY;
14 $scope.mouseInfo.screenX = event.screenX;
15 $scope.mouseInfo.screenY = event.screenY;
16 };
17 });
Listing 6.14 directive_mouse_events.html: An AngularJS Template That Implements the ngClick and Other Mouse Click and Move Event Directives
01 <!doctype html>
02 <html ng-app="myApp">
03 <head>
04 <title>AngularJS Event Directives</title>
05 <style>
06 img {
07 border: 3px ridge black;
08 height: 200px; width: 200px;
09 display: inline-block;
10 }
11 </style>
12 </head>
13 <body>
14 <div ng-controller="myController">
15 <h2>Event Directives</h2>
16 <img
17 src="/images/arch.jpg"
18 ng-mouseenter="mouseState='Entered'"
19 ng-mouseleave="mouseState='Left'"
20 ng-mouseclick="mouseState='Clicked'"
21 ng-mousedown="mouseState='Down'"
22 ng-mouseup="mouseState='Up'"
23 ng-click="mouseClick($event)"
24 ng-mousemove="mouseMove($event)"></img><hr>
25 Mouse State: {{mouseState}}<br/>
26 Mouse Position Info: {{mouseInfo|json}}<br/>
27 Last Click Info: {{lastClickInfo|json}}<br/>
28 </div>
29 <script src="http://code.angularjs.org/1.3.0/angular.min.js"></script>
30 <script src="js/directive_mouse_events.js"></script>
31 </body>
32 </html>