Building a Tabbed View
In this example you will build two custom AngularJS directives, one that acts as a tab group and the other that acts as the individual panes in the tabbed group. The objective of this example is to give you a look at nesting custom directives inside each other, as well as some communication between the two.
The folder structure for this example is as follows:
■ ./server.js: Node.js web server that serves the static project files.
■ ./images: Folder that contains the images used in the examples.
■ ./ch11: Project folder.
■ ./ch11/tabbable.html: AngularJS template for the project.
■ ./ch11/tabs.html: AngularJS partial template for the tabbed group.
■ ./ch11/panel.html: AngularJS partial template for each individual panel in the tabbed group.
■ ./ch11/js/tabbable.js: AngularJS application supporting the custom tabs directives.
The code in Listing 11.1 shows the tabbable.js AngularJS application that defines the two directives myTabs and myPane. Note that the HTML used inside the templates comes from the partial files using the templateUrl option in the directive definition. Also note that the transclude option is used, which enables us to keep the contents for the myPane elements in the AngularJS template.
Communication between the two directives is made possible by requiring the myTabs directive in the definition for myPane. This causes the controller defined in myTabs to be passed in to the link function of myPane. Note that on line 30 we are able to call addPane() to add the scope for the myPane directive to a list in the myTabs directive. The visible tab is changed using the select() method in the myTabs controller function.
Listing 11.1 tabbable.js: AngularJS Application That Defines Two Custom Directives That Can Be Nested to Provide a Tabbed Panel View
01 var app = angular.module('myApp', []);
02 app.directive('myTabs', function() {
03 return {
04 restrict: 'E',
05 transclude: true,
06 scope: {},
07 controller: function($scope) {
08 var panes = $scope.panes = [];
09 $scope.select = function(pane) {
10 angular.forEach(panes, function(pane) {
11 pane.selected = false;
12 });
13 pane.selected = true;
14 };
15 this.addPane = function(pane) {
16 if (panes.length == 0) {
17 $scope.select(pane);
18 }
19 panes.push(pane);
20 };
21 },
22 templateUrl: 'tabs.html'
23 };
24 });
25 app.directive('myPane', function() {
26 return { require: '^myTabs', restrict: 'E',
27 templateUrl: 'pane.html',
28 transclude: true, scope: { title: '@' },
29 link: function(scope, element, attrs, tabsCtrl) {
30 tabsCtrl.addPane(scope);
31 }
32 };
33 });
The code in Listing 11.2 contains the AngularJS partial template that acts as the replacement for the myTabs directive. Notice that the panes value in the scope is used to add the tabs as <span> elements to the top of the view. The panes array is built as each myPane element is compiled and linked into the template.
Listing 11.2 tabs.html: AngularJS Partial Template That Contains the Template Code to Build the Tabs Container
01 <div class="tabbable">
02 <div class="tabs">
03 <span class="tab" ng-repeat="pane in panes"
04 ng-class="{activeTab:pane.selected}"
05 ng-click="select(pane)">{{pane.title}}
06 </span>
07 </div>
08 <div class="tabcontent" ng-transclude></div>
09 </div>?
The code in Listing 11.3 contains the AngularJS partial template that acts as the replacement for the myPane directive. Notice that we use ng-show to show and hide the panes as they are clicked on. The ng-transclude attribute ensures that the contents defined in the myPane element are included in the rendered view.
Listing 11.3 pane.html: AngularJS Partial Template That Contains the Template Code to Build the Individual Panes of the Tabbed Container
01 <div class="pane"
02 ng-show="selected"
03 ng-transclude>
04 </div>
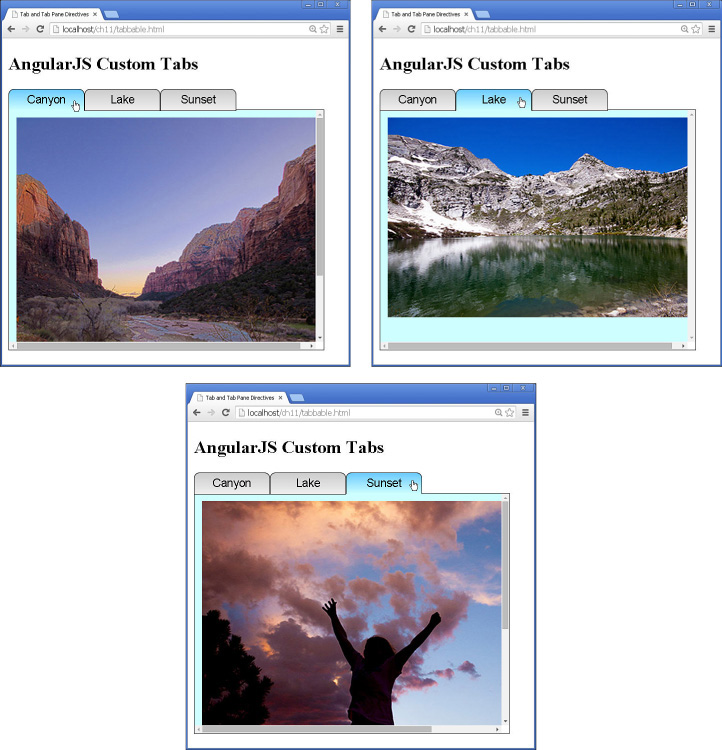
Listing 11.4 shows the AngularJS template that supports the myTabs and myPane directives. Note the naming structure of my-tabs and my-pane for the elements needed in the template. For this example only images are placed inside the myPane element. This could just as easily be a complex series of elements such as a form or table.
Figure 11.1 shows the working web page. Notice that as the tab for each pane is clicked, the content changes.
Listing 11.4 tabbable.html: AngularJS Template That Implements the myTabs and myPane Custom Directives to Create a Tabbed View
01 <!doctype html>
02 <html ng-app="myApp">
03 <head>
04 <title>Tab and Tab Pane Directives</title>
05 <style>
06 .tab{
07 display:inline-block; width:100px;
08 border-radius: .5em .5em 0 0; border:1px solid black;
09 text-align:center; font: 15px/28px Helvetica, sans-serif;
10 background-image: linear-gradient(#CCCCCC, #EEEEEE);
11 cursor: pointer; }
12 .activeTab{
13 border-bottom: none;
14 background-image: linear-gradient(#66CCFF, #CCFFFF); }
15 .pane{
16 border:1px solid black; background-color: #CCFFFF;
17 height:300px; width:400px;
18 padding:10px; margin-top:-2px;
19 overflow: scroll; }
20 </style>
21 </head>
22 <body>
23 <h2>AngularJS Custom Tabs</h2>
24 <my-tabs>
25 <my-pane title="Canyon">
26 <img src="/images/canyon.jpg" />
27 </my-pane>
28 <my-pane title="Lake">
29 <img src="/images/lake.jpg" />
30 </my-pane>
31 <my-pane title="Sunset">
32 <img src="/images/jump.jpg" />
33 </my-pane>
34 </my-tabs>
35 <script src="http://code.angularjs.org/1.3.0/angular.min.js"></script>
36 <script src="js/tabbable.js"></script>
37 </body>
38 </html>