Manipulating the DOM in Custom Directives
One of the most common tasks you will be performing in custom directives is manipulating the DOM. This should be the only place in your AngularJS apps that you actually do manipulate the DOM. In this exercise we build a basic custom directive that applies a box with title and footer around the elements that are contained within. This example is very basic and gives you a chance to see how to use some of the mechanisms in AngularJS, such as setting values as attributes to the custom directive.
The code in Listing 7.1 creates a simple application with a controller that contains only the scope variable title. The code then defines a directive that enables transclusion, restricts the custom directive to element names only, and defines an isolate scope accepting the parameters title and bwidth as strings. The example also defines a template that adds the title bar and a <div ng-transclude> to store the transcluded content of the custom directive.
The link() function uses append to append a footer element. This could also have been done in the template; however, I wanted to illustrate that it can also be done in the link() function. Also note that the text of the footer element is coming from the title value of the parent scope using scope.$parent.title. The link function also adds a border and sets the display and width values based on the bwidth value in the scope.
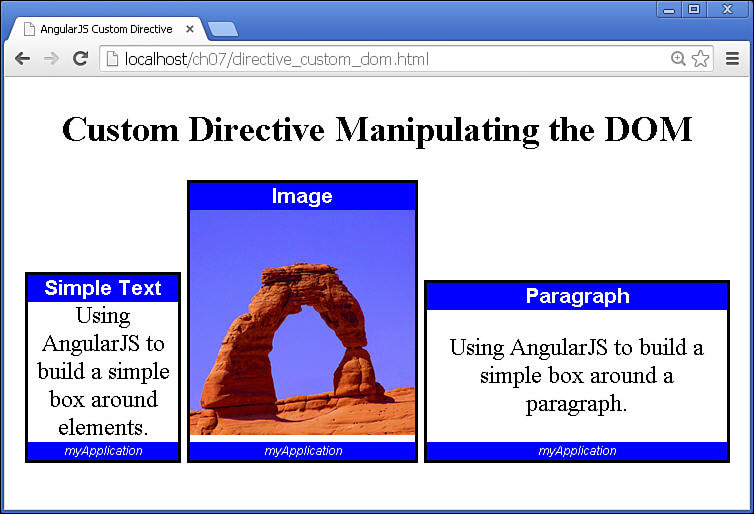
The code in Listing 7.2 implements an AngularJS template that sets up some CSS styles and then adds the <mybox> custom directive that was defined in Listing 7.1. Notice that the content of the directive varies from a string to an image to a paragraph. The results are shown in Figure 7.1. Notice that the bwidth attribute size determines the width of the box and all the elements are surrounded by the same type of box.
Listing 7.1 directive_custom_dom.js: Implementing Custom Directives That Manipulate the DOM
01 angular.module('myApp', [])
02 .controller('myController', function($scope) {
03 $scope.title="myApplication";
04 })
05 .directive('mybox', function() {
06 return {
07 transclude: true,
08 restrict: 'E',
09 scope: {title: '@', bwidth: '@bwidth'},
10 template: '<div><span class="titleBar">{{title}}' +
11 '</span><div ng-transclude></div></div>',
12 link: function (scope, elem, attr, controller, transclude){
13 elem.append('<span class="footer">' + scope.$parent.title + '</span>'),
14 elem.css('border', '2px ridge black'),
15 elem.css('display', 'inline-block'),
16 elem.css('width', scope.bwidth);
17 },
18 };
19 });
Listing 7.2 directive_custom_dom.html: An AngularJS Template That Utilizes a Custom Directive That Manipulates the DOM
01 <!doctype html>
02 <html ng-app="myApp">
03 <head>
04 <title>AngularJS Custom Directive</title>
05 <style>
06 * {text-align: center ;}
07 .titleBar { color: white; background-color: blue;
08 font: bold 14px/18px arial; display: block;}
09 .footer { color: white; background-color: blue;
10 font: italic 8px/12px arial; display: block;}
11 </style>
12 </head>
13 <body>
14 <div ng-controller="myController">
15 <h2>Custom Directive Manipulating the DOM</h2>
16 <mybox title="Simple Text" bwidth="100px">
17 Using AngularJS to build a simple box around elements.
18 </mybox>
19 <mybox title="Image" bwidth="150px">
20 <img src="/images/arch.jpg" width="150px" />
21 </mybox>
22 <mybox title="Paragraph" bwidth="200px">
23 <p>Using AngularJS to build a simple box around a paragraph.</p>
24 </mybox>
25 </div>
26 <script src="http://code.angularjs.org/1.3.0/angular.min.js"></script>
27 <script src="js/directive_custom_dom.js"></script>
28 </body>
29 </html>