7. Creating Motion Animations
What You’ll Do
Create an Animation with the Pin
Create an Animation with Auto Keyframes
Create an Animation with Keyframes
Create an Animation with a Transition
Make Adjustments to an Animation
Introduction
Edge Animate is a property based animation system using keyframes to mark changes in properties. This means that keyframes mark the start and end points of an animation based on changes in element properties, such as location, size, color, border size, border style, border radius, rotation, skew, or scale. Keyframes appear as diamonds in the Timeline. The Timeline displays content in sequential order from 0:00 seconds to the end of the animation. As you play an animation, the playhead moves through the Timeline displaying the current content on the Stage.
There are three main ways to create animations in Edge Animate. The first is an automatic method with the pin, the second is an automatic method with keyframes, and the third is a manual method with keyframes. Each method creates an animation using keyframes. The Pin method provides the fastest way to create an animation, while the manual Keyframe method gives you the most control. You can pick the method that best works for you.
As you create an animation, you can develop the design to respond to changes in the screen size. This allows you to deliver your animation on different screens sizes on a variety of devices, such as desktops, laptops, tablets, and mobile devices. You can make the Stage and individual elements responsive to the screen size by changing their units from pixels (fixed) to percentage (adjustable). By using percentages, the design can respond to any size screen.
Creating an Animation with the Pin
With the Pin, you can minimize the amount of time it takes to a create an animation in Edge Animate. You create an animation by setting keyframes at specific times in the Timeline and changing property values between them. Keyframes appear as diamonds in the Timeline. Instead of creating individual keyframes one at a time, you can use the Pin to create from and to keyframes with a single edit. So, the Pin can be a time saver. To help make the process even easier, you can also use Auto Keyframe Mode, which automatically creates keyframes when a property is modified, and Auto Transition Mode, which automatically creates a transition as needed.
Create an Animation with the Pin
![]() In the Timeline, drag the Playhead to the place where you want to start the animation.
In the Timeline, drag the Playhead to the place where you want to start the animation.
![]() Double-click the Playhead to display a blue pin on top.
Double-click the Playhead to display a blue pin on top.
The Auto-Keyframe Mode, Auto-Transition Mode, and the Toggle Pin button are turned on in the Timeline.
![]() Drag the Pin (blue) to the ending place of the animation.
Drag the Pin (blue) to the ending place of the animation.
The Playhead remains in place while the Pin moves to display a blue region for the animation.
![]() Select and position the elements where you want them to start (this can be on or off the Stage) and/or adjust the properties you want for the start in the Properties panel.
Select and position the elements where you want them to start (this can be on or off the Stage) and/or adjust the properties you want for the start in the Properties panel.
This automatically adds keyframes for each property change.

![]() Click the Play button or press Space to play back the animation.
Click the Play button or press Space to play back the animation.
Project: Create an Animation with the Pin
![]() Open the Pin_start.html file in the chapter folder, and then save it in a new folder.
Open the Pin_start.html file in the chapter folder, and then save it in a new folder.
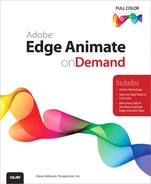
![]() In the Timeline, drag the Playhead to 0:00.500 (0.5 seconds).
In the Timeline, drag the Playhead to 0:00.500 (0.5 seconds).
![]() Double-click the Playhead to display a blue pin on top.
Double-click the Playhead to display a blue pin on top.
The Auto-Keyframe Mode, Auto-Transition Mode, and the Toggle Pin button are turned on in the Timeline.
![]() Drag the Pin (blue) to 0:01.500 (1.5 seconds).
Drag the Pin (blue) to 0:01.500 (1.5 seconds).
The Playhead remains in place while the Pin moves to display a blue region for the animation.
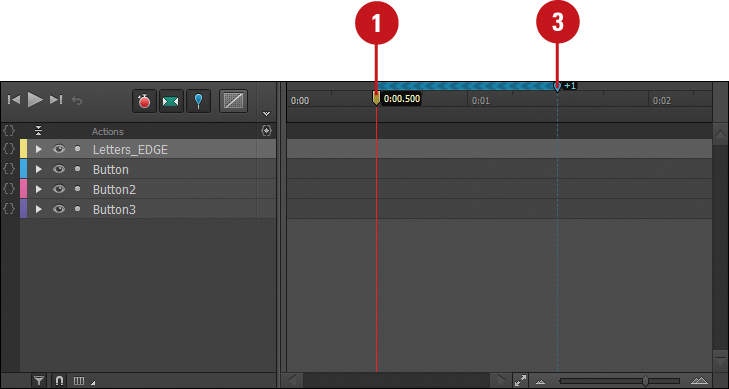
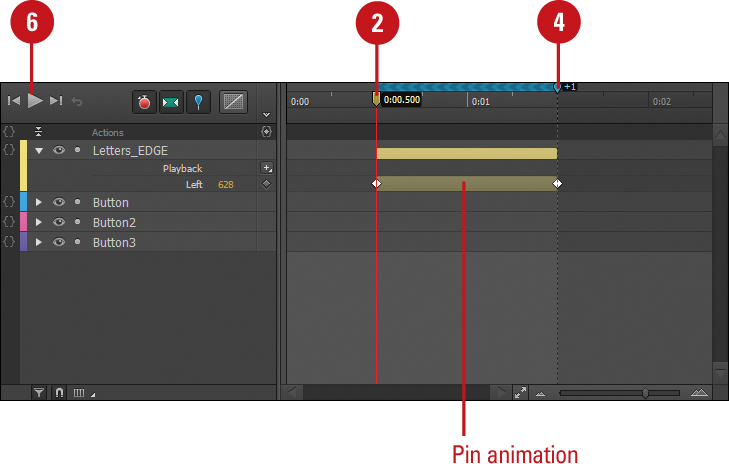
![]() Shift-drag the Letters_EDGE element off the Stage to the right.
Shift-drag the Letters_EDGE element off the Stage to the right.
This automatically adds keyframes for each property change.
![]() Click the Play button or press Space to play back the animation.
Click the Play button or press Space to play back the animation.
The Edge letters animate in from the left.

Did You Know?
You can flip the position of the Playhead and the Pin. Click the Timeline menu, and then click Flip Playhead And Pin or press Shift+P.
Creating an Animation with Auto Keyframes
You create an animation by setting keyframes at specific times in the Timeline and changing property values between them. Keyframes mark the start and end points of an animation based on changes in element properties, such as location, size, color, border size, border style, border radius, rotation, skew, or scale. Keyframes appear as diamonds in the Timeline. You can set keyframes manually one at a time, or you can use Auto-Keyframe Mode, which automatically creates keyframes when a property is modified. It makes the process a little easier, however, it can also add keyframes for property changes you may not want. If this happens, you can delete the keyframes.
Create a Animation with Auto Keyframes
![]() Click the Auto-Keyframe Mode button and the Auto-Transition Mode button to turn them on (highlighted), and then click the Toggle Pin button to turn it off (non-highlighted).
Click the Auto-Keyframe Mode button and the Auto-Transition Mode button to turn them on (highlighted), and then click the Toggle Pin button to turn it off (non-highlighted).
![]() In the Timeline, drag the Playhead to the place where you want to start the animation.
In the Timeline, drag the Playhead to the place where you want to start the animation.
![]() Select and position the elements where you want them to start (this can be on or off the Stage) and/or adjust the properties you want for the start in the Properties panel.
Select and position the elements where you want them to start (this can be on or off the Stage) and/or adjust the properties you want for the start in the Properties panel.
This automatically adds keyframes for each property change.
![]() In the Timeline, drag the Playhead to the place where you want to end the animation.
In the Timeline, drag the Playhead to the place where you want to end the animation.
![]() Select and position the elements where you want them to end (this can be on or off the Stage) and/or adjust the properties you want for the end in the Properties panel.
Select and position the elements where you want them to end (this can be on or off the Stage) and/or adjust the properties you want for the end in the Properties panel.
This automatically adds keyframes for each property change.
![]() Click the Play button or press Space to play back the animation.
Click the Play button or press Space to play back the animation.
Project: Create an Animation with Auto Keyframes
![]() Open the Keyframes_start.html file in the chapter folder, and then save it in a new folder.
Open the Keyframes_start.html file in the chapter folder, and then save it in a new folder.
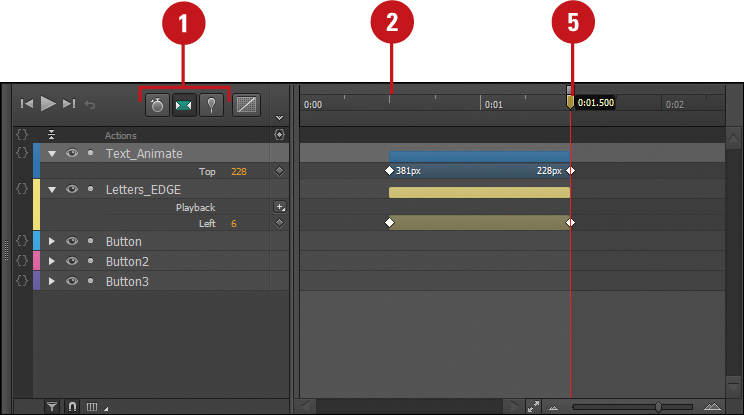
![]() Click the Auto-Keyframe Mode button and the Auto-Transition Mode button to turn them on (highlighted), and then click the Toggle Pin button to turn it off (non-highlighted).
Click the Auto-Keyframe Mode button and the Auto-Transition Mode button to turn them on (highlighted), and then click the Toggle Pin button to turn it off (non-highlighted).
![]() In the Timeline, drag the Playhead to 0:00.500 (0.5 seconds).
In the Timeline, drag the Playhead to 0:00.500 (0.5 seconds).
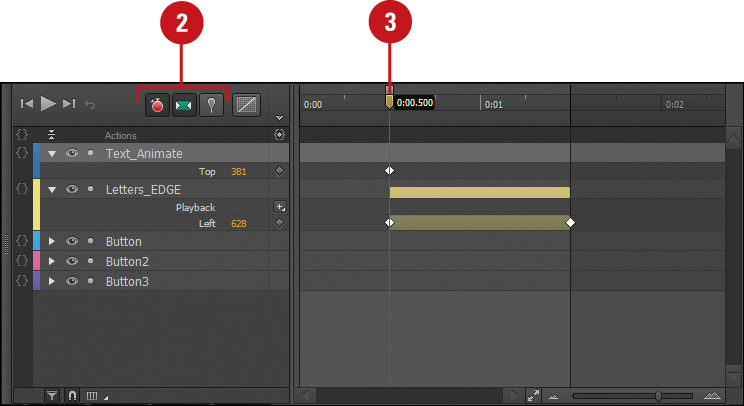
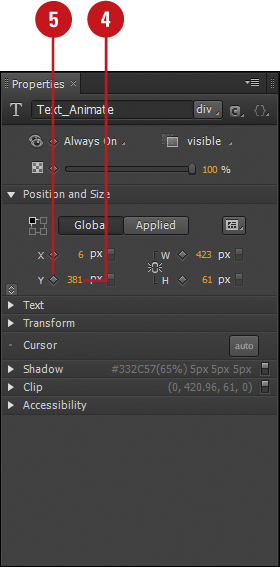
![]() Shift-drag the Text_Animate element off the Stage to the bottom to Y = 381 px in the Properties panel.
Shift-drag the Text_Animate element off the Stage to the bottom to Y = 381 px in the Properties panel.
This automatically adds keyframes for the property change.
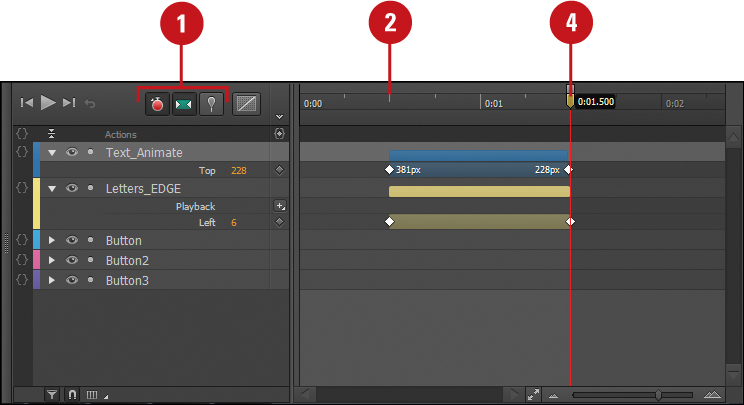
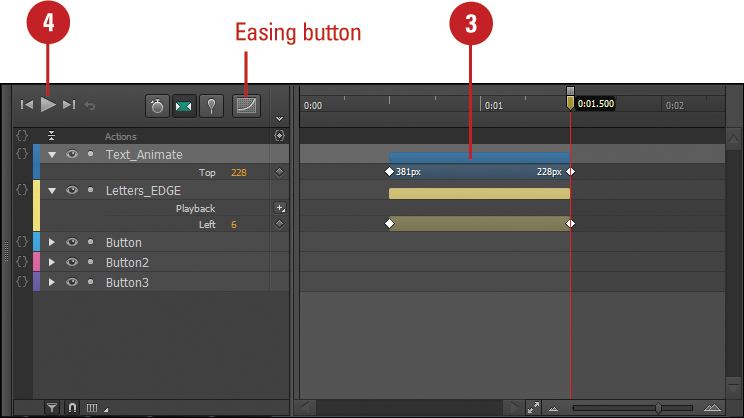
![]() In the Timeline, drag the Playhead to 0:01.500 (1.5 seconds).
In the Timeline, drag the Playhead to 0:01.500 (1.5 seconds).
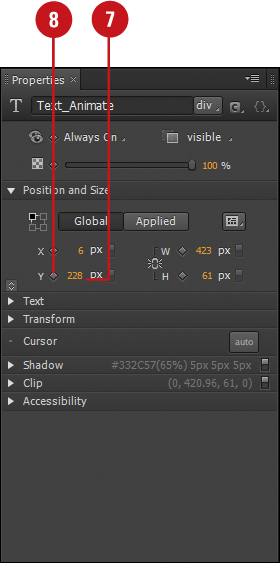
![]() Shift-drag the Text_Animate element on the Stage from the bottom to Y = 228 px in the Properties panel.
Shift-drag the Text_Animate element on the Stage from the bottom to Y = 228 px in the Properties panel.
This automatically adds keyframes for the property change. Auto-Transition Mode adds a transition between the keyframes.

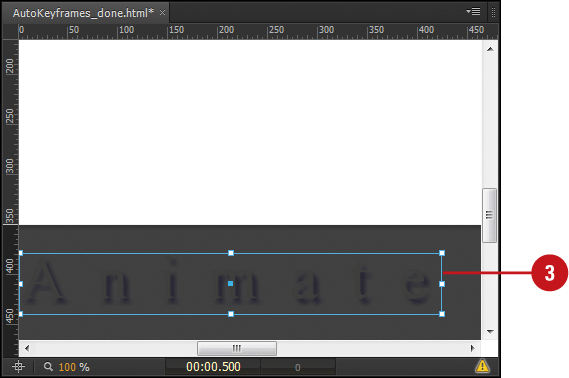
![]() Click the Play button or press Space to play back the animation.
Click the Play button or press Space to play back the animation.
The Edge letters animate in from the left and the Animate text animates in from the bottom.

Creating an Animation with Keyframes
With the Add Keyframe diamonds in the Properties panel, you can manually add keyframes to the Timeline to create an animation. Manually adding keyframes is more time consuming, however, you have more control over the results. Keyframes mark the start and end points of an animation based on changes in element properties, such as location, size, color, border size, border style, border radius, rotation, skew, or scale. If a keyframe appears hollow (not filled in), it means that it has a different value than the previous keyframe. When a keyframe is hollow, it displays a jump between the keyframes instead of a transition.
Create a Manual Animation with Keyframes
![]() Click the Auto-Keyframe Mode button and the Toggle Pin button to turn them off (non-highlighted), and then click the Auto-Transition Mode button to turn it on (highlighted).
Click the Auto-Keyframe Mode button and the Toggle Pin button to turn them off (non-highlighted), and then click the Auto-Transition Mode button to turn it on (highlighted).
![]() In the Timeline, drag the Playhead to the place where you want to start the animation.
In the Timeline, drag the Playhead to the place where you want to start the animation.
![]() Select and position the elements where you want them to start (this can be on or off the Stage) and/or adjust the properties you want for the start in the Properties panel.
Select and position the elements where you want them to start (this can be on or off the Stage) and/or adjust the properties you want for the start in the Properties panel.
![]() In the Properties panel, click the Add Keyframe diamond for the properties you want to animate.
In the Properties panel, click the Add Keyframe diamond for the properties you want to animate.
![]() In the Timeline, drag the Playhead to the place where you want to end the animation.
In the Timeline, drag the Playhead to the place where you want to end the animation.

![]() Select and position the elements where you want them to end (this can be on or off the Stage) and/or adjust the properties you want for the end in the Properties panel.
Select and position the elements where you want them to end (this can be on or off the Stage) and/or adjust the properties you want for the end in the Properties panel.
![]() In the Properties panel, click the Add Keyframe diamond for the properties you want to animate.
In the Properties panel, click the Add Keyframe diamond for the properties you want to animate.
![]() Click the Play button or press Space to play back the animation.
Click the Play button or press Space to play back the animation.
Project: Create an Animation with Keyframes
![]() Open the Keyframes_start.html file in the chapter folder, and then save it in a new folder.
Open the Keyframes_start.html file in the chapter folder, and then save it in a new folder.
![]() Click the Auto-Keyframe Mode button and the Toggle Pin button to turn them off (non-highlighted), and then click the Auto-Transition Mode button to turn it on (highlighted).
Click the Auto-Keyframe Mode button and the Toggle Pin button to turn them off (non-highlighted), and then click the Auto-Transition Mode button to turn it on (highlighted).
![]() In the Timeline, drag the Playhead to 0:00.500 (0.5 seconds).
In the Timeline, drag the Playhead to 0:00.500 (0.5 seconds).

![]() Shift-drag the Text_Animate element off the Stage to the bottom. Set Y = 381 px in the Properties panel.
Shift-drag the Text_Animate element off the Stage to the bottom. Set Y = 381 px in the Properties panel.
![]() Click the Add Keyframe diamond next to Y (under Position and Size).
Click the Add Keyframe diamond next to Y (under Position and Size).
This adds a keyframe for the element for the property change.
![]() In the Timeline, drag the Playhead to 0:01.500 (1.50 seconds).
In the Timeline, drag the Playhead to 0:01.500 (1.50 seconds).
![]() Shift-drag the Text_Animate element on the Stage. Set Y = 228 px in the Properties panel.
Shift-drag the Text_Animate element on the Stage. Set Y = 228 px in the Properties panel.
![]() Click the Add Keyframe diamond next to Y (under Position and Size).
Click the Add Keyframe diamond next to Y (under Position and Size).
This adds another keyframe for the element for the property change.
![]() Click the Play button or press Space to play back the animation.
Click the Play button or press Space to play back the animation.

The Edge letters animate in from the left and the Animate text animates in from the bottom.
Creating an Animation with a Transition
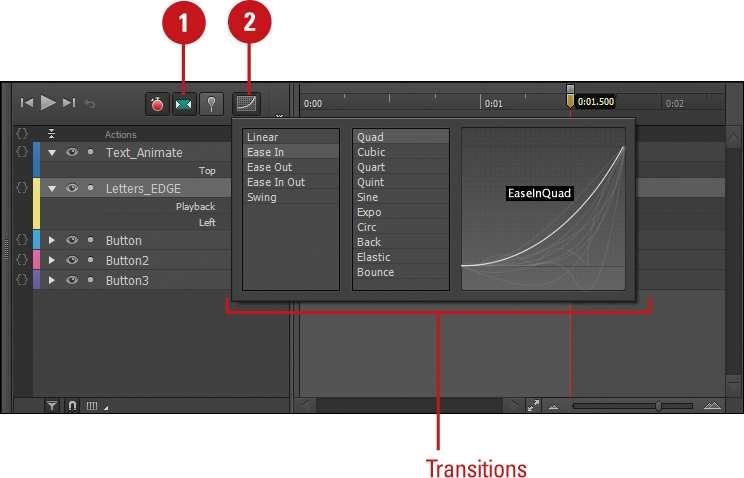
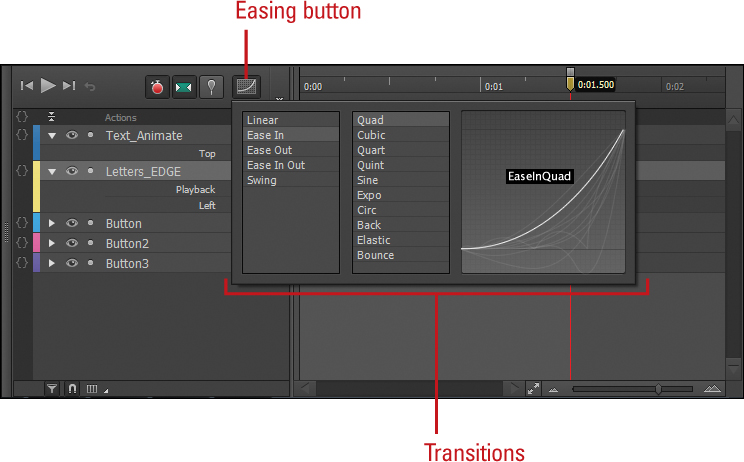
When you create an animation with Auto-Transition Mode turned on (highlighted), Edge Animate applies a smooth transition between the keyframes. Edge Animate uses the current transition selected with the Easing button, which displays a graph of the transition path to provide a visual perspective. If you create an animation with Auto-Transition Mode turned off, no transition is applied between the keyframes. Instead, the animation displays a jump between the keyframes. Without a transition, one of the keyframes appears hollow (not filled in). When a keyframe is hollow, it means that it has a different value than the previous keyframe. In this situation, you can manually create a transition. After you apply and select a transition, you can copy and paste it to another location in the Timeline or invert it to display in the opposite direction. If you no longer want to use a transition, you can remove it at any time.
Create a Animation with a Transition
![]() Click the Auto-Transition Mode button to turn it on (highlighted).
Click the Auto-Transition Mode button to turn it on (highlighted).
![]() Click the Easing button, click a transition type (first column), and then click a transition (second column).
Click the Easing button, click a transition type (first column), and then click a transition (second column).
The selected transition will be applied to any animation.
Timesaver
Point to the Easing button to display a tooltip with the currently selected transition.
![]() Create an animation using the Pin or Auto-Keyframe Mode method.
Create an animation using the Pin or Auto-Keyframe Mode method.
See topics earlier in this chapter for step-by-step instructions to create an animation.
![]() Click the Play button or press Space to play back the animation.
Click the Play button or press Space to play back the animation.
Work with Transitions
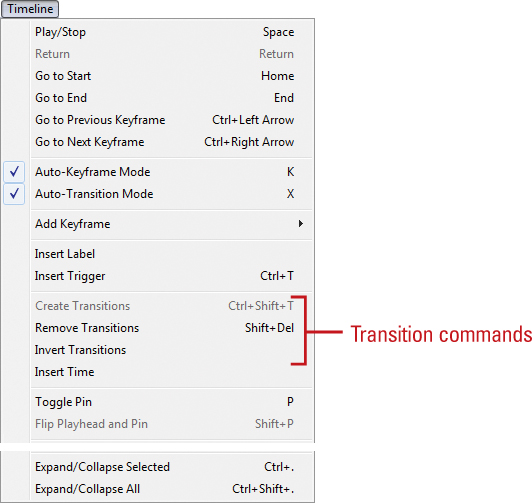
• Invert a Transition. Select the animation layer in the Timeline, click the Timeline menu, and then click Invert Transitions.

• Remove a Transition. Select the animation layer in the Timeline, click the Timeline menu, and then click Remove Transitions.
Timesaver
Press Shift+Del to remove a transition.
• Change a Transition. Select the animation layer in the Timeline, click the Easing button, click a transition type (first column), and then click a transition (second column).
• Copy and Paste a Transition. Select the animation layer, press Ctrl+C (Win) or ![]() +C (Mac), position the Playhead, click the Edit menu, point to Paste Special, and then click Paste Transitions To Location or Paste Transitions From Location.
+C (Mac), position the Playhead, click the Edit menu, point to Paste Special, and then click Paste Transitions To Location or Paste Transitions From Location.
Timesaver
Press Ctrl+Shift+V (Win) or ![]() +Shift+V (Mac) to paste transitions from location.
+Shift+V (Mac) to paste transitions from location.
• Create a Transition (Manually). Select the two keyframes without a transition in between. One of the keyframes should be hollow. Click the Timeline menu, and then click Create Transitions.
Timesaver
Press Ctrl+Shift+T (Win) or ![]() +Shift+T (Mac) to create a transition manually.
+Shift+T (Mac) to create a transition manually.
Playing Animations
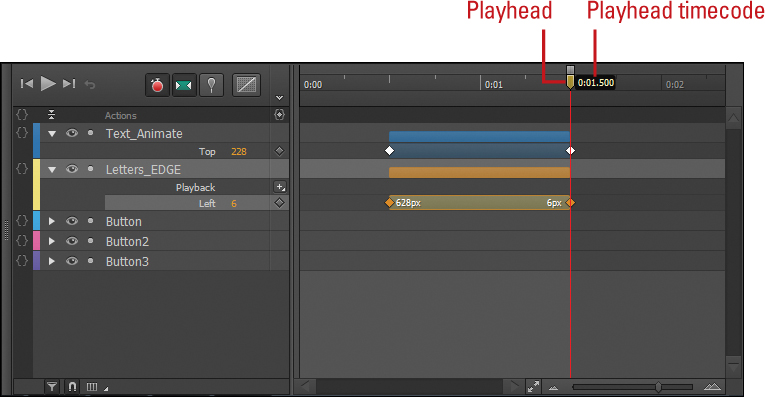
The order in which content appears in the Timeline determines the order in which it appears in the animation. The Timeline displays content in sequential order from 0:00 seconds to the end of the animation. A Playhead appears in the header (with the timecode) with a red line going down the Timeline to indicate the current position in the animation. As you play an animation, the Playhead moves through the Timeline displaying the current content on the Stage. If you want to display specific content on the Stage or review the animation, you can move (drag) the Playhead, known as scrubbing, across the Timeline to a specific position or through a section to display it. Playhead and Timeline commands are available on the Timeline panel and Timeline menu as well as with keyboard shortcuts.
Work with the Playhead
• Play Animation. Click the Play/Pause button or press Space to play or pause the animation.
• Move Playhead. Do any of the following:
• Move Playhead to Start. Click the Rewind button (left of Play/Pause) or press Home.
• Move Playhead to End. Click the Forward button (right of Play/Pause) or press End.
• Move Playhead to Last Play Position. Click the Return button (right of Forward) or press Enter (Win) or Return (Mac).
• Move Playhead to Exact Time. Click and enter a time value or point to the time value and drag.
• Move/Scrub Playhead. Drag the Playhead.
• Move/Scrub Playhead without Snapping. Ctrl (Win) or ![]() (Mac)+drag the Playhead.
(Mac)+drag the Playhead.
• Go to Previous Keyframe. Press Ctrl+Left Arrow (Win) or ![]() +Left Arrow (Mac).
+Left Arrow (Mac).
• Go to Next Keyframe. Press Ctrl+Right Arrow (Win) or ![]() +Right Arrow (Mac).
+Right Arrow (Mac).

Use the Timeline Panel
• Show or Hide the Timeline Panel. Click the Window menu, and then click Timeline to select (show) or deselect (hide) the check mark.
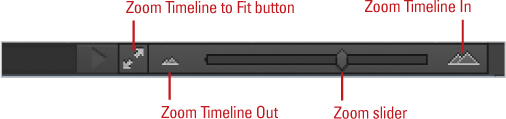
• Zoom In or Out the Timecode. Drag the slider to the right to zoom in and to the left to zoom out.
Timesaver
Press = (equal) to Zoom In. Press - (minus) to Zoom Out.
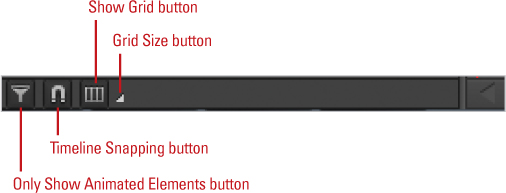
• Zoom Timeline to Fit. Click the Zoom Timeline to Fit button to display the animation to fit in the Timeline view.
Timesaver
Press (back slash) to Zoom to Fit.
• Show the Grid. Click the Show Grid button to toggle on or off.
• Change the Grid Size. Click the Grid Size button, and then select a grid size.
• Filter Animated Elements. Click the Only Show Animated Elements button to toggle on (highlighted) and off (non-highlighted). When turned on, only animated elements show in the Timeline, which helps reduce the Timeline clutter.
When the light bar is grey, the element is not animated; when it’s a color, the element is animated using keyframes.
• Timeline Snapping. Click the Timeline Snapping button to toggle on (highlighted) and off (non-highlighted). You can set Snap To options on the Timeline menu. When turned on, Timeline items snap to the Grid, Playhead, or Keyframes, Labels, Triggers.
Timesaver
Press Alt+; (Win) or Option+; (Mac) to toggle on or off timeline snapping.


Making Adjustments to Animations
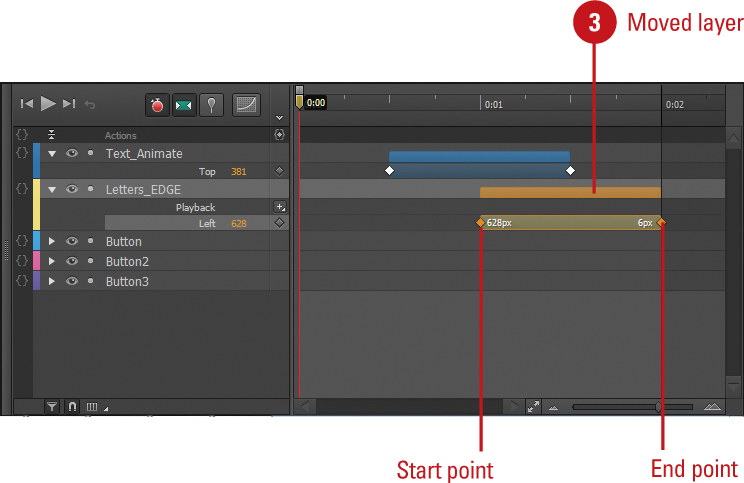
Elements along with their properties appear on the left side of the Timeline while layers (denoted as bars) along with their keyframes (denoted as diamonds) appear on the right. A keyframe defines a point in time where an element property changes in an animation. A layer defines the animation between the keyframes. After you create an animation in the Timeline, you can adjust one or more keyframes or the layer to achieve the result that you want. You can click to select a keyframe (turns orange) or use the Shift key or drag to select multiple keyframes. Once you select a keyframe, you can drag it to adjust the length of an animation or delete it. You can also click to select a layer to change its position, adjust its length, copy and paste it, or delete it.
Work with Keyframes in the Timeline Panel
• Select a Keyframe. Click a keyframe diamond (turns orange) in the Timeline.
• Select Multiple Keyframes. Press and hold the Shift key, and then click individual keyframe diamonds (turns orange) in the Timeline.
• Select Keyframes in a Layer. Click the bar in the property row of an element. The layer and its keyframes are selected.


• Deselect Keyframes. Click a blank area in the Timeline.
• Adjust the Length of a Keyframe. Select the keyframe, and then drag it to adjust the length.
• Delete Keyframes. Select the keyframes you want to remove, and then press Delete.
• Go to Previous Keyframe. Click the Timeline menu, and then click Go to Previous Keyframe, or press Ctrl+Left Arrow (Win) or ![]() +Left Arrow (Mac).
+Left Arrow (Mac).
• Go to Next Keyframe. Click the Timeline menu, and then click Go to Next Keyframe, or press Ctrl+Right Arrow (Win) or ![]() +Right Arrow (Mac).
+Right Arrow (Mac).
Work with Animations in the Timeline Panel
• Select an Animation Layer. Click the bar in the name row of an element. All layers for the element are selected.
• Select an Animation Property Layer. Click the bar in the property row of an element. The layer and its keyframes are selected.
• Move an Animation Layer. Point to the bar in the name row of an element, and then drag it. All layers for the element are moved.
• Move an Animation Property Layer. Point to the bar in the property row of an element, and then drag it. Only the property layer for the element is moved.
• Adjust the Length of an Animation Layer. Select the animation layer, point to the edge (cursor changes to a double-arrow), and then drag.


• Delete an Animation Layer. Select the animation layer you want to remove, and then press Delete.
• Copy and Paste an Animation Layer. Select the animation layer, press Ctrl+C (Win) or ![]() +C (Mac), position the Playhead, click the Edit menu, point to Paste Special, and then click Paste All.
+C (Mac), position the Playhead, click the Edit menu, point to Paste Special, and then click Paste All.
• Copy and Paste Inverted an Animation Layer. Select the animation layer, press Ctrl+C (Win) or ![]() +C (Mac), position the Playhead, click the Edit menu, point to Paste Special, and then click Paste Inverted.
+C (Mac), position the Playhead, click the Edit menu, point to Paste Special, and then click Paste Inverted.
Adjusting Time in an Animation
If you want an animation to last longer, all you need to do is extend the animation layer in the Timeline to the amount of time you want it to last. The more you extend an animation layer in the Timeline, the more time is added to it. To adjust one or more animation layers, select the layers, and then drag an edge keyframe. As you drag a keyframe, the animation displays on the Stage with the adjustment. You can also change the starting position of an animation by moving the animation layer to a different position. To move one or more animation layers, select the layers, and then drag them.
Adjust Time in an Animation
![]() In the Timeline, click the bar in the name row of an element to select the animation layer you want to change. All layers for the element are selected.
In the Timeline, click the bar in the name row of an element to select the animation layer you want to change. All layers for the element are selected.
![]() To extend the animation time, drag an edge keyframe to the position you want.
To extend the animation time, drag an edge keyframe to the position you want.

![]() To move an animation, point to the bar in the name row of an element, and then drag it. All layers for the element are moved.
To move an animation, point to the bar in the name row of an element, and then drag it. All layers for the element are moved.
Inserting Time in an Animation
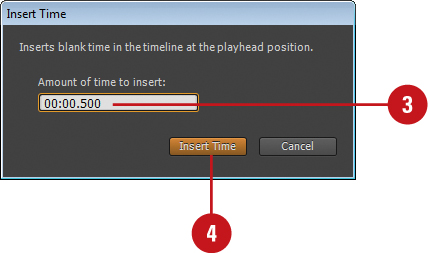
Sometimes you want an animation to last longer. When this is the case, you can insert time to extend it. Instead of adjusting each individual animation layer, you can extend them all with the Insert Time command on the Timeline menu. In the Insert Time dialog box, you can specify the amount of time you want to insert from the Playhead position. You can enter a time or scrub to adjust it.
Insert Time in an Animation
![]() In the Timeline, drag the Playhead to the place where you want to insert a specific amount of time.
In the Timeline, drag the Playhead to the place where you want to insert a specific amount of time.

![]() Click the Timeline menu, and then click Insert Time.
Click the Timeline menu, and then click Insert Time.
![]() Click the time, enter a time, and then press Enter (Win) or Return (Mac), or drag the scrub to the time to adjust it.
Click the time, enter a time, and then press Enter (Win) or Return (Mac), or drag the scrub to the time to adjust it.
![]() Click Insert Time.
Click Insert Time.
Making a Resizable Animation
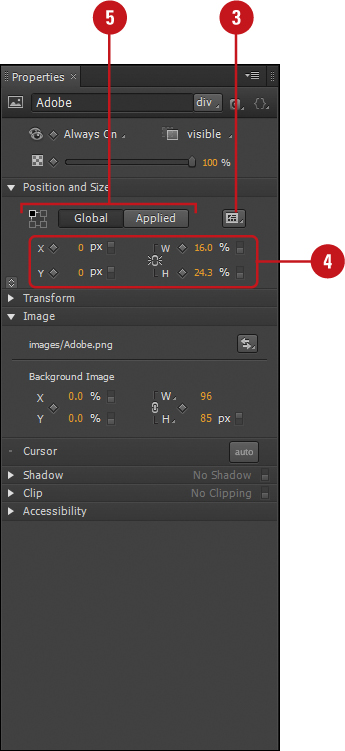
As you create an animation, you can develop the design to automatically respond (resize) to changes in the screen size. This allows you to deliver your animation on different screen sizes on a variety of devices, such as desktops, laptops, tablets, and mobile devices. You can make the Stage and individual elements responsive to the screen size by changing their units from pixels (fixed) to percentage (adjustable). By using percentages, the design can respond to any size screen. For individual elements, you can also modify the relative change position to any corner, either relative to the Stage (Global) or to its parent (Applied), for better control over where elements display. By default, elements are positions relative to the upper-left corner of their parent. You can change the relative position to any corner in the Properties panel. Instead of changing individual values to make an element adjustable, you can apply a layout preset.
Set the Stage for Adjustability
![]() In the Elements panel, select the Stage <div> element.
In the Elements panel, select the Stage <div> element.
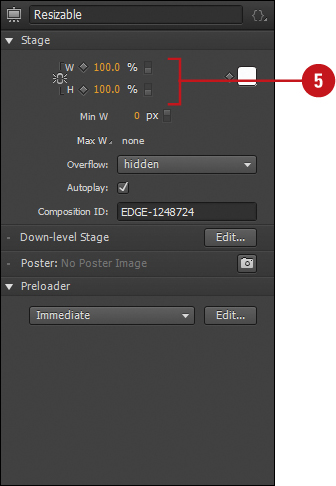
![]() In the Properties panel, point to the units for W and/or H, and then drag the slider from pixels (px) to percentage (%).
In the Properties panel, point to the units for W and/or H, and then drag the slider from pixels (px) to percentage (%).
The percentage is set 100%. This allows the Stage to adjust to screen size changes. The Stage fills the width of the browser with its background to the right of the animation.
![]() To set a minimum and maximum width, do any of the following:
To set a minimum and maximum width, do any of the following:
• Min W. Point to the units for Min W, and then drag the slider from pixels (px) to percentage (%).
• Max W. Click Max W label, and then click None to deselect it. Point to the units for Max W, and then drag the slider from pixels (px) to percentage (%).

Set Elements for Adjustability
![]() Click the Selection Tool on the Tools panel.
Click the Selection Tool on the Tools panel.
![]() Select the element you want to change.
Select the element you want to change.
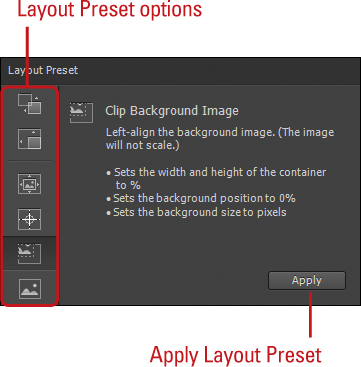
![]() To use preset options, click the Layout Preset button, select a preset and view its settings, and then click Apply.
To use preset options, click the Layout Preset button, select a preset and view its settings, and then click Apply.
• Scale Position (X and Y). Sets the X and Y position to %.
• Scale Size (W and H). Sets the W and H position to %.
• Scale Background Image. Sets the W and H position to %, image position to %, background width to %, and background height to auto.
• Center Background Image. Sets the W and H position to %, background position to 50%, and background size to pixels.
• Clip Background Image. Sets the W and H position to %, background position to 0%, and background size to pixels.
• Static Background Image. Sets the W and H position to pixels, background position to pixels, and background size to pixels.
![]() To set individual adjustable options, point to units for the position (X and Y) and size (W and H), and then drag the slider from px (pixels) to % (percentage).
To set individual adjustable options, point to units for the position (X and Y) and size (W and H), and then drag the slider from px (pixels) to % (percentage).
![]() To set the relative position (upper-left, upper-right, lower-left or lower-right) of the element on the screen, click the corner square in the Coordinate Space Picker, and then click Global or Applied.
To set the relative position (upper-left, upper-right, lower-left or lower-right) of the element on the screen, click the corner square in the Coordinate Space Picker, and then click Global or Applied.
Global calculates the position relative to the Stage, while Applied calculates it relative to its parent.
Project: Make a Resizable Animation
![]() Open the Resizable_start.html file in the chapter folder, and then save it in a new folder.
Open the Resizable_start.html file in the chapter folder, and then save it in a new folder.
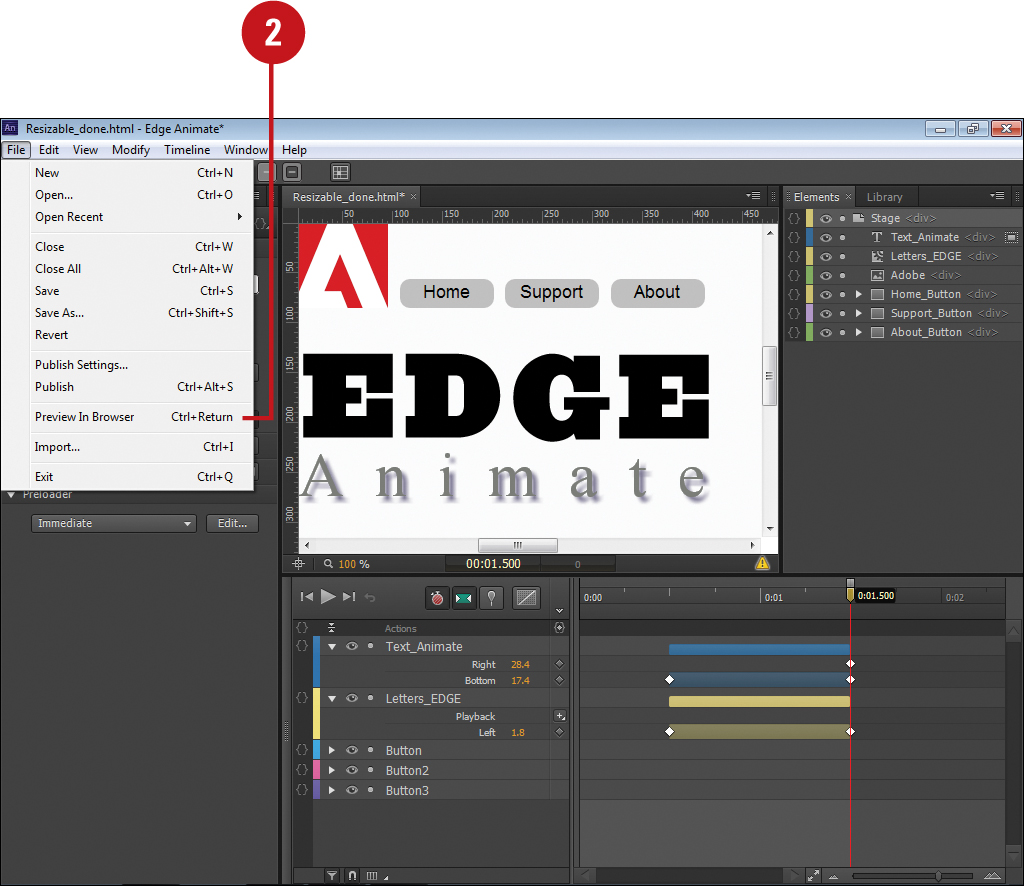
![]() Click the File menu, and then click Preview In Browser or press Ctrl+Enter (Win) or
Click the File menu, and then click Preview In Browser or press Ctrl+Enter (Win) or ![]() +Return (Mac).
+Return (Mac).
![]() Resize the browser window to see how it responds, and then click the Close button to exit.
Resize the browser window to see how it responds, and then click the Close button to exit.
The animation doesn’t respond to changes in the windows size.
![]() In the Elements panel, select the Stage <div> element.
In the Elements panel, select the Stage <div> element.
![]() In the Properties panel, point to the units for W and H, and then drag the slider from pixels (px) to percentage (%).
In the Properties panel, point to the units for W and H, and then drag the slider from pixels (px) to percentage (%).
![]() Click the File menu, and then click Preview In Browser or press Ctrl+Enter (Win) or
Click the File menu, and then click Preview In Browser or press Ctrl+Enter (Win) or ![]() +Return (Mac).
+Return (Mac).
![]() Resize the browser window to see how it responds, and then click the Close button to exit.
Resize the browser window to see how it responds, and then click the Close button to exit.
The Stage fills the width of the browser with its background to the right of the animation.
![]() In the Elements panel, select the Text_Animate <div> element.
In the Elements panel, select the Text_Animate <div> element.
![]() In the Properties panel, click the Layout Presets button, click the Scale Position preset, and then click Apply.
In the Properties panel, click the Layout Presets button, click the Scale Position preset, and then click Apply.
![]() In the Properties panel, select the Bottom Right square in the Coordinate Space Picker.
In the Properties panel, select the Bottom Right square in the Coordinate Space Picker.

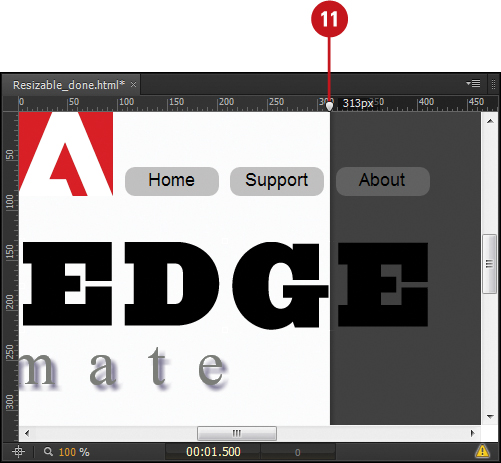
![]() Move the Stage adjustment handle on the top ruler back and forth to preview, and then return it to its original position at 600 px.
Move the Stage adjustment handle on the top ruler back and forth to preview, and then return it to its original position at 600 px.
This makes the element resize on both X and Y axis while keeping it relative to the bottom right.
![]() In the Elements panel, select the Letters_EDGE <div> element.
In the Elements panel, select the Letters_EDGE <div> element.
![]() In the Properties panel, point to the units for X and Y separately, and then change from pixels (px) to percentage (%).
In the Properties panel, point to the units for X and Y separately, and then change from pixels (px) to percentage (%).
![]() In the Properties panel, select the Bottom Left square in the Coordinate Space Picker.
In the Properties panel, select the Bottom Left square in the Coordinate Space Picker.

![]() Move the Stage adjustment handle on the top ruler back and forth to preview, and then return it to its original position at 600 px.
Move the Stage adjustment handle on the top ruler back and forth to preview, and then return it to its original position at 600 px.
This makes the element resize on both X and Y axis while keeping it relative to the bottom left.
![]() In the Properties panel, set the Min W value to 600 px.
In the Properties panel, set the Min W value to 600 px.
![]() Click Max W, deselect None, and then set the Max W value to 1280 px.
Click Max W, deselect None, and then set the Max W value to 1280 px.
![]() In the Properties panel, point to the units for H, and then drag the slider from percentage (%) to pixels (px).
In the Properties panel, point to the units for H, and then drag the slider from percentage (%) to pixels (px).
This keeps the width size range between 600 px and 1280 px, and the height to 350 px.

![]() Click the File menu, and then click Preview In Browser or press Ctrl+Enter (Win) or
Click the File menu, and then click Preview In Browser or press Ctrl+Enter (Win) or ![]() +Return (Mac).
+Return (Mac).
![]() Resize the browser window to see how it responds, and then click the Close button to exit.
Resize the browser window to see how it responds, and then click the Close button to exit.
Testing a Resizable Animation
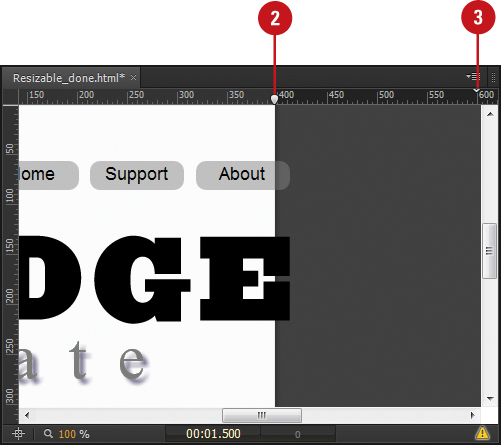
After you create a resizable animation in Edge Animation, you can test the layout by previewing screen size changes in a browser or on the Stage. When you set the Stage width and height units property to percentage (relative position) to create a responsive design, an adjustable pin and nonadjustable marker appear on the right (width) or bottom (height) Stage edge of the ruler, where you can reposition the pin to preview how the design layout responds to Stage size changes. The marker (small down arrow) remains in place to indicate the original width and height. To test your design in a browser, you use the Preview In Browser command, where you can resize the browser window to see how your design responds.
Test a Resizable Animation on the Stage
![]() Open the composition with the resizable animation you want to test; display the ruler, if needed, Ctrl+R (Win) or
Open the composition with the resizable animation you want to test; display the ruler, if needed, Ctrl+R (Win) or ![]() +R (Mac).
+R (Mac).
![]() To preview the results on the Stage, move the Stage adjustment handle (pin) on a ruler back and forth.
To preview the results on the Stage, move the Stage adjustment handle (pin) on a ruler back and forth.
The elements on the Stage respond to the size change based on the attributes set to percentage (%).
![]() Move the Stage adjustment handle (pin) back to its original position marker.
Move the Stage adjustment handle (pin) back to its original position marker.
Did You Know?
You can drag an adjustment handle for the width or height. When you change the Stage width or height to %, you can drag the adjustment handle on the horizontal or vertical ruler.
See Also
See “Making a Resizable Animation” on page 186 for more information on creating a resizable animation.
Test a Resizable Animation in a Web Browser
![]() Open the composition with the resizable animation you want to test.
Open the composition with the resizable animation you want to test.
![]() Click the File menu, and then click Preview In Browser or press Ctrl+Enter (Win) or
Click the File menu, and then click Preview In Browser or press Ctrl+Enter (Win) or ![]() +Return (Mac).
+Return (Mac).
![]() Resize the browser window to see how it responds.
Resize the browser window to see how it responds.
The Stage fills the width of the browser with its background to the right of the animation.
![]() Click the Close button to exit your web browser.
Click the Close button to exit your web browser.
