
2. Basic Organizing
Lesson Overview
As you capture more and more images with your digital camera, it becomes increasingly important that you have effective ways to organize and manage your pictures on your computer so that those valuable memories are always accessible.
Adobe Photoshop Elements makes it easy to import your photos and other media files from a variety of sources and provides an array of powerful tools for sorting and searching your collection.
This lesson will get you started with the essential skills you’ll need to import images and keep track of your growing photo library:
• Opening Adobe Photoshop Elements 10 in Organizer mode
• Importing images from folders on your computer
• Importing photos from a digital camera
• Switching between viewing modes in the Media Browser
• Working in the Date and Folder Location views
• Creating, organizing, and applying keyword tags
• Searching for files by keyword
• Finding and tagging faces in your photos
You’ll probably need about one and a half hours to complete this lesson.

Import files to your catalog, and then explore a variety of ways to view and sort them. Learn how tagging and rating your photos can help you find just the pictures you want, just when you want them—easily and quickly. Once they share a keyword tag, a group of related photos can be retrieved with a single click, no matter how big your catalog, or across how many folders those images are scattered.
Getting started
For the exercises in this lesson you’ll be working in the Elements Organizer.
1. If the Organizer is still open from the previous exercise, skip to step 3; if not, start Photoshop Elements by doing one of the following:
• On Windows, either double-click the shortcut on your desktop, or choose Start > All Programs > Adobe Photoshop Elements 10.
• On Mac OS, either click the Photoshop Elements 10 icon in the Dock or choose Photoshop Elements 10 from the Apple > Recent Items > Applications menu.
Before you start working on this lesson, make sure that you’ve installed the software on your computer from the application CD (see the Photoshop Elements 10 documentation) and that you have correctly copied the Lessons folder from the CD in the back of this book onto your computer’s hard disk (see “Copying the Classroom in a Book files” on page 2). You should also have created a working catalog (see “Creating a new catalog” on page 8).
2. In the Welcome screen, click the Organize button at the left, and then wait while the Elements Organizer opens.
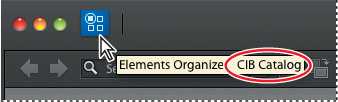
3. Hold the pointer over the Elements Organizer icon (![]() ) at the upper left of the Organizer workspace window to see the name of the currently loaded catalog displayed in a tooltip. Note that the catalog name is also displayed in the lower left corner of the Organizer workspace.
) at the upper left of the Organizer workspace window to see the name of the currently loaded catalog displayed in a tooltip. Note that the catalog name is also displayed in the lower left corner of the Organizer workspace.
4. If the CIB Catalog that you created in Lesson 1 is not currently loaded, choose File > Catalog. Select the CIB Catalog from the list in the Catalog Manager dialog box, and then click Open.
Getting photos
The Elements Organizer provides a workspace where you can view, sort and organize your media files. Before you process, print, or share your photos, the first step is to assemble them in the Organizer. In the following exercises you’ll import the images for this lesson into your new catalog using a variety of different methods.
Perhaps the most direct and intuitive way to bring media files into the Organizer and add them to your catalog is to use the familiar drag-and-drop method.
Dragging photos from Windows Explorer
1. Minimize the Organizer by clicking the Minimize button (![]() ) at the right of the Organizer menu bar, or simply click the Elements Organizer application button on the Windows taskbar.
) at the right of the Organizer menu bar, or simply click the Elements Organizer application button on the Windows taskbar.
2. Open the My Computer window in Windows Explorer; either double-click a shortcut icon on your desktop, or choose My Computer from the Start menu.
3. Locate and open the Lessons folder that you copied to your hard disk. Open the Lesson02 folder, and then the sub-folder named Import.
4. Inside the Import folder you’ll find two subfolders: drag the BATCH1 subfolder and hold it over the Elements Organizer application button on the Windows taskbar.

5. Wait until the Organizer becomes the foreground application; then, drag the BATCH1 folder onto the Media Browser pane in the Organizer and release the mouse button. Skip to “Importing attached keyword tags” on the next page.
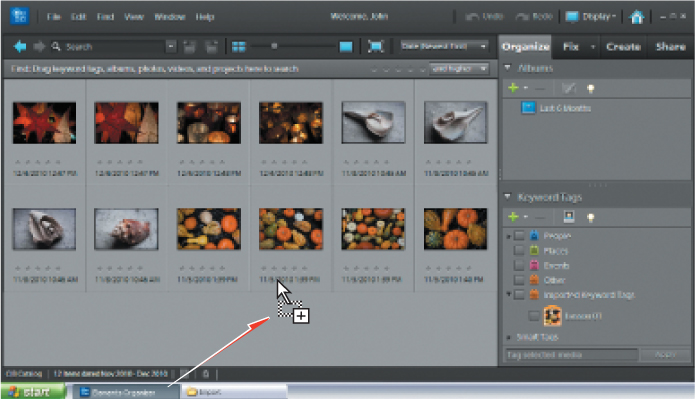
If you can arrange the Windows Explorer window and the Organizer application window on your screen so that you can see both at once, you can simply drag the folder (or individual media files) directly from the Windows Explorer window into the Organizer, rather than going via the Windows taskbar.
Dragging photos from the Mac OS Finder
1. There are several ways to switch to the Finder on Mac OS. For this exercise, we’ll use the Application Switcher. Hold down the Command key; then, press and release the Tab key. Continuing to hold down the Command key, click the Finder icon; then, release the Command key.

2. In the Finder, press Command+N to open a new Finder window. Navigate to and open the Lessons folder that you copied to your hard disk. Open the Lesson02 folder, and then the sub-folder named Import.
3. Inside the Import folder are two sub-folders: BATCH1 and BATCH2. If necessary, move the finder window enough to see the Elements Organizer workspace behind it; then, drag the BATCH1 subfolder onto the Media Browser pane and release the mouse button.

4. Photoshop Elements briefly displays a dialog box while searching inside the BATCH1 folder for files to import; then, the Import Attached Keyword Tags dialog box opens. Click the Organizer workspace to bring it back to the front.
Importing attached keyword tags
Whenever you import photos that have already been tagged with keywords, the Import Attached Keyword Tags dialog box will appear, giving you the opportunity to specify which tags you wish to import with your images.
1. In the Import Attached Keyword Tags dialog box, click Select All; then, click OK.

2. The Getting Media dialog box appears briefly as the Organizer imports the images from your BATCH1 folder. If a message appears telling you that only the newly imported items will be visible in the Media Browser, click OK. Thumbnails of the images you just imported appear in the Media Browser.
3. Each thumbnail is displayed with an orange tag icon indicating that the image has keywords attached. Hold the pointer over the tag icon at the lower right of any image cell in the Media Browser to see a tooltip listing attached keywords.
4. If necessary, click the small triangle to expand the Imported Keyword Tags category in the Keywords Tags panel to the right of the Media Browser; you can see that the newly imported Lesson 02 tag is nested inside, together with the keyword that you imported in the previous lesson.
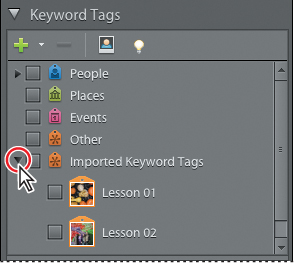
If you don’t see a tag icon associated with each thumbnail in the Media Browser, use the Thumbnail Size slider above the Media Browser to increase the size of the thumbnails.
Searching for photos to import
This import method is useful when you’re not sure exactly where on your hard disk you’ve stashed your photographs and other media files over the years.
You could run a search of your entire hard disk, or just search your My Documents folder, but for the purposes of this exercise, you’ll limit the search to just a small branch of your folder hierarchy.
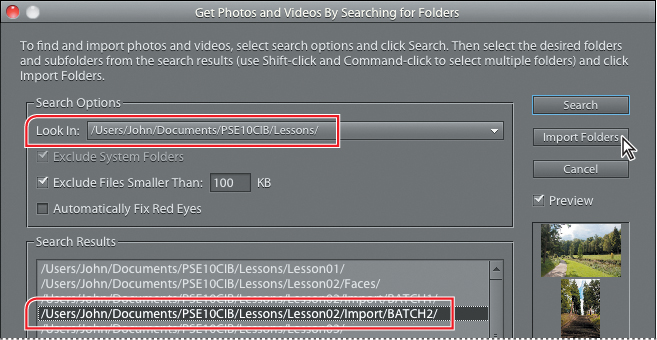
1. In the Organizer, choose File > Get Photos And Videos > By Searching. Under Search Options in the Get Photos And Videos By Searching For Folders dialog box, choose Browse from the Look In menu.
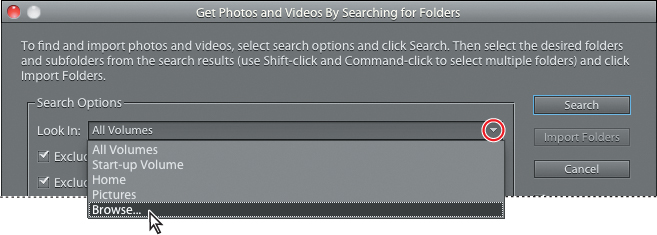
2. In the Browse For Folder / Select Folder For Search dialog box, locate and select your Lessons folder, and then click OK.
3. Under Search Options in the Get Photos And Videos By Searching For Folders dialog box, make sure the Automatically Fix Red Eyes option is disabled; then, click the Search button located at the upper right of the dialog box.
4. The Search Results box lists all folders inside the Lessons folder. Select the folder Lessons/Lesson02/Import/BATCH2. The preview pane at the right shows thumbnails of the contents of the selected folder. Click Import Folders.
5. In the Import Attached Keyword Tags dialog box, click Select All, and then click OK. Click OK to close any other alert dialog box.
When you already know the location of the images you wish to import into Photoshop Elements, you can do so by using the menu command File > Get Photos And Videos > From Files And Folders, as you did in Lesson 1. You’ll use this method again in the next exercise.
Automatically fixing red eyes during import
The term “red eye” refers to the phenomenon common in photos taken with a flash, where the subject’s pupils appear red instead of black. This is caused by the flash reflecting off the retina at the back of the eye. In most cases, Photoshop Elements can successfully remove the red eye effect automatically during the import process, saving you the effort of further editing.
1. If you don’t see the image file names displayed below the thumbnails in the Media Browser, choose View > Show File Names.
2. Double-click the photo RedEyes.jpg to see the enlarged single image view. As you can see, the red eye effect is very pronounced in this flash photograph.
3. Double-click the enlarged image to return to the thumbnail display in the Media Browser. With the image RedEyes.jpg still selected, choose Edit > Delete From Catalog. In the confirmation dialog box, make sure that the option Also Delete Selected Item(s) From The Hard Disk is disabled, and then click OK.

4. Choose File > Get Photos And Videos > From Files And Folders. In the Get Photos And Videos From Files And Folders dialog box, navigate to and open the BATCH2 folder; then, click once to select the image RedEyes.jpg. Activate the option Automatically Fix Red Eyes, and then click Get Media. In the Import Attached Keyword Tags dialog box, select the Lesson 02 tag; then, click OK. Dismiss any other alert dialog box.
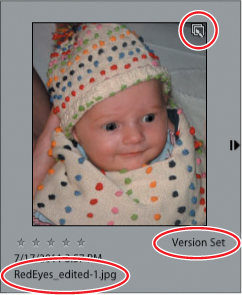
A thumbnail of the newly imported image appears in the Media Browser. Photoshop Elements has stacked the corrected photo with the original in a Version Set, with the edited version on top; the filename has been extended to indicate that the photo has been edited.
For some images, the automatic red eye fix may not be so effective; more tools and techniques for correcting the effect are discussed in Lesson 7.
You can identify a Version Set by the badge in the upper right corner of the thumbnail and the label below the lower right corner. You’ll learn more about working with Version Sets in Lesson 3.
5. Click the arrow at the right of the thumbnail once to expand the Version Set, and again to collapse it.
6. Double-click the edited photo to see it enlarged in the single image view.
7. To display all of the images that you’ve imported during this lesson, click the find box beside the Lesson 02 tag listed under Imported Keyword Tags in the Keyword Tags panel.

Importing from a digital camera
If you have a digital camera or memory card at hand with your own photos on it, you can step through this exercise using those images. Alternatively, you can skip to the next section of this lesson and return to this exercise when you are prepared.
1. Connect your digital camera or card reader to your computer, following the manufacturer’s instructions. If you’re working on Mac OS, skip to step 3.
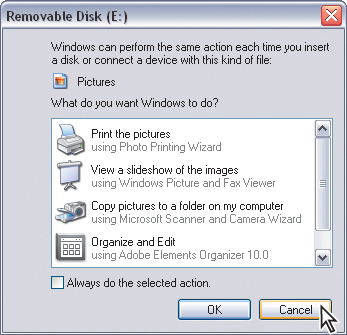
2. On Windows, the Auto Play dialog box may appear. You could choose the option Organize And Edit Using Adobe Elements Organizer 10, but for the purposes of this lesson, simply click Cancel to dismiss the dialog box. If the Photo Downloader dialog box appears automatically, you can skip to step 4; otherwise, continue to step 3.
3. Choose File > Get Photos And Videos > From Camera Or Card Reader.
4. In the Photo Downloader dialog box, choose the name of your connected camera or card reader from the Get Photos From menu.
5. Accept the default target folder listed beside Location, or click Browse / Choose to designate a different destination for the imported files.
6. From the Create Subfolder(s) menu, choose Today’s Date (yyyy mm dd) as the folder name format; the Location path reflects your choice.

7. Choose Do Not Rename Files from the Rename Files menu. From the Delete Options menu, choose After Copying, Do Not Delete Originals. If you’re working on Windows, deactivate the Automatic Download option.
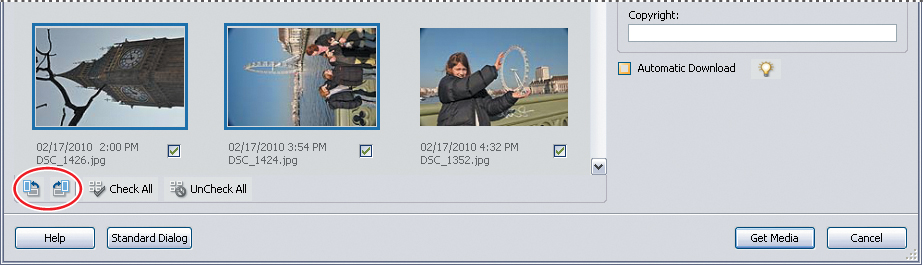
8. Click the Advanced Dialog button. In advanced mode, the Photo Downloader Dialog displays thumbnail previews of all the photos on your camera’s memory card, and also offers options for processing, tagging, and grouping your images.
9. If there is a photo on your camera that you wish to exclude from the selection to be imported, click the check box below its thumbnail to remove the check mark.

If you choose one of the Advanced Options that deletes the original images from your camera after copying, only those images selected to be imported will be deleted from the camera; those excluded from the selection will not be deleted.
10. If you see a photo that needs to be rotated, select its thumbnail, and then click the appropriate Rotate button in the lower left corner of the dialog box.
11. Under Advanced Options, make sure that the Automatically Fix Red Eyes, Automatically Suggest Photo Stacks, Make ‘Group Custom Name’ A Tag, and Import Into Album options are disabled.
12. Click Get Media. The selected photos are copied from the camera to the specified folder on your hard disk. By default, images imported from a camera will be copied to your My Pictures / Pictures folder.
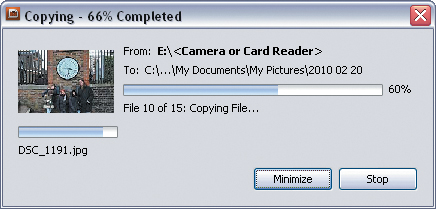
13. In the Files Successfully Copied dialog box, click Yes. Click OK to close any other alert dialog box.
The imported photos appear in the Media Browser, already rotated where specified.

Using watched folders on Windows
Watched folders are not supported for Mac OS; if you’re working on Mac OS, you can skip to “Viewing photo thumbnails in the Organizer” on the next page.
On Windows, you can simplify and automate the process of keeping your catalog up to date by using watched folders. Designate any folder on your hard disk as a watched folder and Photoshop Elements will automatically be alerted when a new file is placed in (or saved to) that folder. By default, the My Pictures folder is watched, but you can set up any number of additional watched folders.
You can either choose to have any new files that are detected in a watched folder added to your catalog automatically, or have Photoshop Elements ask you what to do before importing the new media. If you choose the latter option, the message “New files have been found in Watched Folders” will appear whenever new items are detected. Click Yes to add the new files to your catalog or click No to skip them.
In this exercise you’ll add a folder to the watched folders list.
1. Choose File > Watch Folders.
2. Under Folders To Watch in the Watch Folders dialog box, click Add, and then browse to your Lesson02 folder.
3. Select the Lesson02 folder and click OK.

The Lesson02 folder now appears in the Folders To Watch list. To stop a folder from being watched, select it in the list, and then click Remove.
4. Ensure that the Notify Me option is activated, and then click OK to close the Watch Folders dialog box.
Viewing photo thumbnails in the Organizer
In the Organizer, there are several ways to view the images in your catalog. You can switch between the various viewing modes to suit different stages in your workflow or to make it easier and more efficient to perform specific organizing tasks.
Using the Media Browser views
Up to this point, you’ve been working in the default Media Browser view: the Thumbnail View, where your images are arranged by capture date and time. You can reverse the display order by choosing either Date (Oldest First) or Date (Newest First) from the menu to the right of the Thumbnail Size slider.
Let’s look at some of the other display options in the Organizer.
1. In the Keyword Tags panel, click the find box beside the Lesson 02 tag, if it’s not already activated; then, use the Thumbnail Size slider above the Media Browser pane to reduce the size of the thumbnails so that you can see all of the images that you’ve imported during this lesson.
2. Click the Display button (![]() ) near the upper right corner of the Organizer window, and then choose Import Batch from the menu to see the lesson images organized in groups according to their separate import sessions.
) near the upper right corner of the Organizer window, and then choose Import Batch from the menu to see the lesson images organized in groups according to their separate import sessions.

3. In the Import Batch view, a divider bar marked with a film canister icon (![]() ) and an import session date separates each group of thumbnails. Click any of the divider bars to select all of the images that were imported in that session.
) and an import session date separates each group of thumbnails. Click any of the divider bars to select all of the images that were imported in that session.

4. Another way to work with the Import Batch view is to use the timeline. Choose Window > Timeline. The timeline shows a series of bars representing the separate import sessions that account for all the images in this catalog.

The height of each bar in the timeline indicates the relative number of images in each import batch. In this illustration, the timeline represents four imports spread across a few hours. Your bars may be arranged differently, especially if you’ve completed the preceding exercises over several days.
The white bar represents images imported for Lesson 1, and therefore not currently displayed in the Media Browser.
5. Choose Edit > Deselect, and then use the Thumbnail Size slider to increase the size of the thumbnails until you see only a subset of your Lesson 2 images.
6. Click each of the bars in the timeline in turn. As you click, the view in the Media Browser jumps to show the corresponding import batch and the first image in that batch is temporarily highlighted by a green border and a flashing capture date.

7. Select any photo in the Media Browser; then, click the Display button (![]() ) near the upper right corner of the Organizer window and choose Folder Location to see the image file’s location in the folder hierarchy on your computer. The bars in the timeline now represent the three folders that contain images that are being managed by your CIB Catalog; hold the pointer over any of the three bars to see the corresponding folder’s path-name displayed in a tooltip. The bar across the top of the Media Browser now displays a Managed Folder icon (
) near the upper right corner of the Organizer window and choose Folder Location to see the image file’s location in the folder hierarchy on your computer. The bars in the timeline now represent the three folders that contain images that are being managed by your CIB Catalog; hold the pointer over any of the three bars to see the corresponding folder’s path-name displayed in a tooltip. The bar across the top of the Media Browser now displays a Managed Folder icon (![]() ) and shows the path-name of the folder containing the image you selected.
) and shows the path-name of the folder containing the image you selected.

In the Folders panel at the left of the Media Browser, you can see at a glance which folders contain images that have been imported to the Lesson2 catalog; these folders are marked with the Managed Folder icon (![]() ). On Windows, you’ll also be able to spot your watched folders: look for the Watched Folder icon (
). On Windows, you’ll also be able to spot your watched folders: look for the Watched Folder icon (![]() ).
).
At this point, you’re working with a catalog that contains very few images, so it may not be instantly apparent that a single folder may contain multiple import batches and a single import batch may include files from multiple folders.
8. In the Folders panel, drag the selected image from the Media Browser to the PSE10CIB folder. The CIB catalog is updated to record the new location of the moved photo; in the Folders panel, the PSE10CIB folder is now marked with a Managed Folder icon. Choose Edit > Undo Move.
9. Click the header bar across the top of the Media Browser to select all the photos in the folder you’re viewing.
10. Choose Window > Timeline to hide the timeline from view, and then choose Edit > Deselect. Click the Display button (![]() ) near the upper right corner of the Organizer window and choose Thumbnail View from the menu.
) near the upper right corner of the Organizer window and choose Thumbnail View from the menu.
You can move entire folders on your hard disk in the same way, making it easy to manage your photo library from within the Organizer. Right-click / Control-click any of your managed folders and note the commands that are available in the context menu.
Using the Date View
The Date View can be a great way to browse and search your images, particularly once you’re working with a large collection of photos that span a number of years.
1. From the Media View Arrangement menu (to the right of the Thumbnail Size slider above the Media Browser), choose Date (Oldest First); then, click the Display button (![]() ) and choose Date View from the menu.
) and choose Date View from the menu.
2. If the Date View opens to display other than a full year calendar, click the Year view button (![]() ) below the calendar display.
) below the calendar display.
Photoshop Elements automatically adjusts dates from different time zones; as a result, you may see different dates highlighted on your calendar page.
You can see at a glance that your CIB catalog contains photographs taken on eight separate dates during 2010. The earliest entry, August 31, is already selected on the calendar. A thumbnail preview of the first image captured on that date appears at the right of the Organizer window; an image count at the lower left of the preview pane indicates that there are four files in your catalog that share this creation date.

Dates shown in red are holidays; in the Date View pane of the Organizer preferences you can specify which holidays are marked.
3. Click the Find This Photo In The Media Browser button (![]() ) below the preview thumbnail to see the currently previewed photo in the Media Browser, where it’s already selected, ready for action.
) below the preview thumbnail to see the currently previewed photo in the Media Browser, where it’s already selected, ready for action.
4. In the Media Browser, click the Back To Previous View button (![]() ) near the upper left corner of the Organizer window to return to the Date View.
) near the upper left corner of the Organizer window to return to the Date View.

5. Click the Month view button (![]() ) below the calendar pane; then, click the name of the month at the head of the calendar page and choose December from the months menu. Alternatively, move one month at a time by clicking four times on the Next Month button to the right of the month name.
) below the calendar pane; then, click the name of the month at the head of the calendar page and choose December from the months menu. Alternatively, move one month at a time by clicking four times on the Next Month button to the right of the month name.
6. The December page opens with the 4th selected. the earliest date in December for which there are photos in your catalog. The Month view conveniently displays photo thumbnails for the daily entries.

7. Click the entry for December 31. Click in the Daily Note box below the preview pane and type A great New Year’s Eve show! Click the entry for December 31 on the calendar page; a note icon appears on the thumbnail for that day.

Photoshop Elements automatically adjusts dates from different time zones; as a result, you may see different dates featured on your calendar page.
8. The counter in the preview pane shows that there are four photos in the catalog corresponding to this date. Use the Next Item On Selected Day button (![]() ) below the preview image to see the other images captured on the same day.
) below the preview image to see the other images captured on the same day.

9. Click the Start Automatic Sequencing button (![]() ) under the preview image to view all the photos taken on the same day as a mini slide show.
) under the preview image to view all the photos taken on the same day as a mini slide show.
10. To return to the Media Browser in thumbnail view, either click your way back using the Back To Previous View button (![]() ) near the upper left corner of the Organizer window or click the Media Browser button below the calendar page.
) near the upper left corner of the Organizer window or click the Media Browser button below the calendar page.
Working with star ratings and keyword tags
Most of us find it challenging to organize our files and folders efficiently. It can be so easy to forget which pictures were stored in what folder—and so tedious when you’re forced to examine the contents of numerous folders looking for the files you want. The Elements Organizer offers an array of powerful and versatile tools for organizing, sorting, and searching that make all that frustration a thing of the past.
The next set of exercises will demonstrate how a little time invested in applying tags and ratings to the photos you import can streamline the process of finding and sorting your images, regardless of how many files you have or where they’re stored.
Applying keyword tags and rating photos
Applying keywords to your photos and grouping those tags in categories can make it quick and easy to find exactly the images you’re looking for. With a single click you can rate a photo from one to five stars, adding a simple way to narrow a search. In this exercise, you’ll apply a rating to one of the images you imported into your CIB catalog, and then tag it with a keyword from the default set.
1. If necessary, activate the find box beside the Lesson 02 tag in the Keyword Tags panel to isolate the images for this lesson. From the sorting menu to the right of the Thumbnail Size slider, choose Date (Newest First). Make sure that the menu options View > Details and View > Show File Names are activated.
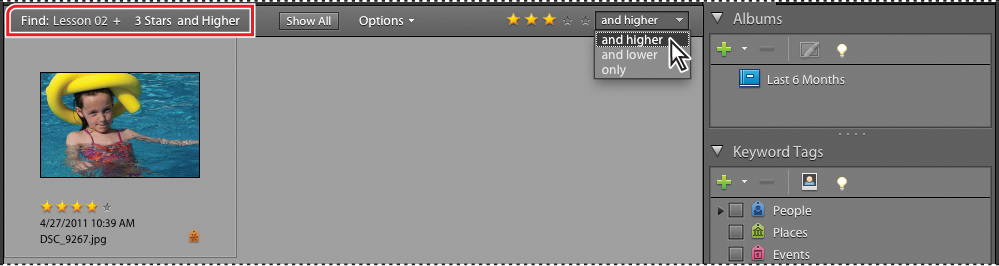
2. In the Media Browser, move the pointer slowly from left to right over the stars beneath one of the thumbnails showing a girl in a swimming pool. When you see four yellow stars, as in the illustration below, click to apply that rating.

3. To find images based on the ratings you’ve assigned, use the stars and the adjacent menu located at the right end of the Find bar above the thumbnail display. For this example set the search criteria at 3 stars and higher. Only the image with the 4-star rating is displayed in the Media Browser.
4. Click on the third star in the Find bar to deactivate the rating search.
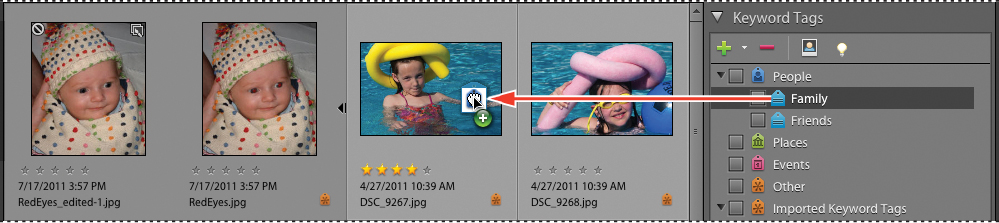
5. In the Keyword Tags panel, click the arrow beside the People category to expand that category so that you can see the two nested sub-categories: “Family” and “Friends.”
6. Drag the Family keyword tag to the thumbnail of the girl in a swimming pool.
7. Collapse the People keyword tag category; then, Ctrl-click / Command-click to select all the other images featuring children.
8. Click in the text box at the bottom of the Keywords Tags panel and type the letter f. As you type a list of the existing keywords starting with f appears; choose Family, and then click Apply. The tag is applied to all of the images selected in the Media Browser.

9. Rest the pointer for a second or two over a tag icon beneath the thumbnail of any of your newly tagged photos; a tooltip message appears identifying the keyword tags that are attached to that image file.
10. In the Keyword Tags panel, click the triangle to expand the People keyword tags category once more. Activate the Find box beside the Family sub-category. The Media Browser is updated to display only the group of images to which you assigned the Family tag.
In the Media Browser, the keyword tag icon or icons that you see below the thumbnails will vary in appearance depending on the size at which the thumbnails are displayed. If the thumbnail size is very small, multiple color-coded tags may display as a single generic (beige) tag icon.
11. Click the Find box beside the Family tag again to clear the search. Once more the Media Browser displays all the Lesson 2 images.
Creating new categories and sub-categories
It’s easy to add or delete new keyword tag categories and sub-categories in the Keyword Tags panel to help you group and organize your keyword tags.
1. At the top of the Keyword Tags panel, click the Create New Keyword Tag, Subcategory, Or Category button (![]() ) and choose New Category from the menu.
) and choose New Category from the menu.
2. In the Create Category dialog box, type Sports as the category name; then scroll the Category Icon menu and select an icon. Click OK.

3. In the Keyword Tags panel, expand the People category if necessary; then click to select the Family sub-category. Click the Create New button (![]() ) and choose New Sub-Category from the menu.
) and choose New Sub-Category from the menu.
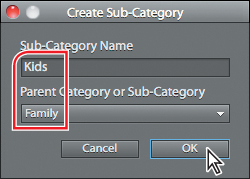
4. In the Create Sub-Category dialog box, type Kids as the new Sub-Category name. Ensure that Family is selected in the Parent Category or Sub-Category menu and click OK. Your new keyword tag category and sub-category have become part of this catalog.
Applying and editing category assignments
You can assign keyword categories to (or remove them from) several files at once.
1. In the Media Browser, click any of the photos featuring children; then hold down the Ctrl / Command key and click to add the rest to the selection.
2. Click in the text box ar the bottom of the Keywords Tags panel and type the letter k; choose Kids and click Apply. The tag is applied to the selected images.

3. Leaving the same images selected, drag the Sports keyword tag to one of the unselected images of marathon runners. Selecting the thumbnail or deselecting the other thumbnails is not necessary; the keyword tag is applied to just this picture.
4. Choose Edit > Deselect, and then Ctrl-click / Command-click to select the three un-tagged marathon photos. Drag your multiple selection onto the Sports tag in the Keyword Tags panel. The keyword tag Sports is applied to all three images at once.
5. Select the image of the young girl swimming to which you applied a 4-star rating earlier in the lesson. Choose Window > Properties to open the Properties panel, and then click the Keyword Tags tab (![]() ) to see which keyword tags are attached to this image.
) to see which keyword tags are attached to this image.

You can also show and hide the Properties panel by holding down the Alt / Option key on your keyboard, and then pressing Enter / Return.
6. Remove the Family tag from the image by doing one of the following:
• In the Properties panel, right-click / Control-click the listing Family, Kids, and then choose Remove Family Sub-Category Keyword Tag.
• In the Media Browser, right-click / Control-click the thumbnail image and choose Remove Keyword Tag > Family from the context menu.
• Right-click / Control-click the tag icon beneath the thumbnail, and then choose Remove Family Sub-Category Keyword Tag from the context menu.

7. Close the Properties panel by clicking the Close button—in the upper right corner of the panel on Windows, at the upper left on Mac OS—or by choosing Window > Properties again.
Creating and applying new keyword tags
In the last exercise you created new keyword categories and sub-categories.
This time you’ll create, apply and edit a new keyword tag.
1. In the Keyword Tags panel, click the Create New button (![]() ) and choose New Keyword Tag from the menu. The Create Keyword Tag dialog box appears.
) and choose New Keyword Tag from the menu. The Create Keyword Tag dialog box appears.
2. In the Create Keyword Tag dialog box, choose Sports as the category, and then type NY Marathon for the tag Name. Click OK.

3. Drag the first of the images of runners, DSC_5740.jpg, to the new NY Marathon tag in the Keyword Tags panel.
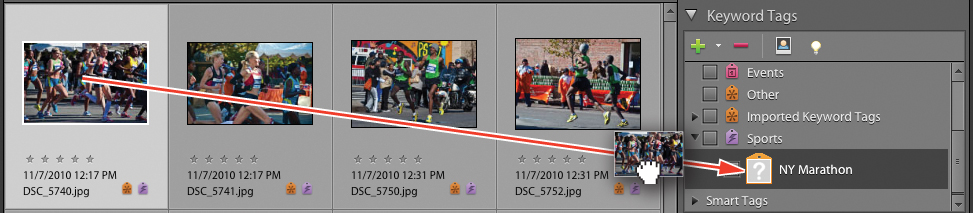
The image becomes the default icon for the new tag because it’s the first to have this keyword applied. You’ll adjust the tag icon in the next steps, before applying the new keyword tag to additional photos.
4. In the Keyword Tags panel, select the NY Marathon keyword tag; then, click the Create New button (![]() ) above the list of keyword tags and choose Edit from the menu. You could also right-click / Control-click the NY Marathon keyword tag itself and choose Edit NY Marathon Keyword Tag from the context menu.
) above the list of keyword tags and choose Edit from the menu. You could also right-click / Control-click the NY Marathon keyword tag itself and choose Edit NY Marathon Keyword Tag from the context menu.
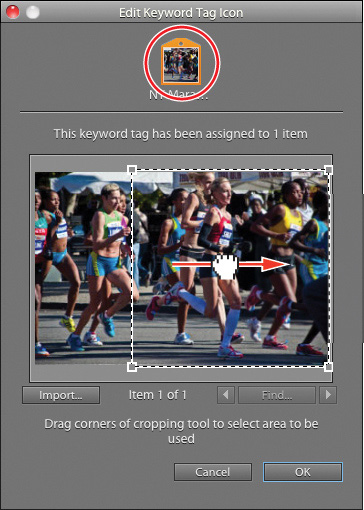
5. In the Edit Keyword Tag dialog box, click the Edit Icon button to open the Edit Keyword Tag Icon dialog box.
6. Drag the bounding box in the preview window as far to the right as possible. A thumbnail at the top of the dialog box shows you how your edit looks applied to the tag icon.
7. Click OK to close the dialog box; then click OK again to close the Edit Keyword Tag dialog box.
You’ll update the keyword tag icon later to an image that works better as an icon for this tag.
8. Shift-click, or Ctrl-click / Command-click, to select the remaining three images showing marathon runners. Drag the NY Marathon keyword tag onto any of the selected photos. The NY Marathon tag is now attached to four images.

9. In the Keyword Tags panel, right-click / Control-click the NY Marathon tag and choose Edit NY Marathon Keyword Tag from the context menu. In the Edit Keyword Tag dialog box, click the Edit Icon button to open the Edit Keyword Tag Icon dialog box.
10. In the Edit Keyword Tag Icon dialog box, click the arrow to the right of the Find button beneath the main preview image.
The Find arrows cycle through all photos with the same keyword tag. A small preview at the top of the dialog box shows how each image would look applied as a tag icon.

11. Choose a new image for the tag icon; then, drag the bounding box on the main preview (and re-size it, if you wish) until you are satisfied with the way it looks in the small tag preview; then click OK to close the dialog box. Click OK again to close the Edit Keyword Tag dialog box.
Converting keyword tags and categories
Changing the hierarchy of categories and keyword tags in the Keyword Tags panel is easy. Doing this will not remove the rearranged tags or categories from the images to which you’ve attached them.
1. Click the Find box next to the Kids sub-category. A binoculars icon (![]() ) appears in the box to remind you that it is now activated. Only the photos you tagged with the Kids keyword are displayed in the Media Browser. Click the Show All button above the Media Browser so that all the images in the catalog are visible.
) appears in the box to remind you that it is now activated. Only the photos you tagged with the Kids keyword are displayed in the Media Browser. Click the Show All button above the Media Browser so that all the images in the catalog are visible.
2. Right-click the Kids sub-category and choose Edit Kids Sub-Category from the context menu. The Edit Sub-Category dialog box appears.
3. From the Parent Category or Sub-Category menu, choose None (Convert To Category) and click OK.
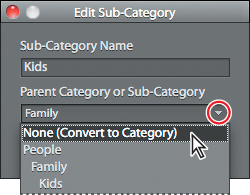
Now Kids is no longer a sub-category under People, Family, but a category in its own right. Its new tag, featuring a stylized portrait icon, has been inherited from its former parent category, People.
4. Click the empty Find box beside the Kids category. Notice that the set of images tagged with the Kids tag did not change. Move the pointer over the tag icons below any of the images featuring children; note the list of attached keywords. Click the Show All button above the Media Browser.
5. In the Keyword Tags panel, drag the Kids category onto the People category.

The Kids tag appears as a sub-category once more; this time listed under People. Because it’s no longer a category, its tag reverts to the generic sub-category icon.
6. Activate the Find box beside the Kids category; then, move the pointer over the tag icons below any of the images displayed. Neither the selection of images tagged with the Kids keyword nor the list of attached keywords has changed. Click the Show All button.
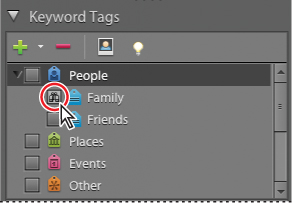
7. Under the People category, right-click / Control-click the Family sub-category and choose Change Family Sub-Category To A Keyword Tag from the menu.

8. In the Media Browser, select the image DSC_9268.jpg—the photo of a girl wearing yellow swimming goggles—in preparation for the next exercise.
Working with keyword tags in Full Screen mode
The Full Screen mode in Photoshop Elements has been improved to give you even more ways to work with keyword tags while reviewing and organizing your photos.
1. Click the View, Edit, Organize In Full Screen button (![]() ) above the Media Browser, or click the Display button (
) above the Media Browser, or click the Display button (![]() ) at the upper right of the Organizer window and choose View, Edit, Organize In Full Screen from the menu.
) at the upper right of the Organizer window and choose View, Edit, Organize In Full Screen from the menu.
2. Move the pointer over the full screen image to see the control bar at the bottom of the screen. If necessary, click the Pause button, and then click the Toggle Film Strip button or press Ctrl+F on your keyboard so that you can see a strip of thumbnails at the right of the screen as shown below.
3. Move the pointer to the left edge of the screen, as shown in the illustration below, to show the Quick Organize panel; then, click to deactivate the Auto Hide button at the top of the vertical title bar of the Quick Organize panel so that the panel remains open while you work.
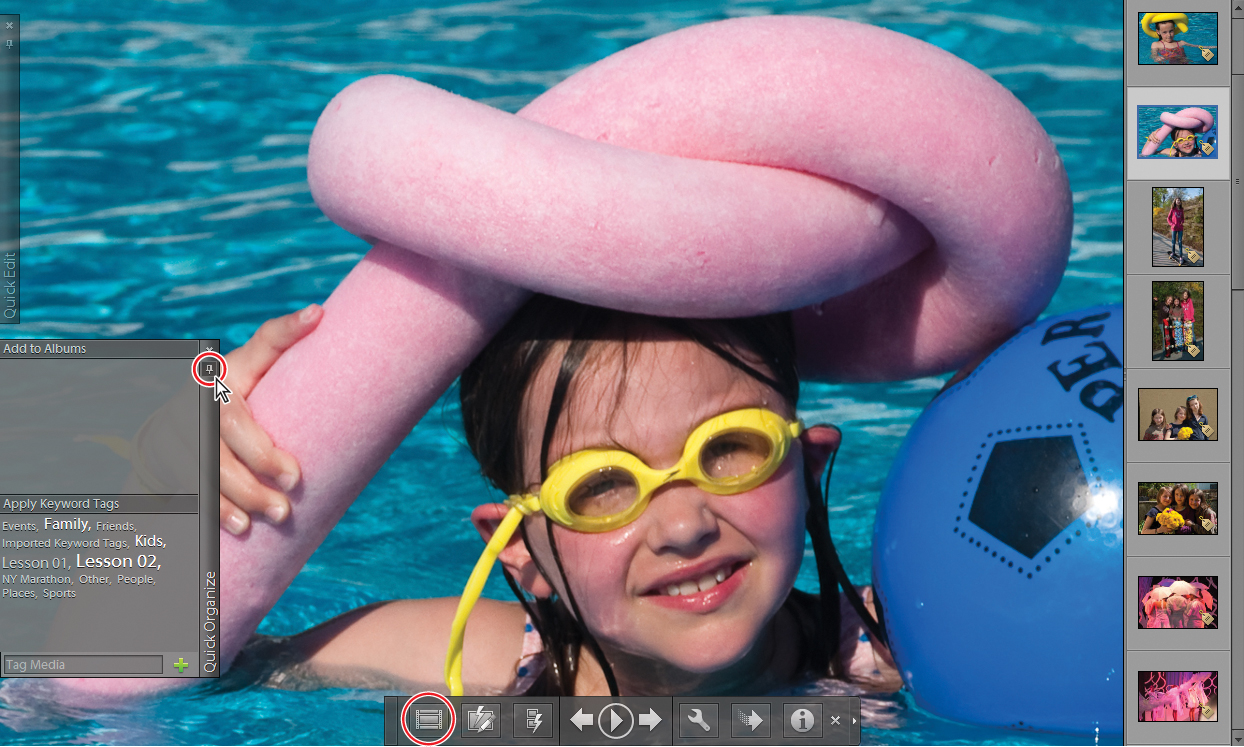
4. Move the pointer over the keywords in the Keyword Tags pane of the Quick Organize panel; as you move over each keyword a tooltip message shows that you can click to either apply or remove any of these tags. All the existing tags in your catalog listed here in alphabetical order. Varying text sizes indicate the relative number of files tagged with each keyword. The keywords already attached to this image are highlighted.
5. Click in the text box at the bottom of the Quick Organize panel and type Lilly; then click the Apply button (![]() ) to the right of the text box to attach the new keyword to this image.
) to the right of the text box to attach the new keyword to this image.
6. Repeat the process in step 5 to apply the keyword Vacation to this photo.
7. In the film strip at the right of the screen, click the other photo of a girl swimming, then click the keyword Vacation in the Keyword Tags pane of the Quick Organize panel to apply that tag.
8. Use the Previous Media and Next Media navigation arrow buttons in the control bar at the bottom of the screen—or the left and right arrow keys on your keyboard—to cycle through the other images in the film strip.

Click the keyword Vacation in the Quick Organize panel to apply that tag to each of the two photos of girls with skateboards and the four marathon images. Return the view to the original photo of Lilly with her yellow goggles.
9. Click to activate the Quick Organize panel’s Auto Hide button once more; then, move the pointer away; the panel closes after a second or so.
10. Right-click / Control-click the image and choose Show Properties from the menu.
11. At the top of the Properties panel, click the Keyword Tags tab (![]() ) to see the keyword tags attached to this image. Right-click / Control-click the tag Lilly and choose Remove Lilly Keyword Tag. You’ll explore a better way to tag people later in this chapter. Click the Close button in the header bar to close the Properties panel.
) to see the keyword tags attached to this image. Right-click / Control-click the tag Lilly and choose Remove Lilly Keyword Tag. You’ll explore a better way to tag people later in this chapter. Click the Close button in the header bar to close the Properties panel.

12. Press the Esc key on your keyboard or click the Close button at the right of the control bar to exit Full Screen mode and return to thumbnail view.
Using keyword tags to find pictures
The reason for creating, applying and sorting all these keyword tags is so that you can always find just the picture you want, just when you want it—easily and quickly. Once they share a keyword tag, a group of related photos can be retrieved with a single click; no matter how big your catalog, or across how many folders those images are scattered.
Before you go on to have fun with the People Recognition feature, let’s become more familiar with using the Keyword Tags panel to sort and search your files.
1. Click the Show All button in the Find bar across the top of the Media browser. Drag the Thumbnail Size to the left so that you can see all the thumbnails in the Media Browser. The Media Browser is now displaying all of the files in your CIB catalog, including those you imported for Lesson 1.
2. In the Keyword Tags panel, activate the find box beside the Lesson 02 tag. The number of images in the Media Browser is reduced by twelve.
3. Leaving the Lesson 02 find box active, activate the new Vacation tag, in the keyword category Other; now only the eight images tagged with both keywords show in the Media Browser.
4. Click to activate the find box beside the Kids tag in the People category; only four images are returned by the narrowed search. The Find bar above the Media Browser shows that these images are tagged with all three keywords.

5. From the Options menu in the Find bar above the Media Browser, choose Show Close Match Results.
The thumbnail display is updated to show more photos: images that are tagged with some, but not all of the searched keywords. These close matches can be identified by a check mark icon in the upper left corner of their thumbnails.

6. From the Options menu in the Find bar above the Media Browser, choose Hide Close Match Results. Click Show All to display all images. In the Keyword Tags panel, right-click / Control-click the tag Lilly and choose Delete Lilly Keyword Tag from the context menu. Click OK to confirm the deletion.
Automatically finding faces for tagging
Undoubtedly, your growing photo library will include many photos of your family and friends. Photoshop Elements 10 makes it quick and easy to tag your photos of friends and family members with the People Recognition feature, taking most of the work out of sorting and organizing a large portion of your catalog.
People Recognition automatically finds the people in your photos and makes it easy for you to tag them. Once you begin using the feature it learns to recognize the faces you’ve already tagged and will automatically tag new photos with those faces.
Using People Recognition
The first experience you’ll have of People Recognition will probably be the “Who Is This?” prompt that appears as you move the pointer over a photo in the single-image view in the Elements Organizer. People Recognition displays these hints to help you identify and tag all the people in your photos. You can ignore the hints if you wish, but remember that the more people you identify, the smarter People Recognition gets at tagging faces for you automatically.

Once People Recognition begins to recognize a particular face, the “Who is this?” hint changes to read “Is this Emma?,” giving you the opportunity to confirm or cancel automatic tagging.
The automatic “Who Is This” hints and the People Recognition feature itself can both be disabled. Before continuing, you need to make sure that both are activated. You can also import a few more images with faces for People Recognition to find.
1. In the Organizer, choose Edit > Preferences > Media-Analysis (Windows) / Adobe Elements 10 Organizer > Preferences (Mac OS). In the Media-Analysis pane of the Preferences dialog box, make sure that the option Analyze Photos For People Automatically is activated. Click OK to save your settings and close the Preferences dialog box.
2. In the View menu, make sure that Show People Recognition is activated.
3. Choose File > Get Photos And Videos > From Files And Folders. In the Get Photos And Videos From Files And Folders dialog box, locate and open your Lesson02 folder; then, click once to select the Faces folder.
4. Disable the options Automatically Fix Red Eyes and Automatically Suggest Photo Stacks. Click Get Media. In the Import Attached Keyword Tags dialog box, click Select All, and then click OK. Click OK to close any other alerts.
5. Above the Media Browser, click the Show All button to display all the images in your CIB catalog, and then choose Date (Newest First) for the sorting order.
Tagging faces in the Media Browser
Photoshop Elements helps you with every step of the face tagging process.
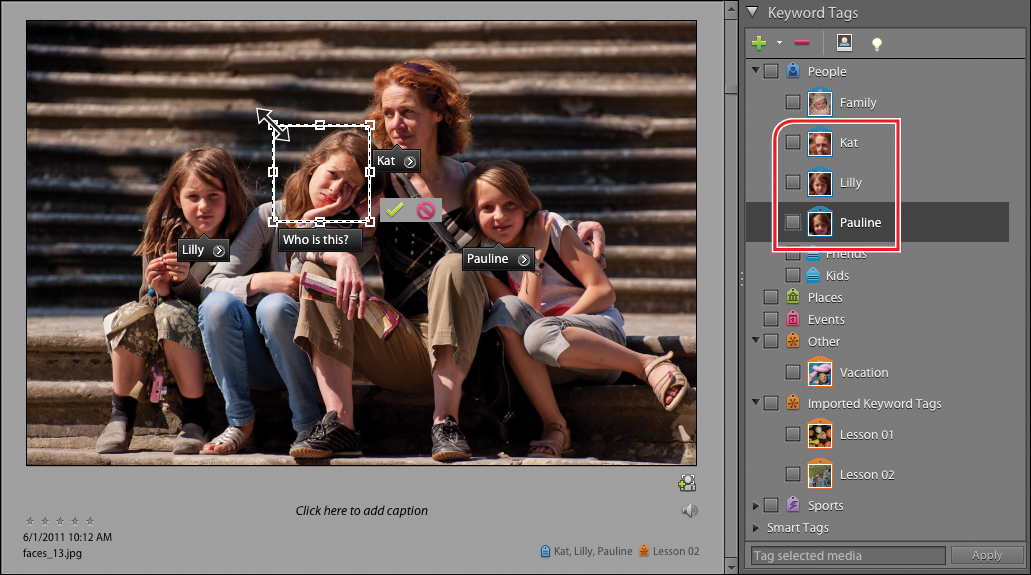
1. In the Media Browser, double-click the photo, faces_13.jpg, to see it in the enlarged single image view. Move the pointer over the image; white boxes appear over any faces detected in the photo. People Recognition has found three of the four faces in this picture. Move the pointer over any of the boxes; the “Who is this?” prompt appears.
2. Starting with the girl at the left, click the “Who is this?” text in the black box, type the name Lilly, and then press Enter / return. Photoshop Elements creates a new keyword tag for Lilly. By default, the new tag appears in the People category in the Keyword Tags panel. Type Kat for the mother’s name and tag the girl on the right Pauline. Be sure to press Enter / return for each tag.
3. Click the Add Missing Person button (![]() ) below the lower right corner of the enlarged image. Drag the new face tagging box onto the face that was not detected; use the handles around the box to resize it so that it surrounds the face neatly. When you’re done, click the green check mark to confirm the position of the box; then, type Emma in the text box and press Enter / return.
) below the lower right corner of the enlarged image. Drag the new face tagging box onto the face that was not detected; use the handles around the box to resize it so that it surrounds the face neatly. When you’re done, click the green check mark to confirm the position of the box; then, type Emma in the text box and press Enter / return.
Face tags are listed inside the People category by default, but you can move them if you choose; People Recognition will keep track of them.
4. Click the left arrow key on your keyboard to move to the preceding photo. People Recognition already recognizes the girl on the right; click the green check mark to confirm the automatic tagging for Lilly. You haven’t yet tagged a photo of the other girl; type Sophie, and then press Enter / return.

Depending on your operating system, you may not see exactly the results from People Recognition that are referred to and illustrated in these exercises. The overall process, however, will be the same.
People Recognition will sometimes incorrectly identify a chance arrangement of light and shadow in an image as a face. For this image, this has happened twice.
5. Move the pointer over the tagging box above Lilly’s head and click the X button at the upper right corner of the box to dismiss it; otherwise People Recognition will continue to register this as a person not yet named.
6. You may find it a little difficult at first to work with the other extraneous tagging box, as it overlaps the boxes for both of the girls. Click in the “Who is this?” text to keep the box active while you move the pointer to the X button to dismiss it.
7. Click the left arrow key on your keyboard to move to the preceding photo. This time, all five of the faces in the photo have been detected. Click in the “Who is this?” text box for the girl at the right of the frame. You haven’t yet tagged enough faces for People Recognition to identify this girl, but you’re offered a choice of possible tags from those available in the People category. Click the name Sophie, and then, if necessary, press Enter / return.

8. Use the same technique to tag Lilly—the girl at the far left—and Pauline, beside her. Type Tom for the father’s name. Photoshop Elements doesn’t yet know the older girl well enough to offer the correct choice. Type the name Emma, and then press Enter / return. Dismiss the extra tagging box at the top of the stairs.
9. Double-click the image to return the Media Browser to Thumbnail view.
When you type a name that matches a tag you created earlier, Photoshop Elements applies the existing keyword, rather than creating a new tag.
Tagging faces in batches
When you want to do some serious face tagging, rather than work through your catalog one image at a time, you can let People Recognition bulk-process your files.
1. Reduce the size of the thumbnails so that you san see as many of the images in the Media Browser as possible. Ctrl-click / Command-click to select all of the photos of this family that have not yet been face-tagged—there are 27 in all.
2. Click the Start People Recognition button (![]() ) at the top of the Keyword Tags panel. The People Recognition – Confirm Groups Of People dialog box opens.
) at the top of the Keyword Tags panel. The People Recognition – Confirm Groups Of People dialog box opens.

In Confirm Groups Of People mode, People Recognition collates groups of faces that match known names, and then offers you the option to exclude any faces that don’t belong. Click the X button at the top right of a face thumbnail to dismiss it.
3. For our example images, there are no images to be excluded from groups to be tagged Lilly and Pauline. Click Save to confirm these groups; then, click Save again to confirm the next sets to be tagged Emma and Sophie. Continue the process, dismissing the thumbnails of any faces of which you are unsure, until the People Recognition – Label People Dialog box appears.
4. In the People Recognition - Label People dialog box, tag as many of the faces as you can. Be sure to press Enter / return whenever you type. When you’re done, click Save; then repeat the process for a new set of faces. Be patient—People Recognition is getting smarter with every click!

People Recognition will alternate between the Confirm Groups and Label People modes, until eventually, you’ll be presented with a set of dimmed images like those in the illustration below. These may be faces obscured by shadows, hands, hats, or sunglasses—or sometimes just chance arrangements of color, light, and shadow with characteristics that have triggered the face recognition algorithms.
5. Click the thumbnail of any face you recognize, and then click Save. If you click to include a face, you’ll be returned to the Label People dialog box to tag it. Images you ignore will no longer be seen as faces by People Recognition.

6. Photoshop Elements will notify you when the tagging session is completed; click OK to dismiss the message and return to the Media Browser.
7. In the keywords panel, activate the Find box beside the each of your new tags in turn, making sure to clear each search before starting the next. Try activating different combinations of Find boxes at the same time.

The details of each search are shown in the Find bar above the thumbnail display. What you see in the Find bar may differ from the illustration, depending on your operating system.
8. To deactivate all of the keyword tag Find boxes and clear the search, click the Show All button above the thumbnails pane.
Sharing keyword tags with Facebook
If you have a Photoshop.com account, you can share your photos directly from Photoshop Elements to Facebook, complete with any tags you’ve applied in the Elements Organizer. Photoshop Elements can even download your friends list from Facebook, making it even easier to tag your photos.
1. Make sure that you’re signed in to your Photoshop.com account (see “Creating an Adobe ID” on page 22 in Lesson 1).
2. Select the photos you wish to share selected in the Media Browser, click the Share tab at the top of the Task Pane, and then click Share To Facebook. If you are asked to confirm the action, click Yes.
3. Photoshop Elements asks for your permission to access your Facebook account. Make sure that the option Download Facebook Friend List is activated, and then click Authorize.
4. Facebook will also require your authorization. When the Facebook Request For Permission page opens in your default browser, click Allow; then, close the browser page and return to the Organizer.

5. Click Complete Authorization. Photoshop Elements opens the Share To Facebook dialog box, where you can set up the details for your upload. Choose whether to upload photos to an existing Facebook album, or create and enter details for a new one. Specify who you wish to share your album to, and select an option for photo upload quality. You can add a photo to the selection to be uploaded, or exclude a picture, using the plus and minus buttons at the lower left of the preview pane. Make sure you activate the option Upload People Tags In These Photos, and then click Upload.

Photoshop Elements will download names from your Facebook friends list while your photos are being uploaded. The next time you’re tagging photos in Photoshop Elements, you’ll notice that the names of your Facebook friends are offered as tagging suggestions.
You’ll be notified when the upload is complete and given the option to return to the Elements Organizer or visit your Facebook page to view your newly shared photos.
6. When you’re done, click the Organise tab at the top of the Task pane to return to the Media Browser.

Congratulations, you’ve finished the lesson! You’ve imported files into the Elements Organizer using a variety of new techniques and learned several different ways to view and access the images in your catalog. You’ve also created, edited, and applied keyword tags to individual photographs so that they’ll be easy to find in future. Before you move on, take a few moments to review the concepts and techniques presented in this lesson by working through the following questions and answers.
Review questions
1. How do you open the Elements Organizer component of Adobe Photoshop Elements?
2. Name three ways to import photos from your computer hard disk into your catalog.
3. What is a “watched folder”? (Windows users only.)
4. Summarize the characteristics of the Media Browser and Date views in the Organizer.
Review answers
1. Click the Organize button in the Welcome Screen when you start Photoshop Elements. Alternatively, if the Editor window is already open, click the Organizer button located at the top right of the Editor workspace.
2. This lesson demonstrated three different ways to import photos into Photoshop Elements:
• Drag-and-drop photographs from a Windows Explorer / Finder window into the Media Browser pane in the Organizer window.
• In the Organizer, choose File > Get Photos And Videos > From Files And Folders, and then navigate to the folder containing your photos. You can import a whole folder, specify whether to include subfolders, or select just those images you want to add to your catalog.
• In the Organizer, choose File > Get Photos And Videos > By Searching, and then select the folder on the hard disk that you wish Photoshop Elements to search. This method will locate all images in that folder and its subfolders and offer you the opportunity to select which images to import.
3. If you designate a folder on your computer as watched, Photoshop Elements is automatically alerted when new photos are saved or added to that folder. By default, the My Pictures folder is watched, but you change that, or add any number of watched folders. When new images appear in a watched folder, you can either have Photoshop Elements import them to the Organizer automatically, or ask you what to do.
4. In the default Media Browser view in the Organizer you can browse thumbnail images of your photos. You can choose to see them sorted by chronological order, by folder location, or by import batch. The Date view is organized in the form of a calendar where you can quickly find photos taken on a particular day, month, or year.