
7. Adjusting Color in Images
Lesson Overview
Photoshop Elements delivers a broad range of tools and options for working with color. Whether you want to make corrections for unusual lighting conditions, remove red eye effects, or brighten a smile, you’ll find a range of solutions from one-click Auto Fixes to options that give you precise control of the adjustments you apply.
This lesson introduces you to a variety of tools and techniques for fixing color problems in your photos:
• Using automatic options to correct color
• Tweaking automatic color adjustments
• Using Color Variations to correct color balance
• Adjusting skin tones
• Whitening yellowed teeth
• Removing red eye effects
• Using the selection tools and saving selections
• Changing the color of a pictured object
• Replacing a color throughout an image
• Working with color management
You’ll probably need about two hours to complete this lesson.
Explore the many powerful and versatile tools and options available in Photoshop Elements for correcting color problems in your photos. Start with a few of the easy-to-use, one-step image correction features, and then experiment with some of the more advanced photo editing features and techniques that can be mastered easily.
Getting started
You’ll begin by importing the sample images for this lesson to the CIB Catalog that you created at the beginning of Lesson 1.
1. Start Photoshop Elements and click Organize in the Welcome Screen. When the Organizer opens, make sure that your CIB Catalog is loaded (if you need to refresh your memory, refer to step 2 in the Getting Started section in Lesson 5).
2. Choose File > Get Photos And Video > From Files And Folders. In the Get Photos And Videos From Files And Folders dialog box, locate and select your Lesson07 folder. Activate the option Get Photos From Subfolders and disable the automatic processing options; then, click Get Media.
Before you start working on this lesson, make sure that you’ve installed the software on your computer from the application CD (see the Photoshop Elements 10 documentation) and that you have correctly copied the Lessons folder from the CD in the back of this book onto your computer’s hard disk (see “Copying the Classroom in a Book files” on page 2). You should also have created a working catalog (see “Creating a new catalog” on page 8).
3. In the Import Attached Keyword Tags dialog box, select the Lesson 07 tag, and then click OK. Click OK to close any other alert dialog box.
Batch-processing the lesson files
As you discovered in Lesson 6, the batch-processing command lets you apply automatic adjustments to an entire folder of image files at once.
Before you start this lesson, you can follow the steps in “Fixing files automatically in batches” and “Adding the auto-corrected files to your catalog” on page 151 to set up automatic processing for the lesson 7 images. At the end of each of the exercises to follow, you can compare the automatic fixes to the results you achieve using various other techniques.
Correcting color problems
Color casts are one of the most common of image problems, affecting every color in a photo as if the entire image is overlaid by a colored film. Artificial light sources, unusual shooting conditions, and incorrect camera exposure settings can all result in an unwelcome color cast.
For some images your color problem may be more specific, such as red eyes in a photo taken with a flash, or a portrait spoiled by yellow-looking teeth. Even when a photo is technically perfect, you may still wish to adjust the color—either across the entire image, or just for a particular area or object—in order to create an effect.
You’ll begin this lesson by revisiting, and comparing, some of the tools and techniques for making quick and easy adjustments using the simple controls in the Quick Edit mode and the step-by-step editing tasks in Guided Edit mode.
Later in the lesson you’ll explore methods for dealing with red eyes and yellow teeth, and learn how to use the selection tools—an essential skill for performing sophisticated, localized edits in Full Edit mode.
Comparing methods of fixing color
The automatic correction features in Photoshop Elements do an excellent job of bringing out the best in most photographs, but each image—and each image problem—is unique. Some photographs don’t respond well to automatic fixes and require a more hands-on approach to color correction. Photoshop Elements offers many ways to adjust color; the more techniques you master, the more likely that you’ll be able to meet the challenge presented by a difficult photograph.
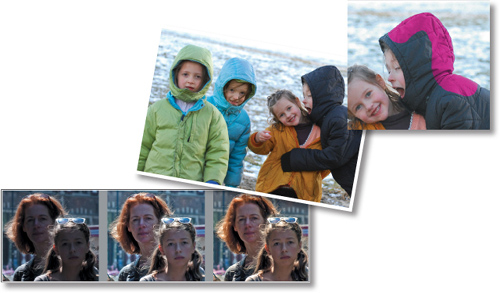
In the next exercises you’ll compare three different techniques for correcting the same color problem, so you’ll need three copies of the original photograph.
1. Select the image 07_01.jpg in the Media Browser, taking care not to confuse the original with the Autofix copy. Click the arrow on the Fix tab at the top of the Task Pane, and choose Quick Photo Edit.
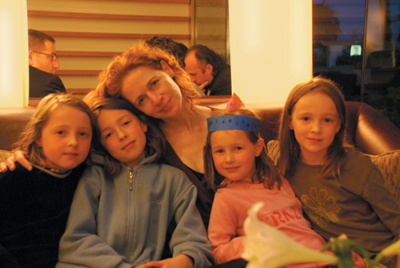
This photo exhibits the overly warm, yellow-orange cast common to many images taken in standard tungsten—or incandescent—lighting. Fluorescent lighting often causes a flat, cold green-blue cast.
2. Click the Reset Panels button (![]() ) at the top of the workspace, and then double-click the Hand tool in the toolbox, or choose View > Fit On Screen.
) at the top of the workspace, and then double-click the Hand tool in the toolbox, or choose View > Fit On Screen.
3. Right-click / Control-click the thumbnail in the Project Bin and choose Duplicate from the context menu. In the Duplicate Image dialog box, click OK to accept the default name 07_01 copy.jpg. Repeat the process to create two more duplicates, 07_01 copy 2.jpg and 07_01 copy 3.jpg.
Although you can view only one image at a time in the Edit pane while you’re in Quick Edit mode, you can easily see which files are open by checking the Project Bin. The name of each image in the Project Bin appears as a tooltip when you hold the pointer over the thumbnail. Alternatively, right-click / Control-click anywhere inside the Project Bin and choose Show File Names from the context menu.
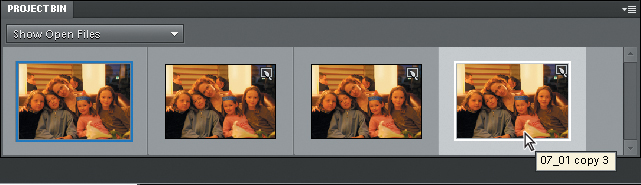
In the Project Bin, a highlighted frame surrounds the active, image—the photo that is currently visible in the Edit pane.
4. Double click the original image 07_01.jpg—the thumbnail at the left—to make it the active photo. Close the file by choosing File > Close, or clicking the Close button (x) in the upper right corner of the Edit pane.
Correcting color automatically
When you batch-processed the sample files at the start of this lesson, you applied all four automatic Quick Fix options. In this exercise, you’ll apply just the Quick Fix color adjustment, so that you can assess the result unaffected by other settings.
1. In the Project Bin, double-click 07_01 copy.jpg—to make it the active file; then, choose Before & After - Vertical from the View menu below the Edit pane. Use the Hand tool and the Zoom slider below the preview to focus on the faces.
2. In the Quick Fix panel, click the Auto button in the Color pane. Compare the Before and After views. There is a marked improvement; the Auto Color fix has corrected the worst of the orange color cast. Skin tones are slightly cooler, clothing colors a little brighter, but the tonal range is still somewhat flat.

3. Choose File > Save. Make sure that Include In The Elements Organizer is activated and the Save In Version Set With Original option is disabled. Name the file 07_01_AutoColor and save it to your My CIB Work folder in JPEG format. Click Save; then, click OK in the JPEG Options dialog box.
Adjusting the results of an automatic fix manually
An automatic fix can serve as a good starting point for some manual fine-tuning.
1. In the Project Bin, double-click the image 07_01 copy 2.jpg to make it active. In the Quick Fix panel, click the Auto button in the Color pane.
2. A slight orange cast can still be detected in the skin tones and the white back-lit panels in the background. In the Balance pane, reduce the Temperature setting to 40 and set the Tint to a value of 10 to give the color a more natural tone.
3. In the Lighting pane, click the Auto Levels button; then, use the sliders to set the Shadows value to 5 and the Midtones to 15. Click the Commit button (![]() ) at the top of the Lighting pane.
) at the top of the Lighting pane.
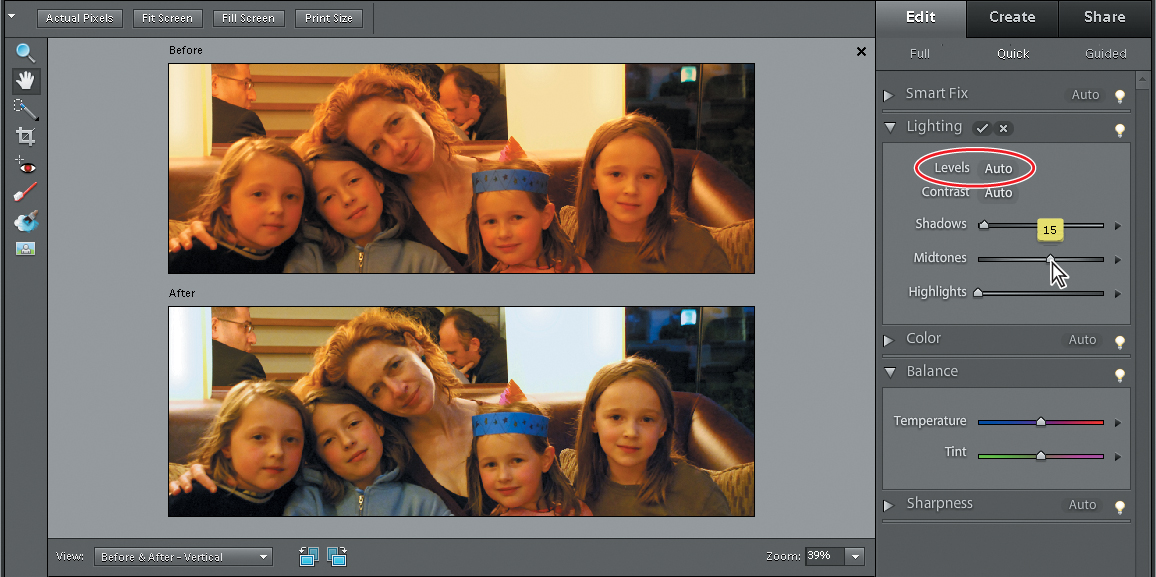
The contrast has improved, the colors are intensified, and the skin tones have lost the “fake tan” look common in photos captured without a flash in tungsten lighting.
4. Choose File > Save. Make sure that Include In The Elements Organizer is activated and the Save In Version Set With Original option is disabled. Name the file 07_01_ColorBalanceLighting and save it to your My CIB Work folder in JPEG format. Click Save; then, click OK in the JPEG Options dialog box.
Tweaking an automatic fix using Color Variations
The first five commands listed in the Enhance menu apply the same automatic image adjustments as do the various Auto buttons in the Quick Fix panel. These Enhance menu commands are available in both the Quick Edit and Full Edit modes, but not in Guided Edit.
Both the Quick Edit and Full Edit modes also offer other methods of enhancing color that give you finer control over the results. These are the commands in the lower half of the Enhance menu. In this exercise, you’ll use one of these options to tweak the adjustments applied by the Auto Color fix button.
1. In the Project bin, double-click the image 07_01 copy 3.jpg to make it active.
2. In the Color pane, click the Auto button to apply the Quick Fix color correction; then, choose Enhance > Adjust Color > Color Variations to open the Color Variations dialog box.
3. In the lower left area of the Color Variations dialog box, make sure that Midtones is selected, and then move the Amount slider one stop to the left of center. Click the Decrease Red and Lighten thumbnails twice each, and click the Decrease Green thumbnail once.
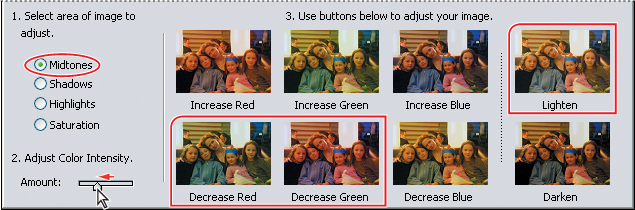
4. Change the settings from Midtones to Shadows and click the Decrease Red and Decrease Green thumbnails once each, and the Darken thumbnail twice.
5. Change the setting to Highlights and click the Decrease Red thumbnail once and the Lighten thumbnail four times; then click OK. The Color Variations adjustments have made the colors warmer and more vivid, reduced the yellow-orange color cast, and improved the tonal range.
6. Choose File > Save. Make sure that Include In The Elements Organizer is activated and the Save In Version Set With Original option is disabled. Name the file 07_01_ColorVariations and save it to your My CIB Work folder in JPEG format. Click Save; then, click OK in the JPEG Options dialog box.
Comparing results
In the Project bin, you can see that all three of your saved work files are still open in the Editor. Let’s compare them to the batch-processed Autofix file.
1. Choose File > Open. Locate and open your My CIB Work folder. Select the file 07_01_Autofix, and then click Open. At the top of the Edit tab in the Task pane, click Full to switch to Full edit mode.
2. Choose Preferences > General from the Edit / Photoshop Elements Editor menu. Activate Allow Floating Documents In Full Edit Mode, and then click OK.
Once you’ve activated the option to allow floating document windows, this becomes the default for any image opened in Full Edit mode. Throughout the rest of this book however, it will be assumed that you are working with tabbed image windows that are docked (consolidated) in the Edit pane, unless otherwise specified. When you complete this exercise you’ll disable floating document windows so that it’ll be easier for you to follow the exercise steps as written.
3. Hide the Project Bin by double-clicking its header bar; then, choose Window > Images > Tile. Use the Zoom and Hand tools to see an area of interest in one of the images, and then choose Window > Images > Match Zoom and Window > Images > Match Location. These commands are also accessible by clicking the Arrange button (![]() ) at the top of the workspace and choosing from the menu.
) at the top of the workspace and choosing from the menu.
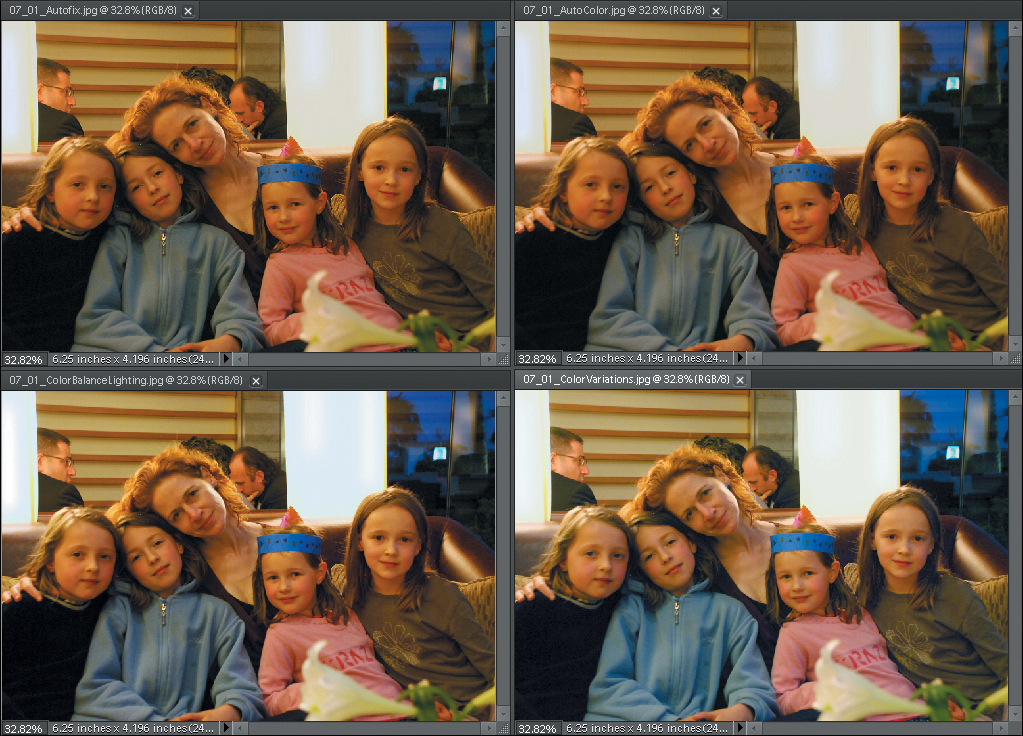
At any given time there is only one active image window. Look at the text in the title bars of the open image windows; the file name and image details are dimmed in the title bars of all but the active image window.
4. Use the Zoom and Hand tools to inspect different areas of the image. For each of these tools respectively, activate the Zoom All Windows or Scroll All Windows option in the tool options bar as you compare the four images.
5. Make your favorite the active image and choose Window > Images > Float In Window. Choose View > Fit On Screen. You can cycle through all the open image windows by pressing Ctrl-Tab or Ctrl-Shift-Tab.
6. Choose File > Close All. From the Edit / Photoshop Elements Editor menu, choose Preferences > General and disable floating documents. Click OK.
Adjusting skin tones
When your primary concern is the people in your photo, you can correct a color cast across the entire image by concentrate on achieving natural, good-looking skin tones. Photoshop Elements offers tools to do just that in all three Edit modes.
1. Choose File > Open. Navigate to and open your Lesson07 folder; then, select the image 07_01.jpg and click Open. Use the Zoom and Hand tools to focus on the faces of the mother and the two daughters that are sitting closest to her.
2. Choose Enhance > Adjust Color > Adjust Color For Skin Tone. In the Adjust Color For Skin Tone dialog box, make sure the Preview option is activated.
3. As you move the pointer over the image, the cursor changes to an eyedropper tool. With the eyedropper tool, click the lightly shaded area of skin to the right of center on the youngest sister’s forehead. The color balance of the entire photo is adjusted using the sampled skin tone as a reference.
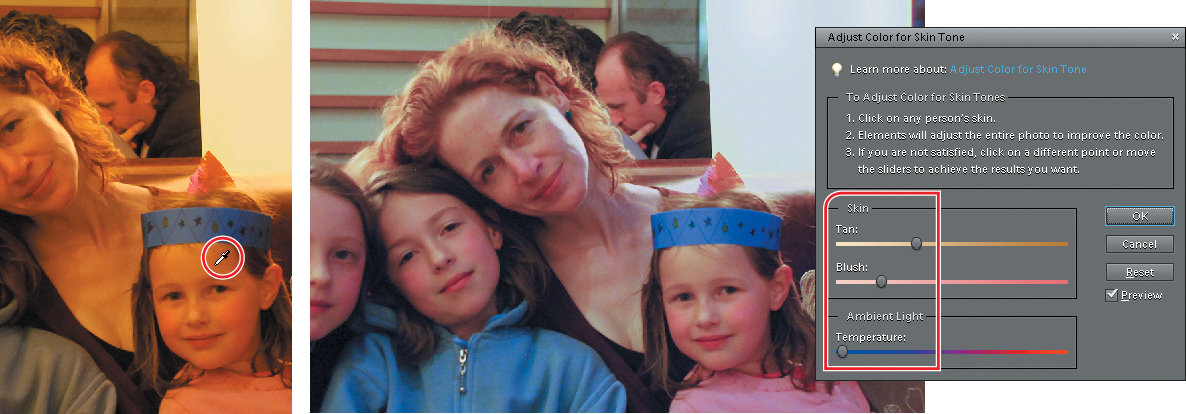
4. Move the Tan, Blush, and Temperature sliders to achieve the skin tones you want, and then click OK. Choose File > Save As. Name the file 07_01_Skin and save it to your My CIB Work folder with the usual options. Choose File > Close.
Removing a color cast with one click
The Color Cast Eyedropper tool provides yet another solution to your color problem that is also available in all three Edit modes.
The Color Cast Eyedropper tool can be accessed in Guided Edit mode’s Remove A Color Cast procedure (as illustrated below), or by choosing Enhance > Adjust Color > Remove Color Cast in Full Edit and Quick Edit modes.
Use the Color Cast Eyedropper to define a color that should appear temperature-neutral—neither warm nor cool—and the color balance is re-calculated around it. The best choice is a mid gray, though black or white can also work. Choosing the right color can take a little practice. In the photo below, for example, the zippered jacket that appears to be a neutral gray in the before image actually contains a lot of cool blue. In this case, we sampled the brightest point on the lily in the foreground.


Working with red eye
The red eye effect occurs when a camera flash is reflected off the retina at the back of the eye so that the dark pupil looks bright red. As you learned in Lesson 2, you can have Photoshop Elements apply an automatic red eye fix during the import process, so the problem is corrected before your images even reach the Organizer. However, the automatic solution is not effective for every photo. In the lesson image chosen for this exercise, the red eye effect is not particularly dramatic, obvious, or well-defined, which makes it a great test case for manual techniques.
Using the automatic Red Eye Fix
1. In the Organizer, use the Lesson 07 keyword tag, if needed, to locate the file 07_02.jpg. Select the image in the Media Browser; then, click the small arrow on the Fix tab above the Task Pane and choose Quick Photo Edit.
2. Hide the Project Bin and choose Before & After - Horizontal from the View menu below the Edit pane. Use the Zoom and Hand tools to focus on the face of the girl on the right; then, choose Enhance > Auto Red Eye Fix.

As you can see, the automatic red eye correction does a great job for this little girl. Unfortunately, it hasn’t worked for her sisters.
3. Use the Zoom and Hand tools to check the eyes of the other two girls; the automatic fix had no effect for either. In both these cases, the red eye effect may be less pronounced or well-defined, but it’s also more difficult to remove.
4. Click the Reset button at the bottom of the Quick Fix panel to clear the Auto Red Eye Fix. Keep the file open for the next exercise.
The automatic red eye removal feature works well for most images, but when you want more control you need to use the Red Eye Removal tool.
Using the Red Eye Removal tool
For stubborn red eye problems that don’t respond well to the automatic fix, the Red Eye Removal tool (![]() ), which can be found in both the Full Edit and Quick Edit toolbox, is an easy-to-use and efficient solution.
), which can be found in both the Full Edit and Quick Edit toolbox, is an easy-to-use and efficient solution.
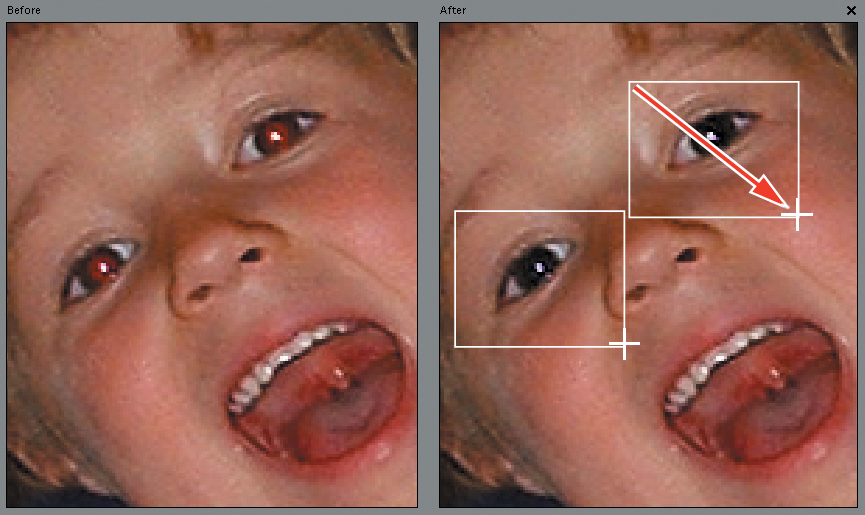
1. Zoom and pan the photo to focus the view on the eyes of the girl in the center.
2. Select the Red Eye Removal tool (![]() ) from the toolbox. Click the small white triangle at the far left of the tool options bar and choose Reset Tool from the menu. In the After image, click once in each eye, just outside the upper right corner of the white highlight.
) from the toolbox. Click the small white triangle at the far left of the tool options bar and choose Reset Tool from the menu. In the After image, click once in each eye, just outside the upper right corner of the white highlight.
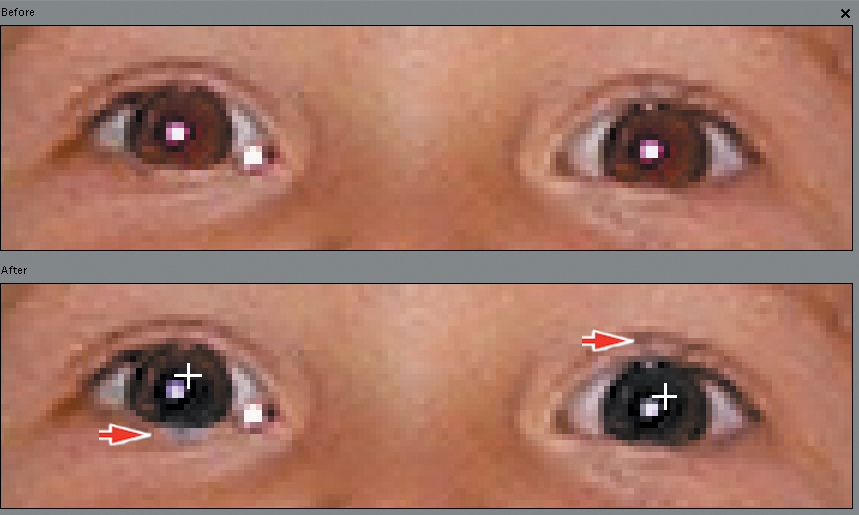
The Red Eye Removal tool over-extends the correction, unevenly blackening portions of the iris and even spilling onto the skin around the eye. Fortunately you can customize the tool to deal with such difficult cases.
3. Choose Edit > Revert. In the Red Eye Removal tool settings in the tool options bar, reduce the Pupil Size to 15% and the Darken Amount to 40%. You can either use the slider controls, type the new values in the text fields, or simply drag left or right over the Pupil Size and Darken Amount values.
4. In the After image, click at the same points you used in step 2. If the effect is off-center, undo and click a slightly different spot.
The red is removed from both eyes. The darkened areas are somewhat shapeless and blurry, giving no real definition to the pupils, but we’ll accept that for now.
5. Use the Zoom and Hand tools to position the image so that you can focus on the eyes of the girl on the left of the photo.
6. Make sure the Red Eye Removal tool is still selected. In the tool options bar, reduce the Pupil Size to 10% and the Darken Amount to 20%; then, drag a marquee rectangle around each eye in turn.
Experiment with the size and placement of the rectangle around each eye to get the best results. If you’re not satisfied, just undo and try again. Hold down the Alt / Option key to draw the rectangle from its center.
7. To re-instate the Auto Red Eye Fix for the little girl on the right, zoom out so that you can see all three faces, and then choose Enhance > Auto Red Eye Fix.
8. Choose File > Save As. Set the options to include the file in the Organizer, but not in a Version Set. Name the file 07_02_RedEye, to be saved to your My CIB Work folder in JPEG format. Click Save, leaving all other options in the Save and JPEG Options dialog boxes unchanged, and then choose File > Close.
Making selections
By default, the entire area of an image layer is active—any adjustments you make are applied across the whole photo. If you want to edit a specific area or object within the image, you first need to make a selection. Once you’ve made a selection it becomes the only active area of the image; the rest of the image layer is protected.
Typically, the boundaries of a selection are indicated by a selection marquee: a flashing border of dashed black and white lines, sometimes likened to marching ants. Selections can be geometric in shape or free form, with crisp borders or soft edges. They can be created manually with the pointer, or calculated automatically by Photoshop Elements, based on similarity in color and texture within the image.
You can save a selection, and then re-use it or edit it later, which can save you time when you’re building up a complicated selection, or when you need to use the same selection more than once.
Perhaps the simplest, most effective way to create a selection is to “paint” it onto your image. This exercise focuses on the use of two selection tools in Photoshop Elements that let you do just that: the Selection Brush and the Quick Selection tool.
1. In the Organizer, use the Lesson 07 tag to locate the file 07_03.psd. Select the file in the Media Browser, taking care not to confuse the original file with the Autofix copy; then, click the arrow on the Fix tab and choose Full Photo Edit.
The lesson image has been saved in Photoshop file format and not as a JPEG file. The Photoshop format can store additional information together with the image data. In this case, a selection has been made previously, and then saved with the file.
The saved selection is loaded. The left half of the flower is now surrounded by a flashing selection marquee, indicating that it has become the active portion of the image.
2. Hide the Panel Bin by choosing its name from the Window menu; then, hide the Project Bin by double-clicking its header bar. Double-click the Hand tool or choose View > Fit On Screen.
3. Choose Select > Load Selection. In the Load Selection dialog box, choose the saved selection “petals” from the Source menu. In the Operation settings, activate the New Selection option, and then click OK.
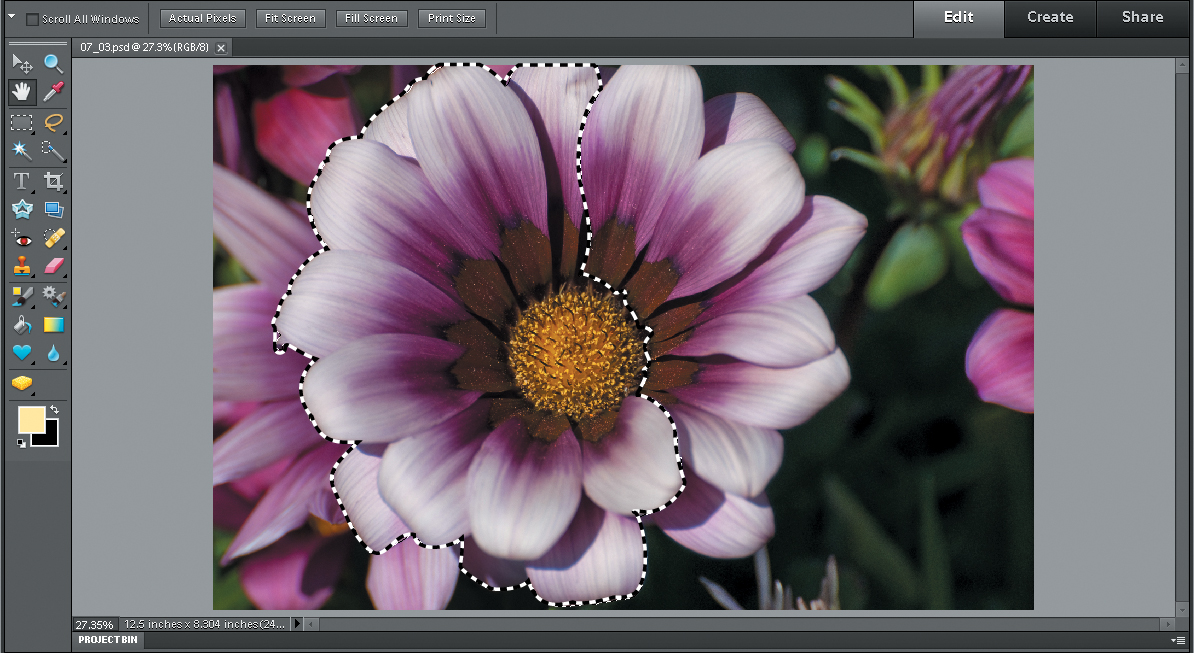
The petals at the right need to be added to make the selection complete. In the next exercise, you’ll modify the saved selection to include the missing petals.
4. Choose Select > Deselect to clear the current selection.
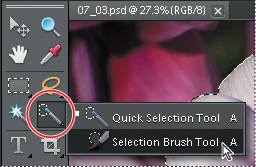
5. In the toolbox, the Selection Brush is grouped with the Quick Selection tool. Right-click / Control-click the Quick Selection tool and choose the Selection Brush from the menu.
Using the Selection Brush
The Selection Brush tool has two modes: the default Selection mode, where you paint over the area you want to select for editing, and Mask mode, which lets you brush a semi-opaque overlay onto the areas you want to protect from editing.
1. In the tool options bar, make sure that the Add To Selection button at the far left is activated (see below); then, set the brush Size to 100 px (pixels), choose Selection from the Mode menu, and set the brush Hardness value to 100%.

2. Drag with the Selection Brush to paint a live selection over the interior of the petals in the right half of the flower, as in the illustration below. Don’t try to paint all the way to the edges; you’ll do that in the next step.

While you paint your selection onto the image, release the mouse button every second or two so that you don’t have to repeat too much work if you need to undo a stroke.
Now you need to reduce your brush size to paint around the edges of the petals, adding to your selection. You could move the Size slider to change your brush size, but while you’re working it’s far more convenient to press the open bracket key ( [) to reduce the brush size in increments and the close bracket key ( ]) to enlarge it.
3. Press the left bracket key ( [) to reduce the Selection Brush size to 25 pixels. Paint the selection to the edges of the petals. Use the bracket keys to change the brush size as needed, until the selection outline completely surrounds the petals in the right half of the flower. Make sure the selection extends just a little into the yellow center of the bloom.
When you need to make a difficult or detailed selection, use the Zoom tool to magnify the area of interest. To remove an area from the selection, hold down the Alt / Option key as you paint.
If you found it tedious using the Selection Brush tool, you’ll appreciate learning about the Quick Selection tool later in this lesson. You’ll also learn that both tools have their uses. But first, you’ll make use of your hard work and save the results.
Editing a saved selection
In this exercise you’ll add your live selection to the one that was saved with the file. You can modify a saved selection by replacing it, adding to it, or subtracting from it.
The New Selection setting replaces the saved selection with the current selection. The Subtract from Selection setting subtracts the current selection from the saved selection. Intersect with Selection replaces the saved selection with the intersection between the current selection and the saved selection.
1. With your new selection still active, choose Select > Load Selection.
2. In the Load Selection dialog box, choose the saved selection “petals” as the Source Selection. Under Operation, activate the option Add To Selection; this setting will combine your current selection with the saved selection of the rest of the flower. Click OK.

You should now see a selection border entirely surrounding all the flower’s petals.
If you’ve missed a spot, simply paint it in with the Selection Brush tool. If you’ve selected too much, simply set an appropriate brush size, switch to Subtract From Selection mode in the tool options bar, or hold Alt / Option, and paint out your mistakes.

3. Choose Select > Save Selection. In the Save Selection dialog box, choose petals as the Selection name, activate Replace Selection in the Operation options, and then click OK. Choose Select > Deselect.
Using the Quick Selection tool
The Quick Selection tool enables you to select an area in the image by simply drawing, scribbling, or clicking on the area you want to select. You don’t need to be precise, because while you’re drawing, Photoshop Elements automatically expands the selection border based on similarities in color and texture.
In this exercise, you’ll use the Quick Selection tool to select everything but the flower, and then switch the selected and un-selected areas in the photo to establish the selection you want. This technique can be a real time-saver in situations where it proves difficult to select a complex object directly.
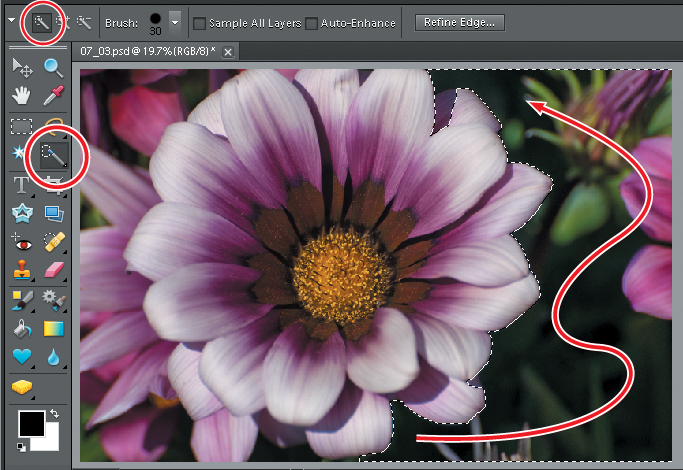
1. In the toolbox, right-click / Control-click to select the Quick Selection tool (![]() ), which is grouped in the toolbox with the Selection Brush you used earlier.
), which is grouped in the toolbox with the Selection Brush you used earlier.
2. In the tool options bar, make sure the New Selection mode button on the far left is activated. Set a brush diameter in the Brush picker. For the purposes of this exercise, you can use the default brush diameter of 30 px (pixels).
3. Scribble over the area to the right if the flower, making sure to draw through black areas, lighter and darker greens, as well as the petals at the right edge of the photo, as shown in the illustration at the right. Release the pointer once or twice to see the result. As you draw, Photoshop Elements automatically expands the selection to areas adjacent to your stroke that have similarities in color and texture.
4. With an active selection already in place, the Quick Selection tool defaults to Add To Selection mode. Scribble over, or click into, un-selected areas around the flower until everything is selected but the flower itself. Hold down the Alt / Option key as you drag to subtract an area from your selection.

5. Finally, turn the selection inside out by choosing Select > Inverse, thereby masking the background and selecting the flower—ready for the next exercise.
Working with selections
Now that you have an active selection outline around the sunflower, you can apply any adjustment you like and only the flower will be affected.
1. Choose Enhance > Adjust Color > Adjust Hue/Saturation.
2. In the Hue/Saturation dialog box, drag the Hue and Saturation sliders to change the color of the flower.
3. Hold down the Alt / Option key; the Cancel button changes to the Reset button. Click Reset to clear your changes.
4. Experiment with applying changes to the Master channel, as well as to the different color channels separately.

Notice that the flower changes color, but the background does not. Only the pixels inside a live selection are affected by edits or adjustments.
5. Click Cancel in the Hue/Saturation dialog box to discard your changes.
By inverting the selection, you could apply changes to the background of the photo instead of the flower.
6. With the flower still selected, choose Select > Inverse.
7. Choose Enhance > Convert To Black And White.
8. Under Select A Style in the Convert To Black And White dialog box, experiment with the different styles to see the effects on the image. Use the Adjustment Intensity sliders to vary the amount of change for red, green, blue, and contrast.
Click Undo if you make an adjustments you don’t like. Click Reset to discard all your adjustments and start again.
9. When you’re done, click Cancel to discard your changes and dismiss the Convert To Black And White dialog box.

10. Choose Select > Inverse to select the flower again. With the Quick Selection tool still active, old down the Alt / Option key and try to remove all of the center parts of the flower from the selection, including the dark bronze-colored bases of the petals.
You can see that it’s very difficult to control the results in this situation—especially when it comes to the shadowed areas where petals overlap. This is precisely the kind of situation where the Selection Brush comes into its own.
11. Swap the Quick Selection tool for its toolbox partner, the Selection Brush. Work at high magnification while you use the Selection Brush together with the Alt / Option key to remove the central disc and its ring of darker petal bases from the selection. When you’re satisfied, choose Select > Save Selection. Name the new selection petals quick select, activate the New Selection option under Operation, and then click OK.
12. Choose File > Save As. Make sure that the image will be included in the Organizer, but not in a Version Set. Name the file 07_03_SavedSelections, to be saved to your My CIB Work folder, in Photoshop format. Click Save, and then choose File > Close.
Why won’t Photoshop Elements do what I tell it to do?
Commit is required
Cancel is required
Edits are restricted by an active selection

Move tool is required
Active layer is hidden

Active layer is locked
Wrong layer is selected (for editing text)
Replacing the color of a pictured object
Photoshop Elements offers two very different methods for switching colors in an image: the Color Replacement tool and the Replace Color dialog box. As with the Selection Brush and the Quick Selection tool, the color replacement method that will be most effective depends on the characteristics of the photo you’re working with and the extent of the change you wish to make.
Using the Color Replacement tool
The Color Replacement tool enables you to replace specific colors in your image by painting over a targeted color with another. You can use the Color Replacement tool either for localized color correction, or for creative purposes.
1. In the Organizer, use the Lesson 07 keyword tag to isolate the images for this lesson. In the Media Browser, right-click / Control-click the image 07_04.jpg, taking care not to confuse it with the Autofix copy, and choose Edit With Photoshop Elements Editor from the context menu.
2. In the Editor, click Window > Reset Panels or click the Reset Panels button (![]() ) at the top of the workspace. Hide the Project Bin by double-clicking its header bar, and then hide the Panel Bin by un-checking its name in the Window menu. Double-click the Hand tool or choose View > Fit On Screen.
) at the top of the workspace. Hide the Project Bin by double-clicking its header bar, and then hide the Panel Bin by un-checking its name in the Window menu. Double-click the Hand tool or choose View > Fit On Screen.
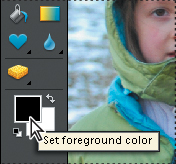
3. Click the foreground color swatch below the tools in the Toolbar to open the Color Picker. In the Color Picker, type new values in the text boxes to set the Hue (H), Saturation (S), and Brightness (B) to 325, 75, and 100 respectively. Click OK to close the Color Picker.
4. Right-click / Control-click to select the Color Replacement tool (![]() ), which is grouped in the toolbox with the Brush tool, the Impressionist Brush tool, and the Pencil tool.
), which is grouped in the toolbox with the Brush tool, the Impressionist Brush tool, and the Pencil tool.
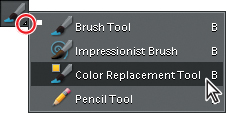
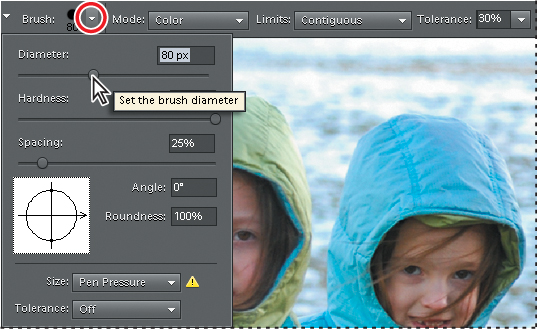
5. Click the small white arrow at the far left of the tool options bar and choose Reset Tool; then, use the Brush Picker to set the brush Diameter to 80 px. You can leave all the other options for this tool at the default settings.
You’ll use the new foreground color to brighten up the dark gray parka worn by the girl on the right, but first you need to know how the Color Replacement tool works.
The cursor for the Color Replacement tool consists of a set of cross-hairs at the center of a circle indicating the brush size. When you drag in the image, the foreground color is applied to any pixel falling inside the cursor’s circle that matches the color under the cross-hairs, within the tolerance value specified in the tool options bar.

What this means is that you can be very relaxed as you paint; as long as you keep the cross-hairs inside the area of color that you wish to replace, the circle can overlap the neighboring area without changing the color, making it easy to paint right up to the edge. Only pixels inside the circle that match the sampled color under the cross-hairs are affected.
6. Paint over the dark parka, moving slowly around the edges and always keeping the cross-hairs over the gray fabric. Stop every few seconds so that you can undo a mistake without losing too much work. For now, avoid the edge of the hood around the girl’s face and the shadowed under-side of her arm, where it rests against her sister’s orange jacket. Take extra care with the deeper seams and folds in the fabric, making sure that the cursor cross-hairs make contact with the darker shades in these areas. Work carefully, sometimes simply clicking rather than stroking, or reduce the brush size as you work by pressing the left bracket key ( [). You may need to paint over some areas twice to apply the color evenly.

7. In the tool options bar, reduce the brush diameter to 10 px, and the Tolerance value to 10%. Zoom in close to work around the edge of the hood and the lower edge of the arm, keeping the cross-hairs inside the area you wish to re-color.
8. You can now adjust the new color to better match the de-saturated tones in this image. Use the Quick Selection tool (![]() ) to isolate the re-colored parka, and then choose Enhance > Adjust Color > Adjust Hue/Saturation. Set the Saturation to -15 and the Lightness to +15; then, click OK.
) to isolate the re-colored parka, and then choose Enhance > Adjust Color > Adjust Hue/Saturation. Set the Saturation to -15 and the Lightness to +15; then, click OK.

9. Choose Enhance > Adjust Lighting > Levels. Under the Input Levels graph, move the black stop to the right to a value of 40; then, drag the grey stop to the left to a value of 1.30. Click OK and choose Select > Deselect.
10. Choose Save As. Make sure that the image will be included in the Organizer, but not grouped in a Version Set. Name the file 07_04_ReplaceColor and save it to your My CIB Work folder in JPEG format. Click Save. Click Ok to accept the JPEG options, and then close the file.
Replacing a color throughout an image
Using the Replace Color dialog box is often faster than painting with the Color Replacement tool, though it can be hard to control when the color of the object you want to change is present in other areas. Even for a difficult case, you can achieve a good result by using the Replace Color dialog box in conjunction with a selection.
In the following exercises, you’ll repaint a red toy car. You’ll make your changes on a duplicate of the Background layer, enabling you to easily compare the finished project to the original picture. First, you’ll work on the entire image, which will give you an indication of where—and how much—the color change will affect the rest of the photo. In the second stage, you’ll use a selection to restrict the changes.
1. In the Organizer, use the Lesson 07 keyword tag to isolate the images for this lesson. Right-click / Control-click the image 07_05.jpg (not the Autofix copy), and choose Edit With Photoshop Elements Editor from the context menu.
2. In the Editor, click Window > Reset Panels or click the Reset Panels button (![]() ) at the top of the workspace. Hide the Project Bin and the grouped Effects and Content panels by double-clicking their header bars; then, double-click the Hand tool or choose View > Fit On Screen.
) at the top of the workspace. Hide the Project Bin and the grouped Effects and Content panels by double-clicking their header bars; then, double-click the Hand tool or choose View > Fit On Screen.
3. In the Editor, choose Layer > Duplicate Layer and accept the default name. Alternatively, you can drag the Background layer to the New Layer button (![]() ) at the bottom of the Layers panel. By duplicating the layer, you’ll have an original to fall back on should you need it.
) at the bottom of the Layers panel. By duplicating the layer, you’ll have an original to fall back on should you need it.

4. With the Background copy layer still selected in the Layers panel, choose Enhance > Adjust Color > Replace Color.
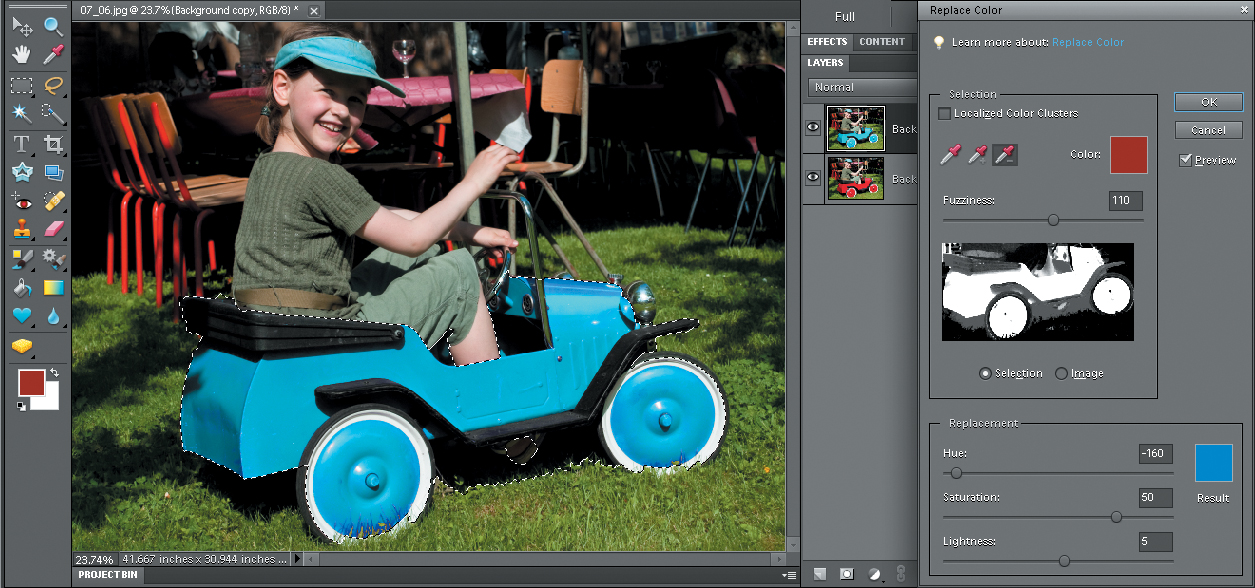
5. In the Replace Color dialog box, make sure that the Eyedropper tool—the left-most of the three eyedropper buttons—is activated, and that Fuzziness is set to the default value of 40. Activate the Image option below the preview thumbnail, and make sure that the Preview option is activated so that you’ll be able to see the results of your adjustments in the Edit pane as you work.

6. Move the pointer over the thumbnail preview in the Replace Color dialog box and click once with the eyedropper on the sunlit side of the toy car. Change the preview option from Image to Selection, so that you can see the extent of the color selection you just made indicated as white areas on a black background.
7. Below the selection preview, either use the sliders or type in the text boxes to set the Hue, Saturation, and Lightness values to –160, +50, and +5 respectively.
8. To adjust the area of selected color—or color-application area—start by clicking the second of the three eyedropper buttons to switch the Eyedropper tool to Add To Sample mode, and then click in the main image window in a few areas where the paint on the car still appears red.
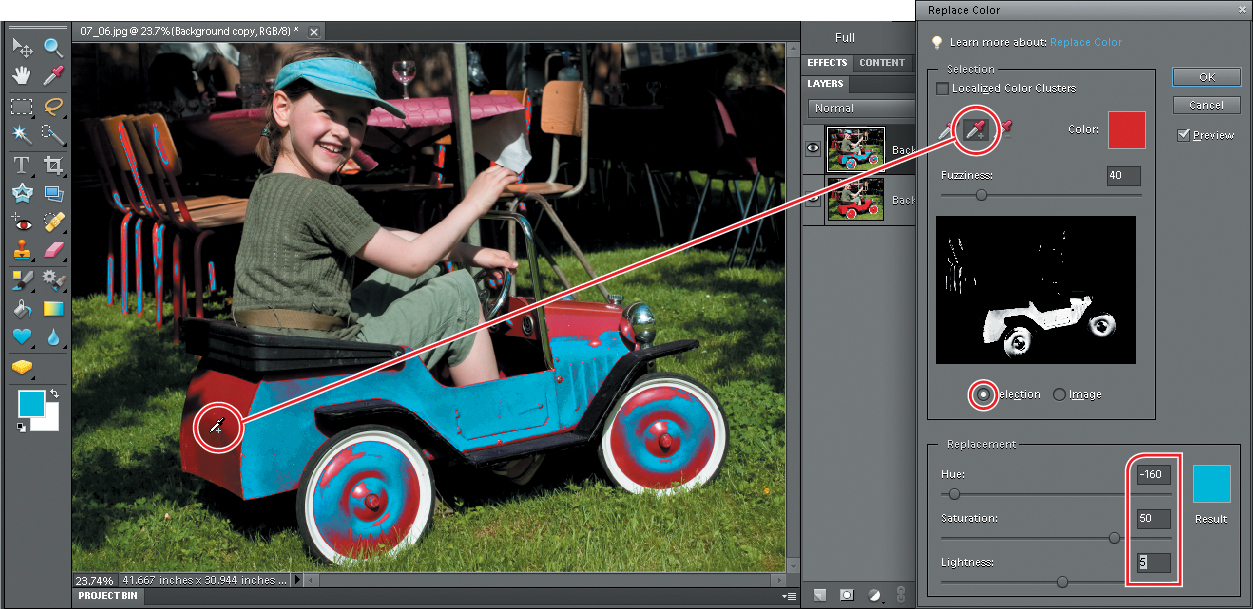
9. Use the Add To Sample eyedropper again, if necessary, and then drag the Fuzziness slider left and right and until you have full coverage on the car. In both the Edit pane and the black and white selection preview, you can see that it’s not possible to change the color of the car using this technique without affecting much of the background, and even the girl’s skin.

10. Click Cancel to close the Replace Color dialog box.
Replacing a color in a limited area of an image
In this exercise you’ll limit the color change to a selected area of the photograph.
1. Make sure the Background copy layer is still selected in the Layers panel. In the toolbox, select the Rectangular Marquee tool and drag a rectangular selection marquee just big enough to surround the car.
2. In the toolbox, switch to the Quick Selection tool (![]() ). In the tool options bar, click the tool variant at the right to set the Quick Selection tool to Subtract From Selection mode. In the Brush picker, set the brush diameter to 50 pixels.
). In the tool options bar, click the tool variant at the right to set the Quick Selection tool to Subtract From Selection mode. In the Brush picker, set the brush diameter to 50 pixels.
3. Use the Quick Selection tool to subtract the girl’s clothing and leg from the rectangular selection. Trim away the red chair legs in the upper left corner and as much of the sunlit grass around the car as possible. Subtract the portion of the girl’s foot that’s visible beneath the car. If you go too far and need to add areas back into the selection, simply hold down the Shift key as you work to switch the Quick Selection tool temporarily to Add To Selection mode.

Don’t be too concerned about the small amount of grass overlapping the car’s wheels; within the constraints of our exercise, there’s not a lot we can do about it.
4. Choose Enhance > Adjust Color > Replace Color. Using the techniques and settings you used in steps 5 to 9 of the previous exercise, change the color of the car. Be sure to follow the steps in order; you need to sample the original red before setting hue, saturation, and brightness to define the replacement color.
5. When you’re satisfied with the results, click OK to close the Replace Color dialog box; then choose Select > Deselect, or press Ctrl+D / Command+D.
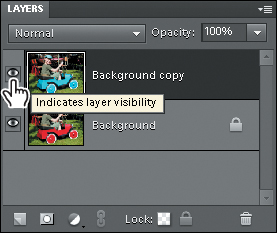
6. To compare the edited image with the original, toggle the visibility of the Background copy layer by clicking the eye icon beside the layer thumbnail. When you’re done, be sure to leave the visibility for the new layer switched on.
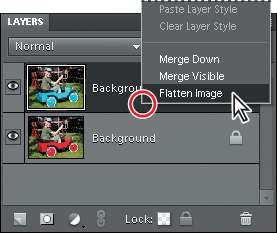
7. Right-click / Control-click the Background copy layer and choose Flatten Image from the context menu. Alternately, you could choose the Flatten Image command from the Layers panel Options menu at the right of the panel’s header bar. The image is flattened to a single layer; the layer you edited replaces the original background layer.
8. Choose File > Save As. Name the file 07_05_ReplaceColor and save it to your My CIB Work folder in JPEG format. Make sure that the image will be included in the Organizer, but not grouped in a Version Set. Click Save, accept the JPEG Options settings, and then close the file.
About printing color pictures
Color problems in your photos can result from a variety of causes, such as incorrect exposure, the quality of the camera, artificial lighting, or even weather conditions. If an image is flawed, you can usually improve it by editing it with Photoshop Elements, as you did with the images in this lesson. Sometimes, however, pictures that look great on your computer don’t turn out so well when you print them; fortunately, there are things you can do to make sure that what you get from the printer is as close as possible to what you see on screen.
Firstly, it’s important that you calibrate your monitor regularly, so that it’s set to display the range of color in your photographs accurately. However, even with a correctly calibrated display, your prints may still look disappointing if your printer interprets color information differently from your computer. You can correct this problem by activating the appropriate type of color management.
Working with color management
Moving a photo from your camera to your monitor and from there to a printer can cause an apparent shift in the colors in the image. This shift occurs because every device has a different color gamut or color space—the range of colors that the device is capable of interpreting and reproducing.
To achieve consistent color between digital cameras, scanners, computer monitors, and printers, you need to use color management. Color management software acts as an interpreter, translating colors so that each device can reproduce them in the same way. This software knows how each device and program understands color, and adjusts colors so that what you see on screen is similar to the colors in your printed image. It should be noted, however, that not all colors may match exactly.
Color management software calls on device-specific color profiles: mathematical descriptions of each device’s color space. If these profiles are compliant with the standards of the ICC (International Color Consortium), they will help you maintain consistent color. When you save a file, activate Embed Color Profile in the Save As dialog box. In Photoshop Elements, you can access the color management controls from the Edit menu in both the Organizer and the Editor.
Setting up color management
1. Choose Edit > Color Settings; then, select one of these color management options in the Color Settings dialog box:
• No Color Management uses your monitor profile as the working color space. It removes any embedded profiles when opening images, and does not apply a profile when saving.
• Always Optimize Colors For Computer Screens uses sRGB as the working color space, preserves embedded profiles, and assigns sRGB when opening untagged files.
• Always Optimize For Printing uses Adobe RGB as the working color space, preserves embedded profiles, and assigns Adobe RGB when opening untagged files.
• Allow Me To Choose lets you choose whether to assign sRGB (the default) or Adobe RGB when opening untagged files.

2. Click OK to close the Color Settings dialog box.
Further information on color management, including monitor calibration, can be found in a series of topics in Photoshop Elements Help.
Congratulations, you’ve completed another exercise. You’ve learned a wide variety of techniques for working with color in your photos—from tweaking automatic corrections to switching the color of a pictured object. You’ve gained a lot of experience in all three Edit modes and honed your selection skills—essential for many sophisticated and creative color edits. Now, take a minute to refresh your knowledge by reading through the review questions and answers on the following page.
Review questions
1. How does the Color Variations command help you correct color problems in a photo?
2. What makes selections so important for adjusting color?
3. Name at least two selection tools and describe how they work.
4. How does the Color Replacement tool work?
Review answers
1. The Color Variations command provides a very visual, intuitive approach to color correction—making it especially useful when you know that you don’t like the color in your photo, but are unsure of what you need to do to fix it. The Color Variations dialog box includes a before and after preview, and an array of image thumbnails that show you just how your image will look if you tweak one color component or another. You can set the controls to deal with saturation, shadows, midtones, or highlights.
2. A selection defines an area as the only part of a layer that can be altered. The areas outside the selection are protected from change for as long as the selection is active. This enables you make adjustments selectively, targeting specific areas or objects.
3. The first selection tool you used in this lesson is the Selection Brush tool, which works like a paintbrush. The Quick Selection tool is similar, but is in most cases a faster, more flexible option. There are more selection tools than are discussed in this lesson: The Magic Wand tool selects areas with the same color as that on which you click. The Rectangular Marquee tool and the Elliptical Marquee tool make selections of a fixed geometric shape. The Lasso tool lets you draw free-form selections, and the Magnetic Lasso tool helps to draw complicated selections around even irregular object edges. The Polygonal Lasso tool is the tool of choice for selecting straight-sided objects.
4. The Color Replacement tool samples the color under the pointer and replaces it with any color that you choose. The cursor for the Color Replacement tool consists of cross-hairs at the center of a circle indicating the brush size. When you drag in the image, the color under the cross-hairs is sampled continuously and the foreground color is applied to any pixel inside the circle that matches the sampled color, within the tolerance value specified in the tool options bar. As long as you keep the cross-hairs inside the area of color that you wish to replace, you can overlap the adjacent area without changing the color, making it easy to paint right up to the edge.