
6. Easy Editing
Lesson Overview
Photoshop Elements offers a suite of easy-to-use tools and a choice of three editing modes that make it easy to achieve impressive results, whatever your level of experience. The Guided Edit mode helps digital imaging novices to learn as they work, Quick Edit presents an array of one-touch controls for correcting some of the most common image problems, and Full Edit mode delivers all the power and sophistication experienced users expect from a Photoshop application.
This lesson takes you on a test drive of the three editing modes, and then introduces you to a range of quick and easy techniques to help you get more from your photos in just a few clicks:
• Making quick and easy edits in the Organizer
• Batch-processing photos
• Using automatic options to improve images
• Working in Guided Edit mode
• Making Quick Edit adjustments
• Using adjustment previews to modify settings
• Applying editing presets with the Smart Brush
• Correcting an image using Smart Fix
• Using the image canvas to create a border
You’ll probably need about one and a half hours to complete this lesson.

Explore the many powerful and versatile tools and options that make it easy to get more from your photos in Photoshop Elements—even if you’re a beginner. Start with a few of the easy-to-use, one-step image correction features, and then experiment with a few more advanced techniques, such as layering preset adjustments with the Smart Brush.
Getting started
You can start by importing the sample images for this lesson to the CIB Catalog that you created at the beginning of Lesson 1.
1. Start Photoshop Elements and click Organize in the Welcome Screen. When the Organizer opens, make sure that your CIB Catalog is loaded (if you need to refresh your memory, refer to step 2 in the Getting Started section in Lesson 5).
2. Choose File > Get Photos And Video > From Files And Folders. In the Get Photos And Videos From Files And Folders dialog box, locate and select your Lesson06 folder. Activate the option Get Photos From Subfolders and disable the automatic processing options; then, click Get Media.
3. In the Import Attached Keyword Tags dialog box, select the Lesson 06 tag, and then click OK. Click OK to close any other alert dialog box.
Before you start working on this lesson, make sure that you’ve installed the software on your computer from the application CD (see the Photoshop Elements 10 documentation) and that you have correctly copied the Lessons folder from the CD in the back of this book onto your computer’s hard disk (see “Copying the Classroom in a Book files” on page 2). You should also have created a working catalog (see “Creating a new catalog” on page 8).
Editing photos in the Organizer
Some of the easiest and most convenient ways to quickly fix many of the most common image problems are at your fingertips, without even leaving the Organizer.
1. In the Media Browser, select the image DSC_2076.jpg. Click the Fix tab at the top of the Task pane; then, click the Auto Smart Fix button. The edited file is grouped with the original in a Version Set. In the Media Browser, the edited version appears as the top image in the collapsed (or closed) Version Set. Click the arrow at the right of the image frame to expand the Version Set.
2. In the expanded Version Set, select the original photo, DSC_2076.jpg, in its un-edited state. On the Fix tab, click the Auto Color button. Repeat the process for the Auto Levels button, and then again for the Auto Contrast button.
The most recent edited version always appears at the left in an expanded version set and becomes the top image when the Version Set is collapsed.
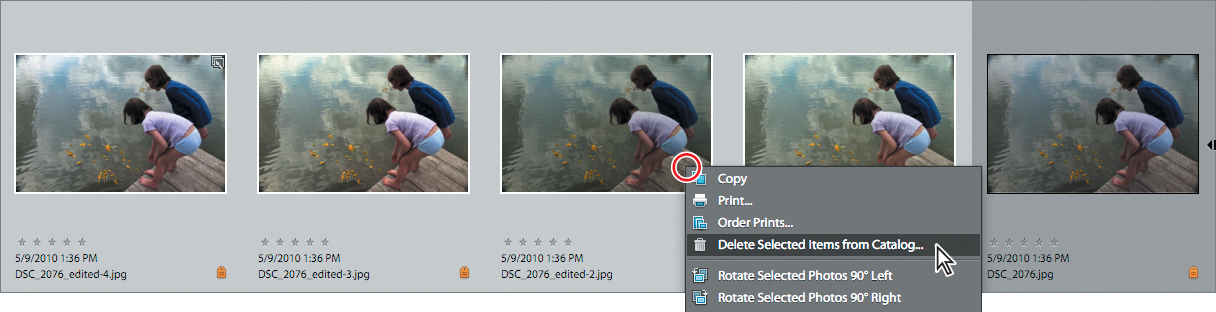
3. Double-click the original image to see it in the single image view. Use the left arrow key on your keyboard to compare the un-edited photo with the results of your single-click adjustments. Double-click the enlarged image to return to the thumbnail view. Select all four edited versions; then, right-click / Control-click any of the selected thumbnails and choose Delete Selected Items From Catalog.
4. In the Confirm Deletion From Catalog dialog box, click to activate the option Also Delete Selected Item(s) From The Hard Disk; then, click OK. Click the Organize tab above the Task pane.
Editing in Full Screen mode
Full Screen mode in the Organizer provides access to the same automatic editing commands you’ll find on the Fix tab. The controls in the Full Screen mode Quick Edit panel enable you to make substantial improvements to an image with just a click or two and assess the results at a conveniently high zoom level.
1. In the Media Browser, select the image DSC_3583.jpg. Click the View, Edit, Organize In Full Screen button (![]() ) above the Find bar.
) above the Find bar.
2. Hold the Ctrl / Command key and press the Plus key (+) on your keyboard to zoom in. Click anywhere in the photo and drag to reposition the view. Double-click the image to fit the photo to the screen.
3. Move the pointer to the upper left edge of the screen to show the Quick Edit panel; then, click to deactivate the Auto Hide button at the top of the panel’s title bar, so that the Quick Edit panel remains open while you work.

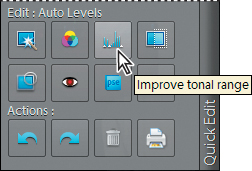
4. In the Quick Edit panel, hold the pointer over each button in turn to see a tooltip describing the effect it will have on the photo. Click the Auto Levels button, and then click the Auto Red Eye Fix button. Click OK to accept the creation of a new Version Set.
5. Click to re-activate the Quick Edit panel’s Auto Hide button, and then move the pointer away; the Quick Edit panel closes after a second or so.

You’ve improved this photo dramatically with just two clicks, without leaving the Organizer.
You can use the Quick Edit panel to correct image problems even while reviewing your photos as a full-screen slideshow.
6. Press the Esc key, or click the Close button (x) in the control bar to exit Full Screen mode. In the Media Browser, expand the new Version Set; then, right-click / Command-click the edited version of the image and choose Delete From Catalog from the menu. In the Confirm Deletion From Catalog dialog box, activate the option Also Delete Selected Item(s) From The Hard Disk; then, click OK. You’ll be using a different technique to fix this photo later in the lesson.
Getting to know the Edit modes
For some photos, applying one-click fixes in the Organizer will be enough, but when you want more control—and access to the full power of Photoshop Elements editing, adjustment and correction tools—you’ll work in the Editor. In the rest of this lesson you’ll improve images in each of the three Editor modes: Full Edit, Quick Edit, and Guided Edit. Before you continue with the exercises, you can take a few minutes to familiarize yourself with switching between the three working modes, and to get an overview of the different editing workspaces.
Full Edit mode
1. Select two or three images in the Media Browser; then, click the small arrow on the Fix tab at the top of the Task Pane and choose Full Photo Edit from the menu.

2. In Full Edit mode, choose Window > Reset Panels or click the Reset Panels button (![]() ) at the top of the workspace. By default, the Effects, Content, and Layers panels are open in the Panel Bin.
) at the top of the workspace. By default, the Effects, Content, and Layers panels are open in the Panel Bin.
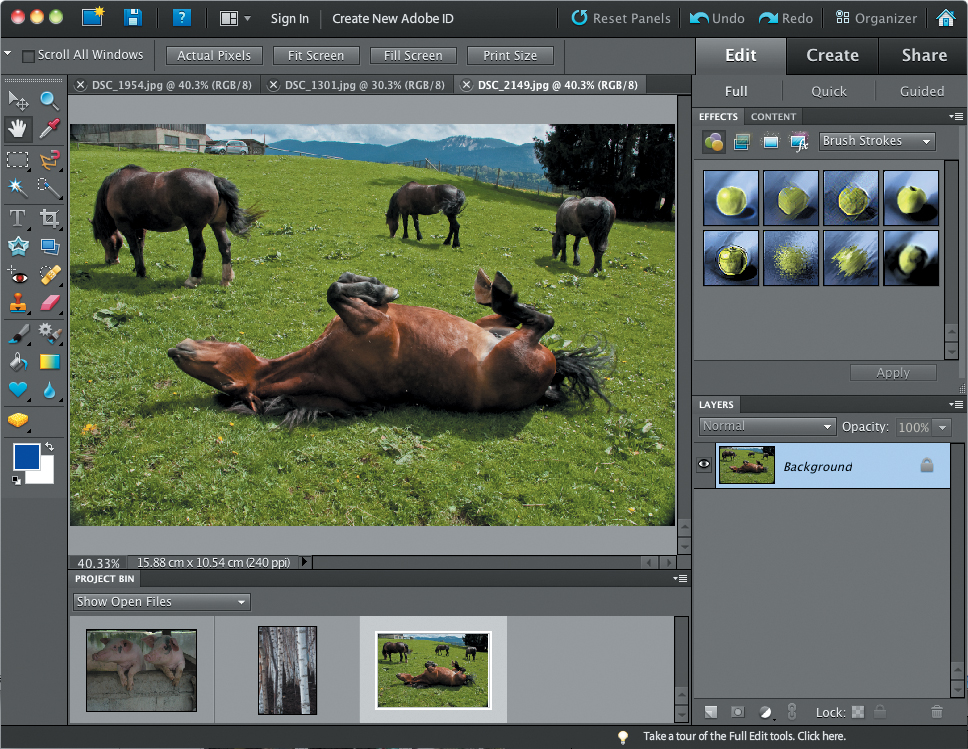
The Full Edit mode is Photoshop Elements’ most powerful and versatile image editing environment, with commands for correcting exposure and color and tools for making precise selections and fixing image imperfections. The Full Edit tool bar even includes painting and text editing tools. You can arrange the flexible Full Edit workspace to suit the way you prefer to work by floating, hiding, and showing panels.
The Project Bin below the Edit pane displays thumbnails of the photos you opened for editing. In the Project Bin menu, you can also choose to display files currently selected in the Organizer, or show the contents of any of your albums.
3. Click a thumbnail in the Project Bin to select an image. Double-click a thumbnail to bring that image to the front. At the top of the Edit pane, the name tab of the foremost image is highlighted. Click another name tab to bring that photo to the front.
In this lesson you will not be working with floating image windows. If your images open in floating windows, choose Images > Consolidate All To Tabs from the Window menu.
4. Drag any panel out of the Panel Bin by its header bar, to float the panel wherever you like in the workspace. Click the Close button (x) in the header bar of the floating panel to close it.
5. Choose the name of the panel you just closed from the Window menu. Check-marks are displayed beside the names of panels that are currently open. Drag the re-opened floating panel back into the Panel Bin. You can dock the panel as part of a tabbed panel group by dragging it to the header of another panel, or drop it between the frames of other panels. Whichever way you choose, release the mouse button when a blue line appears to highlight the targeted position.
You can review the techniques for working with panels in “Using panels and the Panel Bin” on page 20.
6. Experiment with dragging the Toolbox and Project Bin to float over the Edit pane, and then re-docking them. When you’re done exploring, click the Reset Panels button (![]() ), and then click the Quick Edit tab at the top of the Panel Bin.
), and then click the Quick Edit tab at the top of the Panel Bin.
Quick Edit mode
Each Edit mode offers a different set of tools, controls and views. In Quick Edit mode, the Panel Bin is occupied by the Quick Fix panel, with separate panes for Smart Fix, Lighting, Color, Balance, and Sharpness controls.

In Quick Edit mode you cannot add, remove or float panels. To clear extra screen space, collapse the Project Bin by double-clicking its header bar and hide the Toolbox by un-checking Tools in the Window menu.
1. Choose a Before & After view option from the View menu below the Edit pane.
2. Collapse and expand any of the control panes in the Quick Fix panel by clicking the triangle at the left of the header of that pane.
3. Click the small black arrow to the right of any control slider. A grid of preview thumbnails is displayed, showing the full range of variation possible with that control. A white frame highlights the current setting. Move the pointer slowly over each preview thumbnail in the grid to see that level of adjustment applied temporarily to your image in the After view.

4. Click the Reset button at the bottom of the Quick Fix panel to discard any changes you’ve made. Click the Reset Panels button (![]() ), and then click the Guided Edit tab at the top of the Panel Bin.
), and then click the Guided Edit tab at the top of the Panel Bin.
If you’re new to digital imaging, the Guided Edit mode enables you to learn as you work, making it a great starting point for fixing and modifying your photos.
Guided Edit mode
In Guided Edit mode the Panel Bin displays the Guided Edit panel, with grouped listings for a wide range of common—and not-so-common—image editing tasks.
1. Click any listing to find simple step-by-step instructions and any tools or controls that you’ll need for that task. Try several of the guided procedures.

In Guided Edit mode you can’t add, remove or float panels or image windows as you would in Full Edit mode. To clear extra screen space, you can collapse the Project Bin by double-clicking its header bar.
2. When you’re done experimenting, choose File > Close All. Click Don’t Save to discard any changes you made, keeping the images intact for the next exercise.
Making easy color and lighting adjustments
Many of the photographs used for the lessons in this book were chosen to illustrate common image faults that people face every day as they try to make the most of their photographs. Artificial light, unusual conditions, and incorrect camera settings can all result in tonal imbalances and unwelcome color casts in an image. You can make adjustments using the simple controls in Quick Edit mode, let the Guided Edit mode step you through a wide range of editing tasks, perform sophisticated edits selectively in Full Edit mode—or even have Photoshop Elements batch-process your photos, applying your choice of automatic corrections.
Fixing files automatically in batches
In this exercise, you’ll batch process all the image files used in this lesson. You’ll save the auto-adjusted files as copies so that at the end of each project you can compare these automatic results to the edits you’ve made using other techniques.
1. Make sure you’re in Full Edit mode; then choose File > Process Multiple Files. Under Quick Fix, at the upper right of the Process Multiple Files dialog box, click the checkboxes to activate all four of the auto-fix options: Auto Levels, Auto Contrast, Auto Color, and Sharpen.
2. At the left of the dialog box, choose Folder from the Process Files From menu. Under Source, click the Browse button; then, locate and select the Lesson06 folder as the source folder for the images to be processed. Click OK / Choose. Under Destination, use the same method to set the My CIB Work folder as the destination for the processed copies.
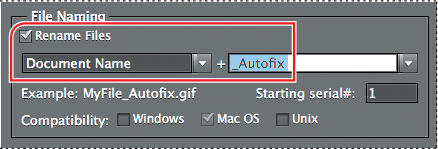
3. Under File Naming, activate the Rename Files option. Choose Document Name from the menu on the left, and then type _Autofix in the second field. This will add the appendix “_Autofix” to the existing document names as the processed copies are saved.
4. Review the settings in the dialog box. Make sure that the options Resize Images and Convert Files are disabled, and then click OK.
For Windows users; ignore any alert warning that files could not be processed. This is caused by a hidden system file and has no effect on the success of your project.
Photoshop Elements goes to work, automatically opening and closing image windows. All you need to do is sit back and wait for the process to finish. The newly copied files are automatically tagged with the same keywords as the source files.
Adding the auto-corrected files to your catalog
When you modify an image in the Editor, the Include In Organizer option in the Save and Save As dialog boxes is activated by default. However, when you batchedit files with the Process Multiple Files command, this option isn’t part of the process—you must add the edited copies to the Organizer manually.
1. Switch to the Organizer; then, choose File > Get Photos And Videos > From Files And Folders. In the Get Photos From Files And Folders dialog box, locate and open your My CIB Work folder, and then Ctrl-click / Command-click or marquee-select all the files with the suffix “_Autofix.”
2. Activate Automatically Fix Red Eyes and disable any other automatic processing option that is currently active; then, click Get Media. If the Auto Red Eye Fix Complete dialog box appears, click OK to accept the creation of a Version Set.
3. In the Import Attached Keyword Tags dialog box, click Select All, and then click OK. Click OK to dismiss any other dialog box.
The files are imported to your CIB Catalog and the Organizer displays thumbnails of the newly added images in the Media Browser.
Correcting a photo in Quick Edit mode
In the Quick Edit mode, Photoshop Elements conveniently groups easy-to-use slider controls for many basic image correction operations and presents them in the Quick Fix panel.
Previously you applied a combination of automatic fixes using the Process Multiple Files command. In this exercise, you’ll use some of the same automatic fix options one at a time, enabling you to see how each step affects an image and giving you the opportunity to fine-tune the default settings.
1. You should be in the Organizer from the last exercise; isolate the lesson images by activating the Find box beside the Lesson 06 tag in the Keyword Tags panel.
2. Select the original photo of the perfume bottles, DSC_2474.jpg, making sure not to confuse the original file with the autofix copy; then, click the small arrow on the Fix tab at the top of the Task Pane and choose Quick Photo Edit. Wait while the image opens in the Editor.
Using Smart Fix
In the Quick Edit workspace, the Quick Fix panel at the right contains five adjustment panes—Smart Fix, Lighting, Color, Balance, and Sharpness.
Smart Fix is actually a combination of several adjustments applied at once; it corrects overall color balance and improves shadow and highlight detail. As with the other tools in Quick Edit mode, you can click the Auto button to apply the correction automatically, use the slider control to fine-tune the adjustment manually, or combine these methods, as you’ll do in this exercise.
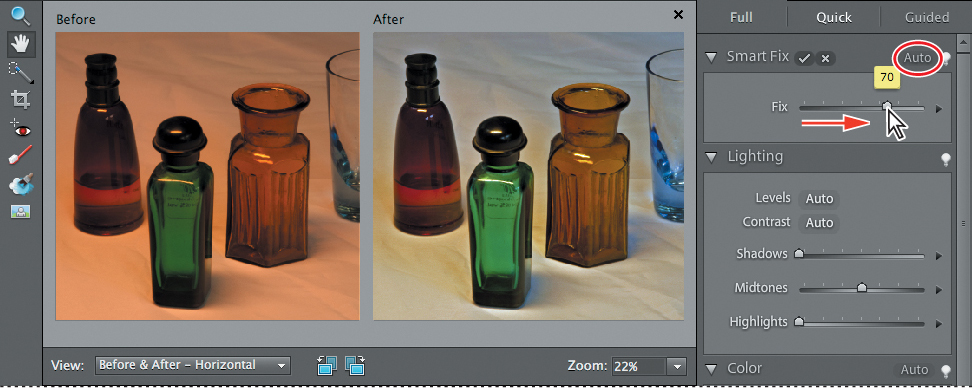
1. Choose Before & After - Horizontal from the View menu below the Edit pane. In the Quick Fix panel, click the Auto button in the Smart Fix pane. Notice the immediate effect on the image in the After view.
2. Now, move the Smart Fix Amount slider to change the color balance and the highlight and shadow settings for your image. Experiment to find the setting you prefer. We set the Smart Fix Amount to a value of 70.
3. Click the Commit button (![]() ) in the header of the Smart Fix pane to commit the changes.
) in the header of the Smart Fix pane to commit the changes.
Applying more automatic fixes
Four more automatic Quick Fix adjustments are available in the Lighting, Color, and Sharpness panes. (There is no Auto Balance adjustment.)
1. In the Lighting pane, click both the Auto Levels and Auto Contrast buttons. You may or may not see a significant shift in the tonal balance of this image, depending on the adjustment you made with the Smart Fix edit.
2. Click the Auto Color and Auto Sharpness buttons, noting the effects of each of these adjustments in the After view.
3. In the Quick Fix Color pane, click the small black arrow to the right of the Saturation slider.
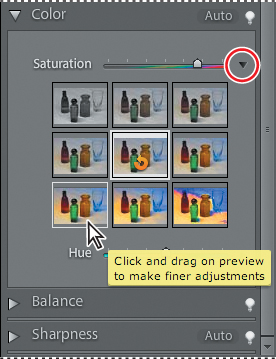
Click a thumbnail to apply the respective level of adjustment; drag left or right to fine-tune the adjustment. The Quick Fix previews not only provide a intuitive editing interface but also make a great way to learn about the effects of the various adjustment controls as you work with them.
A grid of nine preview thumbnails shows the full range of variation possible with the Saturation slider. A white frame highlights the central preview thumbnail, which represents the current saturation setting.
4. Move the pointer slowly over each preview thumbnail in the grid to see that level of saturation applied temporarily to your image in the After view.
5. Experiment with the slider controls and Quick Fix preview grids in each pane of the Quick Fix panel. When you’re satisfied with an adjustment, click the Commit button (![]() ) in the title bar of that pane to accept the changes. If you wish to undo your modifications and start again with the original version of the image, click the Reset button at the bottom of the Quick Fix panel.
) in the title bar of that pane to accept the changes. If you wish to undo your modifications and start again with the original version of the image, click the Reset button at the bottom of the Quick Fix panel.
6. When you’ve achieved the results you want, choose File > Save As. In the Save As dialog box, activate the option Include In The Organizer and disable Save In Version Set With Original. Save the file to your My CIB Work folder, in JPEG format. Type DSC_2474_Quick as the file name; then, click Save. In the JPEG Options dialog box, choose High from the Quality menu, and then click OK. Choose File > Close.
Fixing color and lighting in Guided Edit mode
If you’re a newcomer to digital image editing, the Guided Edit mode is a great place to start. By letting Photoshop Elements step you through the process of improving your photos you’ll not only achieve impressive results quickly, but also learn a lot about image problems and solutions as you work. Even experienced users will enjoy the ease of working in Guided Edit mode—and may just pick up some new tricks.
For this exercise, you’ll work once again with the image of the old perfume bottles, which has an obvious color cast as a result of inadequate artificial lighting.
1. If you’re not already in the Organizer, switch to it now by clicking the Organizer button (![]() ) at the top right of the Editor workspace. If necessary, use the Lesson 06 tag to isolate the Lesson 6 images in the Media Browser.
) at the top right of the Editor workspace. If necessary, use the Lesson 06 tag to isolate the Lesson 6 images in the Media Browser.
As you try more advanced tasks in Photoshop Elements 10, you may find that you need more information to solve any problems you encounter.
For help with some common problems you might have while working through the lessons in this book, see the section “Why won’t Photoshop Elements do what I tell it to do?” in Lesson 7.
2. Select the photo of the perfume bottles, DSC_2474.jpg, making sure not to confuse the original file with the edited copies. Click the small arrow on the Fix tab at the top of the Task Pane and choose Guided Photo Edit from the menu.
3. From the View menu at the left of the bar below the Edit pane, choose the Before & After - Horizontal view. If necessary, click the triangle to expand the Color And Lighting pane in the Guided Edit panel. Click Remove A Color Cast.
4. Read the instructions under Correct Color Cast. Then, using the Color Cast Eyedropper tool, click the bright area in the lower left corner of the Before image to remove the color cast. Notice the change in the After image.
If you’re not satisfied with the result, click the Reset button in the Correct Color Cast pane, and then click a different point in the Before image with the Color Cast Eyedropper.

5. When you’re satisfied with what you see in the After image, click Done.
As is often the case with poorly exposed photos, this photo has more than just one problem. Although the color cast has been removed, the image is still quite flat and dull; it would obviously benefit from some lighting adjustments.
6. If necessary, expand the Color And Lighting pane in the Guided Edit panel so that you can see the options in that group, and then click Lighten Or Darken. In the Lighten Or Darken A Photo controls, click the Auto button. Notice the substantial improvement in the appearance of the image.
7. Use the Lighten Shadows, Darken Highlights, and Midtone Contrast sliders to fine-tune the lighting for this image. We set a value of 50 for Lighten Shadows, left the Darken Highlights slider at 0, and set Midtone Contrast to a value of 70.
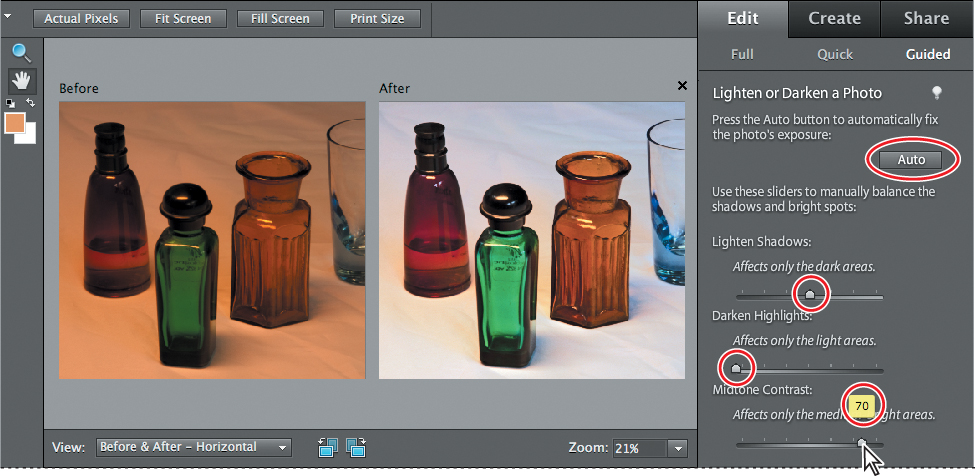
Your choice of settings may differ from those illustrated, depending on the results of your color correction step 4, and your preferences for the look of the final image.
8. When you’re satisfied with the results of your lighting adjustment, click Done.
9. In the Guided Edit panel, click Sharpen Photo in the Basic Edits group. Click the Auto button near the top of the Sharpen Photo pane. Use the slider to fine-tune the sharpening to your liking, and then click Done.
To be able to recognize and avoid the image artifacts that can result from over-sharpening, sharpening is best applied at a magnification of 100%. Use the menu below the Edit pane to change the display to the After Only view, and then choose View > Actual Pixels.
10. Choose File > Save As. Activate Include In The Elements Organizer and disable Save In Version Set With Original. Name the file DSC_2474_Guided, to be saved to your My CIB Work folder. Leaving the JPEG file format selected, click Save. In the JPEG Options dialog box, choose from the Quality menu, and then click OK. Choose File > Close, and then switch back to the Organizer.
With just a few clicks you’ve improved the appearance of the photo dramatically. You don’t need to have prior experience using an image editor to get good results in Guided Edit mode.
Try the Guided Activities—Touch Up Scratches And Blemishes, Guide For Editing A Photo, and Fix Keystone Distortion—with some of your own photos. Each of these procedures will step you through several image editing tasks in the order recommended to achieve professional-looking results.
Creative fun with Guided Edit
The Guided Edit panel offers far more than just correction and retouching tasks. The Photomerge pane includes procedures for combining multiple photos, and the Lens Effects, Photography Effects and Photo Play panes let you experiment with a range of striking and unusual creative treatments for your photos.
1. From the Lesson 6 images in the Media Browser, select the original image of the girls on unicycles, making sure not to confuse it with the _Autofix copy. Click the arrow on the Fix tab and Choose Guided Photo Edit from the menu.
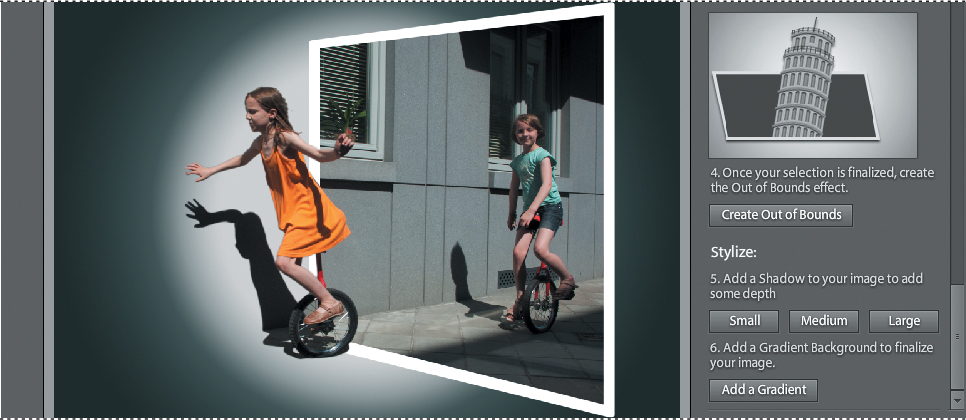
2. Hide the Project Bin; then click the Fit Screen button above the Edit pane. In the Guided Edit panel, expand the Photo Play pane and click Out Of Bounds.
3. Follow the instructions in the Guided Edit panel. Start by clicking Add A Frame, and then let Guided Edit step you through the process of setting up the frame as you see in the illustration below. When you’re happy with the frame, click the green Commit button (![]() ) at the lower right corner.
) at the lower right corner.
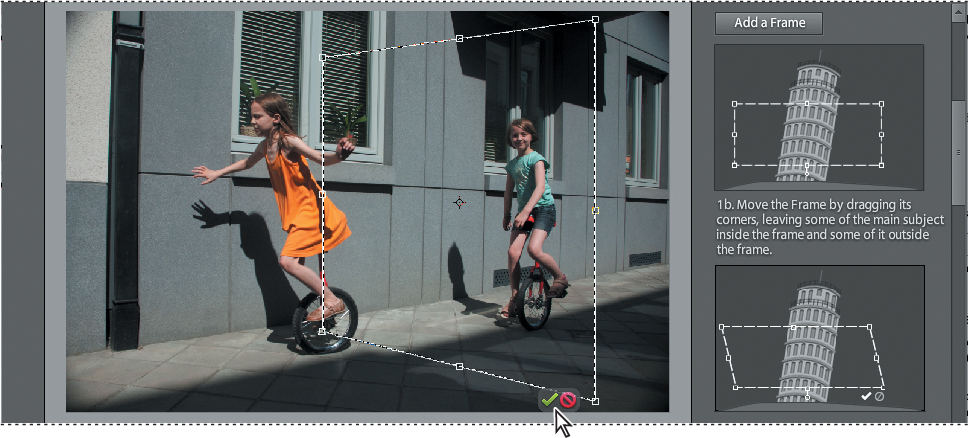
4. Continue with the guided steps until you can replicate something similar to what you see in the illustration below; then, click Done. Don’t be discouraged if you need a few attempts—with a little practice you’ll get great results.
Remember these pointers when you’re using the Quick Selection tool during this guided edit:
• Use Ctrl / Command+[ to decrease the brush size, Ctrl / Command+] to increase it.
• Hold down the Alt / Option key to subtract from the selection.
• Difficult selections can be made much easier by making use of the Auto-Enhance and Refine Edge options in the tool options bar above the Edit pane.
5. Choose File > Save As. Activate the Include In The Elements Organizer option, disable Save In Version Set With Original, name the file, and save it to your My CIB Work folder. Close the file.
Experiment with the other guided edits in the Lens Effects, Photography Effects and Photo Play groups. Apply these effects as they come, use them as inspiration, or treat them as a starting point for further editing in the Full Edit mode. Photoshop Elements 10 introduces several new creative guided photo treatments.
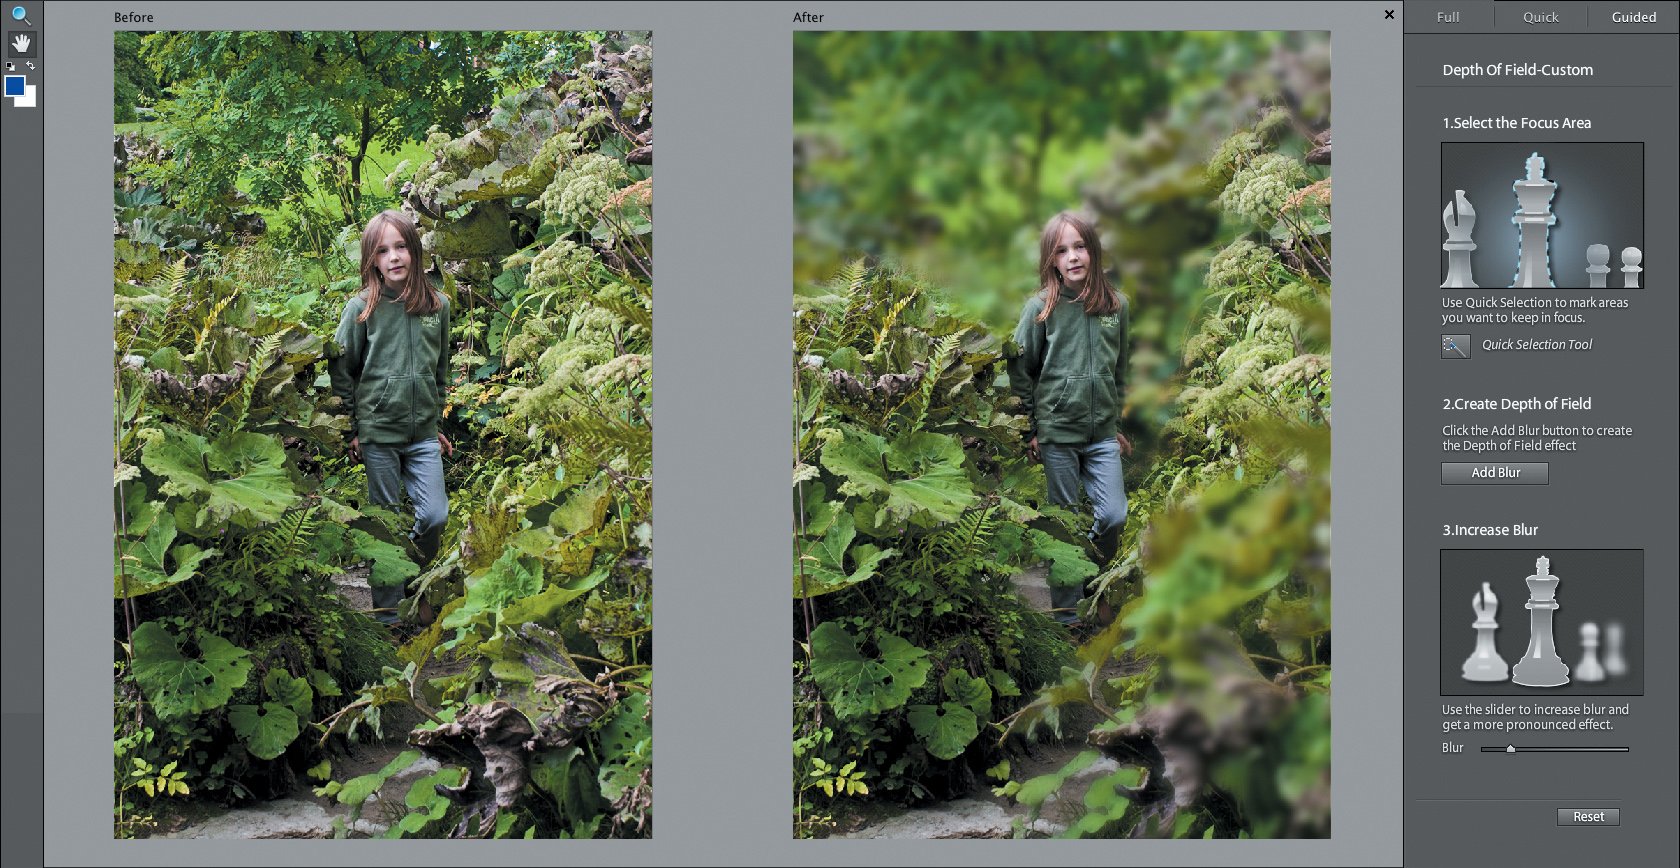
In the Lens Effects category, Depth Of Field offers a choice of Simple or Custom modes, enabling you to create a depth of field effect by masking the image elements you wish to appear sharply focused, while applying a blur to the rest of the image.
The Orton Effect, in the Photography Effects group, combines an out-of-focus glow and intensified color to produce an evocative, dreamy effect in your photos.

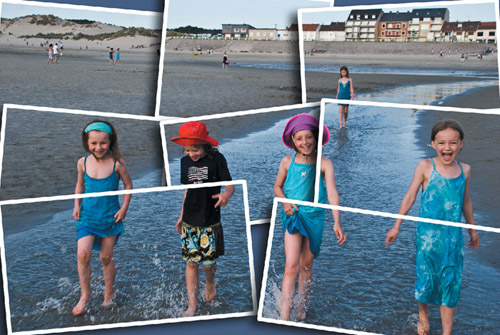
In the Photo Play category, you’ll find the Picture Stack treatment, which turns your image into a scattered stack of photos. As with all the Guided Edit effects, you can fine-tune the result using the tools and controls provided, together with tips and instructions, on the Guided Edit tab.
Selective editing with the Smart Brush
Sometimes the best way to enhance a photo is to modify just part of the image, or to treat separate areas—such as background and foreground elements—differently, rather than applying an adjustment to the whole photo.
The quickest and easiest way to do this is to paint your adjustments directly onto the image with the Smart Brush tool.
The Smart Brush is both a selection tool and an image adjustment tool—as you paint, it creates a selection based on similarities in color and texture, through which your choice of editing preset is applied.
1. In the Organizer, make sure that the Lesson 6 images are isolated in the Media Browser. Double-click the image DSC_8492.jpg—a photo taken on a dull day in Venice—to see it in the single image view. Use the left and right arrow keys on your keyboard to compare the enlarged image with its _Autofix copy.
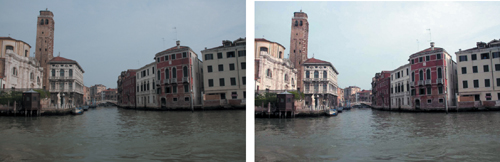
Although the automatic adjustments have brightened the photo and increased its contrast, the result still appears flat, and the sky has become over-exposed, lacking in color and detail. This image is a good candidate for some selective editing.
2. Make sure that you are viewing the original, un-edited photo; then, click the arrow on the Fix tab and choose Full Photo Edit from the menu. In Full Edit mode, click the Reset Panels button (![]() ) at the top of the workspace. Hide the grouped Effects and Content panels, and the Project Bin, by double-clicking their header bars; then, choose View > Fit On Screen.
) at the top of the workspace. Hide the grouped Effects and Content panels, and the Project Bin, by double-clicking their header bars; then, choose View > Fit On Screen.
3. Select the Smart Brush (![]() ) from the toolbox. If the Smart Brush presets picker doesn’t open automatically, click the white triangle beside the small square thumbnail in the tool options bar above the Edit pane.
) from the toolbox. If the Smart Brush presets picker doesn’t open automatically, click the white triangle beside the small square thumbnail in the tool options bar above the Edit pane.

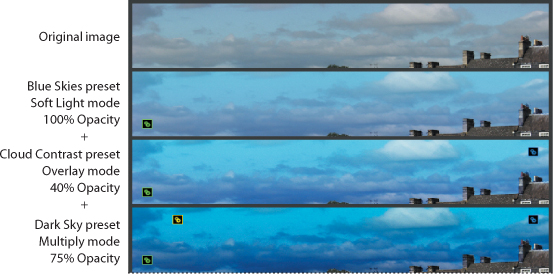
4. Drag the Smart Brush adjustment presets picker away from the tool options bar to float in a position where it won’t obstruct your view of the image while you work. Click the categories menu at the top of the floating Smart Brush presets picker and take note of the categories available. Choose the category Nature. Scroll down in the picker to see the collection of presets in this category; then, select the Blue Skies preset.

5. In the tool options bar, open the Brush Picker and set the brush diameter to 20 px (pixels). To close the Brush Picker, click elsewhere in the tool options bar, or use the Esc key on your keyboard. Starting in the upper right corner of the photo, drag across the sky. Don’t worry if your selection expands to include parts of the buildings; to subtract these areas from the selection, hold down the Alt / Option key and paint over them carefully.

Press the left bracket key ( [) to decrease the brush size, and the right bracket key ( ]) to increase it. While you’re fine-tuning the selection, use a small brush and make slow, short strokes.
6. Choose Select > Deselect. Click the categories menu at the top of the Smart Brush presets picker and choose the category Lighting. Select the Contrast High preset. Drag across the buildings in the photo, staying a little below the roof line, and then work back in the other direction, keeping just above the waterline.
7. Choose Select > Deselect. From the Lighting category in the Smart Brush presets picker, choose the Brighter preset. Drag across the water area, holding down the Alt / Option key and moving slowly to paint out any over-selections.
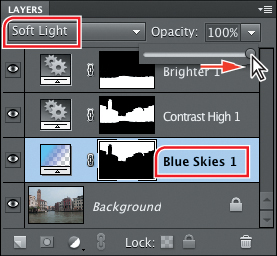
8. Inspect the Layers panel. Each Smart Brush edit occupies its own adjustment layer, where it remains active—so you can add to or subtract from the selection, change the way the adjustment is being applied, or even change which preset is applied at any time, without permanently affecting your original image.
9. Each adjustment shows a pin: a square, colored marker that identifies a Smart Brush edit whenever the tool is active, located near the point that you first clicked with the Smart Brush. Right-click / Control-click the pin for the Brighter adjustment on the water area, and then choose Change Adjustment Settings from the context menu.

10. The Adjustments panel opens in the Panel Bin. The controls presented will vary from one Smart Paint preset to another, depending on the combination of adjustments that make up each preset. Use the sliders, or type in the text boxes, to increase the Brightness value to 55, and the Contrast setting to 50, noting the changes in the image.
The Blue Skies adjustment looks somewhat overdone. Rather than modifying the effect with the adjustment controls, you can use a different technique.
11. Collapse the Adjustments panel by double-clicking its header bar. If necessary, use the same method to expand the Layers panel. In the layers panel, select the layer Blue Skies 1 by clicking the layer name—not either of the thumbnails. Use the menu at the top of the Layers panel to change the blending mode from Color Burn to Soft Light. Increase the layer opacity from 75% to 100%.

12. Chose File > Save As. Activate the Include In The Organizer option and disable Save In Version Set With Original. Name the file DSC_8492_SmartBrush and save it to your My CIB Work folder in Photoshop format with Layers activated. Close the file.
You can use the Smart Brush on the same area in an image as many times as you wish. If you re-apply the same preset the effects are usually cumulative, applying different presets to the same image area combines their effects.
Working with the image canvas
You can think of the image canvas as the equivalent of the paper on which a photo is printed. While you’re working with a digital photo, image data may temporarily lie outside the canvas space, but it will be clipped to the canvas boundary as soon as the image is flattened. To extend our limited analogy just a little further, think of the layer data as the image projected by a photographic enlarger in the darkroom. Although the projected image may be offset or enlarged so that it falls outside the borders of the paper, the data still exists; you can continue to work with it right up until the moment that the photographic paper is exposed.

Adding a border to a photo
By default, the canvas is the same size as the image (if you increase the size of the image file, the canvas is enlarged automatically) and is therefore not visible. However, you can also enlarge the canvas independently of the image size, effectively adding a border around your photo—just as if you printed a photo on a sheet of paper larger than the image.
By default, the extended canvas, and therefore the border, takes on the Background color as set in the color swatches at the bottom of the toolbox.
1. In the Organizer, select the image DSC_1678.jpg from the Lesson 6 images in the Media Browser, making sure not to confuse it with the _Autofix copy. Click the arrow on the Fix tab and Choose Full Photo Edit from the menu.
2. Choose View > Fit On Screen; then, hide the Project Bin by double-clicking its header bar. Hide the Panels Bin by un-checking its name in the Window menu.
3. If you don’t see a reasonable amount of blank canvas surrounding the image, hold down the Ctrl / Command key and press the Minus key (-) on your keyboard or choose View > Zoom Out.
4. Choose Image > Resize > Canvas Size. Move the Canvas Size dialog box, if necessary, so that you can see at least the left half of the image.
5. Set the Canvas Size dialog box as shown in the illustration below:
• Choose Inches from the units menus. Type 0.5 for both Width and Height.
• Activate the Relative option.
• Leave the Anchor control at the default centered setting.
• Choose Black from the Canvas Extension Color menu.
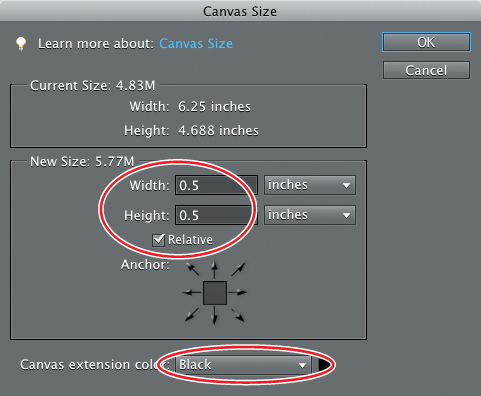
6. Click OK.
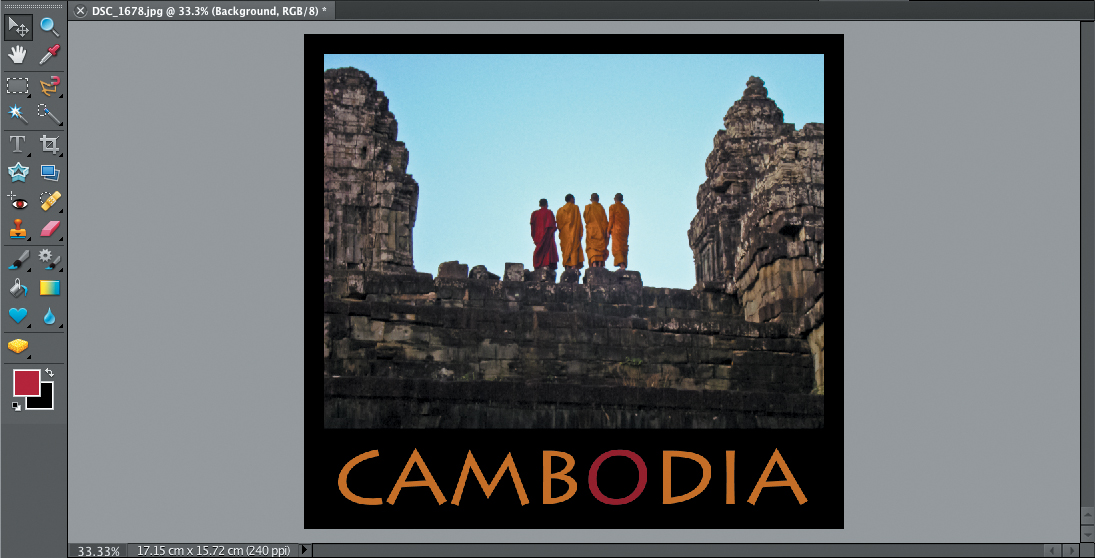
The new black border appears around the photo in the image window. For the purposes of this exercise, we’ll take it one step further, and extend the canvas again to turn the border into an asymmetrical frame.
7. Choose Image > Resize > Canvas Size. In the Canvas Size dialog box, confirm that the Relative check box is still activated. Leave the Width value at 0 and set the Height to 1 inch. In the Anchor control grid diagram, click the center square in the top row. At this setting, the height increase will result in the canvas being extended by one inch only at the bottom of the frame. Leave the Canvas Extension Color setting unchanged and click OK.

8. If you can’t see all of the border framing the image, double-click the Hand tool or choose View > Fit On Screen.

The extended border gives you space to add text to the image, making it an easy and effective way to create a postcard, a stylish cover page for a printed document, or a title screen for a slideshow presentation.
9. In the toolbox, select the Horizontal Type tool (![]() ).
).
10. Set up the tool options bar as shown in the illustration below. Choose Lithos Pro from the Font Family menu and Regular from the Font Style menu. In the Font Size text box, type 80 pt, and then press Enter / Return on your keyboard. Choose Center Text (![]() ) from the paragraph alignment options. Click the text color swatch to open the color picker.
) from the paragraph alignment options. Click the text color swatch to open the color picker.

Photoshop Elements includes several variants of the Type tool. Throughout the remainder of this lesson, the term Type tool will always refer to the Horizontal Type tool, which is the default variant.
11. Move the color picker, if necessary, so that you can see the four monks. Move the pointer over the image; the cursor becomes an eyedropper tool. Sample the brightest orange you can find from the second monk’s robe. Click OK.

12. With the Type tool, click below the center of the black space beneath the photo and type CAMBODIA.
13. Swipe to select the letter O; then, click the text color swatch to open the color picker. Sample the brightest red you can find in the robe of the monk on the left. Move the pointer over the large color field in the color picker and choose a lighter, bolder shade of the sampled color, and then click OK.

14. Click the Move tool in the toolbar and drag the text to center it. Choose File > Save As. Activate Include In The Organizer and disable Save In Version Set With Original. Name the file CAMBODIA and save it to your My CIB Work folder in Photoshop format with Layers activated. Choose File > Close.
1. Zoom out far enough so that you can see some of the blank art-board surrounding the image in the edit window.
2. Use the crop tool to drag a cropping rectangle right around the image.
3. Drag the corner handles of the crop marquee outside the image area onto the art-board to define the size and shape of border that you wish to create.
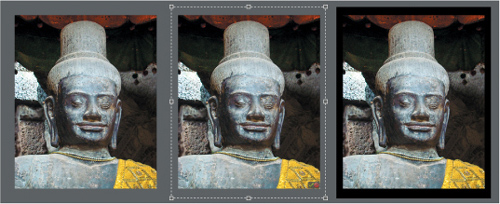
4. When you’re satisfied, click the Commit button in the lower right corner of the image. The canvas expands to fill the cropping rectangle, taking on the background color set in the color swatch at the bottom of the toolbox.
Review questions
1. What are the key differences between adjusting images in Full Edit mode, Quick Edit mode and Guided Edit mode?
2. Can you apply automatic fixes when you are in Full Edit mode?
3. What is the purpose of the Project Bin?
4. Can you float panels and other interface elements in any Edit mode?
5. What is the Smart Brush tool?
Review answers
1. Full Edit provides the most flexible and powerful image correction environment. Full Edit offers lighting and color correction commands and tools for fixing image defects, making selections, adding text, and painting on your images. Quick Fix provides easy access to a range of basic image editing controls for quickly making common adjustments and corrections. If you’re new to digital photography, Guided Edit is the best place to start—stepping you through each procedure to help you get professional-looking results.
2. Yes; the Enhance menu contains commands that are equivalent to the Auto buttons in the Quick Fix panel: Auto Smart Fix, Auto Levels, Auto Contrast, Auto Color Correction, as well as Auto Red Eye Fix. The Enhance menu also provides an Adjust Smart Fix command, which opens a dialog box in which you can specify settings for automatic adjustments.
3. The Project Bin provides easy access to the photos you want to work with, without needing to leave the Editor workspace. You can set the Project Bin to display all the photos that are currently selected in the Media Browser, just those images that are open in the Editor (helpful when some of the open images are hidden behind the front window), or the entire contents of any album in your catalog.
4. No; you can rearrange the workspace only in Full Edit mode.
5. The Smart Brush is both a selection tool and an image adjustment tool—it creates a selection based on similarities in color and texture, through which your choice of editing preset is applied. You can choose from close to seventy Smart Brush presets, each of which can be customized, applied repeatedly for a cumulative effect, or layered with other adjustment presets to produce an almost infinite variety of results.