
3. Advanced Organizing
Lesson Overview
As your collection grows to hundreds or even thousands of images, keeping track of your photos can be a daunting task. Photoshop Elements 10 delivers sophisticated organizing tools that not only get the job done, but actually make the work quite enjoyable.
In this lesson you’ll learn a few new methods of importing images and some of the more advanced techniques for organizing, sorting, and searching your growing photo collection:
• Using advanced Photo Downloader options
• Acquiring still frames from video
• Importing pictures from a PDF document
• Using Version Sets and Stacks to organize photos
• Grouping photos in Albums and Smart Albums
• Viewing and managing files in the Folder Location view
• Finding photos by similarity, metadata, and text search
• Hiding unwanted files from view
You’ll probably need between one and two hours to complete this lesson.

Discover some advanced import options that will make organizing your photos even easier. Have Photoshop Elements apply tags and group images automatically during import so your files will already be organized by the time they arrive in your catalog! Simplify navigating your catalog with Stacks, Version Sets and Albums and learn about a range of powerful search features to help you find exactly the right files.
Getting started
In this lesson you’ll be working mainly in the Organizer workspace, though you will switch to the Editor in order to capture frames from a video and import images from a PDF document.
1. Start Photoshop Elements.
2. In the Welcome screen, click the Organize button at the left, and then wait while the Elements Organizer opens.
Before you start working on this lesson, make sure that you’ve installed the software on your computer from the application CD (see the Photoshop Elements 10 documentation) and that you have correctly copied the Lessons folder from the CD in the back of this book onto your computer’s hard disk (see “Copying the Classroom in a Book files” on page 2). You should also have created a working catalog (see “Creating a new catalog” on page 8).
Advanced import options
In Lesson 2 you imported images into the Organizer using a variety of methods, and learned how to apply keyword tags manually as a way of organizing photos once they are in your catalog. In the following exercise you’ll explore some advanced import options that will make organizing your photos even easier.
You can set up your import so that Photoshop Elements will automatically apply tags and create groups during the import process, so that your images will already be organized by the time they arrive in your catalog! You’ll also learn about importing photos from some different sources: capturing still frames from a movie and extracting the images embedded in a PDF document.
Photo Downloader options
If you have a digital camera or memory card at hand with your own photos on it, you can step through this first exercise using those images. To get the best results from this exercise, you should have several batches of pictures taken at different times on the same day. Alternatively, you can simply follow the process and refer to the illustrations in the book, without actually performing the exercise yourself, and then return to this exercise when you are prepared.
1. Connect your digital camera or card reader to your computer, following the manufacturer’s instructions. If you’re working on Mac OS, skip to step 3.
If the Backup/ Synchronization dialog box appears, click Remind Me Later. You’ll learn about this feature in Lesson 5.
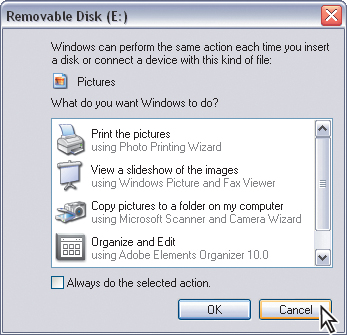
2. On Windows, the Auto Play dialog box may appear. You could choose the option Organize And Edit Using Adobe Elements Organizer 10, but for the purposes of this lesson, simply click Cancel to dismiss the dialog box. If the Photo Downloader dialog box appears automatically, you can skip to step 4; otherwise, continue to step 3.
3. Choose File > Get Photos And Videos > From Camera Or Card Reader.
4. If the Photo Downloader dialog box opens in the Advanced mode, click the Standard Dialog button located at the lower left corner of the dialog box.
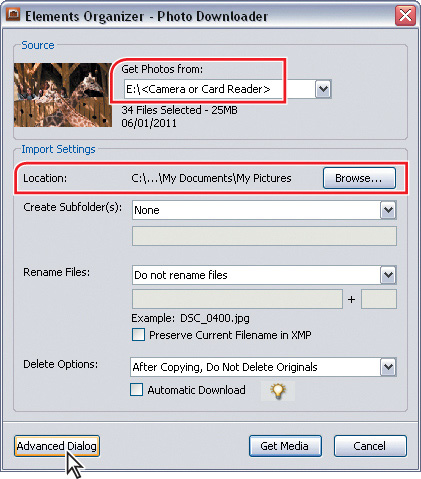
5. From the Get Photos From menu at the top of the Photo Downloader dialog box, choose the name of the connected camera or card reader.
6. Under Import Settings, accept the default destination folder listed beside Location, or click Browse / Choose to specify a different destination. By default, the image files are saved to your My Pictures folder.
7. Without making any other changes to the settings, click the Advanced Dialog button in the lower left corner of the dialog box.
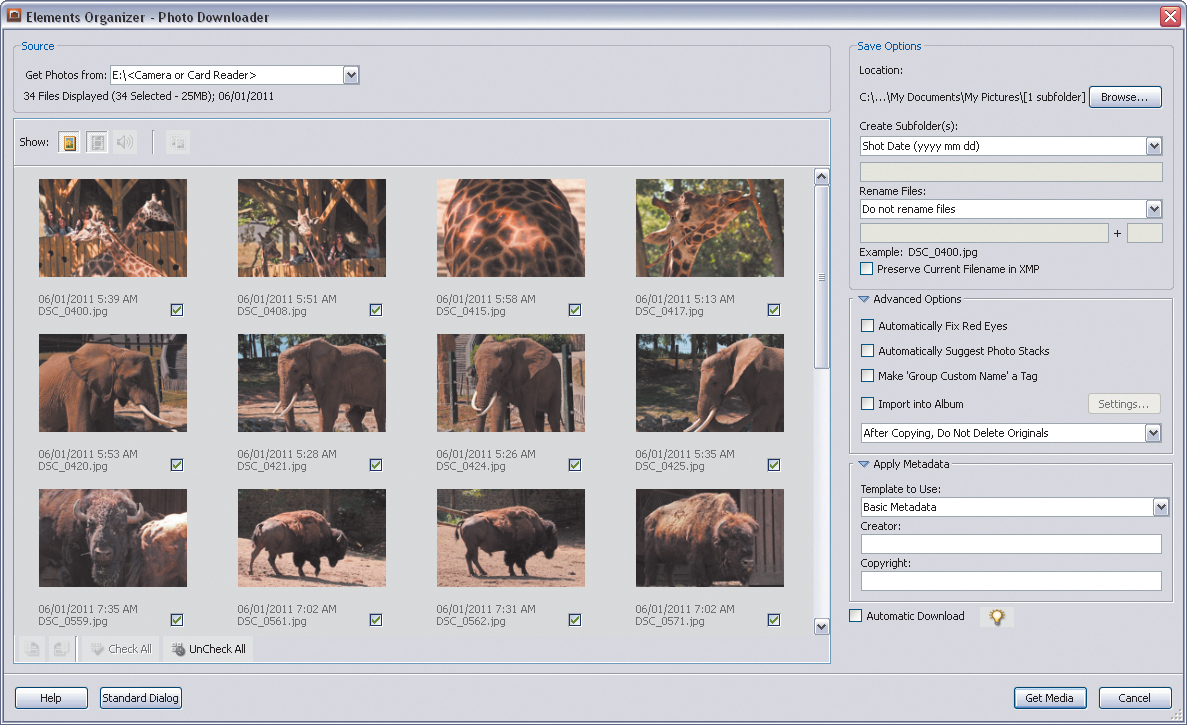
In advanced mode, the Photo Downloader Dialog displays thumbnail previews of all the photos on your camera’s memory card, and also offers options for processing, tagging, and grouping your images during the import process.
In the next steps you’ll set up the automatic creation of subfolders for the files copied from your camera and apply keyword tags to the images as they are imported.
8. Under Save Options, choose Custom Groups (Advanced) from the Create Subfolder(s) menu. Your selection is reflected in the Location pathname.

The images have been automatically divided into groups, based on capture time and date. A slider below the Create Subfolder(s) menu enables you to adjust the granularity of the subdivision and the box to the right of the slider shows the resulting number of groups. In our example, the automatic grouping based on capture time has done a good of job separating our subjects, producing six groups.
9. Experiment by moving the slider to the left to generate fewer groups (subfolders) or to the right to generate more. Scroll down the list of thumbnails to review the effect of the slider on the grouping of your photos. Note that the number of groups created is displayed in the box to the right of the slider.

To increase or decrease the number of groups, you can also press Ctrl / Command together with Shift+M or Shift+L respectively on your keyboard.
10. Next you’ll apply custom names to the subfolders for your grouped photos. From the Group Name menu, choose Shot Date (yyyy mm dd) + Custom Name.

11. On the right end of the separator bar above the thumbnails of the first group, click the Custom Name field and type a descriptive name in the text box.

12. Repeat step 11 for the other groups in the list, giving each a distinct name. In our example, we used the animal names Giraffe, Elephant, Monkey, and so on.
13. Under Advanced Options, activate the option Make ‘Group Custom Name’ A Tag by clicking the check box. This will automatically create keyword tags corresponding to the group custom names and apply them to your photos as they are imported into the Organizer. If any of the options Automatically Fix Red Eyes, Automatically Suggest Photo Stacks, and Import Into Album are currently activated, disable them now by clicking their checkboxes.

14. Click Get Media. The photos are copied to your hard disk, organized in subfolders named for your custom import groups. If the Files Successfully Copied dialog box appears, click Yes. Click OK to dismiss any other message.
The Getting Media dialog box appears briefly while the photos are being imported into your catalog. The imported images appear in the Media Browser, automatically tagged during the import process with keywords drawn from the custom group names. The new tags are nested inside the keyword category Other.
The more you take advantage of these advanced options when importing your photos, the less time and effort you’ll need to spend sorting and organizing images, and looking for the photos you want.
Acquiring still frames from a video
You can capture frames from digital videos in any of the file formats supported by Photoshop Elements. These include: ASF, AVI, MLV, MOV, MPG, MPEG, and WMV. To capture and import frames from video, you’ll need to open the Editor.
1. If you still have any images selected in the Organizer from the previous exercise, choose Edit > Deselect.
2. Click the arrow on the Fix tab at the top of the Task Pane and choose Full Photo Edit from the menu. In the Editor, choose File > Import > Frame From Video.

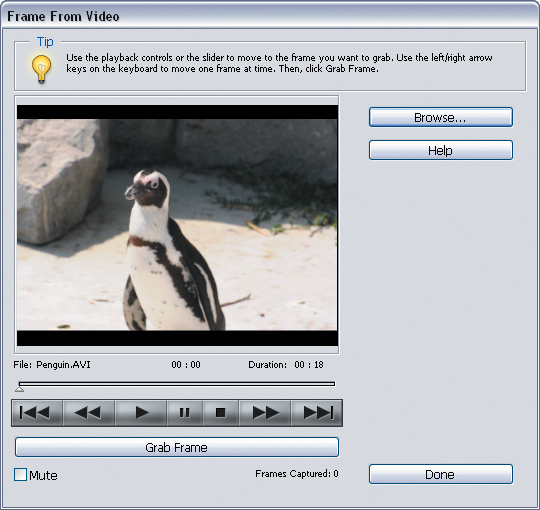
3. In the Frame From Video dialog box, click the Browse button. Navigate to your Lesson03 folder, select the file Penguin.AVI, and click Open.
4. To start video playback, click the Play button (![]() ). Click the Pause button (
). Click the Pause button (![]() ) after 3 or 4 seconds, and then use the arrow keys on your keyboard to move forward or back one frame at a time until you find a frame that you’d like to capture.
) after 3 or 4 seconds, and then use the arrow keys on your keyboard to move forward or back one frame at a time until you find a frame that you’d like to capture.
5. Click the Grab Frame button below the playback controls, or press your spacebar, when the frame you want is visible on the screen.
6. Continue to move forward and backward in the video to capture two or three additional frames. When you have all the frames you want, click Done.

Each captured video frame opens in its own image window in the Editor. Thumbnails for the open files appear in the Project bin below the Edit pane.
7. Choose File > Close All. For the first file, click Yes / Save to save before closing. In the Save As dialog box, navigate to your My CIB Work folder; then, click the New Folder button and name the new folder Penguin. Accept the default file name and choose JPEG from the Format menu. For the purposes of this exercise, make sure that the option Include In The Elements Organizer is disabled; then, click Save. Click OK to accept the default JPEG image quality. Save the other images to the same folder, with the same settings.
8. Use the task bar in Windows or the Dock in Mac OS to return to the Organizer.


Importing from a PDF document
Photoshop Elements enables you to import either whole pages from a PDF document or to select and extract just the images you want.
1. Use the task bar in Windows or the Dock in Mac OS return to the Editor; then, choose File > Open.
2. In the Open dialog box, navigate to your Lesson03 folder, select the file NY.pdf, and then click Open. If you can’t see the file NY.pdf in the Open dialog box, click the Files Of Type / Enable menu at the bottom of the dialog box and choose either All Formats / All Readable Documents or Photoshop PDF.
3. Use the radio buttons in the Select pane to set the Import PDF dialog box to import Images. Select Large from the Thumbnail Size menu below the preview.
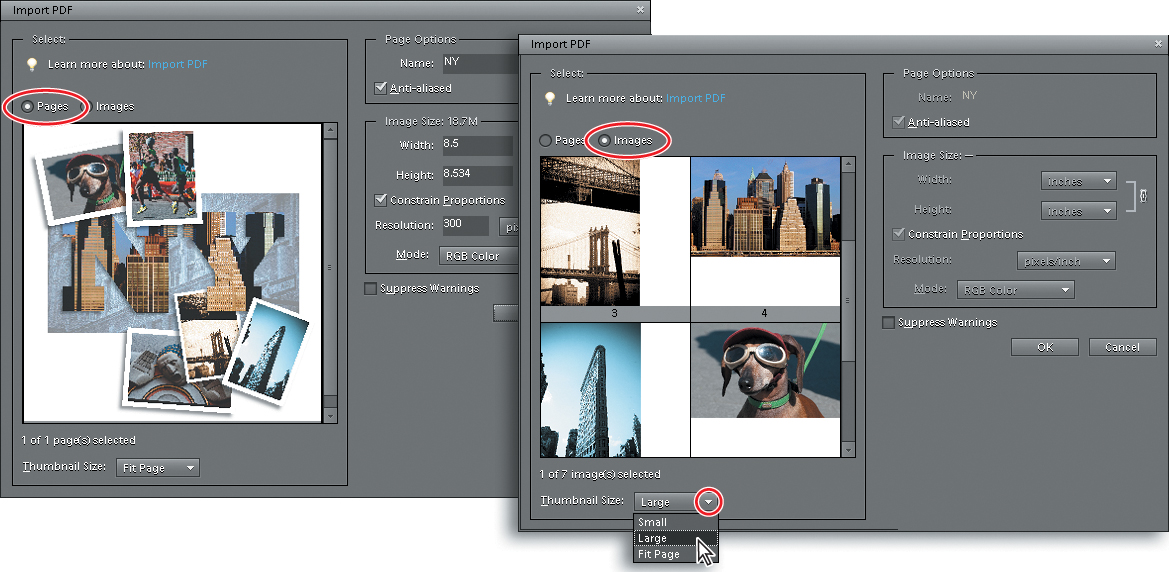
If you choose to import entire pages from a PDF file with more than one page, you can use the same method to multiple-select the pages. Pages are rasterized (converted to bit-mapped graphics) according to your choice of image size, resolution, and color mode. The imported result will be an image similar to that acquired by scanning a printed document.
4. Click to select an image you wish to import; then, scroll the preview pane and Ctrl-click / Command-click to add two or three more to the selection. Click OK.
Each image imported from the PDF file opens in its own document window in the Editor. Thumbnails for the open files appear in the Project bin below the Edit pane.
5. Choose File > Close All. For each file, click Yes / Save to save before closing. Save the images into your My CIB Work folder, accepting the default file names. Choose JPEG from the Format menu and make sure that the option Include In The Elements Organizer is activated; then click Save. Click OK to accept the default JPEG image quality.
6. Choose File > Exit / Adobe Photoshop Elements Editor > Quit to close the Editor and return to the Organizer, where thumbnails of the images you extracted from the PDF file now appear in the in the Media Browser.
Organizing photos
Organizing your files and folders efficiently can be challenging. It’s easy to forget what pictures are stored in which folder—and being forced to open and examine the content of numerous folders to find files can be both time consuming and extremely frustrating.
The Organizer can make the whole process much simpler and more enjoyable. The next set of exercises will show you how investing a little time in organizing your catalog can streamline the process of sorting through your image files, regardless of where they are stored.
Working with version sets
A version set groups a photo in its original state with any edited copies, so that you can find all the versions of the image stacked behind a single thumbnail in the Media Browser, rather than scattered amongst the rest of the items in your catalog.
Photoshop Elements automatically creates a version set whenever you modify a photo in the Elements Organizer. When you edit an photo from your catalog in the Editor, however, you’ll need to choose File > Save As, and then activate the option Save In Version Set With Original.
Grouping your work in this way not only makes it much easier for you to find the version you want, but also enables you to keep your original un-edited photo intact, easy to find and ready for a different treatment whenever you want to re-use it.
1. Check the name of the active catalog at the lower left of the Organizer window. If your CIB catalog is not loaded, choose File > Catalog, select the CIB Catalog from the list in the Catalog Manager dialog box, and then click Open.
2. Choose File > Get Photos And Videos > From Files And Folders. In the Get Photos And Videos From Files And Folders dialog box, navigate to your Lesson03 folder and select the folder Zoo. Activate the option Get Photos From Subfolders. Make sure that the options Automatically Fix Red Eyes and Automatically Suggest Photo Stacks option are disabled; then, click Get Media.
You can also check the name of the currently active catalog by holding the pointer over the Organizer Icon at the upper left of the Organizer workspace.
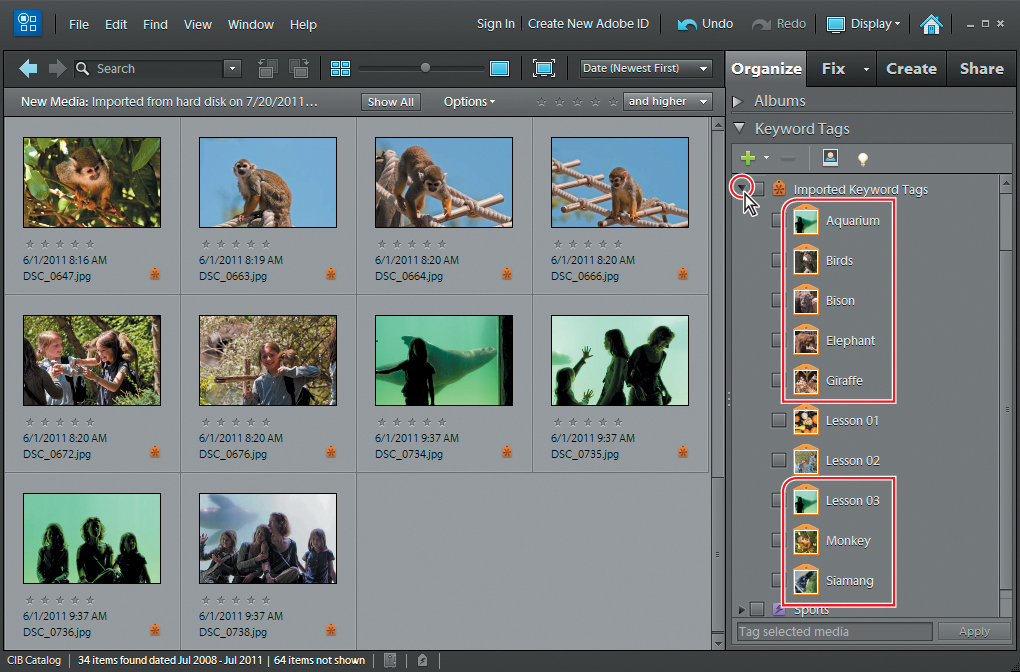
3. In the Import Attached Keyword Tags dialog box, click Select All to enable all eight tags, and then click OK. Click OK to close any other alert dialog box.

Thumbnails of the thirty four images you’ve just added to your CIB catalog appear in the Media Browser.
4. If you don’t see filenames displayed with the thumbnails in the Media Browser, activate the options Details and Show File Names in the View menu.
5. In the Keyword Tags panel, click the triangle beside the Imported Keyword Tags category, if necessary, to see the eight newly imported tags nested inside.
Remember: if you edit an image in the Editor you need to choose File > Save As, and then activate the option Save In Version Set With Original.
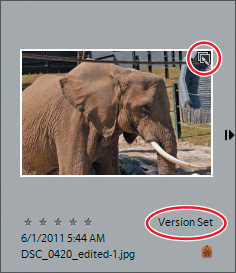
6. Select the image DSC_0420.jpg, and then choose Edit > Auto Smart Fix. The Auto Smart Fix command corrects the overall color balance and improves shadow and highlight detail. The edited copy of the image is automatically grouped in a version set with the original, with the edited version topmost, and the filename has been extended to indicate that the photo has been edited. A version set can be identified in the Media Browser by the badge displayed in the upper right corner of the thumbnail and a label at the lower right.
7. Click the expand button to the right of the thumbnail image to see the original and edited images in the version set displayed side by side.
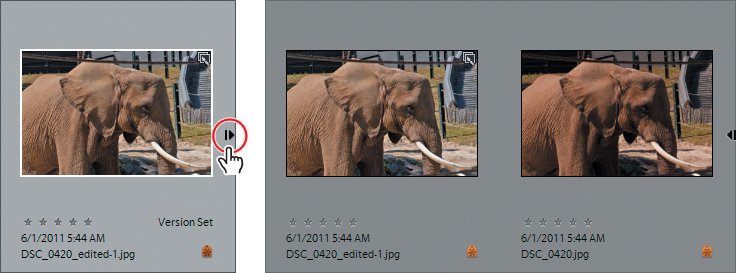
8. To see only the topmost photo in the version set, click the collapse button to the right of the thumbnail image on the right, or right-click / Control-click any image in the set and choose Version Set > Collapse Items In Version Set from the context menu. Note the other commands available from the same context menu; these commands can also be found in the Edit > Version Set menu.
If you edit a photo that’s already in a version set, the edited copy is placed at the top of the existing version set. To specify a different photo as the topmost, select it in the expanded view of the version set, and then choose Edit > Version Set > Set As Top Item.
About stacks
You can create a stack to group a set of related photos in the Media Browser, making them easier to manage. Stack a series, or multiple images of the same subject, to help reduce clutter in the Media Browser. For instance, you might create a stack for several photos of your family taken in the same pose, keeping the candidates together until you have a chance to pick the best shot—or for photos taken at a sports event using your camera’s burst mode or auto-bracket feature. When you take photos this way you end up with many variations of what is essentially the same photo, but you only want the best version to appear in the Media Browser.
1. In the Keyword Tags panel, activate the Find box beside the new Elephant tag in the Imported Keyword Tags category.
2. Ctrl-click / Command-click to select the four photos; then, choose Edit > Stack > Stack Selected Photos. The images are stacked, with the photo you edited earlier on top, now marked with both the version set and stack badges and a Photo Stack label. Expand and collapse the stack by clicking the expand or collapse arrows at the right side of the stack frame.

3. Expand the stack, and then right-click / Control-click the image at the right: DSC_0425.jpg. From the context menu, choose Stack > Set As Top Photo.
4. Collapse the stack; the topmost image no longer displays both the version set and stack badges.
Tips for working with stacks
You should keep these points in mind when you’re working with stacks:
• To specify a new image as the topmost, expand the stack, right-click / Control-click the desired photo, and then choose Stack > Set As Top Photo.
To access stack commands, right-click / Control-click any image in a stack and choose from the Stack sub-menu. Alternatively, select a photo in the stack and choose from the Edit > Stack menu.
• Combining two or more stacks merges them to form one new stack, with the most recent photo on top of the stack. The original groupings are not preserved.
• Many actions applied to a collapsed stack, such as editing, printing, and e-mailing, are applied to the topmost item only. To apply an action to multiple images in a stack, either expand the stack and group-select the images, or un-stack them first.
• If you edit a photo that you’ve already included in a stack, the photo and its edited copy will be grouped as a version set nested inside the stack.
• If you apply a keyword tag to a collapsed stack, the keyword tag is applied to all items in the stack. When you run a search on the keyword tag, the top photo in the stack appears in the search results marked with the stack icon. If you want to apply a keyword tag to only one photo in a stack, expand the stack first and apply the keyword tag to just that photo.
Stacking photos automatically
You can automate the process of grouping related photos in your catalog by having Photoshop Elements suggest stacks, based on visual similarities between images.
1. In the Find bar above the Media Browser, click the Show All button. In the Keyword Tags panel, activate the Find boxes beside the two imported keyword tags Birds and Bison.
2. Choose Edit > Select All to select all twelve images. Choose Edit > Stack > Automatically Suggest Photo Stacks.
In the Visually Similar Photo Search dialog box, Photoshop has suggested a pair of very similar photos from each group as potential stacks. Before you go ahead and stack these groups, lets look at the options for tweaking the automatic stacking process manually.

Experiment with as many of your own photos as possible, so that you’ll get a feel for the kind of images that perform best with this feature.
3. Click the small triangle to expand the Unique Photos pane at the bottom of the Visually Similar Photo Search dialog box. You can see that there is another bison photo that is very similar to those suggested for stacking. Drag the thumbnail from the Unique photos pane to add it to the group.

4. Click the Stack button at the right of the divider bar above each of the groups. The images in each group are stacked behind the first image in the row, which now displays the stacked photos badge.
5. Click the Unstack button to undo stacking for the two photos of the bird’s head, and then click Done to dismiss the Visually Similar Photo Search dialog box.

Creating albums
Another way of grouping your photos is to organize them into albums. You might create a new album to group shots from a special occasion such as a wedding or a vacation, or to assemble the images that you intend to use in a project such as a presentation to a client or a slideshow.
An album is like a virtual folder where you can assemble a group of images that may be drawn from any number of actual folders on your hard disk.
The principal difference between grouping photos in an album and grouping them with a shared keyword tag is that in an album you can rearrange the order of the photos as you wish. In the Media Browser, each photo in an album displays a number in the upper left corner, representing its place in the order. You can drag photos to rearrange their order within the album, which will effect the order in which they appear in a slideshow or their placement in a project layout.
A photo can be added to more than one album—the same image might be the first in a New York album and the last in a National Monuments album. You can also group albums; for example, you might group your New York and San Francisco albums inside your Vacations album. Your San Francisco album may also be included in a Road Trips album while the New York album is not.
1. Click the Show All button above the Media Browser to clear the current search, and then click to activate the Find box beside the imported Lesson 03 tag in the Keyword Tags panel to isolate the images for this lesson.
2. If the Albums panel is collapsed, click the triangle in the panel’s header bar to expand it.
3. To create a new album, click the Create New Album Or Album Category button (![]() ) at the upper left of the Albums panel and choose New Album from the menu.
) at the upper left of the Albums panel and choose New Album from the menu.
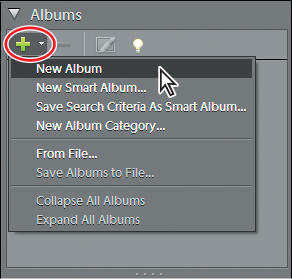

4. In the Album Details pane, type Day At The Zoo as the name for the new album, leaving the Album Category set at None (Top Level). For the purposes of this exercise, disable the Backup/Sync option. Click Done.
5. Click the Create New Album Or Album Category button (![]() ) at the upper left of the Albums panel again, but this time, choose New Album Category from the menu. In the Create Album Category dialog box, type Vacation 2011 as the name for the new album category. Leave the Parent Album Category set at None (Top Level). Click OK.
) at the upper left of the Albums panel again, but this time, choose New Album Category from the menu. In the Create Album Category dialog box, type Vacation 2011 as the name for the new album category. Leave the Parent Album Category set at None (Top Level). Click OK.
6. In the Albums panel, drag the album Day At The Zoo onto the entry for your new Vacation 2011 album category.
7. Right-click / Control-click the icon of the Day At The Zoo album and choose Edit Day At The Zoo Album from the menu.
In the Album Details pane, you could rename the album or use the Album Category menu to move it out of its parent category and back to the top level.
8. Ctrl-click / Command-click to select about half of the Lesson 3 photos in the Media Browser; then, drag the group into the album Content box. Click Done.

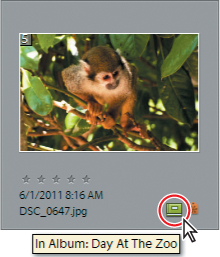
9. Click Show All in the Find bar above the thumbnails pane. To isolate the contents of your new album, click the Day At The Zoo album entry in the Albums panel, or drag the album icon onto the Find bar. Notice the counter in the top left corner of each photo, denoting its order in the album.

If you don’t see the album badges below the thumbnails in the Media Browser, use the slider above the Find bar to increase the size of the thumbnails. Hold the pointer over the album badge to see which album or albums a photo belongs to.
10. Leaving the Day At The Zoo album search (or filter) active, activate the Find box beside the Lesson 03 tag. If you don’t see all of the Lesson 3 images in the Media Browser, choose Show Close Match Results from the Options menu in the Find bar. If the thumbnails are set to display at a large enough size, photos that are included in your new album can be differentiated from the rest of the Lesson 3 images by the green album badges below their thumbnails.
Adding more photos to an album
As you add images to your catalog, you may have new photos that you’d like to add to existing albums—an easy way to sort and organize a fresh import.
1. Keeping the combined filter (Day At The Zoo album + Lesson 03 keyword) active, choose Hide Best Match Results from the Options menu in the Find bar. Choose Edit > Select All; then, drag the selection onto the Day At The Zoo album entry in the Albums panel. (Alternatively, you could drag the album icon from the Albums panel onto any of the selected photos in the Media Browser.)
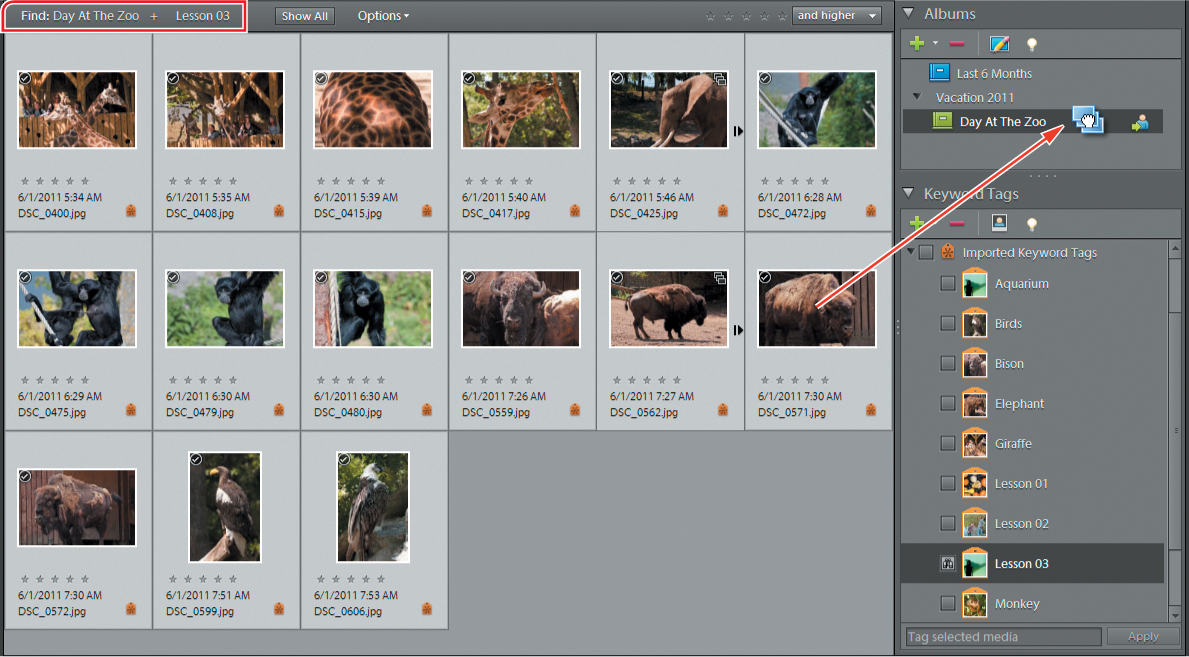
2. Choose Show Best Match Results from the Options menu in the Find bar. All of the Lesson 3 images are now visible in the Media Browser, and all are marked with an album badge to indicate that they’re included in the Day At The Zoo album. Disable the Find box for the Lesson 03 keyword tag.
3. To remove a photo from the album, right-click / Control-click its thumbnail in the album view, and then choose Remove From Album > Day At The Zoo from the context menu. Choose Edit > Undo Remove Item(s) From Album.
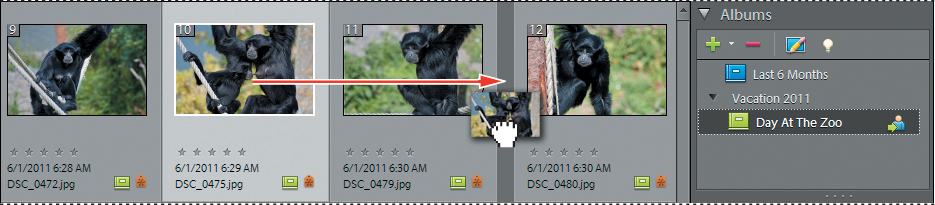
4. To change the order of the images in your album, select one or more photos in the Media Browser, and then simply drag the selection to the new position. The photos in the album are reordered when you release the mouse button.
5. To delete the album, right-click / Control-click its entry in the Albums panel, and choose Delete Day At The Zoo Album from the context menu. For this exercise, click Cancel in the Confirm Album Deletion dialog box.
6. Click Show All above the Media Browser.
Deleting an album will not remove the photos it contains from your catalog or your hard disk. Albums store only references to the actual image files.
Working with smart albums
For a smart album you don’t select and add photos manually, as you do for an ordinary album—you only need to specify search criteria. Once you set the criteria for a smart album, any photo in your catalog—and any new photo imported—matching the specified attributes will automatically appear in that album. In other words, a Smart Album is like an ongoing search that keeps itself up-to-date.
1. To create a new smart album, click the Create New Album Or Album Category button (![]() ) in the Albums panel and choose New Smart Album from the menu.
) in the Albums panel and choose New Smart Album from the menu.
You cannot change the order of the photos in a smart album, or add photos by dragging them onto the album’s icon; a smart album can contain only images that match its criteria.
2. In the New Smart Album dialog box, type Best Animal Shots as the album name.
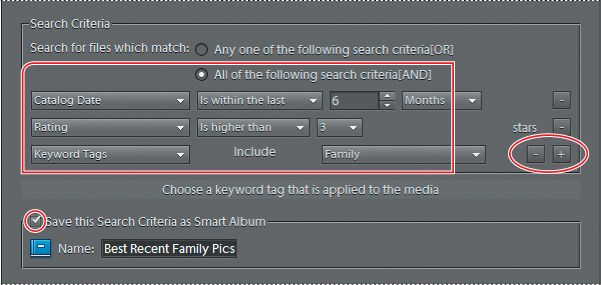
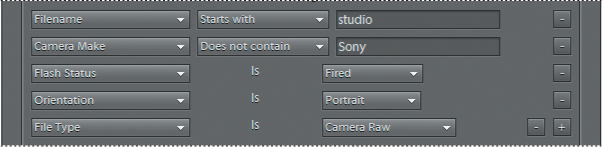
3. Under Search Criteria, activate the option All Of The Following Search Criteria [And]. From the first search criteria menu, choose Keyword Tags, and from the associated value menu, choose the keyword Lesson 03. Click the Add Additional Criteria button (+) to the right of the first criteria. Set the second search criteria to Rating > Is Higher Than > 2 Stars, and then click OK.

Your new Best Animal Shots album appears in the Albums panel; the blue album icon indicates that this is a smart album. As yet, there are no images in your catalog that match both the criteria, so the Media Browser is empty.
4. Click Show All in the Find bar; then, activate the Find box for the Lesson 03 keyword tag to isolate the photos for this lesson.
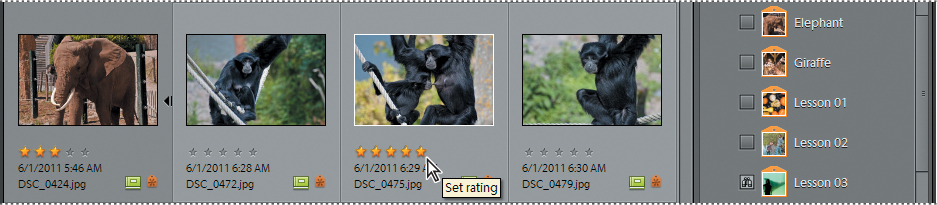
5. In the Media Browser, apply 3-, 4-, or 5-star ratings to the best five or six images by clicking the appropriate star below each thumbnail.
6. Click the smart album Best Animal Shots in the Albums panel; the album now contains the photos that you rated in step 5.
7. Make sure your smart album is selected in the Albums panel; then click Options in the Find bar and choose Modify Search Criteria from the menu.

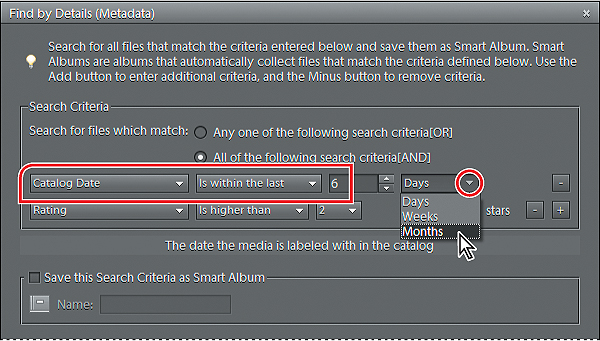
8. In the Find By Details (Metadata) dialog box, use the criteria menus to change the first rule to Catalog Date > Is Within The Last > 6 > Months.
If you clicked Search now, your changes to the criteria would affect the results of the current search—effectively functioning as a one-off filter–but would not be saved to the existing smart album.
9. Activate the option Save This Search Criteria As Smart Album, and then type Best - Last 6 Months as the name for the new smart album. Click Search.

The new smart album, containing all the photos that you’ve rated since you began working through the lessons in this book, is added to the Albums panel.
10. Right-click / Control-click the smart album Best - Last 6 Months and choose Delete Best - Last 6 Months Smart Album from the context menu. Click OK to confirm the deletion. If it’s visible, click the Show All button in the Find bar.
The content of a smart album may change over time, even without adding photos to, or removing them from your catalog. For example, a smart album may be set up to filter for photos captured within the last six months; photos matching that criteria today may not fall within the date range tomorrow.
Viewing and finding photos
Photoshop Elements offers a variety of options for sorting and viewing the media in your catalog, and a range of tools to help you quickly find just the files you need. In the Organizer you can search your catalog by media type, filename, date, folder location, star rating, album, keyword tag, text, or a range of other criteria, and then refine, sort and view the search results by album or in chronological order.
• The Find bar You can drag a photo, keyword tag, creation, or album onto the Find bar across the top of the Media Browser to locate similar photos and media files. The Find bar also offers options for sorting the search results.
• The Find menu Use the Find menu commands to search your catalog by date, caption, file name, history, media type, metadata, or by visual similarity. The Find menu also provides options for finding photos and media files that have unknown dates, are un-tagged, or are not included in any album.
• Keyword Tags, Albums and Star Ratings View only those files with a selected keyword tag, or combination of tags, by clicking the Find boxes in the Keyword Tags panel, or files in a particular album by clicking in the Albums panel. Use the Star Ratings filter in the Find bar to see just those photos and media files with a specified rating, or to narrow a search based on any other criteria.
• Text Search box Type in the text box above the Find bar to locate media with matching text—whether it’s in the filename, caption, metadata, or album name. The Text Search box also includes a dynamic list of all your existing keywords.
• The Timeline Choose Window > Timeline to display the timeline above the Media Browser. Use the Timeline as a search tool in its own right, or in combination with any of the other tools and views to help you refine a search or navigate the results. You might search for photos with a particular keyword tag, and then use the Timeline to limit the search to a specific folder or date range.
In Thumbnail view, click a month or set a date range in the Timeline to find photos and media files by capture date. The Timeline shows you a breakdown of your catalog by import date in the Import Batch view and an overview of the folder by folder distribution of your media files in Folder Location view. The height of the bars in the timeline indicates the relative number of files in each group. The Timeline becomes particularly useful when your catalog contains a large number of files captured over a period of several years and spread over many folders on your hard disk.
Viewing and managing files by folder location
In the Folder Location view you can rename, move, and delete files and folders, add files to your catalog, create instant albums and—on Windows—add folders to, or remove them from, the Watched Folder list.
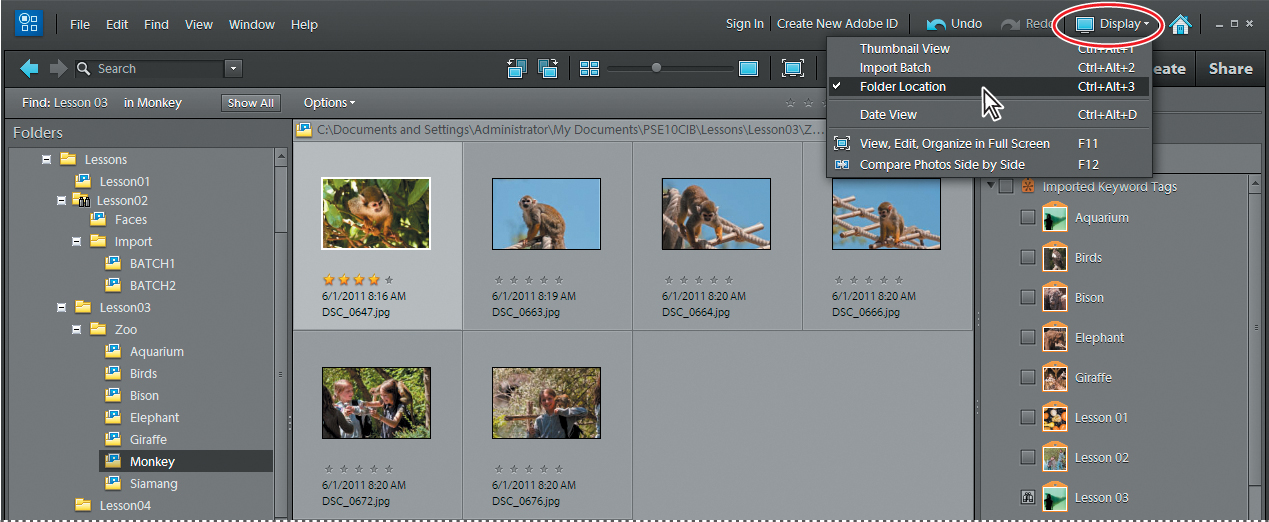
1. If necessary, click the Show All button; then, use the Keyword Tags panel to isolate the Lesson 3 images. Select any photo in the Media Browser, and then click the Display button (![]() ) above the Task Pane and choose Folder Location.
) above the Task Pane and choose Folder Location.
The Folder Location view divides the Media Browser into two parts. On the left, the Folders panel displays the hierarchy of folders on your hard disk. Folders containing managed files (files that you’ve already imported to the current catalog) are indicated by a Managed folder icon (![]() ). Watched folders (on Windows only) have a Watched folder icon (
). Watched folders (on Windows only) have a Watched folder icon (![]() ). The viewing pane on the right displays thumbnail images of the contents of any managed folder selected in the Folders panel.
). The viewing pane on the right displays thumbnail images of the contents of any managed folder selected in the Folders panel.
2. Press Ctrl+A / Command+A to select all the photos in the Media Browser; then, drag the selection to the Zoo folder in the Folders panel. In the Folders panel, the folder from which you just moved the photos has lost its Managed folder icon (![]() ), while the Zoo folder has acquired one. You may need to make the Folders panel wider to see the complete folder names.
), while the Zoo folder has acquired one. You may need to make the Folders panel wider to see the complete folder names.
3. Right-click / Control-click the folder from which you moved the photos and choose Delete Folder from the context menu. Click Yes to confirm the deletion.
4. Right-click / Control-click the Zoo folder and choose Reveal In Explorer / Reveal In Finder from the context menu. A Windows Explorer / Finder window opens to display the contents of the Zoo folder. You can see that the files you moved in the Folders panel have actually been moved on your hard disk, and the folder you deleted no longer exists. Switch back to the Elements Organizer.
5. Right-click / Control-click the Zoo folder and choose New Folder from the context menu; a new sub-folder is created inside the Zoo folder. Type a name for the new folder—if you remember it, you can use the name of the folder you deleted in step 3.
6. Click the Zoo folder. Drag the thumbnails for the photos in the Zoo folder from the Media Browser into the new sub-folder. The Zoo folder has lost its Managed folder icon (![]() ), while the new sub-folder has acquired one.
), while the new sub-folder has acquired one.
7. In the Folders panel, select the Monkey folder (inside the Zoo folder); then, click the Create Instant Album button at the right of the header above the thumbnails. Dismiss any alerts. The new Monkey album appears in the Albums panel.

8. With the album Monkey selected in the in the Albums panel and click the Edit button (![]() ) at the top of the panel. In the Album Details pane, disable the Backup/Sync option, and then click Done.
) at the top of the panel. In the Album Details pane, disable the Backup/Sync option, and then click Done.
Importing files in the Folder Location view
In the preceding exercise you discovered that you can move files and folders, rename, delete, or create a folder, and create an instant album—all without leaving the Folder Location view. The great advantage of organizing your folders and image files from within the Folder Location view, rather than in Windows Explorer or the Mac OS Finder, is that Photoshop Elements can easily keep track of all the files and folders included in your catalog—so you won’t need to deal with missing file alerts.
In this exercise, you’ll stay in the Folder Location view to add new files to your catalog, and then tag them.
1. In the Folders panel, scroll down if necessary, to find your My CIB Work folder. Click the plus sign (Windows) or arrow (Mac OS) beside the folder entry to expand it so that you can see the Penguin subfolder inside.
If you don’t see the Penguin folder, you need to work through the exercise “Acquiring still frames from a video” on page 64.
2. Drag the Penguin folder into the Zoo folder.
3. Right-click / Control-click the Penguin folder in its new location and choose Import To Elements Organizer from the context menu. Your video frames are imported to the CIB catalog. Click OK to dismiss any alerts.

4. Select all your penguin images, and then drag the Lesson 03 tag from the Keyword Tags panel to any of the selected thumbnails. Keep the photos selected.
5. In the Keyword Tags panel, click the Create New button (![]() ) and choose New Keyword Tag from the menu.
) and choose New Keyword Tag from the menu.
6. In the Create Keyword Tag dialog box, choose Imported Keyword Tags as the category, and then type Penguin for the tag Name. Click OK.
7. Drag the selection of penguin pictures from the viewing pane onto the new tag in the Keyword Tags panel.
8. Click the Display button (![]() ) above the Task Pane and choose Thumbnail View from the menu. Click the Show All button in the Find bar.
) above the Task Pane and choose Thumbnail View from the menu. Click the Show All button in the Find bar.

Finding photos using details and metadata
Searching your catalog by metadata detail is useful when you want to narrow a search by applying multiple criteria. Some of the metadata that may be attached to an image file is generated automatically by your camera; some is added when you spend time organizing your catalog. Searchable metadata includes file attributes, keyword tags, ratings, albums, version sets, captions, notes, capture date, and a range of camera, lens, and exposure details—to mention just a few!
1. Choose Find > By Details (Metadata).
If you’ve completed the smart albums exercises, you’re already familiar with setting up a multiple-criteria search. In fact, any metadata search you define can be saved as a new smart album by simply activating that option below the search rules.
To add a new criteria to your search, click the plus (+) button beside an existing rule; then, use the menus to specify a category and values. To remove a criteria, click the minus sign (-) beside the rule. Activate the appropriate option to find files that either match any of the criteria (rule or rule), or all of them (rule and rule).
2. Under Search Criteria, click the first menu and scroll down the list, noting the many categories available. Choose a criteria category and experiment with defining the rule by choosing values from the other menu or menus. Click the plus icon (+) to the right of your first rule and define several more criteria.
3. Click Cancel to dismiss the Find > By Details (Metadata) dialog box.

Hiding files
You’ve already learned how you can simplify the process of working with your growing catalog by creating stacks and version sets to help reduce clutter and repetition in the Media Browser.
Stacking related shots and grouping edited versions with their originals effectively reduces the number of images on view; you can choose the most interesting image in a stack or version set as the topmost and keep the other images tucked out of sight until you choose to work with them. However, in many cases it may be more effective to hide those images from view entirely.
Once you’ve settled on the best of a stack of similar photos, or of several edits in a version set, you can hide the other images from view so that they will no longer appear in search results to distract you when making selections, or need to be taken into consideration when applying commands.
Hiding a photo does not delete it from its folder on your hard disk, remove it from your catalog, or even from an album—you can un-hide it at any time if you start a new project where it might be useful or if you find that you could make use of a differently edited version.
1. In the Keyword Tags panel, activate the Find box beside the Penguin tag.
2. Ctrl-click / Command-click to select all your penguin video stills; then, choose Edit > Auto Smart Fix Selected Photos. Auto Smart Fix is applied to all of the images and each is automatically grouped in a separate version set with the edited version topmost.
3. With all of the new version sets selected, choose Edit > Version Set > Convert Version Set To Individual Items. There are now twice as many penguin images displayed in the Media Browser—the originals together with their edited copies.
4. Activate the option Show All Files in the Edit > Visibility menu.
5. Ctrl-click / Command-click to select all of the original, un-edited penguin photos, and then add any one of the edited versions to the selection. Choose Edit > Visibility > Mark As Hidden. The Hidden File icon appears in the lower left corner of all of the selected thumbnails.

6. Ctrl-click / Command-click to de-select the un-edited originals, leaving only the single edited version selected in the Media Browser. Choose Edit > Visibility > Mark As Visible. The selected photo loses its Hidden File icon.
7. Choose Edit > Visibility > Hide Hidden Files. The un-edited penguin pictures are removed from the Media Browser view.
8. Click the Show All button in the Find bar.
9. Choose Edit > Visibility > Show Only Hidden Files. Select all the hidden images and choose Edit > Delete Selected Items From Catalog. In the Confirm Deletion From Catalog dialog box, activate the option Also Delete Selected Items From The Hard Disk, and then click OK. Choose Edit > Visibility > Hide Hidden Files.
Finding photos by visual similarity
In Lesson 2, we looked at the People Recognition feature and discovered how helpful it can be in quickly organizing your catalog. In this section we’ll look at another tool that harnesses the power of the same automatic image analysis software.
Photoshop Elements 10 introduces an improved visual search feature, with even more ways of finding similar photos to help manage your growing photo library.
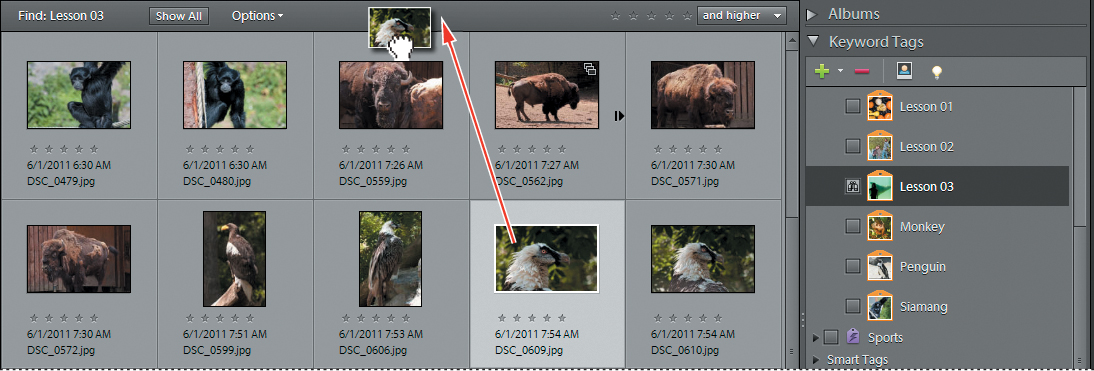
1. Click Show All, if it’s visible, and then activate the Lesson 03 tag to isolate the images for this lesson. Drag the image DSC_0609.jpg to the Find bar.
The search results you see on screen may vary from those illustrated here, depending on your operating system.
The search returns images displayed in the Media Browser in descending order of visual similarity to the photo you dragged to the Find bar. A marker displaying the calculated percentage of visual similarity for each image appears in the bottom left corner of its thumbnail, and a slider appears at the Find bar for tweaking the search results. The optimum position for the slider will vary for each image searched.

2. Experiment with the slider. A move to the left weights the analysis towards similarities in color, texture, and pattern; moving the slider to the right returns images that share more in terms of shape, proportion, and composition.
3. Right-click / Control-click the thumbnail in the Find bar and choose Remove From Search. Click another image in the Media browser to make it the object of a new search. Experiment with the Color–Shape slider, then repeat the process for several more images.
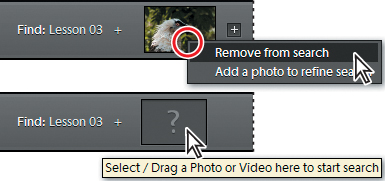

In some cases it may be helpful to add a second reference photo to your visual search. You can either drag a second image to the find bar, or click the plus sign (+) to the right of the first reference photo in the Find bar and select a second image from the Media Browser. The search will look for a combination of visual attributes.
If you prefer, you can launch a visual similarity search with a menu command. Instead of dragging an image to the Find bar, select it in the Media Browser and choose Find > By Visual Searches > Search For Visually Similar Photos And Videos.
4. Click the Show All button to clear this search; then isolate the Lesson 3 images.
Finding objects in photos
In Photoshop Elements 10, you can search your photo library for a specific object.
1. In the Media Browser, select the image DSC_0472.jpg, a photo of a Siamang.
2. Choose Find > By Visual Searches > Search For Objects Within Photos.
3. In the enlarged view, drag the bounding box to the ape’s head. Use the handles at the corners of the bounding box to fit it neatly around the shape, and then click Search Object.

Once again, the results are ranked by similarity to the reference object. As for all visual searches, you can refine the results by tweaking the Color–Shape slider.

Finding and removing duplicate photos
The last kind of visual search finds and groups duplicated or very similar images, and enables you to either stack them or delete them from your catalog.
1. Click the Show All button to clear this search; then isolate the Lesson 3 images.
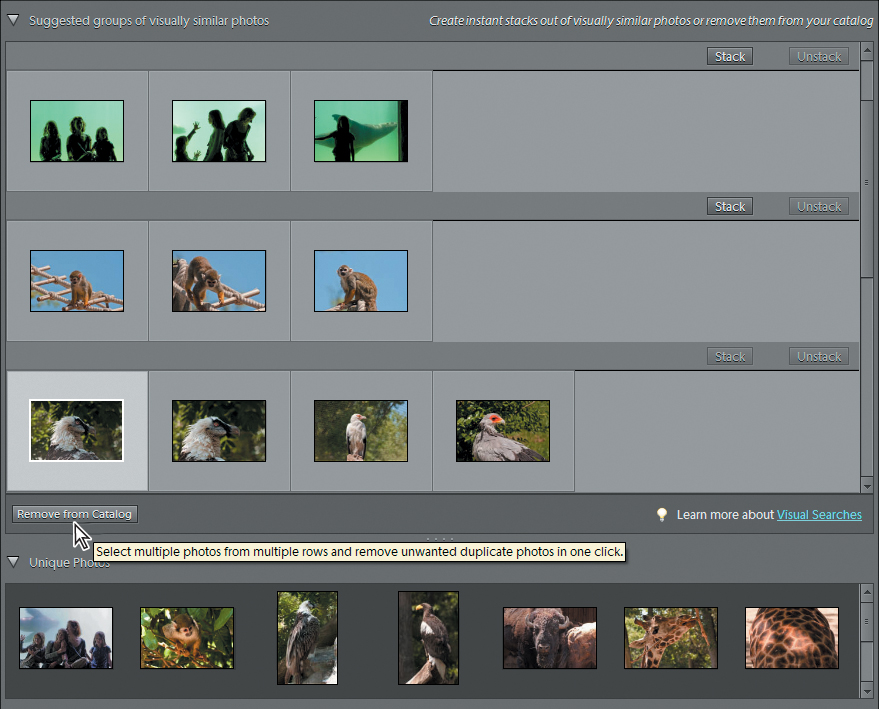
2. Choose Find > By Visual Searches > Search For Duplicate Photos. Because you initiated the search without first making a selection of images Photoshop Elements searches for duplicates amongst all the photos currently displayed in the Media Browser.
The Duplicate Photos search can be particularly helpful when you’re dealing with photos captured with your camera’s auto-bracketing or multi-burst modes.
3. Work through the list of suggested groups of similar photos. For each group, either click the Stack button at the right of the group header to create a stack, remove selected photos from your catalog by clicking the button at the lower left, or do nothing. Don’t forget that you can drag photos in and out of the Unique Photos pane to customize the groups. When you’re done, click Done.
Congratulations—you’ve reached the end of Lesson 3! In this lesson, you’ve exploered advanced options for importing photos from your camera and learned how to acquire images from a video or a PDF file. You’ve created version sets, stacks, and albums, and discovered more techniques for finding and managing your files.
Before you move on, take a moment to review what you’ve learned, and test your command of the concepts and techniques presented in this lesson by working through the following questions and answers.
Review questions
1. How can you automatically create and apply keyword tags to images while importing them from a digital camera or card reader?
2. What does the Photoshop Elements De-Interlace filter do?
3. What does the Auto Smart Fix command do?
4. What are Version Sets and Stacks?
5. What is the main difference between grouping files using shared keyword tags and grouping them in an album?
Review answers
1. In the Advanced Photo Downloader dialog box, choose Custom Groups (Advanced) from the Create Subfolder(s) menu. Next, choose an option including Custom Name from the Group Name menu, and then enter a Group Name in the Custom Name field on the separator bar above each group of thumbnails. Finally, activate the option Make ‘Group Custom Name’ A Tag before clicking Get Photos.
2. The Photoshop Elements De-Interlace filter can improve the appearance of a still frame acquired from a video by removing the artifacts caused by the fact that a video picture consists of two interlaced half-pictures taken at slightly different times. The De-Interlace filter removes either the odd or even fields in a still image from video and replaces the discarded lines by duplication or interpolation from the remaining lines.
3. The Auto Smart Fix command corrects the overall color balance and improves shadow and highlight detail, if necessary. The Auto Smart Fix command automatically groups the edited copy of the photo with the original in a version set.
4. A version set groups an original photo and its edited versions. Stacks are used to group a set of similar photos, such as multiple shots of the same subject or photos taken using your camera’s burst mode or auto-bracket feature. A version set can be nested inside a stack: if you edit a photo that’s already in a stack, the photo and its edited copy are put in a version set that is nested inside the original stack.
5. The main difference between grouping files in an album, rather than with a shared keyword tag, is that in an album you can rearrange the order of the files.