
4. Creating Projects
Lesson Overview
Photoshop Elements makes it simple to create stylish, professional-looking projects to showcase your photos. Choose from the preset themes and layouts—or create your own designs from scratch—as you put together a range of creations from greeting cards and Photo Books to animated slide shows and online albums.
Use your own images in personalized CD or DVD jackets and labels, calendars, collages, and digital flip-books. Combine images, text, animation and even music and narration, to produce unique multimedia creations.
Whether you’re designing your own coffee table book, sharing your photos online, or creating personalized gifts for family and friends, Photoshop Elements will help unleash your creativity.
This lesson will familiarize you with the Create mode by stepping you through some basic techniques and simple projects:
• Using artwork from the Content library
• Creating a personalized greeting card
• Working with layers, layer styles, and effects
• Telling a story with a stylish Photo Book
• Fitting text to a project
You’ll probably need around two hours to complete this lesson.
Photoshop elements offers a huge library of design themes, layout templates, and clip graphics that make it easy to produce eye-catching projects using your own photos. Show loved ones how much you care with stylish personalized greeting cards; preserve and share your precious memories in a sophisticated Photo Book or combine pictures and mementos to tell an evocative story in an artistic Photo Collage.
Getting started
You can start by importing the sample images for this lesson to the CIB Catalog that you created at the beginning of Lesson 1.
1. Start Photoshop Elements and click Organize in the Welcome Screen. If the Backup/Synchronization dialog box appears, click Remind Me Later. You’ll learn about this feature in Lesson 5.
2. Check the name of the active catalog in the lower left corner of the Organizer window. If your CIB Catalog is already loaded, you can skip step to step 3. If another catalog is currently loaded, choose File > Catalog, select your CIB Catalog in the Catalogs list, and then click Open.
3. Choose File > Get Photos And Video > From Files And Folders. In the Get Photos And Videos From Files And Folders dialog box, locate and select your Lesson04 folder. Disable the option Get Photos From Subfolders and all of the automatic processing options; then, click Get Media.
4. In the Import Attached Keyword Tags dialog box, select the Lesson 04 keyword, and then click OK. Click OK to close any other alert dialog box.
Before you start working on this lesson, make sure that you’ve installed the software on your computer from the application CD (see the Photoshop Elements 10 documentation) and that you have correctly copied the Lessons folder from the CD in the back of this book onto your computer’s hard disk (see “Copying the Classroom in a Book files” on page 2). You should also have created a working catalog (see “Creating a new catalog” on page 8).
Thumbnails of the images you’ve just imported appear in the Media Browser and the Lesson 04 tag has been listed in the category Imported Keyword Tags. If you’ve already completed Lessons 1, 2, and 3, the Imported Keyword Tags category has become a little too cluttered to be useful. You can take this opportunity to do some housekeeping before the lesson begins.
5. If necessary, collapse the Albums panel so that you can see as much of the content of the Keyword Tags panel as possible. In the Keyword Tags panel, collapse all but the Imported Keyword Tags category. Control-click / Command-click to select all the imported keywords other than the four numbered Lesson tags; then, drag the selected tags to the category Other.
Exploring the artwork library
Photoshop Elements makes it quick and easy to create distinctive photo projects by providing an extensive collection of themes, backgrounds, frames, text styles, clip-art shapes and graphics in the Content library. Although this artwork is also available in the Create mode, we’ll start by exploring the Content panel.
1. In the Organizer, choose Edit > Deselect to make sure you have no images selected in the Media Browser. Click the arrow on the Fix tab above the Task Pane and choose Full Photo Edit from the menu.
By upgrading your basic Elements Membership to Plus, you can access an even wider range of templates, themes, and artwork, and fresh content will be delivered directly to your computer regularly.
2. In Full Edit mode, choose Window > Reset Panels or click the Reset Panels button (![]() ) at the top of the workspace. By default, the Effects, Content, and Layers panels are open in the Panel Bin. Choose Window > Favorites to open the Favorites panel as well.
) at the top of the workspace. By default, the Effects, Content, and Layers panels are open in the Panel Bin. Choose Window > Favorites to open the Favorites panel as well.
3. Drag the Content panel by its name tab out of the Panels Bin, onto the header of the Project Bin. When you see a blue highlight around the Project Bin, release the mouse button. Enlarge the Content panel by dragging the top border of its header bar upwards. In the Panels Bin, collapse the Layers and Effects panels by double-clicking their headers. The Favorites panel expands to fill the Panels Bin.

What you see displayed in the Content panel depends on the options set with the sorting menus and filter buttons above the sample swatches.
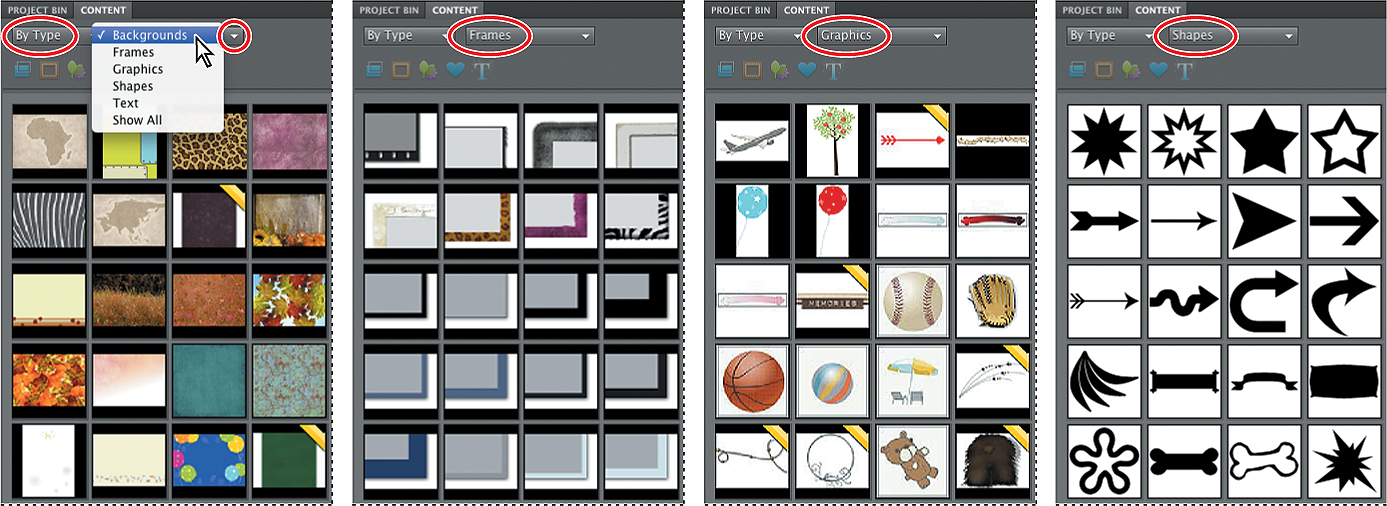
4. In the Content panel, By Type is selected in the sorting menu at the upper left of the panel. With this setting, the contents of the library are sorted by functional category. The second sorting menu, to the right, lists the categories Backgrounds, Frames, Graphics, Shapes, Text, and Show All. Choose each option in turn and scroll down the Content panel see the artwork available.
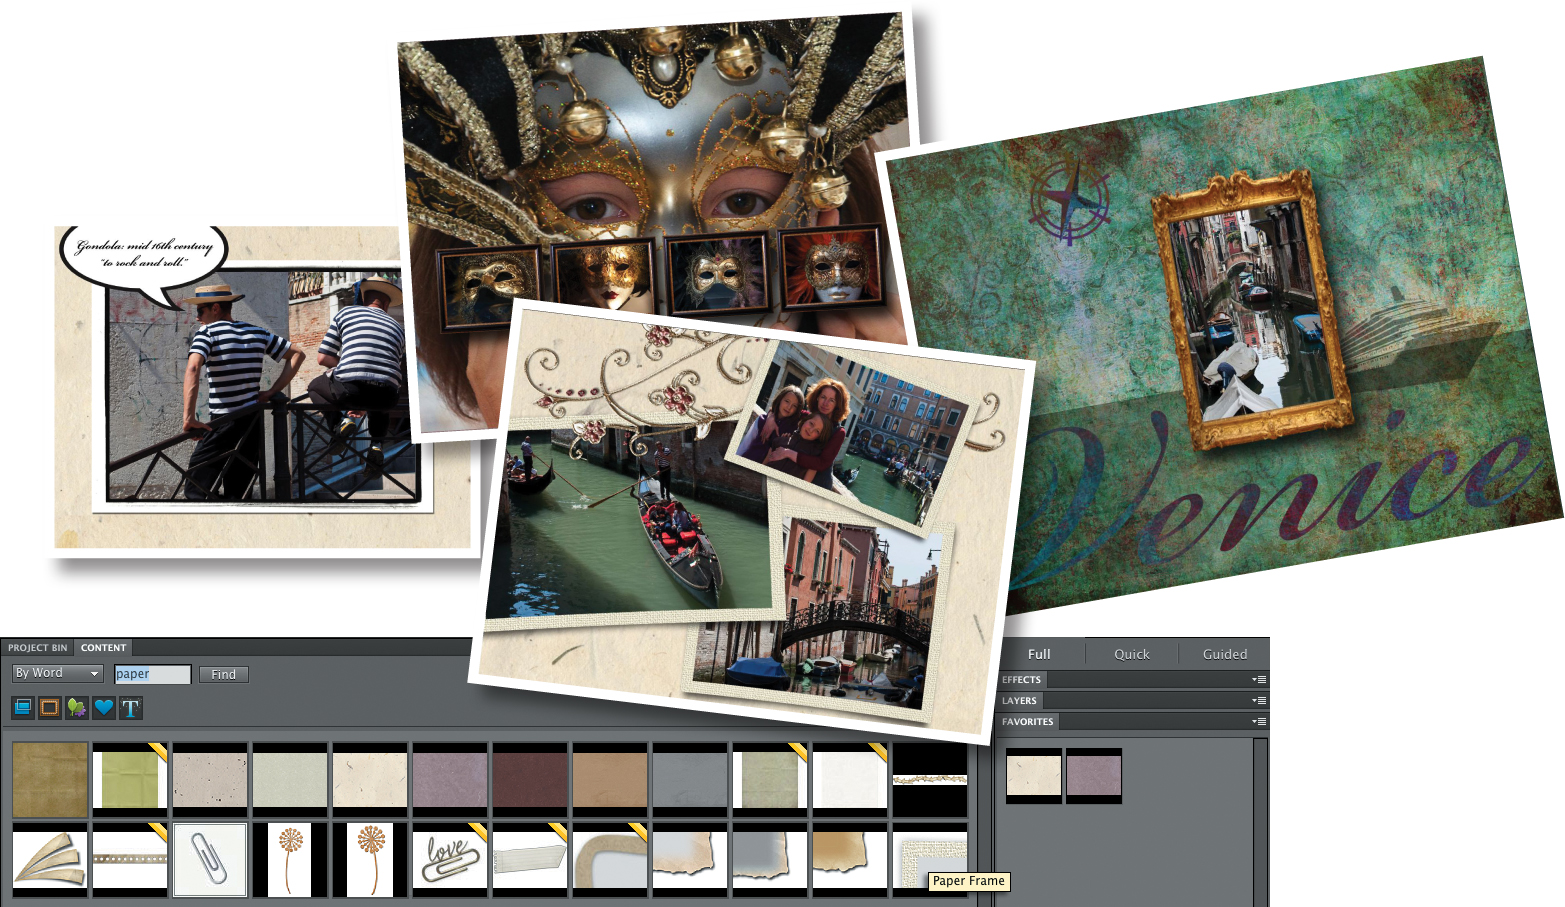
5. Choose By Word from the sorting menu; then, type paper in the search box and click Find. Make sure that all of the filter buttons below the sorting menu are activated, as shown in the illustration below. Drag the fifth swatch—the background “Handmade Paper 03”—into the Favorites panel and release the mouse button when you see a blue line highlighting the panel. Add the background “Handmade Paper 04” and the frame “Paper Frame” to the Favorites panel. You’ll use these items later in this lesson.


To see the name of an artwork item displayed in a tooltip, hold the pointer over the swatch for a moment. Use the same method to see the names of the content filter buttons.
6. Swipe over the word “paper” in the search box and type travel. Click to disable the Backgrounds, Frames, Shapes, and Text Effects filters below the sorting menu, leaving only the Graphics filter active. Click Find. Drag the items “Compass 02” and “Cruise Ship” into the Favorites panel.

7. Activate the Backgrounds and Frames filters once more. From the sorting menu, choose By Color; then choose Black from the colors menu. Add the background “Black Folded Paper” and also the frame “Basic Black 40px” to your collection in the Favorites panel.

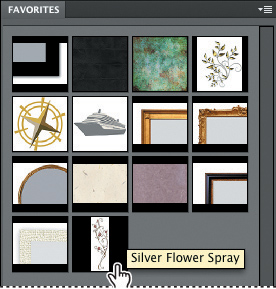
8. From the sorting menu, choose By Style and select Vintage from the styles menu. Collect the background “Blue Swirly” and the frames “Gold Frame 1,” “Gold Frame Ornate,” “Gold Frame Round 2,” and “Old Black & Gold Frame.” Disable the Backgrounds and Frames filters, leaving only the Graphics filter active. Choose Decorative from the styles menu; then, add “Brass Leaves” and “Silver Flower Spray” to your favorites.
As you’ve seen, the Content library includes a great many backgrounds, frames, graphics, shapes and text styles. At first, the number of choices may seem a little overwhelming, but a little practice with the sorting and filtering controls will make it quick and easy to locate the artwork items you need. The search and filter functions in the Content panel are not available on the Artwork tab in Create mode, so it can save you time to do a little advance planning and assemble the items you want for a project while you’re in Full Edit mode, using the Content and Favorites panels in tandem as you’ve just done.
You can also use the Favorites panel to store Filters and Layer Styles from the Effects panel. To complete this exercise, you can add a few effects that you’ll use to liven up and refine your photo projects.
9. Expand the Effects panel by clicking its name tab. Activate the Layer Styles filter at the top of the panel and choose Bevels from the categories menu. Drag the Simple Sharp Inner bevel style swatch to the Favorites panel. Change the Layer Styles category to Drop Shadows and add both the “High” and “Low” drop shadow swatches.

10. Click the Reset Panels button (![]() ) at the top of the workspace; then, click the Organizer button (
) at the top of the workspace; then, click the Organizer button (![]() ) at the top right to return to the Organizer.
) at the top right to return to the Organizer.
Creating a greeting card
Personalized greeting cards based on your own photos make a great way to show friends and family how much you care—a really attractive card can spend months on a loved one’s mantelpiece and may even be framed and displayed with pride.
You can include one or more images on each page of a greeting card and either print it on your home printer, order prints online, or save it to your hard disk, and then send it via e-mail. Once you’ve begun your greeting card, the Create tab offers controls for navigating between pages, and easy access to layout templates, artwork, and effects to help you to create sophisticated designs quickly and easily.
Choosing a size and theme
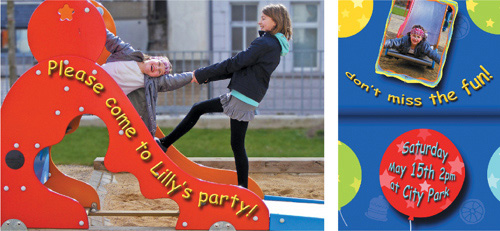
For this project you’ll use two photos to create a folded invitation card.
1. In the Organizer, click Show All in the Find bar above the Media Browser. In the Keyword Tags panel, expand the Imported Keyword Tags category, and click the find box beside the Lesson 04 tag to isolate the images for this lesson.
2. In the Media Browser, select the images card_1.jpg and card_2.jpg.
3. Click the Create tab above the Task Pane. On the Create tab, click the Greeting Card button. The Greeting Card window opens.
If you don’t see file names displayed below the thumbnail images in the Media Browser, ensure that the Details check box in the bar above the browser pane is activated and choose View > Show File Names.
4. At the left, the Sizes pane lists size options for various online services; choose the third listing under Shutterfly: 7.00 x 5.00 inches (Folded, Landscape). From the Themes pane, choose Colorful. You can use a theme “as is”, or as a design template that you can customize. The preview shows that this theme will make a good starting-point for our design, with a front page layout occupied by a single image. Make sure Autofill With Selected Images is activated; then, click OK.

Although the Sizes pane lists options compatible with various online services, any greeting card can also be printed from your home printer. The choice of online services depends on your location and your operating system.
Photoshop Elements takes a few moments to create the appropriate number of pages, place the selected images in the template, and generate a preview. The card design appears in the Edit window and the Create tab presents the Pages panel, where you can click the thumbnails to navigate between the pages in your layout. A thumbnail for your as-yet-untitled photo project appears in the Project Bin.
Positioning photos and replacing frames
You can start to customise your project by tweaking the layout for both pages.
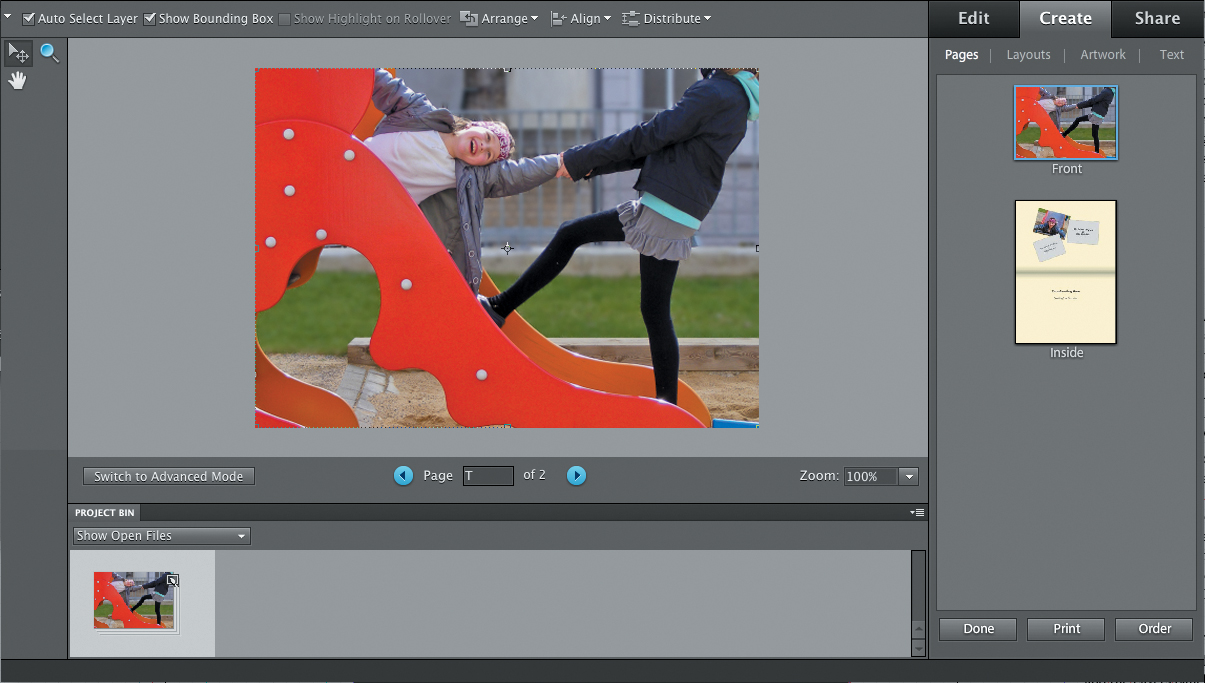
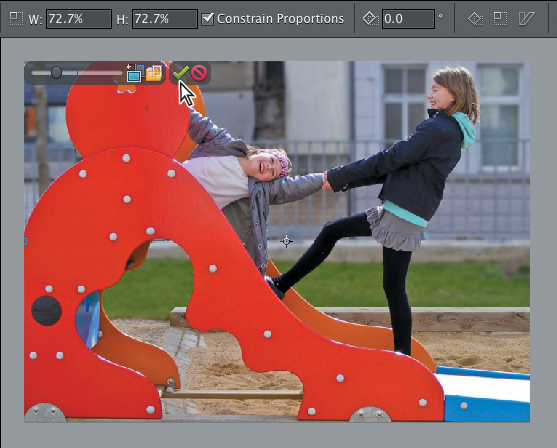
1. Right-click / Control-click the cover page photo in the Edit window and choose Position Photo In Frame from the context menu. A control bar appears at the upper left of the image, with a scaling slider and buttons to re-orient the image or replace it with another.

2. Drag the scaling slider to the left, reducing the size of the photo until it is just a little wider than the page. Keep an eye on the Width (W) and Height (H) values in the tool options bar above the Edit window; we reduced the photo to 72.7%. Use the arrow keys on your keyboard, or simply drag the image to position it as shown in the illustration at the right. When you’re satisfied with the size and position of the photo, click the green check mark at the right of the control bar to commit the changes you’ve made.
3. In the Pages panel on the Create tab, select the Inside layout. Click inside either of the empty image place-holders to select it, taking care not to click too close to the instruction text. Shift-click the other empty frame to add it to the selection; then, press Backspace / Delete on your keyboard. Click Yes to confirm the deletion, and then delete both text frames in the lower part of the layout.
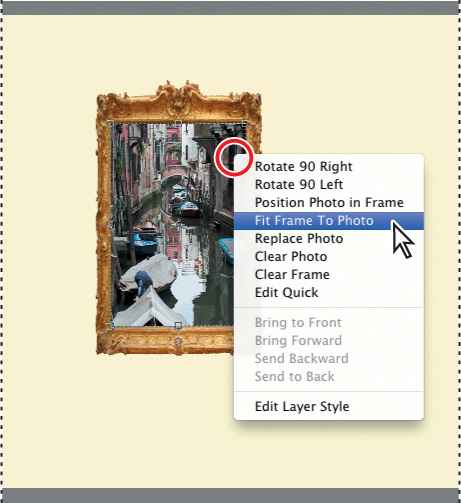
4. Right-click / Control-click the occupied image frame and choose Fit Frame To Photo from the context menu. Drag the handle at the lower right of the bounding box to scale the photo to about 120%. You don’t need to use the Shift key; the proportions are constrained by default. Drag the photo a little to the right to centre it horizontally on the page. When you’re satisfied with the result, click the green check mark at the lower right of the image to commit the changes.
5. Click Artwork at the top of the Create tab. The thumbnail menus present a subset of the artwork from the Content library, with choices most likely to be appropriate for the theme you selected. Collapse the Backgrounds category, and then scroll down in the frames menu to locate the “Groovy” frame.
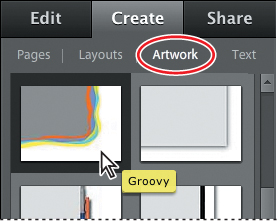
6. With the photo still selected in the Inside layout, either drag the “Groovy” frame swatch from the Artwork panel and drop it directly onto the image, or simply double-click the swatch in the Artwork menu.
Replacing the background image
Each photo project theme consists of a different preset combination of background artwork, image frame, graphics, layer effects and text styles. In some cases you may be happy with the un-edited result once your image has been placed in the layout but in other instances you may wish to treat the theme as a starting point or template and go on to customize the design.
All the design elements can be moved, replaced, or deleted. Images (with or without frames) can also be duplicated, which is one way to add more photos to the layout if you wish.
1. Click the Switch To Advanced Mode button at the left below the Edit pane.
There are two major changes in the workspace: the Layers panel has opened below the Create tab, and the Artwork menu now contains all of the backgrounds, frames, and graphics from the Content library, rather than a limited set. Note, however, that the sort and filter functions you used in the Content panel in Full Edit mode are not available on the Artwork tab.
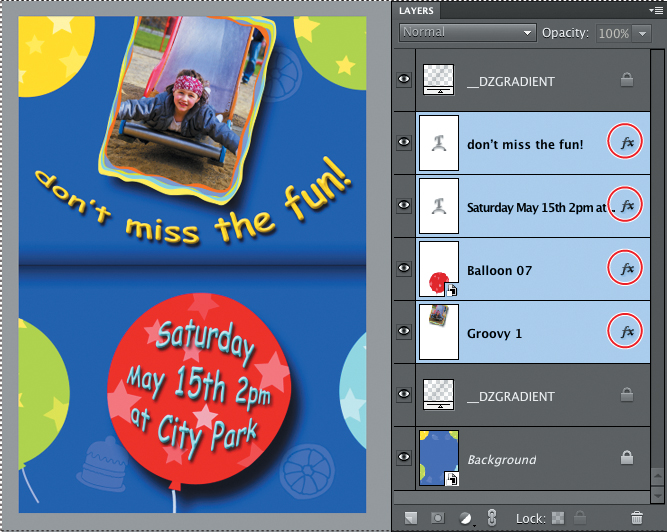
2. Hide the Project Bin by double-clicking its header. Drag the upper edge of the Layers panel’s header bar upwards as far as it will go. You can see that at this point this page is made up of four layers. Items on higher layers appear in front of the contents of lower layers.

The Layers panel displays a separate layer for each element in the layout.
Starting from the bottom, the Background layer contains background art from the Content library, marked with a Smart Object icon in the lower right corner. You can ignore the locked _DZGRADIENT layers—these non-printing layers contain the shading between facing pages for on screen viewing. Above the Background in the stacking order is the layer with the currently selected framed photo.
3. Click to activate the Artwork tab. Scroll down a little in the Backgrounds menu to Locate the background “Balloons.” Either double-click the Balloons background swatch, or drag it onto the background in the Edit window, keeping an eye on what happens in the Layers panel, as well as the preview.
Photoshop elements automatically replaces the old background with your new choice, despite the fact that the background layer was not selected. Background artwork can be scaled, rotated, and moved—but for the purposes of this exercise we’ll accept the default placement.
A Smart Object is resolution independent; it can be scaled or rotated repeatedly without any degradation of the image. For each transformation, the image data is re-drawn from a source file that remains in its original state.
Adding graphics from the Content library
You can use clip-art items from the Content library to create atmosphere, to add dimension, movement, or humour to a design, or to suggest associations that will link your images with other elements in the layout in a way that tells a story.
1. Scroll through the Graphics category on the Artwork tab to locate the red balloon (Balloon 07). Drag the swatch onto the lower half of the Inside layout.
2. Drag the graphic to position it on the page, and use the bounding box handles to scale it as shown in the illustration. When you’re satisfied with the placement of the item, click the Commit button (![]() ) to commit the changes.
) to commit the changes.

When the Move tool is active, you can use the arrow keys on your keyboard to move the project elements in small steps instead of dragging them.
Adding text to a layout
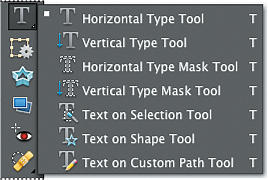
With the Type tools accessible in the Advanced Mode, you can place editable type anywhere in your layout in several different ways. Photoshop Elements includes several variants of the Type tool. We’ll start with the default variant.
1. In the toolbox, select the Horizontal Type tool (![]() ).
).
2. Set up the tool options bar as shown in the illustration below. Choose Comic Sans MS from the Font Family menu and Bold from the Font Style menu. In the Font Size text box, type 30 pt and then press Enter / Return on your keyboard. Choose Center Text (![]() ) from the paragraph alignment options. Click the color swatch to open the color picker.
) from the paragraph alignment options. Click the color swatch to open the color picker.

3. Move the pointer over the preview in the edit window and sample the light blue of the balloon at the lower right. Click OK.

4. Click to place the type insertion cursor a little above the center of the red balloon. Type Saturday, press Enter / Return on your keyboard, and then type May 15th 2pm. Press Enter / Return again; then, type at City Park. Click the Commit button (![]() ) in the tool options bar to commit the text.
) in the tool options bar to commit the text.
5. Select the Move tool (![]() ) in the toolbox; then, center the text on the red balloon.
) in the toolbox; then, center the text on the red balloon.
6. Select the Type tool again and click the color swatch in the tool options bar. Sample the yellow of the balloon at the upper left. Change the font size to 44 pt. Click between the framed image and the central fold of the card layout and type Don’t miss the fun!. Click the green Commit button in the tool options bar to commit the text; then, use the Move tool to adjust its placement as necessary.

Don’t press the Enter or Return keys on the main part of your keyboard to accept text changes. When you have active text in your file, these keys add a line break in the text. Click the Commit button in the tool options bar to accept the text or press the Enter key in the numeric keypad section of your keyboard.
In the Layers panel the design now has two more layers: one for each text message. Most of the space on the text layers is transparent, so that only the text itself interrupts your view of the layers below.
Whenever you use the Type tool, Photoshop Elements automatically creates a new text layer in your image or layout. The type you enter remains active on the text layer, just like type in a word processing document—you can return to edit its content, scale it, reposition it, or change its color at any time.
Warping text
It’s easy to stretch and skew text into unusual shapes using the Photoshop Elements Warp Text effects; the hard part is to avoid overusing them!
1. Make sure the Type tool is active, and then click anywhere on the text “Don’t miss the fun!” in the Edit window. It’s not necessary to highlight the text because warp effects are automatically applied to the entire text layer.
2. In the tool options bar, click the Create Warped Text button (![]() ) to open the Warp Text dialog box. Choose the Arc effect from the Style menu, making sure the Horizontal variant is activated.
) to open the Warp Text dialog box. Choose the Arc effect from the Style menu, making sure the Horizontal variant is activated.
3. The Warp Text dialog offers several controls for changing the way the effect is applied. Set the Bend value to –50%, reversing the direction of the Arc curve. Set the Horizontal Distortion to +50%, and then click OK to close the Warp Text dialog box. In the Layers panel, the text layer thumbnail now displays a Warped Text icon.

4. The text layer is still editable. To check this out, first click the text layer; then, swipe to select the D with the Type tool and type a lower-case d over it.
5. With the Type tool, click anywhere on the text in the red balloon, and then, click the Create Warped Text button in the tool options bar. This time, choose the Bulge effect from the warp Style menu. Make sure the Horizontal variant is activated, and then set the Bend value to +60% and click OK.

6. Select the Move tool and hold it just outside any of the bounding box handles. Drag with the curved double-arrow cursor to rotate the bulged text slightly in a clockwise direction. Confirm the change. If necessary, use the arrow keys on your keyboard to center the text on the balloon.
Using layers and layer styles to refine a project
Now that all the elements of this page design are in place, you can add a little polish to your project with a few quick touches from the Effects menu.
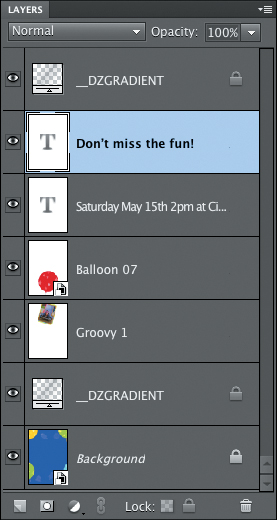
1. In the Layers panel, make sure the layer “Saturday...” is selected.
2. Choose Window > Favorites to open the Favorites panel. If the Favorites panel opens in an inconvenient position, drag it into the Panels Bin by its header bar or position it where it won’t obstruct your view of the card or the Layers panel. In the Favorites panel, double-click the Low drop shadow swatch, and then the Simple Sharp Inner bevel swatch.
3. In the Layers panel, right-click / Control-click the layer “Saturday...” and choose Copy Layer Style from the context menu. Right-click / Control-click the layer “don’t miss the fun!” and choose Paste Layer Style.
4. Finally, select the layer “Balloon 07” in the Layers panel; then double-click the High drop shadow swatch n the Favorites panel. Repeat this process for the layer Groovy 1.
In the Layers panel, there are now four layers marked with the fx icon, indicating that these layers have styles applied. A layer style can be edited by double-clicking the fx icon and adjusting the controls in the Style Settings dialog box.
Fitting text to an image
Photoshop Elements 10 introduces three new variants of the Text tool: the Text On Selection tool, the Text On Shape tool, and the Text On Custom Path tool.
These new tools all enable you to shape your text creatively so that it fits with image elements in your photo. In this exercise, you’ll use the Text On Selection tool to fit a playful message to the photo on the front page of the card layout.
1. With the Horizontal Type tool, click in the yellow text, and then click the Commit button in the tool options bar. This ensures that the Text tool is “loaded” with our bright yellow. Choose Select > Deselect Layers. In the tool options bar, change the font size to 30 pt.
2. In the Layers panel, right-click / Control-click the layer “don’t miss the fun!” and choose Copy Layer Style from the context menu. In the Pages preview on the Create tab, click the Front page thumbnail.
Like all images placed in a photo project layout, our front page photo is contained in a frame; the frame and photo are grouped together on a layer that takes the name of the frame preset. In this particular case, the frame preset is effectively an invisible frame, named “No Frame.” Before you can work in this image with a selection tool, you’ll need to partially ungroup the photo and its invisible container.
3. In the Layers panel, right-click / Control-click the layer “No Frame 1” and choose Simplify Layer from the context menu.
4. Right-click / Control-click the Text tool in the toolbar and choose Text On Selection from the tool variants menu. Over the Edit window, the pointer changes to a selection cursor. Click and drag inside the red panel on the near side of the slide.
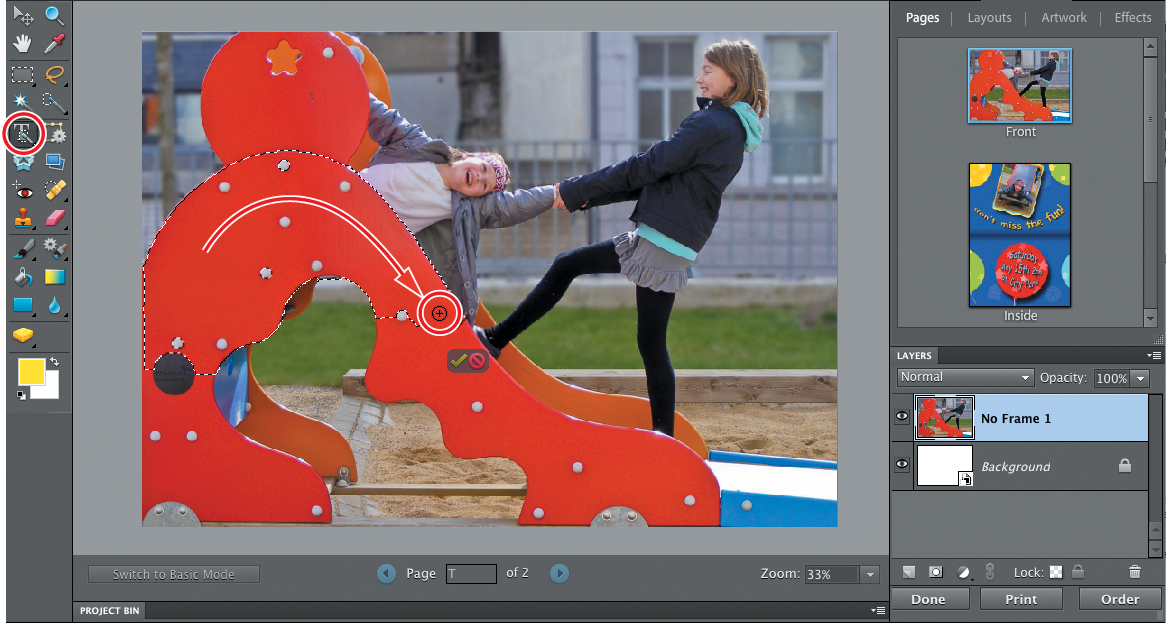
If you make a mistake, hold down the Alt / Option key as you paint to subtract from the selection, or click the Cancel button at the lower right of the selection and start again.
5. When you’re happy with your selection, drag the Offset slider in the tool options bar all the way to the left to contract the selection a little, then click the green Commit button in the Edit window.
6. Move the pointer over the upper edge of the selection; the pointer changes to a text insertion cursor. Click the edge of the selection at a point about half-way down the slide, and then type Please come to Lilly’s party!. Click the green Commit button in the tool options bar to commit the text.
7. Select the Move tool and drag the text, together with its selection path, slightly downwards and to the left, so that it sits within the red panel rather than along its top edge. Activate the Text On Selection tool again and click between the “t” and the “o” in the word “to,” where you can see a small square on the text path marking your original insertion point.
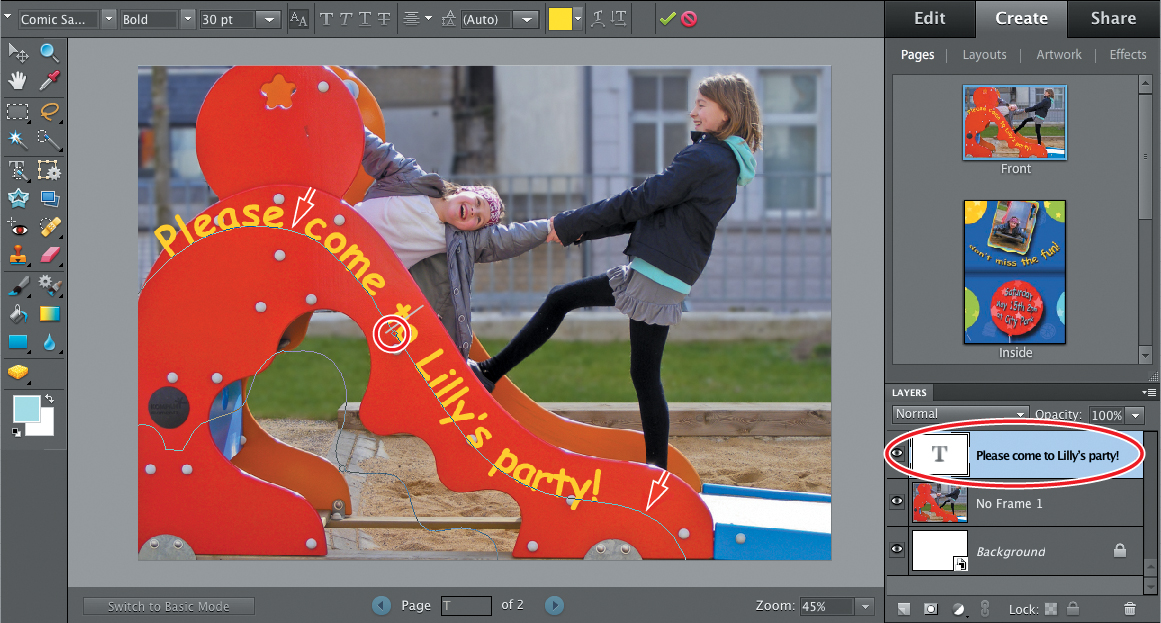
8. Hold down the Control / Command key, while holding the pointer over the text insertion point; the text cursor changes to show two black arrows. Drag the text backwards and forwards a little along the text path, taking care to keep the pointer above the path. When you’re happy with your placement, click the Commit button in the tool options bar.

9. In the Layers panel, right-click / Control-click the text layer and choose Paste Layer Style from the context menu. In the menu bar, choose Layer > Deselect Layers. Congratulations; you’ve completed your first photo project!
10. Choose File > Save. Name the file Invitation and save it to your PSE10CIB > Lessons > My CIB Work folder in Photo Project Format. Activate the option Include In The Elements Organizer, and then click Save. Choose File > Close, click the Reset Panels button (![]() ), and then return to the Organizer.
), and then return to the Organizer.


Producing a Photo Book
A Photo Book is a multi-page digital project that offers an attractive way to present and share your memories and makes the perfect personalized gift for a loved one.
You can either have your completed Photo Book commercially printed and bound by ordering through an online service—great for a sophisticated gift—or print it yourself on your home printer. However, unless you have high-quality, double-sided paper in a large enough size you may have to make some design compromises and possibly scale your layout in the printer dialog box to fit standard paper sizes.
1. Check that you still have the images for this lesson isolated in the Organizer. If you do, you can skip this step; if not, click Show All (if it’s visible) in the Find bar above the Media Browser. In the Keyword Tags panel, activate the find box beside the Lesson 04 tag.
2. Above the Media Browser and the Find bar, set the sorting order to Date (Oldest First). In the Media Browser, select the image photobook_01.jpg; then Shift-click the image photobook_26.jpg to select all the images for this exercise.
If you don’t see file names displayed below the thumbnail images in the Media Browser, ensure that the Details check box in the bar above the browser pane is activated and choose View > Show File Names.
3. Click the Create tab above the Task pane; then, click the Photo Book button. The Photo Book window opens.
4. At the left, the Sizes pane lists size options for various online printing services. Under Print Locally, choose 11.00 x 8.50 inches. From the Themes menu, choose the Colorful template. At the bottom of the dialog box, set the number of pages for the photo book to 8. For the purposes of this exercise, disable the option Autofill With Selected Images; then, click OK.

Although the Sizes pane lists options compatible with various online services, any of the photo book formats can also be printed from your home printer.
You’ll see a progress bar while Photoshop Elements creates pages and generates previews, and then the title page of the photo book appears in the Edit window.
The Pages panel on the Create tab displays thumbnail previews for the title page and four two-page spreads.
5. Thumbnails of the photos you selected in the Media Browser are displayed in the Project Bin. To see more of the images in the Project Bin, drag the top edge of the header bar upwards to increase the depth of the panel, or use the scroll bar.

Changing page layouts
When Photoshop Elements generates Photo Book pages automatically, it applies a different layout to each page randomly, varying the number, size, and positioning of photos so that every spread has a unique design. You can see this reflected in the previews in the Pages panel.
You could, of course, accept the automatic layout as is, but for the purposes of this project, we’ll customise the design page by page. To save time in this exercise, we’ve prepared a tweaked layout designed to fit the lesson images, leaving it up to you to finalize the page layout for the final spread.
1. At the bottom of the Create tab, click Done, and then click Don’t Save to discard the default layout. Choose File > Open. Navigate to and open your Lesson04 folder; then, select the file Venice_Book.pse and click Open. On Windows, select the nested file Venice_Book.pse and click Open.
2. In the Pages panel, click to select the last two-page spread, pages 7 and 8.
3. Click Layouts at the top of the Create tab. In the first category, Different Layouts, locate the page design “4 Up Photobook Landscape” and drag it onto the left page of the Page 7/8 spread in the Edit window.
On Windows, you may see an alert warning that some text layers in the file might need to be updated. In the alert dialog box, activate the option Don’t Show Again, and then click Update.
4. Scroll down the Layouts menu to the One Photo category. Locate the Photobook Landscape template at the left on the bottom row in this category, and drag the layout swatch to the right page of the spread in the Edit window.

5. Inspect the completed base layout in the Pages panel. Including the cover page, the design now includes placeholders for all 26 of the lesson photos. Three of the place-holder frames may be hard to spot as they occupy whole pages (pages 2, 4, and 5) and have smaller frames arranged on top of them.
6. Click to select the Title Page at the top of the Pages preview.
Rearranging the order of images in a project
When you create a photo book—or any other photo project—and have Photoshop Elements place your photos automatically, the images are arranged in the layout template in the order in which they appear in the Project Bin.
For a multiple-page project such as a photo book, you can save a lot of time and effort by arranging your photos before you begin. An easy way to do this is to shuffle your images in the Project Bin in the Editor.
1. Right-click / Control-click any of the thumbnails in the Project Bin and choose Show Filenames from the context menu.
2. Drag the image photobook_05.jpg to a new position to the left of the image photobook_02.jpg, so that it becomes the second image in the Project Bin.

If you don’t see thumbnails of the lesson images in the Project Bin, choose Show Files Selected In Organizer from the menu just below the Project Bin’s name tab.
It’s that easy! You can move multiple selections of images in the same way. If you find you can’t drag a thumbnail to a new position, you probably have all of the images in the Project Bin selected.
3. Right-click / Control-click the image photobook_05.jpg and choose Auto Fill With Project Bin Photos. Wait while Photoshop Elements places the images and regenerates previews.

4. Hide the Project Bin by double-clicking its header bar.
Working with backgrounds
You can change the background, like any other element in a preset theme template, as easily as you changed the page layout. You can move, rotate, scale, or even delete the preset background, just as you can with a frame or clip-art graphic.
Unlike a framed photo however, you can’t simply select and drag the background image—being the basis for the file, the locked Background layer is a special case. The Background graphic is also a Smart Object, which means that for some operations, it will first need to be “simplified”—unlocked and converted to bit-mapped data—before it can be edited as can other layers.
1. In the Pages panel, click the first two-page spread, pages 1 and 2. Click the Switch To Advanced Mode button, at the left below the Edit window. Choose Window > Favorites to open the Favorites panel. If the Favorites panel opens in an inconvenient position, drag it into the Panels Bin by its header bar or position it where it won’t obstruct your view of the layout or the Layers panel.
2. In the Favorites panel, double-click the swatch for the background Black Folded Paper. Watch as the Background layer in the Layers panel is updated.

The background image has been scaled to fit the width of the two-page spread, though the full-page image on page 2 is obscuring the right half.
We could make more of the sparse, subtle textural detail in this background by reducing it so that it covers only the area where it is needed. To move, scale, or rotate the background, you first need to “free” the Content library image on the Background layer, much as you need to temporarily ungroup a photo from its frame before you can move the image independently within the frame.
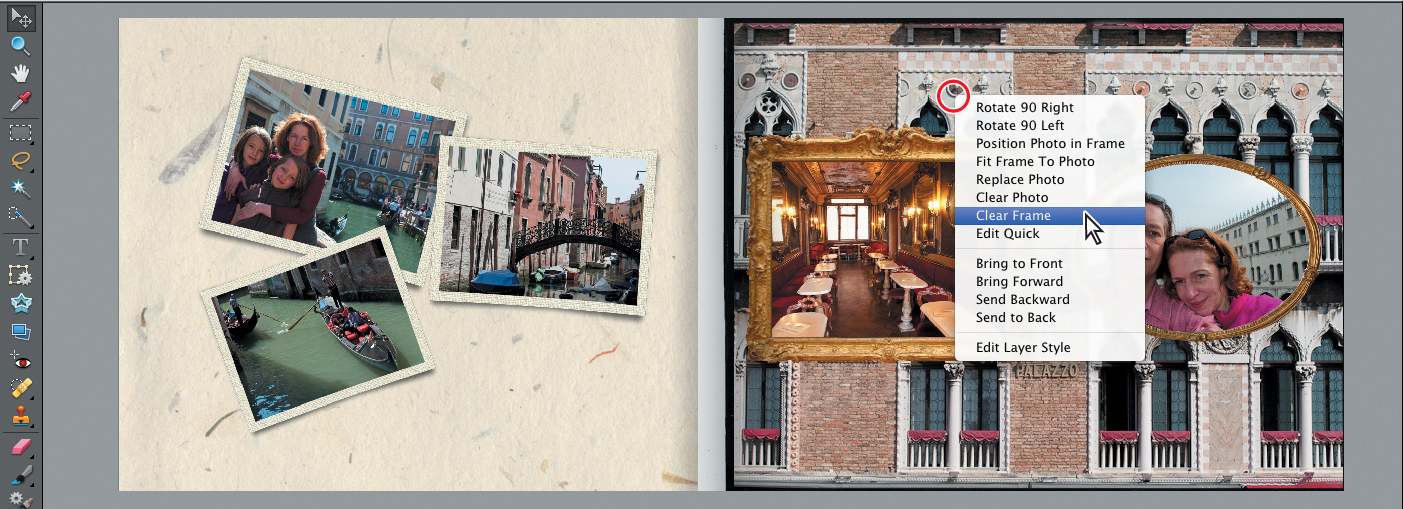
3. Right-click / Control-click the full-page image on the right page of the spread and choose Clear Frame from the context menu. You now have a clear view of the line where the inside edges of the facing pages meet.
4. Right-click / Control-click the background on the left page and choose Move Background. The Background layer becomes active in the Layers panel and a bounding box surrounds the graphic, though most if it is out of view; the image is larger than the two-page spread. Test this by dragging the background downwards. Click the Cancel button at the lower right of the bounding box.
5. In order to scale or rotate the background manually, you could drag the image until one of the control handles was visible, but in this case it will be more convenient to use the controls in the tool options bar. Type 50% in the Width (W) text box; with the Constrain Proportions option activated, the Height (H) value is updated automatically. The background image is scaled by 50% from its center.

6. Drag the reduced background artwork and position it flush with the left edge of page 1. Move the image up and down until you’re pleased with the placement of the detail, and then click the Commit button (![]() ) to commit the changes.
) to commit the changes.
7. Without the background covering the entire spread, there is a thin margin of white showing around the large photo on the right page. Click the image; then, click once on any of the bounding box handles. Rather than drag the handles to scale the image and its containing frame, type 101% in either the W ot H text box in the tool options bar and Commit the change.

8. Drag the Basic Black 40px frame swatch from the Favorites panel onto each of the five frames photos in the layout.
9. In the Pages panel, click the third spread in the photo book: pages 5 and 6. Alternatively, navigate to the Page 5/6 spread using the blue right-arrow button below the Edit window preview.

Working with photos and frames
The design theme you chose as a first step in creating your photo book places every photo in a default frame, but each theme’s design differs. You already substituted frames with artwork from the Content library; in this exercise you’ll learn how to manipulate a photo and its frame as a group, and how to modify a photo’s position and orientation independently of its frame.
1. You can start by replacing all seven frames in the spread. Drag the Old Black & Gold Frame swatch from the Favorites panel onto each of the four small images on the left page, and the Paper Frame swatch onto the three photos on the right.
2. Double-click the Handmade Paper 04 swatch to replace the background; then, right-click / Control-click the full-page image on the left and choose Clear Frame from the context menu.
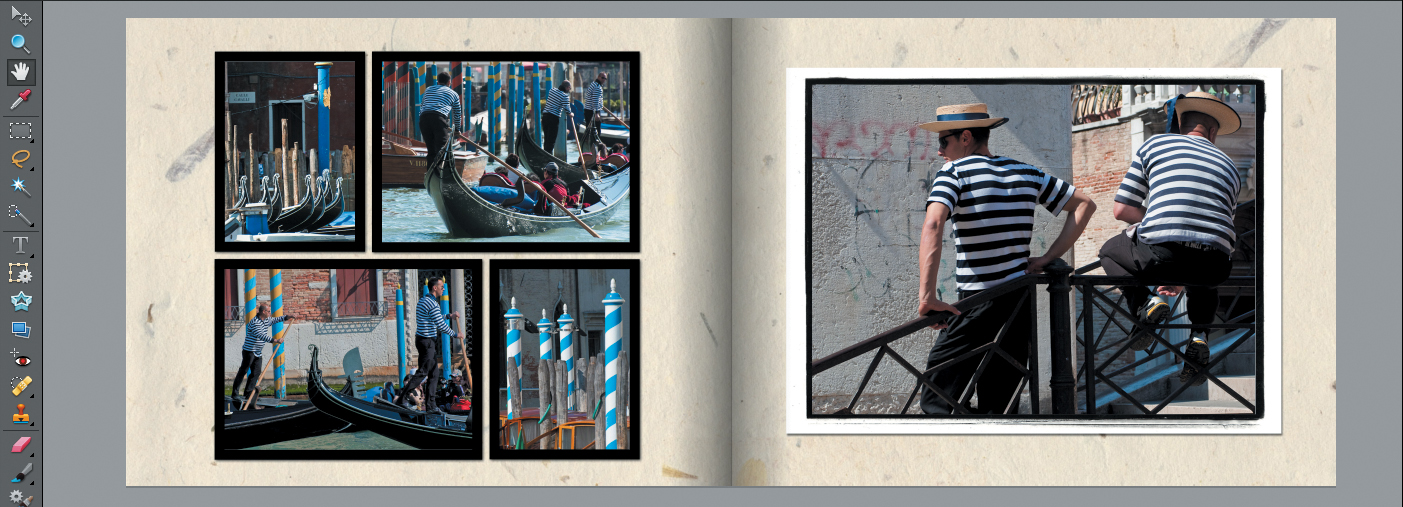
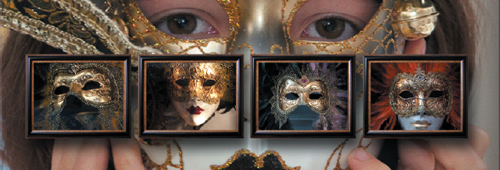
3. To move a framed photo in the layout, simply drag it with the Move tool (![]() ). Shift-click to select all four of the small images on the left page. Hold down the shift key to constrain the movement and drag the row of photos downwards to position them half-way between the girl’s eyes and the mouth of her mask.
). Shift-click to select all four of the small images on the left page. Hold down the shift key to constrain the movement and drag the row of photos downwards to position them half-way between the girl’s eyes and the mouth of her mask.
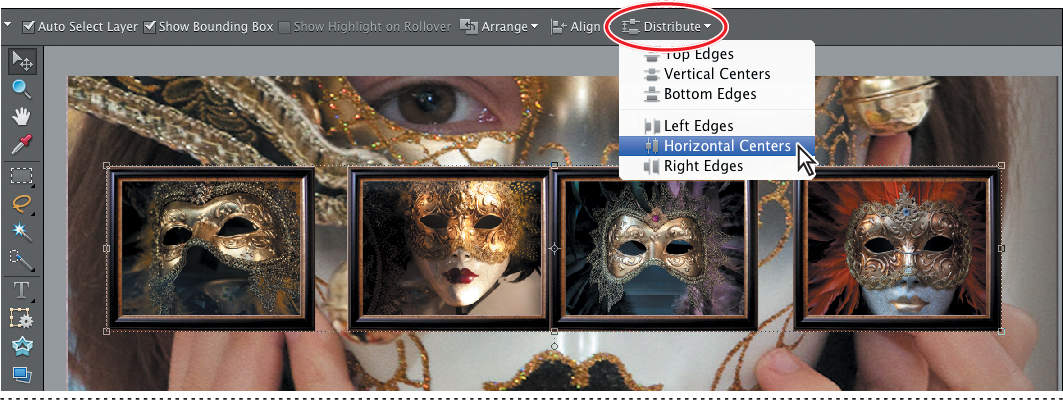
4. Click the background to deselect the photos, and then re-select the one on the left. Hold down the Shift key as you drag the framed image about halfway to the left edge of the page. Move the photo on the right end of the row the same distance in the opposite direction. Select all four images; then, click Distribute in the tool options bar and choose Horizontal Centers from the menu.
When the Move tool is active, you can use the arrow keys on your keyboard to move a selected project element in small steps instead of dragging them with the mouse.
5. Right-click / Control-click each of the three photos on the right page and choose Fit Frame To Photo from the context menu. The frames are re-sized so that their outside borders conform to the edge of the images. Click to select the image at the right, and then drag the handle at the lower right of the bounding box to enlarge the photo—together with its frame—until the right edge extends beyond the limits of the page. You don’t need to use the Shift key; the proportions of the frame group are constrained by default. Click the Commit button.
6. Drag or nudge the three tilted photos into a pleasing arrangement, scaling or rotating them as you wish. To rotate a framed photo manually, select the photo; then, move the pointer close to one of the corner handles, staying just outside the bounding box. When the curved double-arrow cursor appears, drag to rotate the image. Hold down the Shift key as you drag to constrain the rotation to 15° increments. Always click the Commit button (![]() ) to commit the changes.
) to commit the changes.
If your photos do not automatically fill their frames, right-click / Control-click each photo and choose Fit Frame To Photo, and then resize the frame and photo together using the handles on the bounding box. Alternatively, double-click the photo and resize it within its frame by using the slider, as discussed in “Adjusting a photo inside a frame” below.
7. In the Pages panel, click the last spread in the photo book: pages 7 and 8.
Adjusting a photo inside a frame
A photo frame and the image it surrounds occupy the same layer—even though the frame appears to be overlaid on the photo. In fact, by default the layer entry in the Layers panel even takes its name from the frame.
1. You can start by replacing the background and the four smaller frames in the spread. Double-click the Handmade Paper 03 swatch to replace the background; then, drag the Basic Black 40px frame swatch from the Favorites panel onto each of the four images on the left page. You can keep the default frame for the large photo on the right page. Select both of the text frames below the lower left corner of the large image and press Backspace / Delete on your keyboard.
When you move, or scale or rotate a framed photo using the bounding box handles, the photo and frame are transformed together. To move or transform an image independently within its frame, you first need to right-click / Control-click the image and choose Position Photo In Frame from the context menu—or alternatively, isolate the image from its frame group by double-clicking the photo inside the frame with the Move tool (![]() ).
).
Whichever of these actions you take to isolate the image, a control bar appears above the photo, with a scaling slider and buttons to re-orient the image or replace it with another.
2. Right-click / Control-click the image on the right page and choose Position Photo In Frame from the context menu. Hold down the Shift key to constrain the movement as you drag the image to the left within its frame, so that the gondolier on the right is no longer cut off by the border. Commit the change.
3. Use the Zoom tool to focus on the group of four photos on the left page. For each of these photos except the image at the lower right, right-click / Control-click the image and choose Position Photo In Frame. Use the scaling slider to show as much of each image as possible, without resizing the frames. Drag each photo within its frame to reveal the most interesting crop. Commit the changes. We’ll deal with the image at the lower right in the next step.
4. You can rotate the last of the four photos within its frame to straighten the blue and white gondola poles. Right-click / Control-click the image and choose Position Photo In Frame. To rotate the photo inside its frame, move the pointer close to any bounding box handle; when the pointer becomes a curved double-arrow cursor, drag the handle in either direction. Scale and position the photo within its frame as you did with its three neighbors; then, commit the changes.

5. Move the large photo on the right downwards to center it on the page. Double-click the Hand tool to see the entire spread.
6. In the Pages panel, click the second spread in the photo book: pages 3 and 4.
Refining your Photo Book layout using layers and effects
In this exercise you’ll begin to polish your Photo Book design while you refresh some of the skills you’ve picked up in the course this lesson.
You’ll start by customizing pages 3 and 4—the last un-treated spread—then, add some sophistication to the layout using a little layer magic.
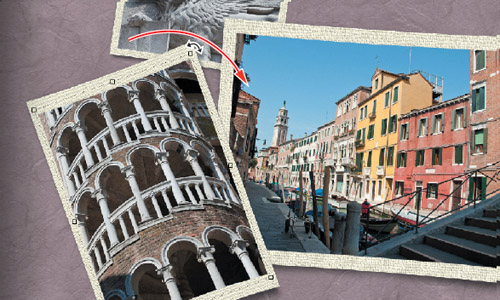
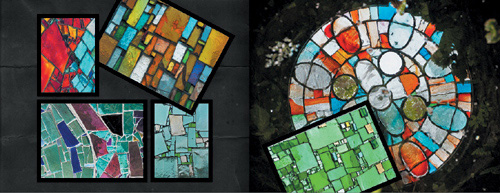
1. Double-click the Handmade Paper 03 swatch to replace the background; then, drag the Paper Frame swatch from the Favorites panel onto each of the three images on the left page. Drag the Gold Frame Ornate swatch from the Favorites panel onto the photo of an antique interior on the right page, and the Gold Frame Round 2 swatch onto the photo of the couple. Right-click / Control-click the large image on the right and choose Clear Frame from the context menu.
2. Right-click / Control-click each of the three photos on the left page and choose Fit Frame To Photo from the context menu. Drag or nudge the three tilted photos to position them, and scale or rotate them as you wish. If you want to change the stacking order of a photo, right-click / Control-click the image and choose Bring To Front, Bring Forward, Send Backwards, or Send To Back from the context menu. Scale, move or rotate each photo within its frame as needed, referring to the previous exercises if you need to refresh your memory.
3. For each of the two gold-framed photos, first make sure you are happy with scaling and placement; then, select the framed image, right-click / Control-click its layer in the Layers panel, and choose Simplify Layer. Without this step, it would not be possible to apply layer styles to these particular framing groups.
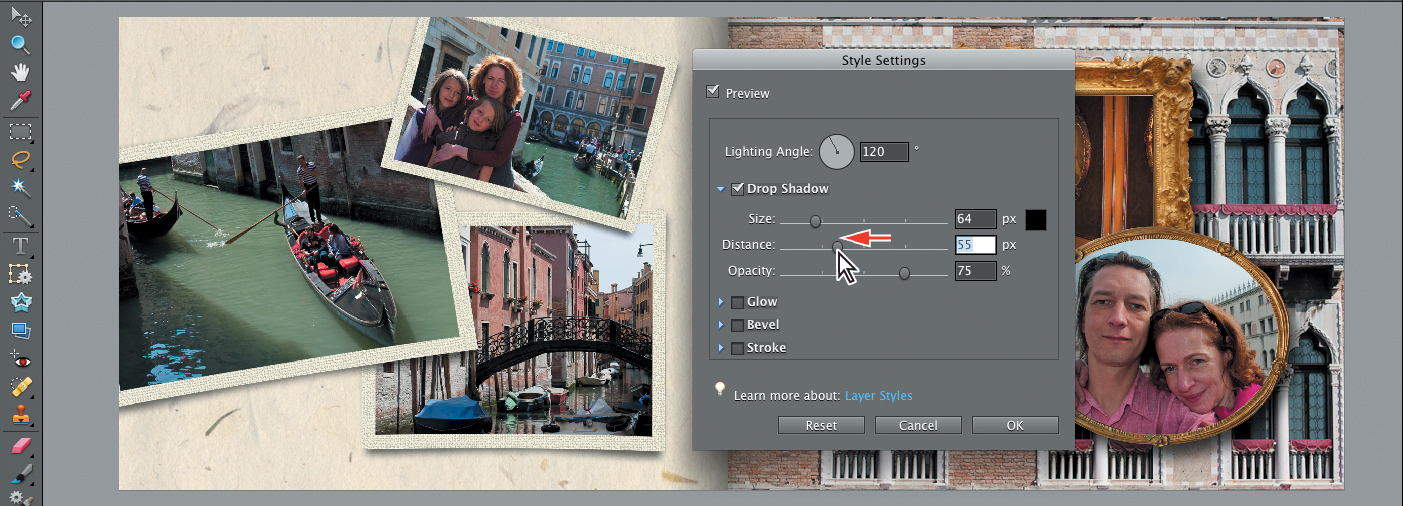
4. Drag the High drop shadow swatch from the Favorites panel onto each of the simplified images. Double-click the fx icon on each of the simplified layers in the Layers panel to open the Style Settings dialog box where you can tweak the drop shadow effect. In both cases, reduce the Distance setting to 55px, and then click OK.
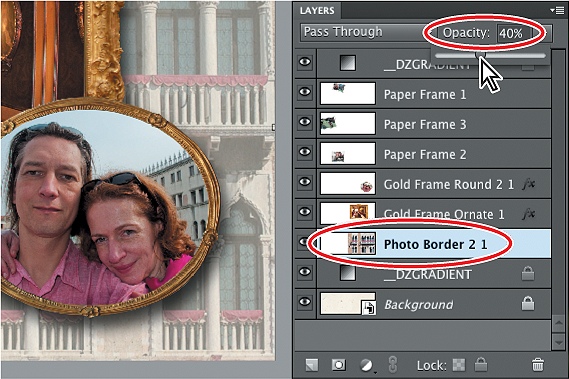
5. Click to select the full-page image on the right of the spread. At the top of the Layers panel, use the slider to reduce the selected layer’s opacity to 40%. Don’t forget that this image can also be scaled, moved, or rotated within its image container frame, even though the frame graphic has been removed.
6. Revisit the Page 5/6 spread and apply the High drop shadow effect to the four small photos on the left page, first simplifying the respective layers in the Layers panel, as you did in step 3, and then editing the effect as you did in step 4.
Re-ordering the pages in a Photo Book
If you feel that a particular spread would look better placed at a different point in your photo book, it’s very easy to change the page order.
1. You can start by revisiting the Page 1/2 spread. Move, tilt and scale the upper right photo of the group on page 1 to break up the regular arrangement a little. Rotate and position the smaller image on page 2 to cover the out-of-focus foliage at the bottom of the full-page image.
2. In the Pages panel, drag the Page 1/2 spread downwards. Release the mouse button when you see an insertion line appear between the Page 3/4 and Page 5/6 spreads.

The Pages panel previews are regenerated and the pages are re-numbered. If the layout preview is slow refreshing, click each spread in the Pages panel in turn.
Adding graphics to a project
The Photo Book is almost complete. Before adding text, you can liven up the design with a judicious use of graphics from the content library. You can start by creating some atmosphere on the title page: the front cover of your photo book.
1. Use the blue navigation buttons below the Edit pane, or click in the Pages preview, to move to the title page.
2. The preset text frames included in many of the page layout templates are very useful for simple titles, captioning, and notes, but you’ll create your own text layers in the next exercise. Select both of the text frames below the lower left corner of the framed image and press Backspace / Delete on your keyboard; then, confirm the deletions.
3. Select the framed photo, and then click any of the bounding box handles. In the tool options bar, type 30% in the Width (W) text box; with Constrain Proportions activated, the Height (H) value is updated automatically. Click the Commit button. While the framed photo is still selected, double-click the Gold Frame Ornate swatch in the Favorites panel. Right-click / Control-click the image and choose Fit Frame To Photo.
4. In the Favorites panel, double-click the Blue Swirly swatch to replace the background. In the Layers panel, right-click / Control click the Background layer and choose Duplicate Layer from the context menu. Click OK to accept the default name for the duplicate layer. At the top of the Layers panel, set the layer blending mode to Multiply, and the opacity to 50%.
5. In the Edit window, hold down the Shift key to constrain the movement as you drag the new layer downwards until it covers only the lower third of the page.

6. Drag the swatch for the graphic Cruise Ship from the Favorites panel to the right side of the page. Drag the bounding box handles to scale the graphic up to around 200%. Choose Image > Rotate > Flip Layer Horizontal, and then drag the ship to position as shown in the illustration below. To move the graphic behind the framed photo, right-click / Control-click the cruise ship and choose Send Backward from the context menu.
7. Drag the graphic Compass 02 from the Favorites panel to the upper left of the page, placing it as shown. At the top of the Layers panel, change the blending mode for the new layer to Difference, and set the layer’s opacity to 70%. Change the opacity for the Cruise Ship layer to the same value.

Placing text in a layout
In this exercise you’ll create a title for the front page, and add a text message on the last page of the photo book.
1. Select the Horizontal Type tool; then, choose Bickham Script Pro from the font menu in the tool options bar across the top of the Edit pane. Set the font style to Regular and type 460 pt in the font size text box. Ensure that the Anti-aliased button beside the font size text box is activated so that the edges of the letters are smoothed, and then choose Center Text from the text alignment menu. Click the small white triangle beside the text color swatch in the tool options bar—not the swatch itself—and sample Light Green Cyan for the text color.

2. Click below the photo and Type Venice, then commit the text. In the Layers panel, change the blending mode for the text layer to Difference and the layer opacity to 90%; then drag the text layer downwards to position it below (behind) the framed photo. Center the title horizontally. Select the compass and the photo together and drag them to the right to center the frame above the “n” in Venice. De-select the compass and move the frame up to the height of the dot on the “i.”
3. Finally, right-click / Control-click the text layer in the Layers panel and choose Simplify Layer from the context menu; then, apply the High drop shadow effect. In the Layers panel, double-click the fx icon on the text layer and reduce the drop shadow’s Distance setting to 55px (see the illustration on the next page).

4. In the Pages panel, click the last spread in the layout, and then click Artwork at the top of the Create tab. Scroll down the artwork menu to locate the graphic “Speech Bubble 03.” Drag the bubble onto page 8; then, choose Image > Rotate > Flip Layer Horizontal. Use the handles on the bounding box to scale the shape and position it as shown in the illustration at the right.

5. With the speech bubble graphic still selected, switch to the Type tool again. Keep the same font, but change the font size to 36 pt and the font style to Semibold. Click the white arrow beside the Leading text box—to the left of the text color swatch—and change the setting from Auto to 30 pt. Click in the center of the speech bubble and type Gondola: mid 16th century. Press Enter / Return, and then type “to rock and roll.” (include the quote marks and period). Click the Confirm button and drag the text to adjust its position.
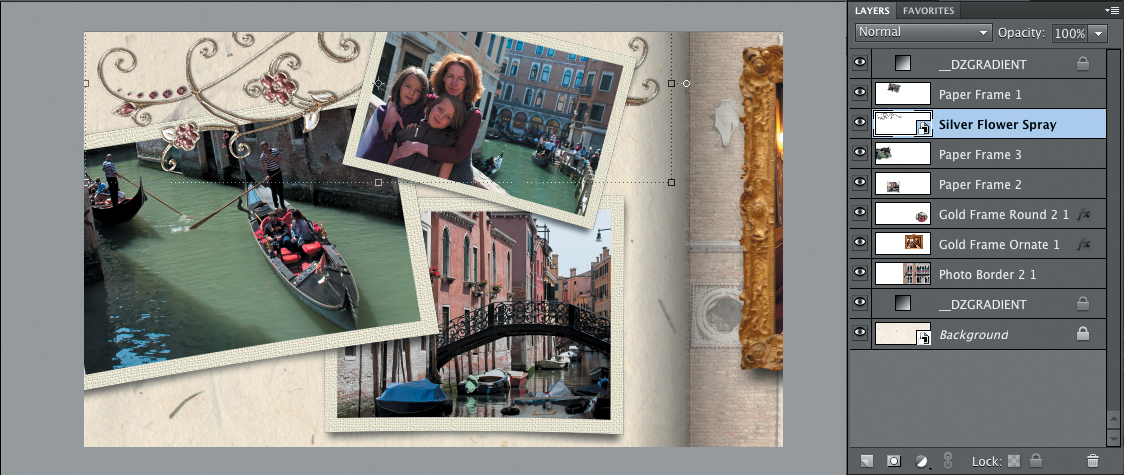
6. Just two more flourishes and you’re done! Use the navigation buttons below the Edit window preview, or the Pages panel, to move to the Page 1/2 spread. Drag the graphic Silver Flower Spray onto the left page. Rotate the artwork 90° counter-clockwise, and scale it to almost the width of the page. Move the flower spray so that it extends off the top edge of the page. In the Layers panel, move the layer Silver Flower Spray down in the order, so that it lies below (behind) at least one of the paper-framed photos, and above (in front of) at least one other.
7. Drag the Brass Leaves graphic onto the right page of the Page 5/6 spread twice. Scale and rotate each copy so that plenty of the leaves lie in areas not occupied by framed photos, particularly at the right side of the page. In the Layers panel, move both Brass Leaves layers below (behind) all of the Paper Frame layers. Change the blending mode for both Brass Leaves layers to Screen.

8. The Photo Book is complete; choose File > Save. By default photo projects are saved in Photo Project Format, a multi-page document format that preserves text and layers so that they can be edited later. You could also choose to save the project as a PDF file that can be shared as an e-mail attachment.

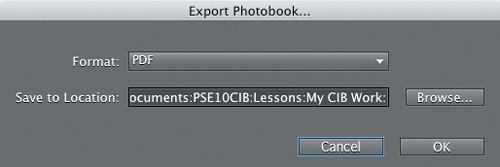
9. Choose File > Export Photobook. In the Export Photobook dialog box, choose PDF from the Format menu. Click Browse to specify your My CIB Work folder as the Save To Location; then, click OK. Choose File > Close.
Congratulations! You’ve completed the lesson. You’ve learned about using the preset Theme and Layout templates, explored the Content library, and become familiar with a variety of methods for locating the content you need. You’ve also learned how to manipulate backgrounds, frames, and text, and the basics of working with layers and applying layer styles. Before you move on to the next lesson, take a moment to refresh your new skills by reading through the review on the next page.
Review questions
1. How do you begin a new project such as a greeting card or Photo Book?
2. How do you scale and reposition a photo in a photo project?
3. How do you change the order of the pictures in a photo book?
4. How can you find the items you want amongst all the choices in the Content library?
5. What are layers, how do they work, and how do you work with them?
Review answers
1. To create a project, select a project option on the Create tab in the Panel Bin by clicking one of the project buttons or choosing from the More Options menu. The Create tab presents page previews and navigation controls, and provides access to layout templates, backgrounds, frames, graphics and effects.
2. You can scale or rotate a framed photo by dragging the bounding box handles and move it by dragging. To scale, rotate, or move a photo within its frame you need to double-click the image to isolate it before using the same techniques, so that the changes affect the photo independently of its frame.
3. You can change the order of images in a photo book by dragging them to new positions in the Project Bin below the Edit pane.
4. You can sort and search the items in the Content library by using the menus and buttons at the top of the Content panel. You can sort the content by type, activity, mood, season, color, keywords and other attributes. Use the Favorites panel to assemble a collection of the items you’re most likely to use, rather than looking through the entire library every time you want to add an artwork item to a project.
5. Layers are like transparent overlays on which you can paint or place photos, artwork, or text. Each element in a photo project occupies its own layer—the background is at the bottom and the other elements are overlaid in the order in which they are added to the project. Photos from the Project Bin are placed in the order of their capture date, so that the oldest is on the lowest layer. You can drag the thumbnails in the Project Bin to change that order. You work with layers in the Layers panel, where you can toggle their visibility, change their order and add layer styles and effects. The checkerboard grid areas in the layer thumbnails represent the transparent parts of the layers through which you can see the layers below.