Lesson 11. Publishing Smart Templates for Final Cut Pro X
Lesson Files
Motion5_Book_Files > Lessons > Lesson_11
Media
Motion5_Book_Files > Media > Audi_FCP_X, Audi_Motion
Time
This lesson takes approximately 45 minutes to complete.
Goals
Preview, apply, and adjust Final Cut Pro title effects
Modify Final Cut Pro effects in Motion
Create a Smart Motion Template from scratch
Publish template parameters
Motion is a powerful motion graphics and effects tool on its own. But when you add Final Cut Pro X to the mix, a new world of possibilities opens up. All the preset effects that are available in Final Cut Pro—titles, transitions, generators, and other effects—are actually Motion project files, called Smart Motion Templates. They were created in Motion and can be modified in Motion.
Furthermore, you can create your own Smart Motion Templates from scratch and then publish them to Final Cut Pro. And not only can you publish the project, you can choose to publish specific parameters of the project, which makes those parameters available to the Final Cut Pro editor.

In this lesson, you’ll open and review an edited Final Cut Pro project. You’ll then apply, adjust, and modify a preset title. From there, you’ll create your own smart template title and choose several parameters to publish to Final Cut Pro.
In order to follow all the steps in this chapter and the next, Final Cut Pro X must be installed on your computer.
Setting Up the Final Cut Pro Project
In this lesson, you will create effects for an edited project in Final Cut Pro. To enable Final Cut Pro to see the project, however, you must move the Final Cut Pro project folder and event folder to the proper locations.
1. In the Finder, open a new window, navigate to Motion5_Book_Files > Media > Audi_FCP_X and open the Final Cut Events and Final Cut Projects folders.

In each of these folders you’ll find a folder named Audi Promo. You must place these two Audi Promo folders in the enclosing folders that already exist in your Movies folder with the same names (Final Cut Events and Final Cut Projects). When you’ve done this, Final Cut Pro will be able to find them.
2. Open a new Finder window, and from the sidebar, select the Movies folder.
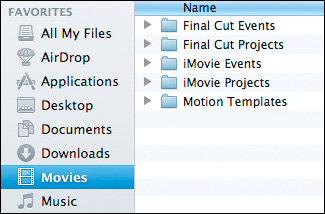
If you have already been working with Final Cut Pro, you may find other folders inside the Final Cut Events and Final Cut Projects folders. If you don’t have Final Cut Events and Final Cut Projects folders in your Movies folder, you should create them for this lesson.
3. Drag the Audi Promo folder from Media > Final Cut Events to Movies > Final Cut Events.
4. Drag the Audi Promo folder from Media > Final Cut Projects to Movies > Final Cut Projects.
5. Confirm that the Audi Promo folders are now contained in Movies > Final Cut Events and in Movies > Final Cut Projects.

6. Open Final Cut Pro. If necessary, press Command-0 to open the Project Library.
The Audi Promo project now appears in the Project Library, along with any other projects you may have created.

7. Double-click the Audi Promo project to open it, and play the project.

The project is a short promotional spot for the Audi R8, shot on location at the Infineon Raceway in Sonoma, California. The edit is completed, or “locked,” but the speaker needs to be identified.
Working with Effects Presets
Final Cut Pro contains a huge number of preset effects, transitions, titles, and generators collectively called “effects”—and you can modify all of them in a variety of ways. In this exercise, you’ll work with a title effect from the Titles Browser.
1. Click in the middle of the Paul_006 clip to select it, and then press the Up Arrow to move the playhead to the first visible frame of the clip, which will appear in the Viewer.

To identify the speaker, Paul Gerrard, you can add a title on top of the video clip.
2. In the Toolbar under the Viewer, hover the pointer over the Titles Browser (T) button to view the tooltip, and then click it.

As the tooltip indicates, clicking this button shows or hides the Titles Browser, which contains over 150 titling effects organized into five categories.
In addition to the Titles Browser, Final Cut Pro X includes browsers for Effects, Transitions, Generators, Themes, Photos, and Music and Sounds.
3. Select the Lower Thirds category, and then move the pointer across the first title, Clouds.

By moving the pointer, or skimming, across the preview thumbnail, the title animation plays in both the thumbnail and in the Viewer so you can preview the title before applying it to your project.
4. Scroll down to the Boxes section and skim the Left title to preview the animation. With a few adjustments, this title may work with your video clip.
5. With the playhead still located on the first visible frame of the Paul_006 clip, double-click the Boxes > Left title to add it to the project at the playhead position. The title appears as a purple bar over the video clip.
6. Press Command-= (equals) twice to zoom in on the playhead position and then select the title.

When the title is selected and the Timeline active, the title is outlined in yellow. In the Viewer, the two lines of text each have a box around them, indicating that they are editable.
You may need to move the playhead to a frame of the title where you can see all the text on the screen.
7. In the Viewer, double-click the Up Next text to select a single word, and then press Command-A to select all the text in that text box. Type PAUL GERRARD, and press the Esc key to exit the text editing mode.

8. Now replace the Name text with Paul’s title: Director of Training, Audi Sportscar Experience. That’s a long title. It doesn’t even fit on the screen! You can fix that in the Inspector.
9. At the far right of the toolbar, click the Inspector (I) button to open the Inspector.
The Inspector has buttons across the top for adjusting different aspects of the title.
10. Select the Text button. In the Canvas, reselect all the title text in the Viewer, and then in the Inspector, adjust the Size parameter to about 52 so that Paul’s full title fits on the screen.

11. In the Inspector, move the pointer over the Face bar, and click Show when it appears. Click the Color swatch, and choose a red color for Paul’s title.

12. Close the Colors window, click the red title text, and press the Esc key to exit the text editing mode.
The Text Inspector contains many of the parameters for modifying text you have already seen in Motion. Feel free to change the font; add an outline, glow, or drop shadow; or change other properties to your liking.
The first text box (containing Paul’s name) has a blend mode applied to “cut out” the text from the blue background and reveal the video underneath. Therefore, you can’t alter its color as you can for the second text box.
Unlike Motion, where you should save your work often, Final Cut Pro X has no File > Save command! A Final Cut Pro project is saved for you automatically after every change you make.
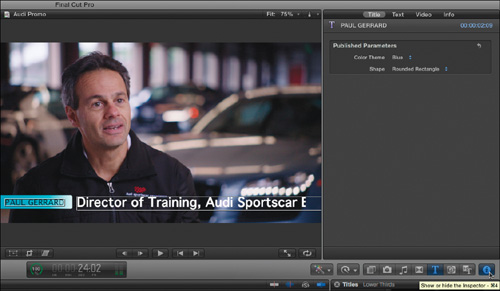
13. In the Inspector, click the Title button, and from the pop-up menus, try out the different values available for Color Theme and Shape.

The parameters available in the Title Inspector have been “published” by the title designer—that’s why they are called Published Parameters. Although the arrow shape works for this promo, none of the color theme choices work that well. But you can create more options by modifying the title in the application that created it: Motion.
Modifying Effects Presets
The beautiful thing about all these titles in the Titles Browser (and just about all the transitions, effects, and generators in their respective browsers) is that they were created using Motion. This means that you can modify them in Motion! Although these presets are very flexible, if you can’t get them to look precisely the way you want, you can open a copy in Motion, and change the preset to suit your purpose exactly. In this exercise, you’ll make a few changes to the Left title to make it a better match for the Audi project.
1. In the Titles Browser, Control-click (or right-click) the Boxes > Left thumbnail, and from the shortcut menu, choose “Open a copy in Motion.”

The title opens in Motion with the name Left Copy.moti. The .moti indicates that this project is a Motion Title project. In the Layers list, you’ll find a new layer called a rig with two layers beneath it: Color and Shape. These layers are “widgets.” You’ll create your own Rig and widgets in Lesson 12.
2. Select the Color widget, and press F4 to open the Widget Inspector.

The Color pop-up menu contains the same color options you saw in Final Cut Pro. Let’s add a new item to the list.
3. From the Color pop-up menu, choose Purple (the last option). Click the Add (+) button next to the Color pop-up menu, and in the highlighted Color field, type Red.

By selecting the last menu item before adding a new one, your new menu option appears at the bottom of the list.
4. Use the color picker to change the color of the middle color swatch to a light red, and then change the color of the bottom color swatch to a darker red.

The top swatch for the text color has no visible effect because the text within the colored shape is transparent.
Let’s also change the default shape and font so that you won’t need to make these changes in Final Cut Pro.
5. In the Layers list, select the Shape widget; and in the Widget Inspector, from the Shape pop-up menu, choose Arrow.

6. Open the Scene 2 group, the Lower 3rd group, and the text group. Select the Title 1 text layer, and use the HUD to change the font to Arial Bold and Size to 46. Then change the Title 2 text layer to Arial Regular and its Size value to 52.

7. Select the Gradient layer. In the Canvas, Control-click the gradient to choose the Edit Position tool, and drag the rightmost color tag to the left to brighten more of the arrow tip.

8. Press Shift-S to return to the Select/Transform tool, and then press Command-S to save your work.
Because this project is a “.moti” title project, it is automatically published to the Titles Browser in Final Cut Pro. Let’s see for ourselves.
9. Press Command-Tab to switch to Final Cut Pro X. The title in the Timeline hasn’t changed. When you change a Final Cut Pro effect project in Motion, only the Browser copy is changed.
10. In the Titles Browser, reselect the Lower Thirds category, and scroll down to the Boxes section.

There’s your new “Left Copy” title, and its preview reflects the new default color and arrow shape.
“Left Copy” may not be the best name for this title. While you could choose Save As in Motion to change the name, the “Left Copy” project would remain in the Titles Browser. To change the name, in the Finder, navigate to User/Movies/Motion Templates/Titles/Lower Thirds/Boxes. Rename the Left Copy folder and the Left Copy.moti Motion project as you want. Then quit and reopen Final Cut Pro.
11. With the title still selected in the Timeline (as indicated by the gray outline), in the Titles Browser, double-click the Left Copy title to update the Timeline version.
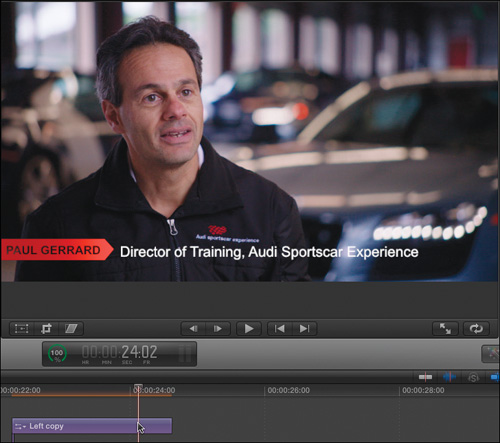
The Timeline title name updates to Left Copy, and the design updates in the Viewer. Notice, however, that the custom text you previously entered remains intact, so you don’t need to retype it.
12. Move the playhead to the start of the title, and play the project to watch the animation. Clearly, a viewer won’t have enough time to comfortably read the full title.
13. Drag the right edge of the title to extend its duration by 2 seconds, and then play the title. It now lasts long enough to read.

Terrific. You can see how easy it is to apply Final Cut Pro preset effects and modify them in Motion. But for the most creative control, you’ll want to create your own Smart Motion Templates from scratch.
Creating Smart Motion Templates
As you’ve learned, the effects in Final Cut Pro X (effects, transitions, titles, and generators) were created in Motion using special project types called Smart Motion Templates. In this next exercise, you’ll make your own Smart Template and a custom title for the Audi Promo. You’ll also publish some parameters so that you can modify it in Final Cut Pro.
1. Press Command-Tab to return to Motion from Final Cut Pro, choose File > Close or press Command-W to close the current project, and then press Command-N to open a new Motion project.
When you create a new project in Motion, you have to choose the project type. The Project Browser displays five project types. So far, you have worked only with standard Motion projects. The other projects types are Smart Motion Templates for Final Cut Pro.
2. In the Blank category, click the Final Cut Title icon. Change the Preset pop-up menu to Broadcast HD 1080, the Frame Rate to 29.97, and the Duration to 5 seconds.

To see the Final Cut Pro Title icon text, you may need to resize the Project Browser by dragging its lower-right corner.
Because you chose the largest HD preset, this title will automatically scale down when used in Final Cut Pro Timelines with the same aspect ratio but lower resolution project settings. In this case, five seconds should be enough time for the title animation. If not, you can always adjust it in Final Cut Pro.
3. Click Open to open the new project, and press Shift-Z to fit the Canvas to the window.
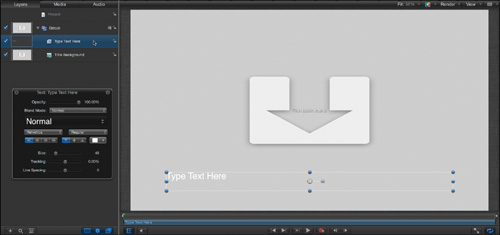
Unlike standard Motion projects that are empty when first opened, each new Smart Motion Template has content specific to each effect type. Final Cut Title projects contain a Text layer, and a “placeholder” layer named Title Background.
This placeholder represents the video under your title in Final Cut Pro and serves two purposes. First, it allows you to add a video clip or an image to the background of the project so that you can design “in context.” Second, any effects you may choose to apply to it (such as filters, behaviors, and masks) will be applied to the video underneath the title in Final Cut Pro.
For this title, you won’t apply any effects to the underlying video, but because you are designing this title to work for a specific shot, it can be helpful to add that shot here.
Although the placeholder layer looks like a Drop Zone (available under the Object menu), it is not the same. Do not delete the Title Background placeholder layer. If you do, it cannot be added back into the project.
4. In the File Browser, select the Movies folder. Locate Final Cut Events > Audi Promo > Original Media > Paul_006.mov, and drag it to the Canvas. When you see the yellow outline, release the mouse button.

The video clip now appears in the Canvas. However, it can be distracting to see it during the design process, so let’s turn it off for the time being.
5. In the Layers list, deselect the activation checkbox to turn off the Title Background layer.
Now you can design on a blank, empty Canvas, but at any time you can turn on the video clip layer to make sure that graphics aren’t blocking the speaker. Speaking of graphics, let’s add some after we save this project.
6. Press Command-S to save the project.
A new dialog appears. Because this project is a Smart Motion Template (specifically, a Final Cut Pro Title), you need to provide some information to establish how it will appear in Final Cut Pro.
7. For the Template Name, type Audi Lower Third.
8. For the Category, choose New Category, and name it Audi.
9. Leave the Theme as None, deselect “Include unused media,” and make sure Save Preview Movie is also deselected because you haven’t designed anything yet.
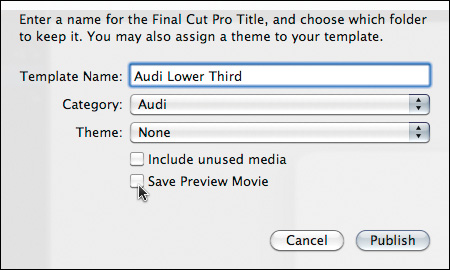
10. Click Publish.
The project is published to Final Cut Pro’s Titles Browser and is immediately available. However, it’s not very interesting yet, so let’s add some graphics and animation.
The project is saved to ~/Movies/Motion Templates, in the appropriate folder for the type of effect—in this case, Titles. The project, media, and thumbnails are contained in a folder with the Category name (Audi), and within that, a folder with the Template name (Audi Lower Third).
11. In the File Browser, navigate to Motion5_Book_Files > Media > Audi_Motion.
This folder contains graphics you can use for designing the title.

12. With the playhead still at the start of the project, add the Asphalt Texture.png and Arrow.png files to Group, and move the Asphalt Texture layer beneath the Type Text Here layer.
13. Select the Arrow layer, and in the Canvas, rotate it 180 degrees. Move it to the right of the text, using the dynamic guides to align it vertically with the text.

You can animate the arrow graphic across the screen, and use it to reveal the asphalt background.
14. With the Arrow layer selected, in the toolbar, click the Add Behavior pop-up menu, and choose Basic Motion > Motion Path.
15. Hold down Command-Spacebar, and drag left in the Canvas to create some room. Then move the starting control point for the motion path off the left side of the screen.
If pressing Command-Spacebar activates the Spotlight search field at the upper-right of your screen, deactivate this keyboard shortcut in the Spotlight section of System Preferences. Or, you can press Z to choose the Zoom tool and drag left in the Canvas, then press Shift-S to return to the Select/Transform tool.

16. Move the playhead to 1:00 and press O to trim the Out point of the Motion Path behavior. Play the project.
If the timing display is currently displaying frames instead of timecode, click the arrow to switch to timecode.
The arrows move across the screen in one second.
17. Save your work.
Completing the Animation
Now, with the basic elements in place, you’ll reveal the asphalt background as the arrows move across the screen by using a new shape and an image mask. Then you’ll animate the text onscreen, and fade everything out to complete the animation.
1. With the Motion Path behavior selected, press Shift-O to move the playhead to the Out point of the behavior. Choose View > Show Full View Area so you can see the arrows when they are offscreen.

2. In the toolbar, choose the Bezier tool, and in the Canvas, draw a shape that fits inside the first arrow on the right and extends all the way back to cover the asphalt image on the left. It doesn’t need to be perfect. It just needs to completely cover the asphalt image.

3. Press Shift-S to return to the Select/Transform tool. Return the playhead to Home, and press I to trim the In point of the new shape to the playhead. Rename this shape layer Mask.
4. In the Canvas, drag the Mask shape back so that it lines up with the arrow to the left of the screen.
5. Now Option-drag a copy of the Motion Path behavior from the Arrow layer to the Mask layer so that the shape will move along with the arrow.

The Mask shape now follows the same motion path as the arrow.
6. Select the Asphalt Texture layer, choose Object > Add Image Mask, and drag the Mask layer to the well in the HUD. This action automatically turns off the visibility of the Mask layer.

7. Play the project. The Asphalt Texture layer is now revealed as the arrows pass over it.
If you find the audio from the video clip annoying, click the small speaker button at the bottom left of the Canvas to mute the audio. Or, in the Project pane, select the Audio list, click the Link button for the audio track to unlink it from the video, and delete it.
Let’s trim the text layer to have it appear after the arrows pass by, and then apply a behavior to animate the text onscreen.
8. Select the Type Text Here layer, move the playhead to 0:07, and press I to trim the layer to start at this frame. In the toolbar, click the Add Behavior pop-up menu, and choose Text Basic > Blur In.
9. In the mini-Timeline, trim the right edge of the behavior to a duration of 20 frames.
10. Scale down the Arrow layer to align with the top and bottom of the Asphalt Texture layer, and play the project.

The opening animation is complete. Now you can put all the elements into a group to fade them out at the end.
11. Close the Arrow, Type Text Here, and Asphalt Texture layers, and then Shift-click them. Choose Object > Group (not New Group), or press Shift-Command-G, to group them. Name the new group Elements.

12. Click the Add Behavior pop-up menu to add the Basic Motion > Fade In/Fade Out behavior to the group, and in the HUD set Fade In to 0.
13. Move the playhead to the end of the project, and press O to trim the Out point of the behavior.
14. Turn on the Title Background layer and play the project to see how it looks in context.
15. Turn off the Title Background layer and save your work.
Using Build In and Build Out Markers
Your title now animates on, remains still so you can read it, and animates off. And you’ve spent some time getting the animation to work just as you want. However, in Final Cut Pro, if the title is trimmed, your animation will speed up or slow down to match the new length. That’s not what you want here.
Fortunately, Motion has anticipated this situation and provides a solution in the form of two specialized markers you can use to force the opening and closing animations to play at their designed speeds, no matter how much your title is “stretched” or “squashed” in Final Cut Pro.
1. Move the playhead to a point a few frames past the opening animation, about 1:05.
2. Choose Edit > Deselect All. Choose Mark > Markers > Add Marker, and then choose Mark > Markers > Edit Marker. A project marker appears in the ruler area of the Timeline.
Remember, pressing Shift-M will also add a project marker even if a layer, group, or effect is selected. When the playhead is parked on a marker, you can press Command-Option-M to open the Edit Marker dialog. You can also double-click a marker to edit it (but you may first need to move the playhead out of the way).
3. From the Type pop-up menu, choose Build In – Optional.

The Build In and Build Out markers “lock in” the opening or closing animation to the number of frames established in the Motion project. “Optional” markers differ from the “mandatory” markers in that they offer the Final Cut Pro user the option to completely bypass the build-in or build-out animation.
4. Click OK.
5. Move the playhead to a point a few frames before the ending fade-out animation, about 4:05.
6. Press Shift-M to add a project marker, and press Command-Option-M to edit the marker. Choose Build Out – Optional, and click OK to change the marker type.
7. Move the playhead out of the way so you can see both markers, and move the pointer over each one.

The marker shapes have changed to small green flags, each pointing toward the animated part of the project. Moving the pointer over a marker displays the marker type. The ruler area between the markers is shaded gold to indicate that this region of the project will be extended or shortened when the title is trimmed in Final Cut Pro. Because this region has no animation, the animated portions are “protected.” That is, they will play at the same speed no matter how long or short the full title plays in Final Cut Pro. Let’s test it.
8. Press Command-S to save your work, and then press Command-Tab to switch to Final Cut Pro.
9. In the Timeline, select the Left Copy title.
10. In the Titles Browser, select the new Audi category, and skim over the Audi Lower Third preview thumbnail.

Your title animates in both the thumbnail and the Viewer, even though you haven’t created a preview movie! This is because when no preview movie is available, Final Cut Pro plays the Motion project itself.
Although Final Cut Pro will play the preview directly from the Motion project, it is good practice to create a preview movie in Motion when your project is completed. The preview movie will load faster and play more smoothly than a preview of the Motion project.
11. Double-click the Audi Lower Third title to replace the selected title in the Timeline, and play the title.

The new title design animates, and it is automatically updated with Paul’s name and title.
12. Trim the title to make it shorter or longer, and play the title animation.
The title still animates on and off at the same speed. What if you didn’t want it to animate at all?
13. Select the title, and then go to the Title Inspector and click the Title button.

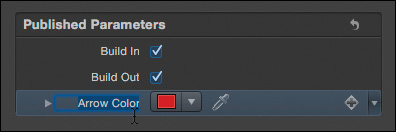
Because you chose optional Build In and Build Out markers, checkboxes appear in the list of published parameters. If you don’t want the title to animate on or off, simply deselect the appropriate checkbox.
14. Deselect the Build In checkbox, and play the title.
As you can see, Build In and Build Out markers are automatically published to the Title Inspector in Final Cut Pro. But you can manually select other parameters to publish as well.
Publishing Parameters
By publishing specific parameters of a Smart Motion Template, you can give a Final Cut Pro editor more control over the look of an effect. For this Audi title, let’s publish parameters that will allow a Final Cut Pro editor to change the color of the arrows, the opacity of the background graphic, and the overall position of the entire title animation.
1. Press Command-Tab to switch back to Motion.
2. Move the playhead to a frame where you can see the Arrow layer. Select it in the Layers list, and from the Add Filter pop-up menu, choose Color Correction > Colorize.
3. In the HUD, click the downward-facing arrow next to the Remap White To color swatch, and choose a red color.

This red will be the default color of the arrows, but you want to be able to change the color in Final Cut Pro.
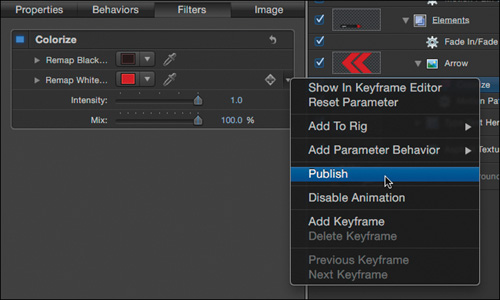
4. Press F3 to open the Filters Inspector.
5. Click the Animation menu for the Remap White To parameter (the small downward-facing arrow at the far right of the parameter name) and choose Publish.
That’s all you need to do to make a parameter available in Final Cut Pro! But you may want to change its name. To do so, use the Project Inspector.
6. In the Layers list, select the Project layer, and then go to the Project Inspector and click the Publishing button.

There is your color swatch. However, “Remap White To” isn’t going to make much sense in Final Cut Pro. Luckily, you can change published parameter names to anything you like.
7. Double-click the Remap White To parameter name, and change it to Arrow Color.
Next, the dark asphalt texture might look better if it were partially transparent over certain shots. Or maybe the Final Cut Pro editor will want to remove it completely. You can enable both scenarios by publishing the opacity of the layer.
8. In the Layers list, select the Asphalt Texture layer.
9. In the HUD, Control-click the parameter name Opacity, and from the shortcut menu, choose Publish.

As you can see, you can publish certain parameters directly from the HUD. Now, let’s allow the Final Cut Pro user to shift the vertical position of the entire animation, just in case it’s blocking something important in the underlying video.
10. In the Layers list, drag the Mask layer into the Elements group.
You’ll change the position of the Elements group, and you want the mask to move with everything else.
11. Select the Elements group, and press F1 to open the Properties Inspector. Click the disclosure triangle for Position, Control-click the Y, and choose Publish. This action publishes the vertical (Y) position of the group containing the entire title animation.

12. Select the project in the Layers list, and return to the Publishing pane of the Project Inspector.
13. Rename Opacity to Asphalt Opacity, and rename Y.Position to Vertical Position.
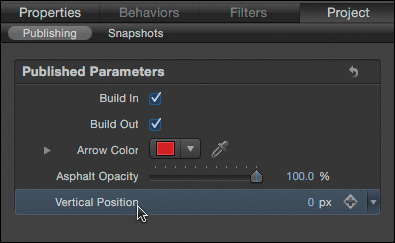
You can even change the order of published parameters.
14. Drag the Asphalt Opacity parameter above the Arrow Color parameter. Then drag it back down again.

The last selected parameter in the Inspector remains selected, as indicated by a highlight. Command-click the parameter to turn off the highlight.
Let’s see how your newly published parameters work in Final Cut Pro.
15. Save your work and switch to Final Cut Pro.
16. With the Timeline title selected, double-click the Browser version of the title to update the Timeline version.
17. In the Timeline, select the title, and in the Title Inspector, experiment with changing the values for Arrow Color, Asphalt Opacity, and Vertical Position. In the Viewer, you can see the arrows change color, the asphalt background fade or completely disappear, and the entire animation move up or down.

Great work! You’ve learned how to work with preset title effects in Final Cut Pro, how to modify a preset title in Motion, how to create your own Smart Motion Template from scratch, and how to publish parameters to give a Final Cut Pro editor more control. In the next lesson, you’ll take this process a step further through the power of parameter rigs.
Lesson Review
1. Name the four kinds of effects in Final Cut Pro.
2. In Final Cut Pro, if you can’t get the look you want for an effect by using the Published Parameters in the Inspector, how could you modify the effect?
3. How do you exit text editing mode in Final Cut Pro?
4. In Final Cut Pro, how can you preview a title animation in both the thumbnail and in the Viewer before applying it to your project?
5. In Motion, what content does a Final Cut Title project already contain?
6. How can you force Final Cut Pro to play your opening title animation at the same speed as your Motion project, no matter how the duration of the title is trimmed in Final Cut Pro?
7. Describe two ways you can publish a parameter of a Motion Smart Template so that it’s available in Final Cut Pro.
8. How can you change the name of a published parameter?
Answers
1. Effects, Transitions, Titles, and Generators
2. Control-click the effect in the Browser, and choose “Open a copy in Motion” from the shortcut menu. Then change anything you like.
3. Press the Esc key.
4. Move the pointer or skim across the preview thumbnail.
5. A text layer and a placeholder layer named Title Background
6. In Motion, add a Build In marker to the Timeline on a frame after the opening animation has completed.
7. In Motion’s Inspector, use the Animation menu, or Control-click the parameter name. Also, for some parameters, you can Control-click the parameter name in the HUD.
8. Select the project in the Layers list. Open the Project Inspector, and click the Publishing button. Double-click any parameter name to change it.
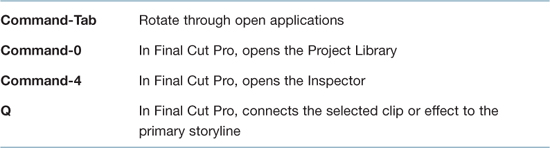
Keyboard Shortcuts