Lesson 3. Creating Animation with Behaviors
Lesson Files
Motion5_Book_Files > Lessons > Lesson_03
Media
Motion5_Book_Files > Media > Rockumentary
Motion5_Book_Files > Media > Stage
Time
This lesson takes approximately 60 minutes to complete.
Goals
Create animation using Basic Motion behaviors
Adjust, copy, and trim behaviors
Use Simulation behaviors
Apply Parameter behaviors
Clone animated groups
Compare animation using behaviors and keyframes
Motion has a unique method for putting the “motion” in motion graphics: using behaviors. So what are behaviors? They are an effect, like a filter or a mask, that you can apply to a layer or group of layers. They allow you to create animation procedurally—that is, they contain a set of instructions that describe how to make an element move, or spin, or fade, so you don’t have to create the animation manually with keyframes.
Motion includes a huge variety of behaviors to animate graphics, video, shapes, particle systems, and text; stabilize footage; track objects; simulate gravity; and even animate cameras to fly around in 3D space.
In this lesson, you will use Basic Motion and Simulation behaviors to animate the first half of the opening title for your Rockumentary project. After that, you will explore Parameter behaviors in a new project.
Adding Basic Motion Behaviors
When you want to float a layer across the screen, rotate it, or fade it into view, you should reach for a Basic Motion behavior. These behaviors create animation using simple drag-and-drop techniques, and they even work in 3D. In the upcoming exercises, you’ll use several Basic Motion behaviors to make graphics appear to tumble through space.
First, let’s play the final Rockumentary animation again to preview what you’ll create in this lesson; then we’ll examine the partially completed project, and add the first behavior.
1. In the Finder, open Motion5_Book_Files > Lessons > Lesson_03 > Rockumentary_Open.mov, and play it.

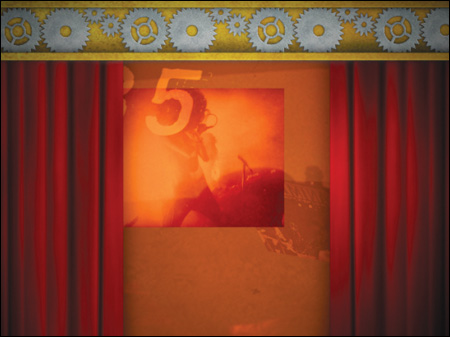
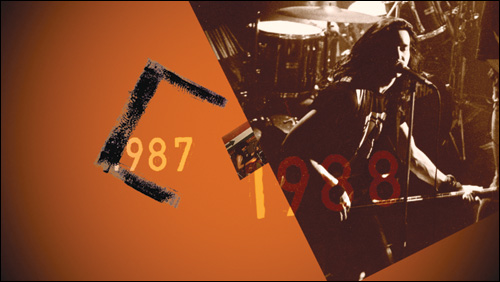
You want to illustrate the touring years of the rock group Pale Divine by creating a cascade of dates and images. In the first 15 seconds of the title, you can animate dates and photos to fade in, spin back into space, and fade out.
2. In the Finder, open Motion5_Book_Files > Lessons > Lesson_03 > Rockumentary Behaviors Start. Save a working copy of the project to the Lesson_03 > Student_Saves folder. You can leave the QuickTime movie open for reference if you like.
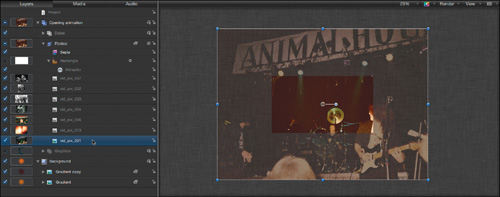
3. In the Layers list, click the disclosure triangles to view all groups and layers.
You can drag up between any two layers or groups to resize all the layers and see more of them without scrolling.
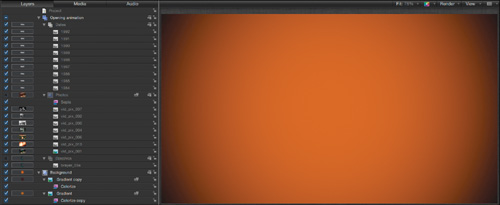
There are two top-level groups: The Background group contains two still-image layers with filters and blend modes applied to create an aged, vignetted background look; and the Opening animation group contains a group of dates, a group of photos, and a group with a brayer image. The icons for all but one of the layers in the Opening animation group are black and white because they don’t exist at the current playhead location. The Photos and Graphics groups are dimmed because they are disabled.
4. If necessary, choose Window > Video Timeline to reveal the Timeline below the Canvas. In the Timeline, open the Opening Animation, Dates, and Photos groups. If necessary, drag the zoom slider to see the full project.
You can increase the height of the Timing pane by dragging up between the Timing pane and the toolbar. You can also resize the layers and groups by dragging between any two of them, but they won’t get as small as they will in the Layers list.

The Dates and Photos layers are staggered in a staircase-like pattern to introduce one after the other. The layer bars in the Photos group are dimmed because the group’s visibility is turned off, enabling you to focus on the dates.
5. Close the Background, Graphics, and Photos groups in both the Timeline and the Layers list. Press the Spacebar to play the project, and then click each of the layers in the Dates group.

The HUD shows that each of the layers has the Overlay Blend Mode applied.
Now that you have a feel for the project’s structure, you will animate the dates. First, you will set a play range around one layer.
6. Stop playback, select the bottom 1984 layer, and press Shift-I to move the playhead to the layer’s In point.
7. Choose Mark > Mark Play Range In or press Command-Option-I.
8. Press Shift-O to move the playhead to the layer’s Out point, press Command-Option-O to set a play range Out point, and then press the Spacebar to play the play range.
At the far right of the transport controls below the Canvas, make sure that Loop Playback is turned on.

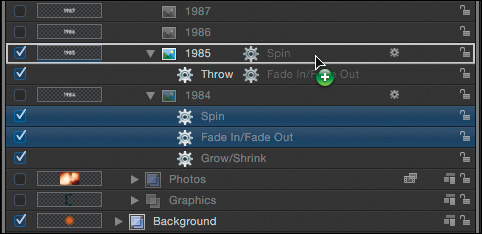
The next two layers, 1985 and 1986, overlap the 1984 layer, which makes them pop onscreen in a distracting way.
9. During playback, turn off the visibility of the 1985 and 1986 layers. You are now set up to animate the 1984 layer by adding several Basic Motion behaviors.
10. Press Command-2 to open the Library. Select Behaviors, and then select the Basic Motion folder. The folder contains eight behaviors.
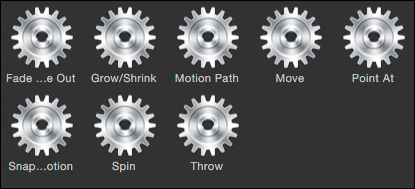
11. Select the Grow/Shrink behavior. The preview area shows an animation of the behavior in action, along with a written description. You can use this behavior to create the illusion that the layer is falling “back” in space.

12. Drag the Grow/Shrink behavior onto the 1984 layer in either the Timeline or the Layers list.
Behaviors appear under the layer they are applied to, just like a filter or a mask. In the mini-Timeline, a purple bar representing the behavior matches the duration of the layer between the play range’s In and Out points. In the HUD, a graphical interface allows you to manipulate the behavior. In the Canvas, nothing appears to happen, even though the project is playing. Many behaviors must be adjusted to create animation.
13. In the HUD, drag inward on a corner of the square. The layer shrinks over the duration of the behavior, appearing to fall back in space.

Be sure to drag from a corner. If you drag an edge handle, the layer will scale nonproportionally.
14. Save your work.
It’s a good start, but the animation could use more pizzazz. Luckily, it’s easy to add multiple behaviors to the same layer.
Stacking Behaviors
You can add multiple behaviors to a layer, and Motion will combine their effects. In this exercise, you apply two additional behaviors: one behavior to make the layer fade into view and then disappear, and another behavior to make the layer tumble as it falls away.
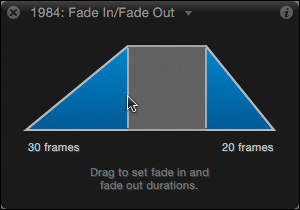
1. From the Library, drag the Fade In/Fade Out behavior onto the 1984 layer.
2. Drag in the HUD to increase the Fade In duration to 30 frames.
To make the layer tumble, you would use the Spin behavior. Rather than return to the Library, this time you’ll use the toolbar to apply the behavior.
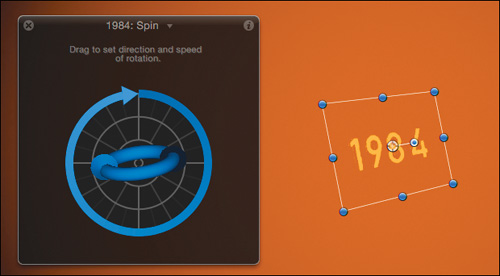
3. In the toolbar, click the Add Behavior pop-up menu, and choose Basic Motion > Spin. The Spin behavior appears underneath the 1984 layer, stacked on top of the other behaviors.

While the Library lets you preview behaviors as you select them, you may find it faster to select behaviors from the toolbar.
4. In the HUD, drag around the edge of the circle clockwise 360 degrees. An arrow indicates the direction and amount of rotation.

The layer now spins around its anchor point, but it is only rotating flat to the screen. It would be more interesting if the layer tilted (like a laptop computer screen) and swung (like a door).
5. In the HUD, drag the sphere containing the 3D arrows. The layer now rotates on all three axes as it shrinks.
With three behaviors applied to this layer, you can adjust each of them in the context of the completed animation while playing the project, quickly switching between the behaviors in the HUD. Or, use the Inspector to apply more precise adjustments.
6. Press D to select the next behavior, the Fade In/Fade Out behavior, and adjust it as desired in the HUD.
Pressing D repeatedly cycles through each layer and each of the behaviors and filters applied to it, allowing you to quickly make changes in the HUD.
7. Press F2 to open the second pane of the Inspector: the Behaviors pane. Here, you can precisely adjust all of a behavior’s parameters, some of which are not available in the HUD.

8. In the Spin behavior section, from the Axis pop-up menu, choose Y. The layer now swings around its vertical y-axis only.
9. Return the Axis pop-up menu to Custom, and adjust the Latitude and Longitude parameters to your liking.
10. Stop playback and save your work.
Your first date layer animation with behaviors is complete. You’ll animate the other dates by copying some of these behaviors and applying new ones.
Using Basic Motion Behaviors in 3D
In later lessons, you’ll use more of the 3D features in Motion, but for now let’s get a general feel for them. In 3D space, you can change a layer’s rotation and position along all three axes: the horizontal, or x-axis; the vertical, or y-axis; and the depth, or z-axis (the axis pointing straight in and out of the screen).

Every layer in a Motion project can be rotated and positioned along the x, y, and z axes without turning on the 3D features—such as 3D groups, 3D tools, views, and cameras—that you will use in later lessons.
You already animated the 1984 layer in 3D by rotating it on all three axes. But it’s not really moving “back” in space, it’s just shrinking in size. Instead of using the Grow/Shrink behavior to simulate this 3D movement, you can make the layer move back in z-space using the Throw or Motion Path behavior. Let’s try each to see what it can do.
1. Turn on the 1985 layer, select it, and set a play range around it by dragging the play range In and Out points in the mini-Timeline, or by pressing the keyboard shortcuts you used earlier: Command-Option-I and Command-Option-O.
2. Turn off the 1984 and 1987 layers so that they won’t distract you, and start playback.
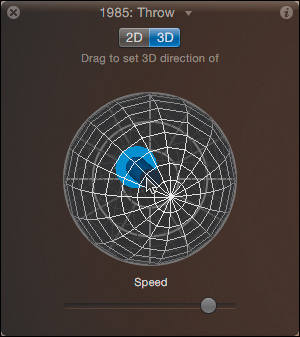
3. In the toolbar, click the Add Behavior pop-up menu and choose Basic Motion > Throw.
4. In the HUD, drag the zoom slider to about a third of the way from the left, and then, starting at the center of the circle, drag out in any direction.

The date graphic moves in the Canvas, with a red line indicating the direction and length of travel. The zoom slider in the HUD determines how far you can move. By default, the behavior moves the layer only horizontally and/or vertically along the x and/or y axes. But what about the z-axis?
5. In the HUD, click the 3D button and drag the zoom slider near the right edge of its range. Drag in the sphere to move the 3D arrow until it points away from you.
After you enable 3D for the behavior, you can throw a layer in any direction in 3D space. To make it fly directly away from you, it’s easiest to use the Inspector.
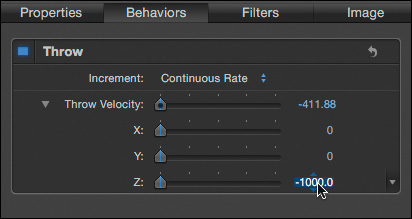
6. If the Behaviors pane isn’t selected, press F2. Click the Throw Velocity disclosure triangle, then set the X and Y values to 0, and the Z value to –1000. The Throw Velocity determines how many pixels the object will move over the duration of the behavior. These settings will throw the date graphic 1,000 pixels “away” from you in Z-space.
To make the layer spin and fade, you can copy those two behaviors from the 1984 layer. You need to modify the copied Spin behavior so that the animation doesn’t look exactly the same for each layer.
7. In the Layers list, under the 1984 layer, select both the Spin and Fade In/Fade Out behaviors. Then Option-drag them onto the 1985 layer.
The behaviors are copied to the 1985 layer and exactly fill the play range in the mini-Timeline and Timeline, which means that they match the location and duration of the 1985 layer.
When you copy a behavior from one layer to another, the behavior automatically starts at the beginning of the target layer. However, the behavior’s duration is not changed, so it may need to be trimmed to match the Out point of the target layer. In this case, all the layers have the same duration, so no trimming is necessary.
The HUD indicates that multiple objects are selected.

8. Click the Spin copy behavior, and in the HUD, adjust it to vary the tumbling animation from the 1984 layer.
The Throw behavior is great for animating a layer in a specific direction at a specific speed, but if you want a layer to change direction or orient itself in the direction in which it’s moving, the Motion Path behavior is a better option. You can experiment with this behavior on the next date layer.
9. Turn on and select the 1986 layer, set a play range around it, and turn off the 1985 and 1988 layers.
10. Click the Add Behavior pop-up menu, choose Basic Motion > Motion Path, and start playback. The 1986 layer slides off the screen along a red motion path line.
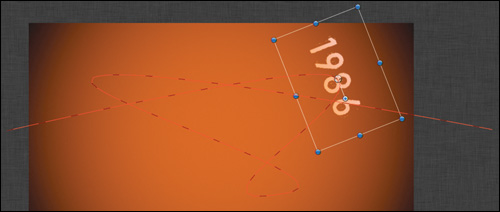
11. Command-Spacebar-drag left to change the zoom level on the Canvas so that you can see both ends of the motion path line.
If Spotlight opens when you press Command-Spacebar, choose Apple > System Preferences. Click the Spotlight icon, and turn off the menu keyboard shortcut, or change it to a different key combination.
After changing the zoom level with a Command-Spacebar-drag, you can move the Canvas around to re-center it by holding down the Spacebar until the pointer changes to a Hand tool, and then dragging the hand in the Canvas.
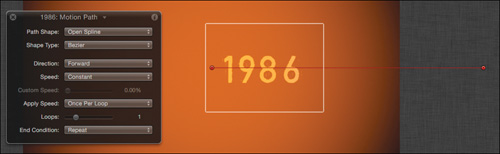
The red dots at each end of the motion path line are control points. You can reposition them and add more points to create a customized, curving path.
12. Move the leftmost control point off the left side of the Canvas; then Option-click the motion path line to add more control points, moving them and adjusting the Bezier handles to create a curving, looping path.

The layer moves along the path at a constant speed, no matter how many twists and turns it contains, but it doesn’t rotate. To point the date graphic in its direction of travel, let’s use another behavior.
13. Click the Add Behavior pop-up menu in the toolbar and choose Basic Motion > Snap Alignment to Motion. The layer now turns as it follows the path.
The Motion Path behavior is very flexible. For this project, you don’t need many twists and turns. All you really need are the two original control points. And you don’t need to align the movement to the motion path, because that would conflict with the Spin behavior that you will add shortly.
14. Delete the “Snap Alignment to Motion” behavior, select the Motion Path behavior, and in the Behaviors pane of the Inspector, click the hooked arrow to reset the behavior to its default values.
You can set specific values for each control point in X, Y, and Z in the Inspector.
15. Stop playback. In the Behaviors Inspector, click the Control Points disclosure triangle, and enter 0, 0, 0 for Point 1 and 0, 0, –5000 for Point 2. The layer will now fly straight back in z-space 5,000 pixels along the motion path. To make it spin and fade, you can copy those behaviors from the first layer.
Press Shift-Z to return the Canvas to Fit in Window, or press Option-Z to scale it to exactly 100 percent.

16. From the 1984 layer, Option-drag the Spin and Fade In/Fade Out behaviors to the 1986 layer. Then adjust the Spin behavior so that the animation doesn’t look the same as the other two layers.
You used three different methods to animate three layers to fade, spin, and fall back in 3D space. To animate the rest of the date graphics, let’s copy those behaviors to the remaining layers.
17. Option-drag the three behaviors from any of the layers you worked with to each of the date layers that haven’t yet been animated. Then turn on the appropriate layers, set play ranges, and modify the Spin behavior of each.

18. Turn on all layers in the Dates group, press Option-X to reset the play range, play the animation, and adjust it as desired.
19. Stop playback, move the playhead to the start of the project, close the Dates group, and save your work.
Great job! You used several of the Basic Motion behaviors to animate the dates falling in space. Next, you’ll turn your attention to animating the photos using another behavior-based technique.
Using Simulation Behaviors
Motion graphics animators often try to mimic real-world movements, such as an object accelerating as it starts to move, or slowing to a stop. Simulation behaviors are great for imitating motion caused by inertia, gravity, and other natural forces.
To animate the photos falling back into z-space, you will apply an Attractor behavior to an invisible layer. The layer will act like a black hole that attracts passing meteors.
1. Turn off the Dates group, and then turn on, select, and open the Photos group. The photos are much larger than the Canvas, so they will look as if they are falling into the scene very close to your view.
To make the Attractor behavior work in 3D in this group, you must first make the group a 3D group.
2. Choose Object > 3D Group.
3D groups allow the layers contained within them to be composited based on their positions in Z-space, rather than their stacking order in the Layers list. Furthermore, certain behaviors will work only in three dimensions if the group containing them is a 3D group.
Rather than applying a behavior to each layer to move it back in z-space, you will place a shape layer where you want the photos to move, and you’ll use one behavior to animate them all toward that shape layer.
3. In the toolbar, choose the Rectangle tool.

4. With the playhead at the start of the project, drag in the Canvas to create a rectangle of any size. You won’t see the rectangle in the final animation, so the size doesn’t matter. However, you do want to place it in the center of the Canvas and 5,000 pixels back on the z-axis, much like the end of the motion path in the previous exercise.
5. Press Esc or Shift-S to return to the Select/Transform tool, and then press F1 to open the Properties Inspector. Click the disclosure triangle next to the Position parameter and set the Position values to 0, 0, –5000.
The rectangle should get much smaller as it jumps back in z-space. Now you can apply the behavior to attract the photos.
6. Turn off the rectangle’s visibility. Press Command-2 to open the Library, and in the Behaviors folder, select the Simulations folder. Click to preview a few of the behaviors.
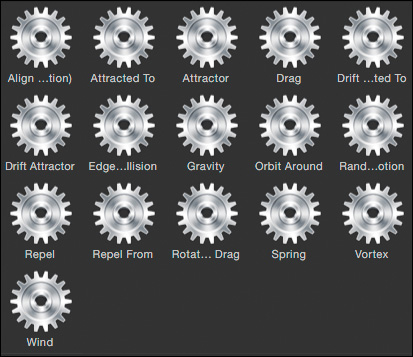
7. Drag the Attractor behavior onto the Rectangle layer and start playback. The pictures change from one to the next, but they don’t move. By default, the Attractor does not work in z-space.
8. In the Include section of the HUD, click the Z button. There is still no change because the Influence parameter is set to 1,000 pixels by default, and the rectangle is 5,000 pixels away from the photos. The Influence parameters establish a radius around the layer. Any objects within the radius are affected by the behavior, while objects outside the radius are not.

9. Drag the Influence slider all the way to the right. You’ll find that the value stops at an insufficient 4,000 pixels. When the HUD won’t let you set the value you want, try the Inspector.
10. Press F2 to open the Behaviors pane of the Inspector, and set the Influence value to 6,000 for good measure. Now, the pictures move back in z-space, but not very quickly.
11. Increase the Strength value to about 200.
The animation is starting to look better, but it would be more interesting if each photo started from a different position. To do this, you will first create some working room around the Canvas, and you’ll then use a feature that lets you see layers outside the Canvas.
12. Stop playback, press Home, and select the first photo layer vid_pix_001. Then Command-Spacebar-drag left to create a lot of extra space around the Canvas—enough to easily see the bounding box of the first photo. By default, objects outside the Canvas are invisible, and you can see only the bounding box of a selected object.
13. Choose View > Show Full View Area, or press Shift-V so that layers outside the Canvas will be visible, but at a lower opacity.
14. Select and drag each layer in to a different location away from the center of the Canvas. When you are finished, Shift-click all the layers in the Layers list, and you’ll see all of their bounding boxes and red motion paths.

15. Press Shift-Command-A to deselect all, press Shift-Z to fit the Canvas to the window, play the project to check the animation, and save your work.
By applying a Simulation behavior to a “dummy” shape layer, you made one behavior do the work of many. Now you can make the layers fade and spin by copying the behaviors from the Dates group. But the photo layers have a different duration than the date layers, so some trimming will be in order.
Trimming and Applying Behaviors to Multiple Layers
In this exercise, you’ll use the Timeline to check and trim the durations of copied behaviors.
1. Move the playhead to the start of the project.
2. In the Layers list, open the Dates group. Open the 1984 layer, Shift-select the Spin and Fade In/Fade Out behaviors, and press Command-C to copy them. Select the vid_pix_001 layer and press Command-V to paste the behaviors onto it. Close the Dates group in the Layers list.
3. In the Timeline, also close the Dates group. If necessary, scroll down to the vid_pix_001 layer and open it. The behaviors begin at the start of the layer bar, but they are too short.

4. Select the vid_pix_001 layer and press Shift-O to move the playhead to the layer’s Out point.
5. Select both behaviors, and press O to trim their Out points to the playhead.
All the photo layers have the same duration, so you could now copy these two behaviors to those layers with no further trimming. However, you won’t always have layers of equal duration, so let’s use a different method that will automatically match every behavior to a layer’s length.
6. In the Timeline, Shift-click the top and bottom layers to select all the remaining photo layers that do not have the Fade and Spin behaviors applied.
7. Click the Add Behavior pop-up menu, and choose Basic Motion > Fade In/Fade Out. The behavior is applied to all the selected layers and matches the length of each. It would do so even if the layers had different durations. Because this is a new behavior, you need to modify it to match the others.
8. In the Timeline, Command-click each of the six new Fade In/Fade Out behaviors.
You could also select the behaviors in the Layers list. Command-clicking allows you to make a noncontiguous selection of the behaviors by skipping the layers and just selecting the behaviors applied to each layer. Shift-clicking includes the layers in the selection and the next step would not be possible.
9. In the HUD, increase the Fade In value to 30 frames. The HUD title, Multiple Selection, tells you that this adjustment will affect all the selected behaviors at once. Now you’ll add the Spin behavior.

10. Command-click all the photo layers except the first to select the layers without selecting the behaviors applied to them. Then click the Add Behavior pop-up menu, and choose Basic Motion > Spin.
11. Select each Spin behavior one at a time, and in the HUD, give each a unique Spin Rate, Latitude angle, and Longitude angle.
As a final step, you can animate the brayer graphic in the Graphics group.
12. In the Timeline, close the Photos group. Activate and open the Graphics group. Open the Dates group, and then open the 1984 layer. Select and copy the Fade In/Fade Out and Grow/Shrink behaviors, and then paste them to the brayer_03e layer. This layer doesn’t need to spin, but you may want to change its starting scale, position, and rotation.
13. With both behaviors still selected, Shift-drag the Out points to the right until they snap to the end of the brayer_03e layer.

14. Close all the groups in the Timeline and Layers list. Press Shift-V to turn off the full view area, and play the project.
You now have a nice animation of falling dates and photos, with one brayer graphic that foreshadows the additional graphic elements you’ll add in the next lesson.
15. Make any final adjustments you choose. For example, you might want to increase the size of the date graphics by increasing the Scale of the Dates group, and change their starting positions. Save your work.
You used a variety of Basic Motion and Simulation behaviors to create animation; and learned several ways to add, adjust, copy, and trim those behaviors. To conclude this lesson, we’ll use a different project to explore another type of behavior—the Parameter behavior.
Applying Parameter Behaviors
Parameter behaviors are powerful little critters that you add to your project using a different method than the behaviors you’ve applied so far. You create movement by applying Parameter behaviors to a specific parameter you want to animate.
In this exercise, you will use several Parameter behaviors to animate a set of gears that appear to open the curtains of a stage. You’ll learn how to apply and adjust Parameter behaviors, clone groups of animated layers, and combine Parameter behaviors.
You can choose the parameter you want to animate either before or after you apply the Parameter behavior. Let’s experiment with both methods.
1. Close any open projects. In the Finder, open Motion5_Book_Files > Lessons > Lesson_03 > Parameter Behaviors Start, and save a working copy to the Student_Saves folder. If necessary, open both groups in the Layers list.
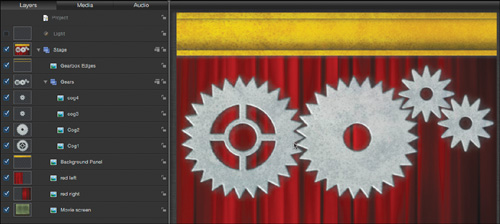
The project contains two groups: the root-level Stage group, which contains several layers; and within the Stage group, the Gears group, which contains the four cogs you see in the Canvas. There is also a Light layer, which is disabled. Currently, nothing in the scene is animated.
The first task is to rotate the left-hand gear. Your initial inclination might be to apply a Spin behavior from the Basic Motion category to rotate the cog. That would certainly work, but applying a Parameter behavior is another option.
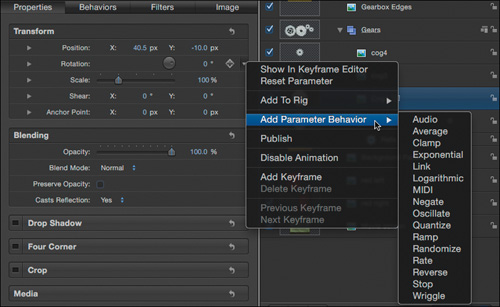
2. Press Command-2 to open the Library, select Behaviors, and then select the Parameter folder.
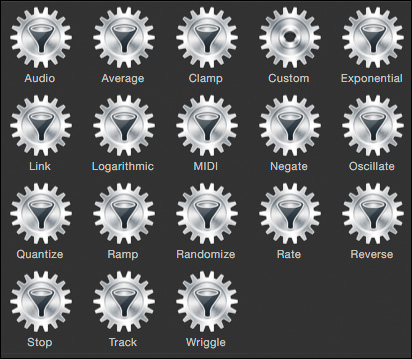
The 18 behaviors in this folder are unique because you apply them to a specific parameter of a layer, effect, or group. The Rate parameter behavior will change the value of a selected parameter at a constant rate, which is perfect for rotating the gear. One way to apply a Parameter behavior is to add it to an object, and then choose which parameter to animate.
3. Start playback, and then drag the Rate Parameter behavior from the Library to the Cog1 layer in the Layers list. Nothing happens, because you need to tell the behavior which parameter you want to animate.
4. In the HUD, from the To pop-up menu, choose Properties > Transform > Rotation > Z.

5. Drag the Rate slider to about –50. The cog now rotates at a constant rate of speed.
Another way to apply a Parameter behavior is to first decide which parameter to animate, and then choose the appropriate behavior. Let’s use this approach to animate the second large gear layer, Cog2, with a different Parameter behavior: the Link behavior.
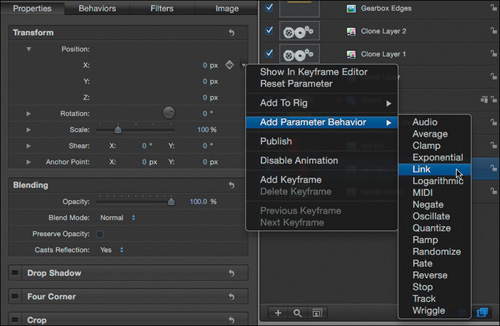
6. Select the Cog2 layer, and press F1 to open the Properties Inspector. You want to rotate the Cog2 layer, too, so click the Animation menu for Rotation (the small downward arrow to the right) and choose Add Parameter Behavior > Link. The shortcut menu contains the Parameter behaviors you saw in the Library.
The list does not include the Track and Custom Parameter behaviors, which are used in more specialized circumstances.
You could choose Rate again and manually try to match the speed of the first cog. However, by applying the Link Parameter behavior, you can connect the animation of one layer to the animation of another.
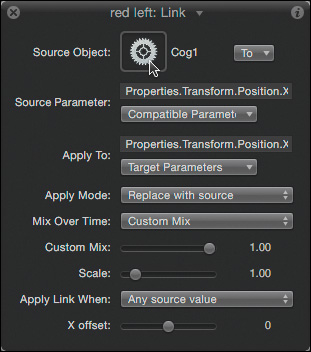
The HUD indicates that the parameter is applied to the rotation of the layer, but you still need to tell it what source object to use.
7. Drag the Cog1 layer into the Source Object well in the HUD.

Be sure to hold down the mouse button as you drag the layer to the well. If you click the Cog1 layer and release the mouse button, you will select the layer, and the Link behavior will no longer appear in the HUD. If that happens, reselect the Link behavior and try again.
The Cog2 layer now rotates, exactly matching the rate of the Cog1 layer. But this isn’t quite right. The cog should spin in the opposite direction. The Scale parameter determines how the linked layer animates in relation to the source layer. A value of 1 animates it in the same direction at the same speed. A value of 0 stops the animation, and a value of –1 reverses the animation yet maintains the same speed. The Scale slider in the HUD goes down only to 0, but we can change that value in the Inspector.
8. In the Behaviors Inspector, in the Scale value field, type –1. (minus one period) and press Enter. The Cog2 layer now rotates in the opposite direction, and its teeth mesh perfectly with Cog1.
The same Link behavior can be used to animate the two smaller cogs.
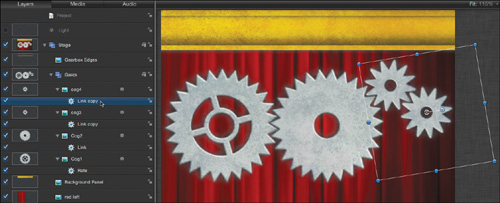
9. In the Layers list, Option-drag the Link behavior from the Cog2 layer to the cog3 layer.
10. Select the Link copy behavior, and in the Behaviors pane, set the Scale value to 2.25. This cog needs to rotate in the same direction as the first cog, and because it’s smaller, it also needs to rotate more quickly – 2.25 times faster – to mesh with the Cog2 gear.
11. Option-drag the Link copy behavior from the cog3 layer to the cog4 layer; and select the copy. In the Behaviors pane, change the Scale value to –2.25. All the cogs now animate nicely together.
12. Turn off the Rate behavior applied to the Cog1 layer by deselecting its activation checkbox. All the cogs stop turning because they are linked to the Cog1 layer.
13. Turn the Rate behavior on, stop playback, press Home, and save your work.
With the base animation completed, you will fill the area above the curtains with gears by using clones.
Cloning a Group
To create more animated gears, you will copy the Gears group. You could duplicate the group; but by creating clones, changes made to the original group will pass through to the clones, which will come in handy later. First, however, you’ll scale and reposition the cogs to fit into the gold bar at the top of the curtains.
1. Close and select the Gears group. Then, in the Canvas, scale the group down to about 28% to fit in the gold bar, and move it to the left.
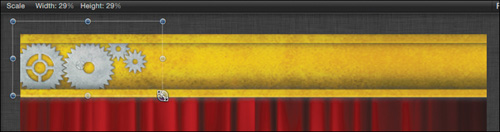
Shift-drag a bounding box handle to scale the box proportionately. If the dynamic guides make it difficult to precisely scale and/or position the group, press N to turn off snapping.
Now, let’s clone this group to place more gears along the gold bar.
2. Choose Object > Make Clone Layer, or press K.
Make sure the playhead is at the start of the project or is moving when you create the clone; otherwise, the clone layer’s In point will start at the playhead location.
3. In the Canvas, drag the Clone Layer to the right of the original, and line up the layers so that the teeth of the cogs appear to mesh with the original.
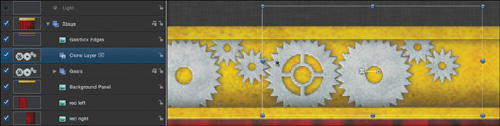
Change the zoom level of the Canvas if you want to get a closer look at the gears as you position the clone layer. Do so by pressing Command-Spacebar and dragging right from the location you want to see more closely. When you finish, press Shift-Z to fit the Canvas back into the window.
4. Press K to make a clone of Clone Layer, and position Clone Layer 1 to the right of the other cogs.
You may want to turn off the visibility of the layer’s bounding box in the Canvas to see the cog teeth more clearly. From the View and Overlay pop-up menu, choose Show Overlays, or press Command-/ (slash). Remember to turn on the overlays again when you are done.
5. Press K to clone Clone Layer 1, and position Clone Layer 2 at the far right. It’s OK if it goes off the screen. You now have a fully assembled gearbox.
You can nudge the position of selected layers or groups by holding down the Command key and tapping the Left or Right Arrow keys. The distance the layer moves each time you tap an arrow key depends on your zoom level. When you are zoomed in closer, each tap of the arrow key nudges the layer a shorter distance.

6. Press the Spacebar to start playback. All the cogs rotate and mesh together nicely.
7. Open the Gears group. Open the Cog1 layer and turn off the Rate behavior. All the gears stop.
If you had duplicated the Gears group rather than cloning it, each duplicate would have its own Rate behavior, and you’d need to turn off each of them to stop the animation. With clones, changes you make to the source of the clones pass through to all of them.
8. Turn on the Rate behavior and save your work.
Now you can make it look as if the cogs are opening the curtains.
Combining Behaviors and Adding a Light
To animate the opening curtains, you will first link them to each other, and then link their positions to the rotation of the very first Cog1 layer—the source of all the animation so far. And because you want the curtains to open and come to a stop, you’ll add a Stop Parameter behavior to the Cog1 layer to stop the rotation at a specific point in time.
1. Select the red right layer; press F1 to go to the Properties Inspector; and, if necessary, click the Position disclosure triangle to reveal the individual X, Y, and Z position parameters.
You want to link the right curtain’s horizontal or X position to the same parameter of the left curtain, but move it in the opposite direction.
2. From the Animation menu for the Position X parameter, choose Add Parameter Behavior > Link.
3. Drag the red left layer from the Layers list to the Source Object well in the Behaviors pane, and then set the Scale value to –1.
4. Select the red left layer, and in the Canvas, drag the layer around; then undo.

As the left curtain moves left, the right curtain moves right and vice versa; but moving the left curtain up or down has no affect on the right curtain because only the horizontal (X) position is linked.
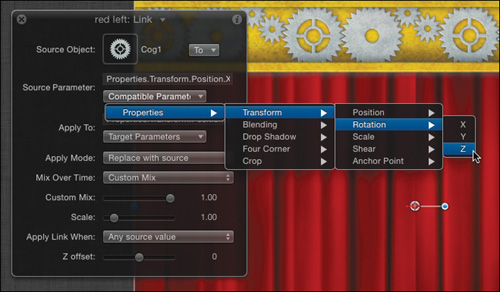
To make the left curtain move, you will link its position to the rotation of the Cog1 layer. You can also Control-click the name of a parameter to access a menu of parameter behaviors.
5. With the red left layer still selected, go to the Properties Inspector. Control-click (or right-click) the X under Position, and choose Add Parameter Behavior > Link.
6. Open the Gears group and drag the Cog1 layer from the Layers list to the Source Object well in the HUD.
Motion assumes that you want to link the position of the left curtain to the position of the Cog1 layer, as it says in the Source Parameter box. But you want the rotation of the cog to drive the position of the curtain.
7. From the Compatible Parameters pop-up menu, choose Properties > Transform > Rotation > Z. The curtains now open as the project plays, but they do so too quickly.
8. In the Behaviors Inspector, watch the animation in the Canvas as you Option-drag left in the Scale value field to set it to about 0.4.
When you Option-drag in a value field, the rate of change “gears down” to one-hundredth the normal speed, making it much easier to make small value changes; Shift-dragging makes the value change ten times faster.
It’s not bad, but the animation would work better if the gears and curtains came to a stop before the curtains moved all the way out of view. We’ll use another Parameter behavior to make them stop.
9. Stop playback and move the playhead to 5:00. At this point, the curtains are open but still visible.
10. Select the Cog1 layer. In the Properties Inspector, Control-click the word Rotation, and from the shortcut menu, choose Add Parameter Behavior > Stop. The new Parameter behavior appears in the mini-Timeline with its In point at the playhead.
11. Resume playback. The curtains open and suddenly come to a stop at 5:00.
The stop is a bit abrupt, but let’s leave it for now. In the next lesson, you’ll learn how to use keyframes to create different kinds of movement. For example, you could make the gears and curtains slow down before they came to a stop.
As a final touch to this project, you can enable the light and make the screen flicker like an old-fashioned movie projector.
12. Select the activation checkbox for the Light layer. Nothing happens because lights affect only 3D groups.
If you accidentally select the Light layer when you turn it on, the default Select/Transform tool changes to the Adjust 3D Transform tool, and new red, green, and blue arrows appear in the Canvas. We’ll work with this tool and these controls in later lessons. For now, press Shift-S to return to the default selection tool.
13. Select the Stage group, and choose 3D group from the Object menu. The light now affects the scene. You’ll explore other types of lights and how to manipulate them in a later lesson.
Let’s finish by making the screen flicker using a final Parameter behavior. If the parameter you want to animate is listed in the HUD, you can apply a parameter behavior to it within the HUD..
14. Select the Movie screen layer, and in the HUD, Control-click the word Opacity. From the shortcut menu, choose Add Parameter Behavior > Wriggle. The Wriggle parameter behavior applies random changes to the value of the selected parameter, but the changes are not as extreme as with the Randomize parameter behavior.

15. In the Behaviors Inspector, set the Amount to 50%, the Apply Mode to Subtract, and adjust the Frequency and Noisiness sliders to suit yourself. Subtract will subtract random values from the Opacity of the light, which is set to 100% by default. Close all the groups and save your work.
Great work. You applied many types of behaviors in two separate projects, duplicated and trimmed behaviors, worked with clones, and explored some 3D concepts.
Lesson Review
1. Name three of the Basic Motion behaviors.
2. You applied a Motion Path behavior and added control points to create a curved path. How can you make the layer turn as it moves along the path?
3. If you copy a behavior from one layer to another, will it always match the duration of the target layer?
4. How do you trim the Out point of a behavior to match the layer to which it’s applied?
5. What types of behaviors mimic physical phenomena such as gravity, inertia, and random movement?
6. You added a Grow/Shrink behavior to a layer and would like to adjust it using the onscreen controls. What happens if you drag one of the blue edge handles?
7. Why would you change a group from a 2D group to a 3D group?
8. Describe two ways to apply a Parameter behavior.
9. What’s one difference between duplicating a layer and cloning a layer?
Answers
1. Grow/Shrink, Fade In/Fade Out, Throw, Spin, Motion Path, and Snap Alignment to Motion are all Basic Motion behaviors.
2. Add the “Snap Alignment to Motion” behavior from the Basic Motion category.
3. No, the copied behavior will match the In point of the target layer but its duration won’t change from the original. So, if the target layer is longer or shorter than the source layer, the Out point of the behavior must be trimmed to match it.
4. Select a layer in the Timeline and press Shift-O to move the playhead to the layer’s Out point. Then press O to trim the Out point of the behavior to the playhead. Or drag the right edge of the behavior, holding down the Shift key to snap to other layers.
5. Simulation behaviors
6. Dragging an edge handle will scale the layer up or down non-proportionally over time.
7. You want to composite the layers in the group based on their positions in z-space rather than the stacking order in the Layers list. Also, certain behaviors will work in 3D only if the group containing them is a 3D group. Finally, lights do not affect 2D groups.
8. Drag a Parameter behavior from the Library to a layer, and then select the target parameter in the HUD or Behaviors Inspector. Alternatively, first choose the target parameter you want to animate and then in the Inspector, click the Animation menu for that parameter and choose Add Parameter Behavior.
9. A duplicated layer is independent of the original; a clone will change when you change certain aspects of the original—for example, changing the animation of the original.
Keyboard Shortcuts