
Lesson 4. Animating with Keyframes
Lesson Files
Motion5_Book_Files > Lessons > Lesson_04
Media
Motion5_Book_Files > Media > Stage
Motion5_Book_Files > Media > Rockumentary
Time
This lesson takes approximately 60 minutes to complete.
Goals
Record keyframes
Set keyframes manually
Use the Keyframe Editor
Change keyframe interpolation and adjust keyframe curves
Add, move, and change the values of keyframes on a curve
Set keyframes for multiple layers simultaneously
Change keyframe timing in the Timeline
Choose keyframe curves for editing in the Keyframe Editor
In the previous lesson, behaviors allowed you to create animation procedurally—you applied a behavior that contained a set of instructions for making the layer animate. Setting keyframes is a way to articulate an animation—that is, manually identify exactly what, when, and how you want to animate.
The term keyframes, or key frames, originates from traditional hand-animation techniques in which a senior artist would draw “key” poses of a character and turn over those images to a junior artist, who would draw the in-between frames to create smooth character animation from one keyframe to the next.
In Motion, keyframes work much the same way: You are the senior artist, creating your composition and identifying the frames you want to establish as keyframes; and the computer acts as the junior artist, creating in-between frames of animation through a process called interpolation.
Whether you should choose to animate using keyframes or behaviors is not always a clear-cut decision; but as a rule of thumb, if you want repeated, continuous motion—such as a graphic drifting across the screen, a pendulum swinging, or a neon sign blinking—use behaviors. If you want animation that starts, stops, and changes direction at specific points in time, use keyframes.
In this lesson, you’ll open the stage project and animate the curtains using keyframes to compare that method to animating with behaviors. You’ll also experiment with interpolation types and adjusting keyframe Bezier handles. We’ll then set and adjust keyframes in the Rockumentary project to animate multiple layers to form a composition.
Recording Keyframes
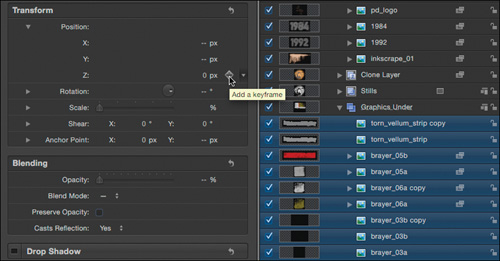
The easiest way to set keyframes is to turn on recording. When recording is turned on, every change you make to any keyframeable parameter will be recorded as a keyframe at the playhead location, locking in the new value at that point in time. In this exercise, you will use recording to set a keyframe for the rotation value of the first cog, which will cause the curtains to part.
1. Open Motion5_Book_Files > Lessons > Lesson_04 > Keyframes Start, and save the project to the Student_Saves folder.
This is the stage project you worked with in the previous lesson. The position of the curtains is linked to the Cog1 layer with the Link behavior, as is the rotation of all the other cog layers. But the Cog1 layer is not currently animated. You can test the animation by rotating the Cog1 layer.
2. Open the Stage and Gears groups, select the Cog1 layer, and in the Canvas, drag the rotation handle.

Rotating the Cog1 layer clockwise turns the other cogs and opens the curtains. In the previous lesson, you animated the rotation of this layer using a Rate behavior and stopped the rotation with a Stop behavior. The result was a rather abrupt ending. Here, you’ll animate the rotation by recording keyframes.
3. Press Command-Z to undo the rotation, and at the bottom of the Canvas, click the Record button. The button turns red to let you know that recording is enabled.

4. Press F1 to open the Properties Inspector.
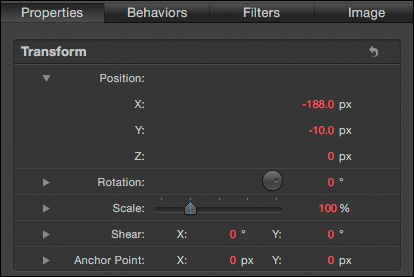
The value fields for all parameters are now red, another warning sign that recording is enabled. If you change any red parameter, it won’t change for the whole project; it will change only at the playhead position. Let’s see how this works.
5. In the timing display in the toolbar, type 5. (5 period) and then press Return (or Enter) to move the playhead to the frame at five seconds. This is the frame where you want the curtains to stop opening.
If the timing display is set to frames, you can move the playhead to 5 seconds by clicking the downward-facing arrow, and choosing Show Timecode. Then, type 5. (five period) to move the playhead to 5:00.
You don’t have to double-click in the timing display to enter a number. As long as a value field in the Inspector isn’t active when you start typing, Motion assumes that you want to move the playhead and will automatically enter the number in the timing display.
6. In the Properties Inspector, drag left in the Rotation value field to about –300 degrees as you watch the curtains open in the Canvas.

A yellow diamond appears to the right of the value field to indicate that a keyframe for this parameter has been set at the current playhead location.
7. Play the project. The curtains animate open until 5:00, and then stop.
8. Stop playback on any frame other than 5:00 or 0:00. The yellow diamond for Rotation is now gray. A gray diamond indicates that at least one keyframe for this parameter exists, but not at the current playhead location.
9. Move the playhead to the start of the project. The diamond turns yellow again, indicating that a keyframe exists at the playhead. But wait a minute. You only set a keyframe at 5:00, not at 0:00. Why is there a keyframe here, too?
A single keyframe will not create animation; it locks the value of the keyframed parameter at a point in time, but the parameter will have that same value at all other points in time. To animate with keyframes, you need to have at least two keyframes with different values.
When you use recording to set keyframes, Motion assumes that you want the value to change over time, so it automatically sets a keyframe with the original value at the beginning of the layer you are animating. Remember that recording will always perform this action, although sometimes you may not want a keyframe at the beginning of the layer.
By default, when recording is enabled, any other changes you make to the Cog1 layer, such as adjusting its position or scale, will set keyframes for that parameter as well. Sometimes, you’ll want to make an overall adjustment to a parameter without setting a keyframe, yet you’d still like to add keyframes to a parameter you’ve already animated.
10. Double-click the Record button. The Recording Options dialog opens. One of the options in this dialog is to “Record keyframes on animated parameters only.”
11. Select “Record keyframes on animated parameters only” and click OK. If necessary, click the Record button, or press A, to turn on recording
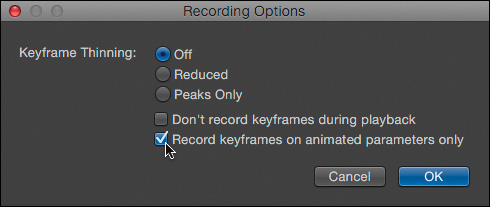
When recording is turned on, opening and closing the Recording Options dialog turns off recording, so you may need to turn recording on again.

Now only the Rotation value field is red, indicating that keyframes will be applied only to changes to this parameter. Changes to other parameters will change the value for all points in time.
12. Change the Position Y value for the Cog1 layer, and play the project. The Cog1 layer and all its clones are in new locations, but their positions don’t change over time as they would with keyframes.
13. Press Command-Z to undo the position change. Double-click the Record button, deselect the “Record keyframes on animated parameters only” checkbox, and click OK. You are returned to the default setting. If necessary, click the Record button to turn off recording.
You’ve now animated the Cog1 layer and the curtains linked to it using keyframes. But the resulting animation is very similar to the animation in the last lesson: The curtain movement still comes to an abrupt stop at 5:00. You can make the curtains slow to a smoother stop by using keyframe interpolation.
Changing Keyframe Interpolation
When you recorded a keyframe for the cog rotation value of –300 degrees at 5:00, Motion automatically set a keyframe at the start of the layer with the original value, 0 degrees.
Therefore, the layer needs to change from 0 degrees at 0:00 to –300 degrees at 5:00. To get from 0 to –300 over the course of five seconds, Motion calculates, or interpolates, the value over time between the starting and ending values. You can change the type of interpolation in several ways using the Keyframe Editor.
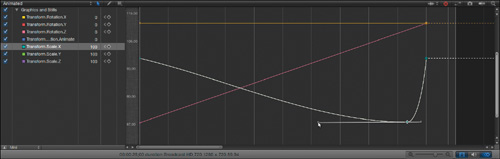
1. Choose Window > Keyframe Editor. A new window appears below the Timeline. Drag the divider up to make more room.
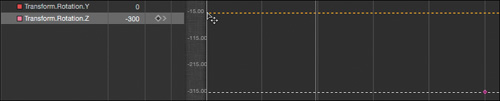
The animated parameter for the Cog1 layer, Transform.Rotation.Z, appears on the left side of the window along with the other two Rotation parameters. Next to it is the value of the parameter at the current frame (–145) and a hollow diamond, indicating that keyframes exist for this parameter but not at the playhead position.
Depending on your playhead location, the value for the Transform.Rotation.Z parameter may differ from the preceding figure.
By default, the Keyframe Editor displays all animated parameters for selected layers or groups, as indicated by the presence of the word Animated in the Show Curve Set pop-up menu in the Keyframe Editor. Motion will include all “channels” for the parameter (for example, x, y, and z) even if not all the channels are animated.
On the right side of the window, a pink line connects two diamonds. The diamonds are the keyframes, and the line is the keyframe curve. The curve is straight because the default interpolation for rotation is linear, meaning that the rotation value changes at a constant rate. You can change the interpolation in the Animation pop-up menu, which appears as a downward facing arrow in the parameter column to the right of the keyframe icon when you place your pointer over it.
The Animation pop-up menu in the Keyframe Editor is similar to the Animation pop-up menu in the Inspector, but it contains more options.
2. Start playback, and from the Animation pop-up menu, choose Interpolation. The submenu includes four interpolation options: Constant, Linear, Bezier, and Continuous.

3. Choose Bezier.
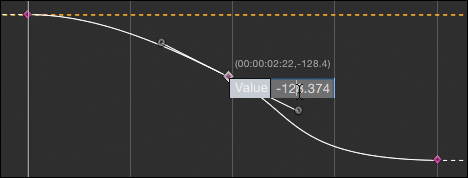
Bezier interpolation creates smoother, more real-world animation by imitating the effect of inertia: Objects with mass take some time to get up to speed and to slow to a stop. Instead of a constant rate of change, the rate of change starts low, increases over time, and then decreases again.
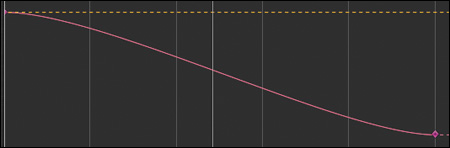
The curve starts out flat, gets steeper in the middle, and then flattens out at the end. The curtains now start opening slowly, speed up, and then slow to a smooth stop, creating more realistic animation.
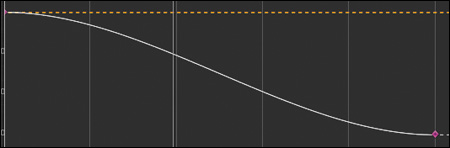
4. Experiment with the other interpolation options. Constant maintains the keyframe value until the next keyframe, when the value changes instantaneously.

Continuous is similar to Bezier in that it creates a smooth ramping into and out of keyframes. It’s easier to create smooth motion with Continuous interpolation; however, the curve cannot be adjusted as with Bezier interpolation.
You can also change the interpolation of individual keyframes along a curve by Control-clicking (or right-clicking) a keyframe and choosing an interpolation type. Using this technique you’ll have access to five additional interpolation options: Ease In, Ease Out, Ease Both, Exponential, and Logarithmic.
5. Return the interpolation type to Bezier. Bezier interpolation gives you the most creative flexibility to fine-tune your animation. You can use it to speed up the time it takes the curtains to open and make them come to an even slower stop.
6. Click the keyframe at 5:00 to select it, and then drag the Bezier handle to the left to make it longer and flatten out the curve coming into the keyframe.
If you do not see a bezier handle extending from the keyframe when you select it, Command-drag left on the keyframe to create one.
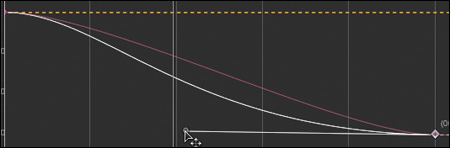
Be careful not to pull the Bezier handle down, or the curve may dip below the keyframe value and the curtains will start to close again before opening fully.
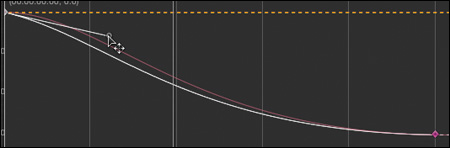
7. Click the keyframe at 0:00. Adjust the Bezier handle to create a steeper curve and, therefore, faster initial movement. Play the project to see the results of your changes.
Currently, the animation starts at 0:00 because keyframe recording automatically added a keyframe at the start of the layer. But what if you want the curtains to stay closed for the first second to build a little suspense? Setting keyframes manually gives you the most creative control.
Setting Keyframes Manually
In addition to recording keyframes, you can manually set keyframes, whether or not recording is enabled. Manually setting keyframes is a great solution when you want to lock in an existing value at the current frame. (Recording requires you to change the value to create a keyframe.)
In this exercise, you’d like the curtains to stay closed for the first second. In other words, you want the rotation of the Cog1 layer to remain at 0 degrees from 0:00 to 1:00, and then start to change. So, let’s delete the current keyframe at 0:00 and create a new one at 1:00.
1. In the Keyframe Editor, select the keyframe at 0:00. Then press Delete to remove it.
Only the keyframe at 5:00 remains, and the flat dotted line indicates that there is no animation because only one keyframe exists, and at least two keyframes with different values are required to create animation. The Rotation value at the keyframe of –300 is the same for the entire layer, and the curtains remain open. You want them to be closed at 1:00.
2. In the timing display, type 1. (1 period), and press Return to move the playhead to 1:00.
3. In the Keyframe Editor, from the Animation pop-up menu, choose Add Keyframe. When adding keyframes manually, you must first add the keyframe, and then change the value. If you change the value first, you change the value of the parameter for the full duration of the layer, not just at the playhead.
After you set a keyframe and moved the playhead, you can press Control-K to set a keyframe for that same parameter, or choose Object > Add Keyframe. In this case, the menu would read Object > Add Rotation Keyframe.
4. Double-click the value field for Transform.Rotation.Z, type 0, and press Return.

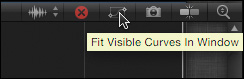
5. If necessary, at the top right of the Keyframe Editor, click the “Fit Visible Curves in Window” button to see the full curve.
6. Play the project. The curtains stay closed for the first second, and then they animate open from 1:00 to 5:00.
7. You can adjust the Bezier handles on each keyframe to suit yourself. You can also add and adjust keyframes directly on a curve.
8. Double-click anywhere along the curve to add a keyframe.
9. Drag the keyframe up or down to change its value. Shift-drag up or down to constrain the pointer to vertical movement and avoid dragging left or right, which would change the keyframe’s timing. As you drag, the numbers that appear in parentheses indicate the timecode of the keyframe location and the value of the keyframe, in that order.
10. Double-click the keyframe to enter a specific value for the parameter at this frame. Play the project.
By adding keyframes, you can radically alter the animation. For this project, two keyframes will suffice.
11. Stop playback, delete any extra keyframes, save your work, and close the project.
You can delete multiple keyframes by dragging a selection rectangle around them and pressing Delete.
You’ve now explored the basics of creating keyframes by recording them or setting them manually for a single parameter on a single layer. Next, you’ll explore techniques for applying and adjusting the keyframes of multiple parameters on multiple layers.
For more information on keyframe interpolation, refer to the Motion 5 Help document available from the Help menu.
Using Keyframes on Multiple Parameters and Layers
Because keyframes are so precise and flexible, they are often used to animate multiple layers to move, spin, or blur at a specific point in time. In this exercise, we’ll return to the Rockumentary project and animate all the title elements to fall into place and form the final composition. Motion lets you quickly set keyframes for parameters on multiple layers, and it also lets you choose which keyframes appear for editing in the Keyframe Editor.
Keyframing Multiple Layers
The first step is to add keyframes that will lock in place all the layers that are to be animated.
1. Open Motion5_Book_Files > Lessons > Lesson_04 > Rockumentary Keyframes Start. Save it to the Student_Saves folder, and if necessary, open the Project pane.

In previous lessons, you created the second half of this project, the composite image of the title elements with the sequence of photos. You also animated the initial photos and dates “falling” through space. Now we’ll concentrate on the middle part of the project: animating the title elements into position. Unlike the photos and dates that fell away with continuous movement, these layers need to fall and then stop in a specific arrangement, which happens to be a great task for keyframes.
This project does not include the opening sequence of falling dates and pictures, but starts with the title elements you will animate into position.
As with many motion graphics projects, it will be easiest to approach this task in reverse. You’ll first set keyframes that lock each layer into its final position, and then set keyframes at the start of the project to spread out the layers in z-space, completely offscreen.
Let’s take a look at the layers we’ll animate.
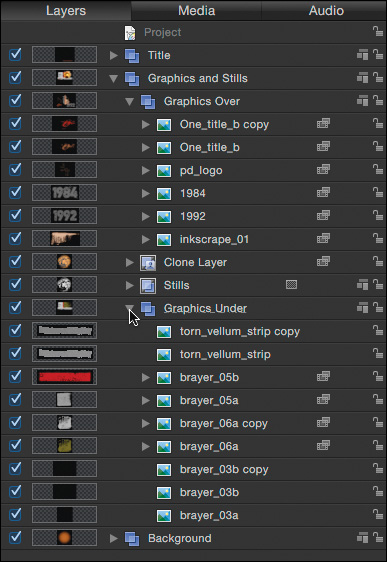
2. In the Layers list, open the Graphics Over and Graphics Under groups, and adjust the layer heights in the Layers list as necessary to fit everything into the view. These layers will start offscreen and then animate onscreen by “falling” into place.
3. Set the timing display to Show Timecode, and move the playhead to 5:00.
At 5:00, you want all the layers to have landed in their final positions, so you will set a keyframe here to lock them in place on this frame. Rather than individually setting a position keyframe for each layer, you can set a keyframe for multiple layers at the same time.
4. Shift-click the first and last layers in the Graphics Over group to select them all, press F1 to reveal the Properties Inspector, and open the Position parameter.

The value fields for Position x, y, and z contain dashes because you have selected multiple layers, each with a different position value. But you can still set a keyframe for all of them at once.
5. From the Animation pop-up menu for the Position Z parameter, choose Add Keyframe. An orange diamond appears in the Animation pop-up menu, indicating that a keyframe exists at the current playhead position.

6. In the Layers list, click each layer individually in the Graphics Over group to select just that layer and examine its Position values.
Each layer has a keyframe for Position Z. Now let’s create the same keyframes for the layers in the Graphics Under group, this time using a shortcut.
7. Select all the layers in the Graphics Under group; then, in the Properties pane, click the gray diamond with the + (plus) symbol that appears when you move the pointer over the Animation pop-up menu for Position Z. With a single click, you add a keyframe to this parameter for all the selected layers.
With the layers safely locked in place in their final “assembled” positions, you can now go to the beginning of the project and move the layers away in z-space. Because you are setting keyframes manually, you must first set the keyframe, and then change the value for each layer.
8. Move the playhead to the start of the project.
9. With all the layers in the Graphics Under group still selected, Command-click each of the layers in the Graphics Over group to add them to the selection.
10. In the Properties pane, click the gray diamond to the left of the Position Z Animation pop-up menu to add a keyframe to all the selected layers.
Because at least one keyframe has already been set for this parameter (but none at the current playhead location), the gray diamond turns orange when you move the pointer over it.
Now that a keyframe is set at 0:00, when you change the Z-position of each layer at this frame, it will change only at this frame, and animate back to its final position by the next keyframe at 5:00.
Each layer now has two keyframes; but if you play the project, nothing is animating because the keyframes for each layer have the same value. With the beginning and ending keyframes in place, you can start animating.
Animating Layers and Groups with Keyframes
To animate the layer positions, you’ll give each layer a new Position Z value on the first frame. Then, you’ll animate the rotation of the group containing the layers to add a nice spin to the overall animation as the layers assemble themselves.
1. With the playhead at the first frame of the project, select the lowest layer in the Graphics Under group. In the Inspector, drag right in the Position Z value field to set it to about 1,000 pixels, enough to make the layer disappear off the edge of the Canvas.
2. Continue up the group, selecting the next brayer layers individually, and setting a Position Z value for each one at around 1,000 to 2,000 pixels, until each one is offscreen. Give each layer a different Position Z value to spread them out.
3. When you get to the two vellum layers, Shift-click each to select it, and then change both their values at the same time so that they will stay together as they move.

4. Continue to the layers in the Graphics Over group, selecting each layer in the group and changing its initial Position Z value to move it off the screen. When you are done, you should see nothing but the background image in the Canvas.
5. Play the project. The layers all move into position and come to a soft landing. Why don’t they stop abruptly like the curtains in the last exercise?
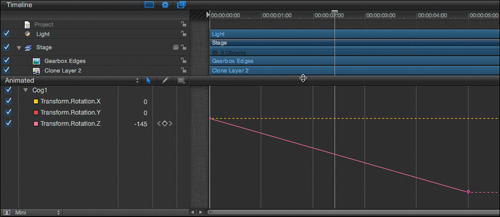
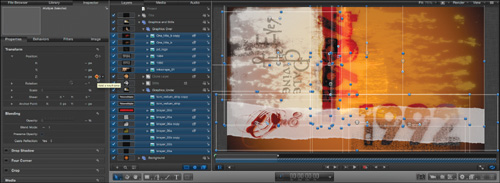
6. Select all the animated layers in the two groups, press Command-8 to open the Keyframe Editor, and drag up on the divider to make the window taller.
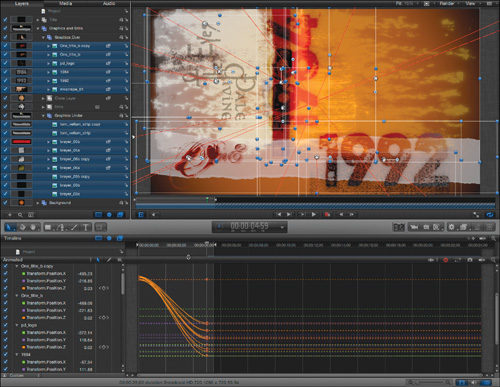
The red motion paths in the Canvas are straight lines that indicate the path of travel. The orange keyframe curves in the Keyframe Editor indicate how the speed of each layer changes over time. They are curved because the default interpolation for the Position parameters is Bezier (most other parameters have a default interpolation of Linear).
It’s nice that the layers already come to smooth landings, but you can take the animation a step further by rotating the layers into position. You can achieve this action by animating the group containing all layers.
To rotate the group containing all the layers, let’s work backward from its final value. You want to move the playhead to 5:00, the same frame as the other keyframes. Rather than entering a time value, you can jump the playhead directly to a keyframe.
7. In the Properties pane, click the Animation pop-up menu for Position Z and choose Next Keyframe, or press Shift-K.

The keyboard shortcuts for jumping to keyframes are Shift-K for the next keyframe and Option-K for the previous keyframe of the selected layer(s). You can also click the small arrows on either side of the keyframe icon to move to the next or previous keyframe for that parameter.
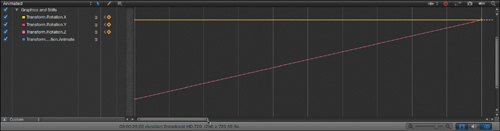
8. Select the Graphics and Stills group, and in the Properties pane, set a keyframe for the Rotation parameter of the group by clicking the gray diamond next to the Animation pop-up menu.
9. Move the playhead to the start of the project, set an initial keyframe for the rotation of the group, and then set the Rotation value to –90 degrees. Notice the straight sloped line for the Rotation parameter in the Keyframe Editor, indicating a linear interpolation.
If you don’t see the keyframe curve for the rotation parameter in the Keyframe Editor, click the bar above the list of parameters, and from the pop-up menu, choose Animated.
If any layers now appear on the screen at the start of the project due to the rotation, select them and increase their Position Z values to move them completely offscreen.
10. Play the project.

All the layers now rotate as they fall into position. However, they all come in at pretty much the same time, and land without much punch. You’ll now work in both the Keyframe Editor and the Timing pane to liven things up.
Working with Multiple Keyframe Curves
You’d like all the layers to suddenly snap into final position. Rather than adding keyframes to each layer’s Position Z property, you can achieve this effect using just one keyframe on the group. Then, in the Timing pane, you can adjust the timing of keyframes on individual layers to create more of a cascading effect as the layers fall into place.
1. Stop playback, and with the Graphics and Stills group still selected, press Shift-K to move the playhead to the ending keyframe for the rotation of the group.
2. In the Keyframe Editor, frame the curve by dragging left on the right side of the zoom slider at the bottom of the window.
Currently, only rotation is animated for this group. We will now animate the Scale parameter over the last ten frames of the project.
3. In the Properties pane, add a keyframe for Scale at 5:00.
4. Type –20 and press Return to move the playhead back 20 frames.
5. Add a keyframe for Scale at the playhead position, and set the value to 70%. The scale now changes from 70% to 100% over the last ten frames, but it’s scaled at 70% for the entire project before the last ten frames.
6. Go to the first frame, set a keyframe, and set the Scale value to 100%. Play the project. Now the layers scale down slowly from 100% to 70% and then quickly scale up to 100% at the end. But they do so too smoothly.
7. In the Properties pane, from the Animation pop-up menu for Scale, choose Show in Keyframe Editor. Now just the curve for Scale appears.
8. In the Keyframe Editor, drag a selection rectangle to select the middle Scale X, Y, and Z keyframes that are stacked on top of each other, and then Control-click and choose Interpolation > Bezier from the shortcut menu. Then drag out the right Bezier handle to make a steeper curve up into the final keyframe.
If you just click the keyframe to select it, only Transform.Scale.X is selected and not Y and Z, which are directly underneath it. Dragging a selection rectangle around keyframes that are stacked selects them all.

Play the project. The layers now scale down and then pop back up and appear to snap onto the screen.
Your final step is to stagger the keyframes on the layers so that they don’t all appear at once. When you want to change the timing of keyframes, using the Timeline rather than the Keyframe Editor is frequently easiest.
9. Open the Graphics Over and Graphics Under groups, and drag the top of the Timeline up to make the window much taller. Drag down on the divider bar for the Keyframe Editor to make room for the Timeline layers.
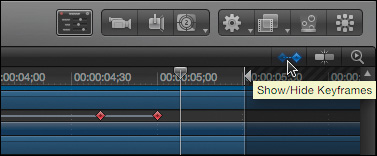
10. If it’s not already active, click the Show/Hide Keyframes button at the top right of the Timeline to display the keyframes under each layer bar.
It’s not necessary to reopen the Keyframe Editor for the next steps, but it’s helpful to see how changing keyframes in the Timeline also changes them in the Keyframe Editor.
There are three reasons why it can be easier to change the timing of keyframes in the Timeline rather than the Keyframe Editor:
• You can see the relationships of keyframes applied to multiple layers.
• Each keyframe at a given frame is actually a “bundle,” representing all keyframes at that point in time for a group or layer, so it’s easy to select and move all of them.
• You can’t accidentally drag a keyframe up or down, which would change its value.
Here, you want to stagger the introduction of each layer in time by moving the first keyframe a different amount for each layer.
11. Select the second-to-last layer in the Graphics Under group, brayer_03b.
The keyframes appear under each layer. You don’t have to select a layer to select its keyframes, but doing so enables you to clearly see which keyframes are related to that layer.
If you don’t see the keyframes in the Timeline, click the Show/Hide Keyframes button at the top right of the Timeline window.
12. Drag the first keyframe to the right a small amount.

The animation for this layer will now start a little later than the layer below it.
13. In the brayer_03b copy layer, move the first keyframe to the right a little bit more than the first keyframe in the brayer_03b layer.
14. Move the first keyframe for each of the layers in the Graphics Under group to a different point in time. When you reach the upper vellum layer, Shift-drag to snap it to the lower vellum layer. As you Shift-drag, thin vertical lines appear on the layer bar, representing all possible snapping points.

15. Repeat the process for the layers in the Graphics Over group, staggering the keyframes. Then play the project and adjust the keyframe locations to your liking. The layers now drop into the scene at different times, but they all end in their final positions at 5:00.
For a final touch, you can animate the strips of vellum to spread out just before they land.
Animating Crop with Keyframes
To make the strip of vellum appear to open up, let’s animate its Crop parameter. Because the graphic comprises two layers, we will animate them in tandem.
1. Stop playback, drag down on the top bar of the Timing pane to return it to its original size, and move the playhead to the start of the project.
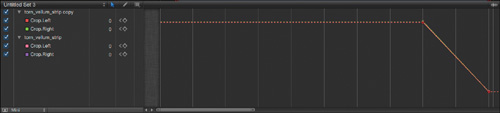
2. In the Layers list, Shift-select the torn_vellum_strip and torn_vellum_strip copy layers, and press Shift-K twice to move the playhead to the second keyframe at 5:00. In the Properties Inspector, a solid diamond appears in the Position Z Animation menu, confirming that the playhead is parked on a keyframe.
3. In the Properties Inspector, select the Crop checkbox, and click the word Show to display the Crop parameters. Click the gray diamond next to the Animation pop-up menu for the Left and Right parameters to set keyframes.

Once again, you are working backward, first locking the final crop values. Now you’ll back up in time and crop the layers.
4. Drag the playhead back to a point where the layers are still rotated, at about 4:00.
5. Set keyframes for the Crop Left and Crop Right parameters, and then increase their values so that the crop lines cross in the middle and make the layers disappear, at just over 700 pixels each.
6. Play the project.
It looks good, but let’s say you’d like to modify the keyframe interpolation.
7. Press Command-8 to open the Keyframe Editor, and then from the Show Curve Set pop-up menu located above the list of parameters, choose Animated.

The Keyframe Editor shows the curves for all animated properties—in this case, Position and Crop. That’s great, but sometimes you want to focus on just one or two curves.
The Show Curve Set pop-up menu also allows you to reveal keyframe curves for specific parameters—such as Position, Rotation, and Scale—of the selected layers.
8. In the Properties pane, from the Animation pop-up menu next to the Crop Left parameter, choose Show in Keyframe Editor.
9. Do the same for the Crop Right parameter. Now only those two keyframe curves appear in the Keyframe Editor. Now you can focus on these curves without being distracted by other animated parameters of the selected layers.
You can choose Show in Keyframe Editor for parameters from different layers or groups to add them to the Keyframe Editor. It’s a great way to match the timing of multiple objects without cluttering the window with other curves.
10. Shorten and reposition the zoom slider to center the curves and make them larger.
11. Command-click the names of each parameter to select them all, and then use the Animation pop-up menu in the Keyframe Editor to change the curve interpolation to Bezier for all four curves at once.

12. Drag a selection rectangle around the starting set of keyframes that are stacked on top of each other to select them all and use the Bezier handles to adjust the curves to your liking. Repeat this action for the ending keyframes.

13. Save your work.
You now have a good understanding of recording keyframes and setting them manually, changing interpolation and adjusting Bezier curves, and adding and adjusting multiple keyframes at the same time.
Lesson Review
1. How does Motion let you know that recording is enabled?
2. Which parameters of a layer or group are keyframed when recording is turned on and their values are changed?
3. How many keyframes do you need to create animation?
4. The position of a video is keyframed at 1:00 and 5:00, but it does not move. Why?
5. How do you open the Keyframe Editor?
6. How do you change the interpolation for a keyframe curve?
7. How can you set the interpolation for a keyframe to Logarithmic?
8. You want to set a keyframe at 3:15 for the scale of three layers that are each in different groups. How can you set it for all of them at once?
9. When you set a keyframe with recording enabled at a frame that is not at the beginning of a layer, what does Motion do automatically?
10. When setting keyframes manually, which do you do first—set the keyframe or change the value—and why?
11. What parameters can be keyframed?
Answers
1. The Record button turns red, and all keyframeable value fields in the Inspector turn red.
2. All keyframeable parameters will be keyframed by default if you change their values with recording enabled. You can change the recording options by double-clicking the Record button and selecting the checkbox to record keyframes on animated parameters only.
3. To animate with keyframes, you need to have at least two keyframes with different values.
4. Because the keyframes have the same value.
5. Choose Window > Keyframe Editor or press Command-8.
6. In the Keyframe Editor, from the Animation pop-up menu, choose Interpolation. The submenu includes four interpolation options: Constant, Linear, Bezier, and Continuous. You can also Control-click a keyframe or a curve in the Keyframe Editor.
7. In the Keyframe Editor, you can change the interpolation of individual keyframes along a curve by Control-clicking a keyframe and choosing an interpolation type. This technique provides access to five additional interpolation options: Ease In, Ease Out, Ease Both, Exponential, and Bezier.
8. Command-click each of the layers to select them. Then click the Animation pop-up menu in the Properties Inspector for Scale and choose Add Keyframe, or click the keyframe icon.
9. Motion automatically sets a keyframe at the beginning of a layer if recording is enabled when you change the value of a parameter at any other point in time.
10. Always set the keyframe first and then change the value when setting keyframes manually; otherwise, the value will change for the entire duration of the layer, not just at the keyframe.
11. Any parameter of any layer, group, or effect that has an Animation pop-up menu in the Inspector.
Keyboard Shortcuts
