
Lesson 9. Speed Changes and Optical Flow
Lesson Files
Motion5_Book_Files > Lessons > Lesson_9
Media
Motion5_Book_Files > Media > Retiming
Time
This lesson takes approximately 30 minutes to complete.
Goals
Speed up and slow down a video clip
Apply optical flow frame blending
Use keyframes to create a variable speed ramp
Apply, trim, and combine Retiming behaviors
Use and modify Time filters
It’s rare to see a title sequence or an advertisement where the video hasn’t been sped up, slowed down, or both: A car races toward the camera and suddenly slows to a freeze before it passes by; a skateboarder flies off the edge of a ramp and freezes at his apex; a new laptop spins around in a blur, slows down suddenly so that it’s barely moving, and speeds up again just as suddenly.
In Motion, you can change and animate the playback speed of a video clip using keyframes and behaviors.
In this lesson, you’ll apply a constant speed change to a video clip to create smooth slow motion using different frame blending options, including optical flow.
Then you’ll vary the speed of the clip over time, creating ramping effects—first by using keyframes and then by using Retiming behaviors. Finally, using the Motion Time filters, you’ll create time-based special effects.
Creating Constant Speed Changes
The simplest way to change the speed of a clip is to apply a constant speed change—for example, slowing a clip down to 50 percent of its original speed or speeding it up to 200 percent. Constant speed changes are great for adjusting a clip’s length to fit within a sequence, creating a time-lapse effect, or playing a clip in slow motion.
1. Navigate to Motion5_Book_Files > Lessons > Lesson_09. Open the Lesson_09_Start project, save it to the Lesson_09 > Student_Saves Folder, and play it.
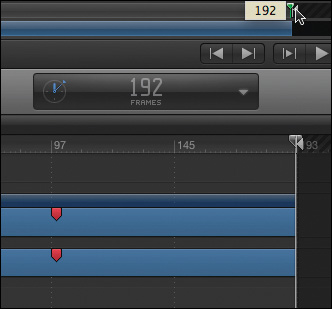
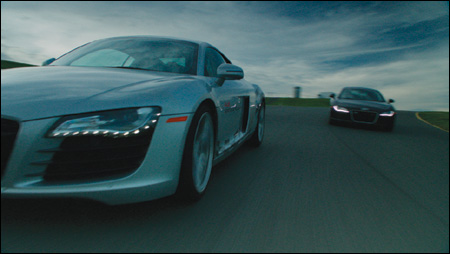
The project contains a clip from an Audi promotional video shot at 24 frames per second. Notice that the project duration is longer than the duration of the clip. This extra time will come in handy when you slow down the clip.
2. With the project still playing, select the clip, press F1 to open the Properties Inspector, and in the Timing section, click Show.
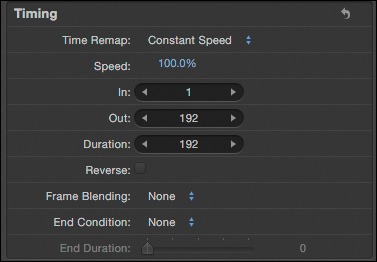
In the Timing section, you can control a clip’s playback speed. The Speed parameter is currently set to the default value of 100%. Notice that the clip Duration is 192 frames, or eight seconds if you are displaying timecode.
3. Drag in the Speed value field to change the Speed value to 50%. The clip now plays in slow motion. Notice that the bar in the Timeline has become longer, and the duration field now reads about 16 seconds, or 384 frames.
Because the clip plays half as fast, it now lasts twice as long. The clip plays more slowly, but the motion is not very smooth.
When you slow down a clip, you extend the existing frames over a longer time period, so frames are repeated. So when a clip is slowed by 50 percent, every frame is played twice so that half the original frames can play in the same amount of time. This repetition of frames can create a distracting, step-like effect. Motion has other options for altering clips that produce smoother changes at less than 100 percent speed.
Using Frame Blending and Optical Flow
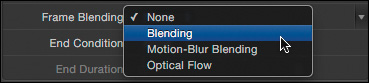
When you slow down a clip, you can control the slow motion appearance by choosing one of several frame blending options from the Frame Blending pop-up menu. The Blending option blends adjacent frames, quickly creating the most predictable results. Optical flow can produce more fluid and realistic slow motion results. This option estimates the motion between two frames of video and renders an intermediate frame that interpolates the motion. However, optical flow requires processing and affects playback performance most significantly.
1. In the Properties Inspector’s Timing pane, from the Frame Blending pop-up menu, choose Blending. Rather than repeating each frame, blending creates new frames by combining the original adjacent frames with varying levels of opacity to smooth out the transition from one frame to the next.
2. Stop playback, and press the Left and Right Arrow keys to step through the clip. Between every original frame you can see a frame that blends the preceding and following frames.
3. Locate the playhead on a frame in which you can see two blended images. Then, from the Frame Blending pop-up menu, choose Motion-Blur Blending.

Motion-Blur Blending creates blur between frames when a clip’s frame rate is higher than the project’s frame rate. Because this clip has been slowed down, blending has no impact.
Motion-Blur Blending is unrelated to Motion Blur, which is located in the Render pop-up menu and is adjusted in the Render Settings pane of Project Properties. Motion-Blur Blending creates blur within a video frame, whereas Motion Blur affects only animated objects.
The remaining Frame Blending option, Optical Flow, needs some time to do its magic because it first analyzes movement from frame to frame to generate entirely new frames in real time.
4. From the Frame Blending pop-up menu, choose Optical Flow. Then play the clip. Nothing seems to change, but an animated icon appears under the mini-Timeline on the right. This icon is the analysis indicator. It tells you that Motion is analyzing the optical flow or the directional movement of pixels.
5. Click the analysis indicator. The Background Task List window opens and displays the analysis progress. In this dialog, you also can pause and restart the analysis. The process runs as a background task, so you can continue to work in Motion while the analysis is performed.
You can batch-process multiple clips in a project. Each clip is analyzed in the order in which it was added to the queue. You can reorder clips by dragging them up and down in the Background Task List window.
6. After the analysis is completed, play the project. The clip now plays much more smoothly.
Depending on the source material, you may see artifacts in individual frames where optical flow has attempted to interpret the motion. Optical flow works best on clips that have little or no camera movement and a primary subject moving in the scene. A panning camera can create a tearing effect in the background.
When you perform the optical flow analysis, Motion creates a cache file that contains information about the clip. After this cache is created, you can change the speed of the clip as much as you want—including adding keyframes and behaviors—without analyzing the clip again. The cache file is large because it contains information to enable all possible speed changes.
You can choose how the cache file is handled in Motion Preferences.
7. Choose Motion > Preferences, or press Command-, (comma).
8. Click the Cache icon. In the Optical Flow Retiming section, you can choose a different location in which to store the cache file, and delete the cache file.
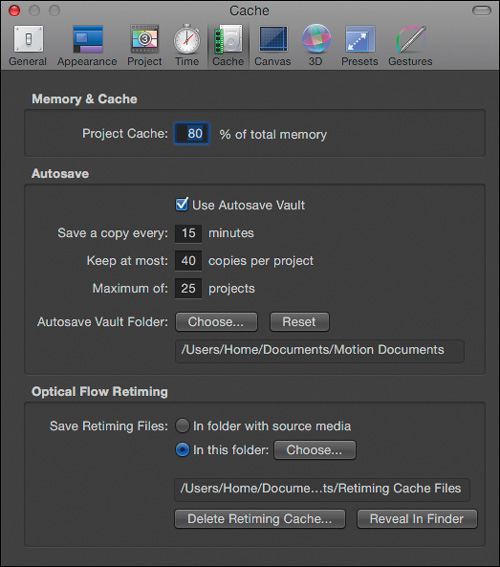
9. To see how large the cache file is, click the “Reveal in Finder” button, and then select the cache file to view its properties. This cache file is roughly 350 MB.
The cache file includes the optical flow analysis of only the portion of the clip used in the project. The longer the clip’s duration and the greater its resolution, the larger the cache file will be. If you are analyzing long HD-resolution clips, make sure you have adequate disk space to store the cache files.
10. Return to Motion and close the Preferences window.
If you extend a clip’s In or Out points, Motion will analyze the added media as a background task.
11. Change the Speed value from 50% to 40%. The clip immediately plays at the new speed with optical flow frame blending applied.
12. Return the Speed value to 100%.
At the top left of the Canvas, keep an eye on the project’s frame rate (displayed only when the project is playing). Optical flow processing during playback is GPU intensive, and you may need to export the clip to play at a full frame rate.
Next, you’ll work with ways to change speed over time. Because the optical flow analysis was performed, the results of your changes with optical flow frame blending will be visible immediately. You can return the Frame Blending type to one of the other options at any time. If you later return to optical flow, it will use the existing cache file.
Creating Speed Ramps with Keyframes
The real fun of retiming clips starts when you change the speed over time. For example, a clip can start in slow motion, suddenly speed up, stop in a freeze frame, and speed up again.
1. Stop playback. Set the play range Out point at the end of the video layer by dragging the white arrow in the mini-Timeline, or press Command-Option-O.
2. Press Home to move the playhead to the start of the project.
If you are using a keyboard that does not have a Home key, such as a MacBook or MacBook Pro, press Fn-Left Arrow to move the playhead to the start of the project.
3. In the Properties Inspector’s Timing pane, from the Time Remap pop-up menu, choose Variable Speed. A Retime Value field appears with a value of 1. A solid diamond in the Animation menu indicates that a keyframe is located at the playhead.
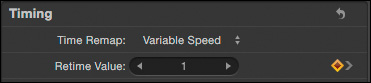
4. Next to the current time field, click the clock icon to toggle from timecode to frames. The Retime Value of 1 refers to frame 1, which is the current playhead location. Working in frames will clarify the relationship between the current time field and the Retime Value field.

5. Drag the playhead to frame 30, and look at the Retime Value field. No matter where you move the playhead, the frame under the playhead is the same as the frame in the Retime Value field. This indicates that the clip will play at its native speed: At any given frame in the project, the same frame of the video is seen.
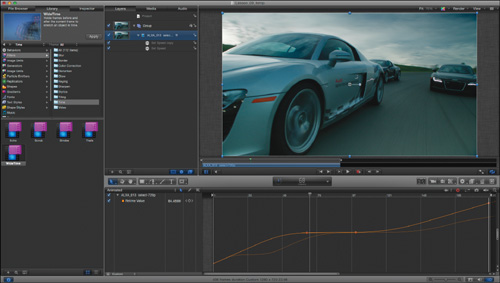
6. Press Command-8 to open the Keyframe Editor. If necessary, drag the zoom slider to view the full curve in the window.
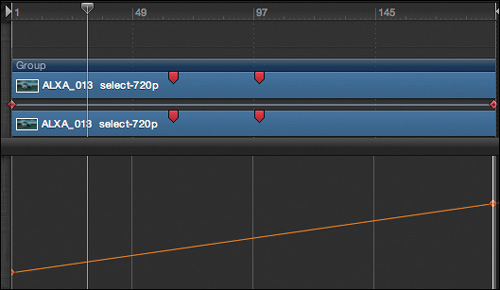
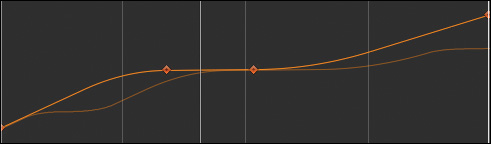
The project plays at 100 percent speed. The curve in the Keyframe Editor contains keyframes at the beginning and end of the clip. The first keyframe tells Motion to play the first frame of the clip at the beginning of the project, and the second keyframe tells Motion to play the last frame of the clip when the playhead reaches the corresponding frame in the Timeline. Between those keyframes, Motion interpolates a straight line, and therefore the project plays at normal speed.
Now that you have a curve, you can manipulate which frames of the video play and at what times. You’ll now create a freeze frame by adding two keyframes to the curve that have the same value.
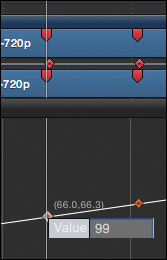
7. Hold down Command-Option and press Right Arrow twice to move the playhead to the second marker on frame 99. Double-click the keyframe curve directly under the playhead to add a keyframe. In this frame, you can clearly see the Audi branding on the side of the car, which makes it a good frame to freeze.
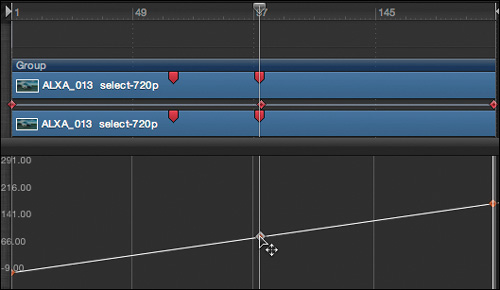
8. Hold down Command-Option and press the Left Arrow to move the playhead to the first marker, and double-click to add a keyframe on the curve. Then double-click the keyframe, and in the Value field, enter 99. Press Return, and play the project. Because both the new keyframes are playing the same frame of the video clip, the curve between them is flat, and the video appears to freeze between them.
The car stops and starts again rather suddenly. You can slow it to a stop and speed it up again by changing the interpolation of the keyframes.
9. Control-click (or right-click) the first new keyframe and choose Ease In from the shortcut menu.
10. Control-click the second keyframe and choose Ease Out from the shortcut menu. The combination of the eased keyframes and optical flow frame blending creates a very smooth freeze-frame effect.
If you just want to change the location of a keyframe without changing its value, drag it in the Timeline instead of dragging it in the Keyframe Editor, where you could accidentally drag it up or down, thereby changing its value. (You may need to click the Show/Hide Keyframes button at the upper left of the Timeline.)
11. Stop playback, press Command-8 to close the Keyframe Editor, and save your work.
Using keyframes to change clip speed lets you precisely control which frame of video plays at any point in time.
Creating Speed Effects with Retiming Behaviors
If you can animate an element in Motion using keyframes, it’s likely that you can also animate it using behaviors. Time remapping is no exception. While keyframes allow great animation precision, Retiming behaviors have their own strengths. They can be added and adjusted quickly; they can be combined with keyframes; and they can create effects that would be difficult or time-consuming using keyframes.
Also, Retiming behaviors will not change those parts of a clip they are not applied to. If you slow down the first half of a clip with a behavior, the rest of the clip will still play at 100 percent, and the clip will become longer. If you use keyframes to slow down the first half of a clip, the second half will speed up so that the total clip length remains the same.
You will start this exercise by building the same freeze-frame effect using a Retiming behavior. Then you’ll modify the behavior, duplicate it, and try a few variations.
1. Return the Time Remap parameter to Constant Speed.
The clip returns to its default settings. However, if you were to return the Time Remap value to Variable Speed, the keyframes you created would still be intact. And the optical flow frame blending also would be intact.
Let’s create a speed ramp effect using the Set Speed behavior.
2. Press Command-2 to open the Library, choose Behaviors, and then choose the Retiming folder.
You have 11 available Retiming behaviors. Selecting a behavior displays a sample movie and written description in the preview area.
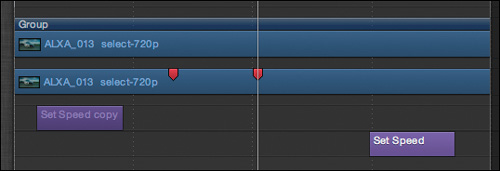
3. Move the playhead to the first marker at frame 65. Let’s start the speed ramp at the same point as the freeze frame in the previous exercise.
4. Drag the Set Speed behavior from the Library onto the video clip in the Canvas, and then press I to trim the behavior’s In point to the playhead.
5. Drag the playhead to the second marker at frame 99, and press O to trim the Out point. We’ll end the speed ramp at the same point the freeze frame ended in the previous exercise.
If you press Command-Option-Right Arrow to move to the markers after you add the behavior, you must reselect the video layer. If you do not, Motion will look for a marker on the selected behavior.
6. Start playback, and in the HUD, drag the Speed slider to 0 to create a freeze-frame effect.
The Ease In Time and Ease Out Time parameters determine how many frames it takes to get from full speed to the Speed value. The Curve parameters set acceleration and deceleration over the Time values and work much like the Bezier handles on keyframes.
7. Adjust the Time and Curve values in the HUD as you like.
One of the advantages to Retiming behaviors is that you can change their locations and durations right in the mini-Timeline.
8. Try dragging the Set Speed behavior earlier and later in time, and drag the In and/or Out points to change their durations. Adjust the play range as needed.
You can also quickly duplicate, add, and stack Retiming behaviors.
9. Press Command-D to duplicate the Set Speed behavior, and then reposition and trim each behavior to create two separate speed ramp effects.
Finally, you can combine Retiming behaviors and keyframes.
10. Press F1 to open the Properties Inspector, and in the Timing section, change the Time Remap parameter to Variable Speed. The keyframe curve you previously created is added to the Retiming behaviors (look at the Keyframe Editor to see the curve), and as the clip plays, both keyframes and behaviors manipulate its playback speed.
The other Retiming behaviors in the Library create a variety of time-related effects and can be freely mixed and matched in the Timeline.
11. Return the Time Remap parameter to Constant so that the keyframes no longer affect the animation.
12. At the top of the toolbar, click the Add Behavior pop-up menu and try several of the behaviors in the Retiming group. Trim them, move them, and adjust them in the HUD or the Behaviors Inspector to understand how they work. You may need to remove the existing behaviors to make more space available for the new behaviors you want to try.
Using Time Filters
Time filters are designed to create time-based effects you can use alone or in combination with time remapping and optical flow frame blending.
1. Delete all the Retiming behaviors you applied to your clip. It will be easier to see the effects of the Time filters if you use the speed of the original footage.
2. Press Command-2 to go to the Library. Choose Filters, and then choose the Time folder, which contains five Time filters.
3. Select each filter and watch its preview. Most of the filters work by holding and/or combining frames on top of each other.
4. Drag the WideTime filter to the clip.
5. In the HUD, increase Duration to 0.2 and increase Decay to 1.

The filter holds frames before and after the current frame to create a blurry series of images surrounding the cars. You can combine this effect with Retiming behaviors or keyframes.
You can also keyframe the filter parameters. For example, you could set a Duration of 0 until immediately after a freeze frame, and then increase the value to create a “spray” of copies that shoot out of the freeze frame.
With constant and variable time remapping, frame blending options such as optical flow, retiming behaviors, and time-based filters, Motion provides you with a vast arsenal of time-manipulation tools.
Lesson Review
1. In which pane and section do you change the speed of a clip?
2. Name the two kinds of Time Remap speed changes.
3. Identify three of the four frame blending options.
4. You created a slow motion effect using the Optical Flow option. How can you determine the size of the resulting cache file?
5. Can you continue working on a Motion project while the optical flow analysis is performed?
6. Describe four reasons to create a speed effect with a Retiming behavior instead of using keyframes.
7. Which Retiming behavior lets you create a speed ramp effect?
8. Can you combine Retiming behaviors with keyframes?
9. Name two of the Time filters.
Answers
1. The Properties Inspector in the Timing pane
2. Constant Speed and Variable Speed
3. None, Blending, Motion-Blur Blending, and Optical Flow
4. Choose Motion > Preferences. In the Cache pane, click the “Reveal in Finder” button, and then select the cache file to view its properties.
5. Yes, it’s a background task.
6. Behaviors can be added and adjusted quickly; they can create effects that would be difficult or time-consuming using keyframes; Retiming behaviors only change the parts of a clip to which they are applied; you can change the locations and durations of Retiming behaviors in the mini-Timeline.
7. The Set Speed behavior
8. Yes, if you apply a keyframe curve to a Retiming behavior, both keyframes and behaviors manipulate the clip’s playback speed.
9. Echo, Scrub, Strobe, Trails, Wide Time