
Lesson 10. Keying and Compositing
Lesson Files
Motion5_Book_Files > Lessons > Lesson_10
Media
Motion5_Book_Files > Media > Green Screen
Time
This lesson takes approximately 90 minutes to complete.
Goals
Stabilize a shot
Match move one shot to another
Use the Keyer to remove a green screen
Create and animate a B-Spline mask
Match foreground and background color
Add and customize a particle effect
When producers want an actor to hang off the edge of a cliff, blast aliens on a distant planet, or read a book at a Parisian outdoor café, they’ll frequently save time, money, and work-safety violations by shooting the actor in a studio against a green screen and then replace the green background with a new background. But replacing the green screen is just one aspect of visual effects compositing, as you’ll find out in this lesson.
In this lesson, you will prepare a background for the composite and then remove a green screen background using a keying filter. After finessing the key, you will animate a mask to cut out problem areas of the image, and finish by matching the tone and color of the foreground clip to the background.

Stabilizing a Clip
When you combine any two shots to look as if they are one shot, the framing and camera movement of each shot must match exactly. To accomplish this, you first remove unnecessary camera movement from one of the clips. In Motion, you can do this with the Stabilize behavior. But before you begin stabilizing, let’s look at the simple structure of this project.
1. Close any open projects, and choose File > Open. Open Motion5_Book_Files > Lessons > Lesson_10 > Lesson_10_Start. Choose File > Save As and save a copy to the Student_Saves folder. This project has a resolution of 1280 × 720 pixels and includes two groups, each containing a single clip.
2. In the Layers list, click the disclosure triangle for the Foreground group, and then press the Spacebar to play the clip. After you play the clip a few times, stop playback.

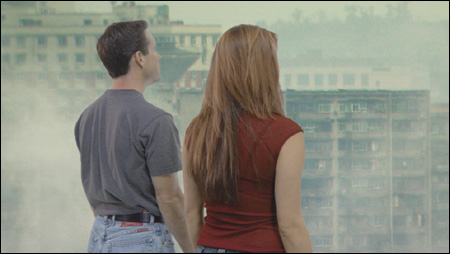
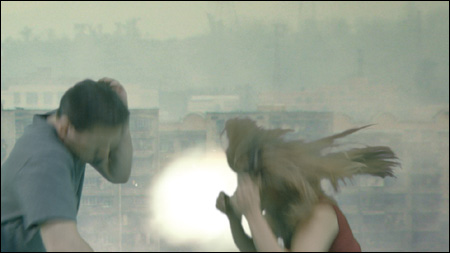
This clip has two actors on a green screen. The evenly lit green screen makes it easier to place subjects onto a new background because you can remove the green using a process called keying.
In this clip, the camera moves behind the actors, and at the end of the clip, they duck down. We can assume that this action is the important part of the shot and signals that something spectacular happens here. In this exercise, you’ll key the clip in preparation for adding the “spectacular” bit.

3. In the Layers list, deselect the activation checkbox next to the Foreground group to hide it, and then click the disclosure triangle for the Background group. Press the Spacebar to play the clip. After you play the clip a few times, stop playback.

This background already includes a Levels filter to provide more contrast. This 1920 × 1080 pixel clip is much larger than the project. It’s convenient to have a larger background for your composite in case you need to stabilize it or pan the background to fit the action in the scene
In this exercise, the background is really just a temporary placeholder. For an actual composite, you would need a live action background filmed with the same camera move as the foreground, or a 3D background matching the foreground camera move.
You can mix and match codecs and frame sizes in a composition; but if possible, match frame rates to avoid any skipped or repeating frames.
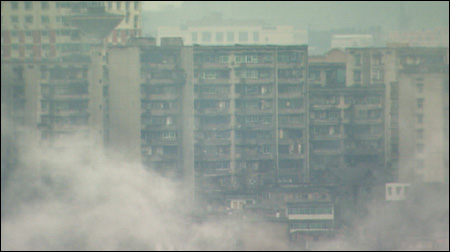
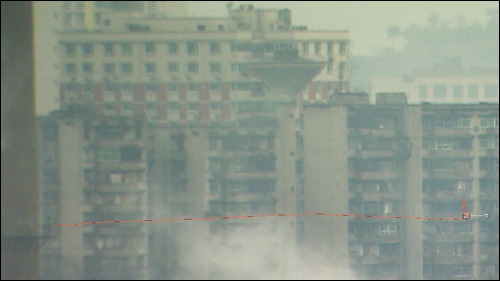
If you examine the background clip as it plays, you’ll see a slight shake in the camera probably caused because the camera is zoomed in quite far and the tripod might have been a bit unstable. In any case that movement is enough to ruin the illusion that the foreground and background are a single shot. So the first thing to do is remove the unwanted background movement using the Stabilize behavior.
4. Press Command-2 to go to the Library. Select Behaviors, and then select Motion Tracking. You use the four behaviors in this category to perform a variety of tracking-related operations.
Tracking operations analyze and record the movement of objects or regions within a clip. Once you acquire the motion data, you can invert it and apply that inverted motion data to stabilize the clip. When the camera moves right, the inverted motion data creates a move left that negates the camera movement.
5. Drag the Stabilize behavior onto the temp_city_scene layer in the Layers list, and then press F2 to open the Behaviors pane in the Inspector.
The Stabilize behavior can function automatically if you click Analyze and let it do its thing, but that method works best for smoothing a clip and not as well when locking a clip down or stabilizing it.
When stabilizing, you can adjust several parameters to ensure you get the results you want.
6. To completely remove the camera movement from this clip, leave Method set to Stabilize in the Inspector. The camera moves only horizontally and vertically in this shot, so you’ll also leave the Adjust options enabled for Position. The Stabilize behavior can also stabilize camera tilting and zooming transforms by enabling the Scale and Rotation options. You won’t need those two options for this shot so you will also leave those at their default setting.
Setting Method to Smooth is a great way to reduce shaky moving camera footage, such as when a camera is on a dolly or attached to a car.
The next step is to add a tracker to the Canvas. When stabilizing, a tracker is used to identify an area in the image that should remain stable. Motion locks onto the defined area as it moves across the screen to determine its movement over time. Ideally you want to position the tracker over a high contrast clear pattern that is not obscured and does not change shape for the duration of the clip.
7. In the Inspector, click the Tracker Add button.
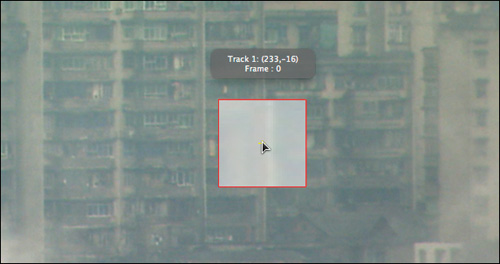
The small circular tracker is added to the center of the Canvas. Although it is sometimes called a tracking point, the tracker actually identifies a small region. Because tracking begins at the start of the behavior, it’s critical that you place the tracker while looking at the first frame of the behavior, which in this case is the start of the project.
8. Position the playhead at the start of the project, and then drag the tracker around the Canvas.
As you drag the tracker, Motion displays a magnified inset view under your pointer to help you precisely select the tracking reference pattern. You can control the level of magnification in the Inset view from the Auto-Zoom menu in the Inspector.
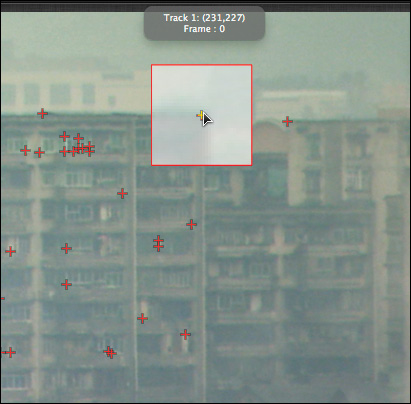
9. In the Canvas, Option-drag the tracker.

After a brief pause, Motion displays suggested tracker points for that frame. Because these reference points are chosen for this frame and not for the entire clip, they may not all be ideal tracking reference patterns. Still, they are a huge help in the somewhat hit-and-miss process of selecting a tracking point.
10. Drag the tracker to the upper-right corner of the building in the center of the screen. The tracker will snap to the reference point.
11. In the Inspector, click Analyze.
If you were stabilizing a clip of the same size as the project, you would choose Zoom from the Borders pop-up menu. Motion would then automatically scale the clip as necessary to ensure that black borders wouldn’t appear in the Canvas as the clip is repositioned to eliminate camera movement.
Motion analyzes the clip frame by frame. When the analysis is completed, you can play the clip and Motion will attempt to remove all movement by changing the layer’s position at every frame (and the rotation or scale, if those are selected in the Inspector) to lock down the buildings.
12. Play the project, and stop playback after you confirm that the clip no longer has any unwanted movement.
In the Canvas, the bounding box of the layer moves and a small dotted line appears under the tracker to indicate the motion path of the layer that causes the buildings to appear motionless. With the background stabilized, your next step is to have it inherit the movement of the foreground shot.
Creating a Match Move
Since the camera moves in the green screen clip, the background must track that movement to make the composite look realistic. Tracking works almost exactly like stabilization. You set up trackers to calculate the movement of objects as with stabilization, but the acquired motion data is applied to a different layer, in this case, the background.
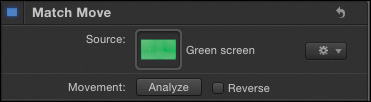
Motion’s main tracking behavior is the aptly named Match Move behavior. It matches the movement of one layer to another. You apply the Match Move behavior to the layer that you want to inherit the new movement.
In this exercise, you want the layer stabilized prior to applying any match-moving data. To achieve this, you’ll apply the Match Move to the Background group. The hierarchy of layers within groups dictates that the Stabilize behavior on the layer is applied first and the group’s Match Move behavior is applied second.
1. Press Command-2 to open the Library. Drag the Match Move behavior onto the Background group in the Layers list, and then press F2 to open the Behaviors pane of the Inspector.
2. Drag the Green screen layer from the Layers list to the Source well in the Inspector. Select the activation checkbox for the Green screen layer to view it in the Canvas.
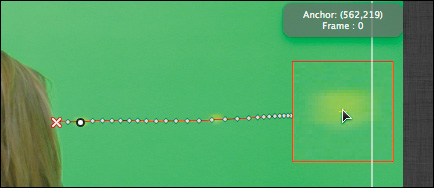
The tracker appears in the center of the Canvas. By default, the behavior will match only the position of the layer, so only one tracker is required.
When you want to track the layer’s scale and/or rotation, a second tracker is needed. When you enable Scale and Rotation in the Inspector, Motion automatically displays a second tracker.
Trackers are positioned on the Canvas to identify which object in the frame should be followed to match the movement. And again, the location of the playhead is critical for the Match Move behavior because it assumes the playhead is on the first frame of the behavior.
3. Press Shift-I to move the playhead to the In point of the layer.
If the source layer is obscured under another layer in the Canvas, clicking the tracker will still correctly show a zoomed-in view of it.
When selecting a pattern to track, choose an area of high contrast that stays in the frame. Luckily the people who shot this clip knew you would need to track it so they conveniently placed tracking references on the green screen wall. The light green rectangles are perfect for tracking because they are clearly defined for the duration of the clip.
4. Drag the tracker over the green rectangle in the upper-right corner of the frame, and center the rectangle in the magnified inset view

5. In the Inspector, click Analyze.
If you are trying to track a fast moving object, you may have to increase the Search Size value in the Anchor or Rotation-Scale sections of the Inspector. A larger search size helps ensure that the tracker won’t be lost when a lot of movement occurs from one frame to the next.
As the tracking begins, white dots in the Canvas indicate the path of the tracker over the duration of the clip. As you watch the Canvas, you’ll notice the woman’s head obscures the tracking reference pattern (the green rectangle) before the analysis is complete. The tracker stops prematurely because it can no longer find the tracking reference pattern you selected. When a tracking reference pattern is obscured or goes offscreen during a track, you can use the Track Offset to select a new pattern to pick up where the original pattern is lost. Motion calculates the offset between the new and old tracks to create a single continuous track.

6. Drag the playhead to the frame just before the tracking point is obscured. Use the Tracker Preview in the Inspector to make sure you clearly see the green rectangle. You’ll want to position the playhead at 4:10 (or frame 131).
7. In the Inspector, select the Offset Track checkbox.

8. In the Canvas, drag the yellow tracker to a green rectangle in the upper-right of the frame, and then in the Inspector, click Analyze.
The tracker picks up where the previous one left off; but once again, the woman’s head obscures the green rectangle before the analysis is completed. You’ll have to repeat the offset process by selecting yet another track reference pattern in the upper-right of the Canvas.
9. With Track Offset still enabled, position the playhead at 5:00 (or frame 151) just before the second tracker is obscured. Drag the tracker to a third green rectangle in the upper-right corner of the Canvas, and then click Analyze in the Inspector.

Now the Canvas has a perfect tracking line that will act as a motion path for your background clip. Let’s review the applied motion.
10. In the Layers list, deselect the activation checkbox next to the Foreground group to hide the group. Press the Spacebar to play the background clip. Stop playback after you view the clip a few times.
The clip clearly has the right motion applied to it, but the movement is much greater than the clip size so the background pans offscreen. The only solution is to scale the background clip to fill the Canvas.
11. In the Layers list, select the temp_city_scene layer, and then select the Properties pane in the Inspector. Set the Scale to 125, and then drag the playhead to the start of the project.
The camera moves only to the right so you know that at the start of the project, the right edge of the frame can be placed against the right edge of the Canvas.
12. In the Canvas, drag the temp_city_scene layer until its left edge is against the left edge of the Canvas. Also drag down until you can see the rooftops and some sky. Then move the playhead to the end of the project.
You can see the edge of the frame no longer moves into the Canvas so that resize works. The background clip now matches the camera move from the green screen clip, and it no longer pans off the Canvas thanks to the resize and repositioning.
13. Save your project.
You are now ready to key the green screen.
Keying in Automatic Mode
Motion includes an excellent keying filter for replacing a green screen or blue screen background with a new background from a different layer.
The Keyer in Motion starts in an automatic mode by analyzing the image to determine what color range to select. The color range is then keyed to make it transparent and reveal the background layer. In this exercise, you’ll apply the keying filter to see how well this automatic mode works for your shot.
1. Position the playhead at 4:00 (or frame 121).
2. In the Layers list, select the activation checkbox for the Foreground group, and select the Green screen layer inside the Foreground group.
Instead of using the Library to add the Keying filter, you’ll use the alternative toolbar method.
3. From the toolbar, click the Add Filter pop-up menu, and choose Keying > Keyer.

As soon as it is applied, the Keyer samples the dominant green color and makes it transparent to reveal the background clip.
4. Play the project a few times and then stop playback and return the playhead to 4:00 (or frame 121).
At first look this key seems to be very good; but when you are keying, always view the matte created by the key because it can reveal more subtle problems.
5. Press F3 to open the Filters pane in the Inspector, and then click the center View button to view the matte in the Canvas.
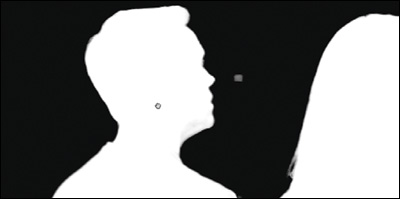
The matte is a grayscale representation of the key displayed in the Canvas. Areas of white are opaque in the actual composite, areas of black are completely transparent, and areas of gray are partially transparent. Ideally, the background is completely black and the subject is completely white to the edges, which should have smooth edges, without any stair-stepping.
How easy or difficult it is to create a clean matte is dependent upon the way the subject was shot; how brightly and evenly the background screen was lit; how far the subject was from that background; what colors the subject was wearing; how much movement and detail were in the shot; and the type of camera, recording media, and compression in use.
Perfect mattes are never created without some adjustments, and this shot is no exception. As you can see, the key that looked great when viewed as a composite has lots of semi-transparent gray areas on the actors. You can make adjustments to remove some of these gray semi-transparent areas while maintaining others (especially around hair).
Start your adjustments with the Strength slider, which adjusts the core transparency. When you reduce the slider value, you reduce the areas of transparency by narrowing the range of green used to create the matte.
6. Drag the Strength slider to 50%.
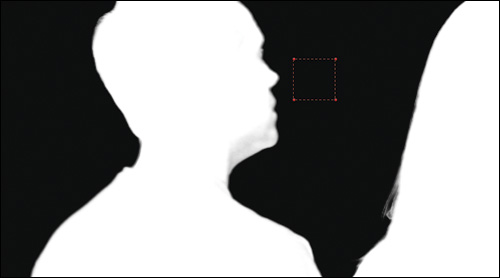
In the Canvas, the white areas of the matte now have no gray or semi-transparent areas within them. Unfortunately, by narrowing the green color range, you also revealed the green rectangles you used for tracking. Those rectangles are a slightly different shade of green and show up as gray rectangles in the black area of your matte. When you have several shades of green or blue in the background that you want to include in the key, you can use the Sample Color tool.
7. From the Zoom Level pop-up at the top of the Canvas, choose 200% to see the rectangles more clearly. Then press H to choose the Pan tool, and drag the Canvas until the male actor’s head is centered on the screen.
8. In the Inspector, click the Sample Color button. In the Canvas, drag a selection rectangle around the gray rectangle that appears between the two actors’ heads.

Instead of clicking the Sample Color button in the Inspector, if the Keyer is selected in the Layers list, you can Shift-drag in the Canvas to create a Sample Color selection rectangle.
The black areas of the matte are now totally black, just as you want them.
You can add sample regions in different areas and on different frames. When you add sample regions on different frames, keyframes are created to interpolate the difference from one frame to the next. These keyframes are not shown in the Motion user interface, but you can move to each keyframe by clicking the “Jump to Sample” buttons in the Inspector.
9. Press Shift-Z to see the entire frame in the Canvas.
Although the Sample Color tool corrects the color range problem, it can remove some nice soft edges, especially around hair. Let’s view a different frame to see if any new problems have arisen.
10. Drag the playhead to 5:25 (or frame 176) to better see the matte around the woman’s hair.
The Edges tool is used to refine semi-transparent areas such as hair, smoke, and motion blurred objects by drawing a control line over the edge of the matte you want to work on. Let’s use the Edges tool to improve the transparency on the actor’s hair as she ducks down.
11. In the Inspector, choose the Edges tool.

12. In the Canvas, drag from the white area at the top of her head to just above the black area of the background to create a control line.

Instead of selecting the Edges tool in the Inspector, if the Keyer is selected in the Layers list, you can Command-drag in the Canvas to create a control line.
Once the control line is in place, the matte can be made softer or harder by dragging the control line slider handle in the Canvas.
13. Drag the slider handle toward the white portion of the matte to soften the edges of her hair, and then drag toward the black side of the matte to harden the edges. Leave the slider handle set about two-thirds of the way to the top of the control line.
As you drag the slider handle toward the white side of the matte, more gray semi-transparent areas are revealed, which is not the way you want to go. Dragging toward the black side of the matte improves the matte slightly, and gives it a good mix of pure white with gray strands. But this is beginning to feel like a seesaw because those pesky rectangles reappear. One more sample color addition should remove them for good.
You can change the size of the Edges control line and the sample region anytime by dragging their control handles in the Canvas.
14. In the Inspector, click the Sample Color button. Then in the Canvas, drag a selection rectangle around the gray rectangle above the male actor’s head.

You can delete a sample color range rectangle or an Edges control line by Option-clicking it in the Canvas.
The rectangles are now gone, and the hair still looks great! The only remaining problem with the matte is some gray areas under the male actor’s chin. One way to fill in unwanted holes or subtle gray areas in the white part of your matte is to drag the Fill Holes slider. But that technique can also ruin the softness you just achieved on her hair. You could cut her hair and reshoot, but that might be too expensive. Instead you’ll correct this problem later using the Matte tools. For now, review the project and see if you have other basic adjustments to make here.
If you are filling holes near semi-transparent edges you want to keep, use the Edge Distance slider to determine how close the Fill Holes parameter gets to the edges of your matte.
15. Click the left View button to view the composite in the Canvas, and continue to play the project. Stop playback after you watch the entire project a few times.

The basic key adjustments are almost complete. The final slider you’ll use in this exercise is Spill Level, and by default it is already applied. When a subject is shot in front of a green screen, the light from the screen can often bounce back and add a green tint to the subject. This green fringing is called spill, and one way to get rid of it is by using a spill suppressor. Let’s lower the Spill Level slider to see what the shot looks like without it.
16. In the Inspector, move the Spill Level slider to 0.
Without spill suppression the actors look a little radioactive with green fringe around them. The spill suppression pushes the color in the opposite direction of the key color (green, in this case). Adjusting the Spill Level slider is a balancing act between reducing the green and adding magenta.
17. Slowly drag the Spill Level slider to about 30. Then stop playing after you are satisfied with the amount of spill suppression.
You are done creating your matte. In some cases that might be enough to complete your key. In other cases, such as this one, you will want to refine the matte a bit more before making color adjustments.
Refining the Matte
The additional tools found in the Keyer filter are a bit more advanced; in fact, one set of parameters is labeled Advanced. Because the Keyer begins in an automatic mode, the Advanced parameters are primarily used as an alternative mode.
1. In the Inspector, click the Advanced disclosure triangle to open the controls.
The Advanced section reveals a circular graph for adjusting the core key color selection and softness or edge transparency. When using the Keyer filter in Motion, you can use the Automatic mode, or manually select the core color and softness using the Advanced Chroma and Luma graphs. To use the Advanced mode, click the Manual button and define the core color, softness, and luminance regions in the graphs. The graphs are most useful when you know what you want but can’t quite find it on your image.
When selected, the Fix Video checkbox in the Advanced section corrects the horizontal chroma blending found in video captured at 4:2:0/4:1:1/4:2:2. You can deselect it when you use clips captured at full bandwidth 4:4:4.
2. In the Inspector, click the Advanced disclosure triangle to hide the controls.
Your key is nearly complete, so you won’t need the Advanced tools, but the sections below the Advanced tools can significantly add to the realism of your composite by refining your existing matte. The Matte tools don’t recreate the matte, they process it. Think of them as filters that are applied to the matte.
3. Position the playhead to 4:00 (or 121 frames) to view the frame where the actor’s chin was still semi-transparent. In the Inspector, click the center View button to view the matte.
4. From the Zoom pop-up menu, choose 200%. Press H to choose the Pan tool, and then drag in the Canvas to pan the frame until you can see the actor’s chin.
Using the Matte tools on subtle matte problems like this chin—instead of applying Fill Holes adjustments—can make a fix easier because the controls are more precise.
5. In the Inspector, click the Matte Tools disclosure triangle to open the controls.
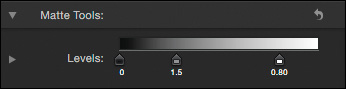
The first of the Matte tools is the Levels control. This is similar to a Levels control in color correction because you can adjust the contrast by moving the black point, white point, and midtones. The chin area probably falls within the white point and midtone areas so you can adjust those first and check the results.
6. In the Levels controls, drag the White point handle to 0.8 and the center Bias point to the left to around 1.5.
The disclosure triangle on the Levels control reveals parameters for the gradient handles. Keyframing these parameters can make it easier to create a key for blue screen and green screen backgrounds that change over the duration of a clip due to lighting or shadows.
In the Canvas, the semi-transparent gray area is almost completely gone, and the matte is definitely improved. To be sure, let’s check the Matte view.
7. Press Shift-Z to fit the frame in the Canvas. Click Play to play the project once and then stop.
The matte for his chin and her hair look pretty good, but all these adjustments have weakened the black matte at the start of the project. While watching playback, notice that the lower-left area of the black matte has a lot of gray in it. To address this, you can adjust the black point to clip or crush more of the black areas.
8. In the Inspector, drag the Black point handle to .15 to darken the black matte a bit, and then click the Composite view button to view the composite in the Canvas.
The key looks nearly perfect, except for the nagging white outline around the actors. The Shrink/Expand tool can alter the matte size, which is exactly what you need to remove the white outline.
9. Drag the Shrink/Expand parameter to –1, slightly shrinking the matte.
The white outline is gone, but the Shrink parameter change has made the matte a bit hard, especially around the female actor’s head and arms. A small amount of softness will help.
10. Drag the Soften parameter to 2.5, and then play the project a few times to review your key. Stop playback.
The softness adds a slight blur to the edges of the matte so they don’t appear so hard. It also blended in a tiny bit of the white ring. The easiest way to remove the ring without eating away at your matte by shrinking it again is to use the Spill Suppression tools.
11. In the Inspector, click the Spill Suppression disclosure triangle to open the controls.
The Spill Level you previously adjusted controls the amount of applied suppression. The Spill Suppression controls allow you to customize the color and luminance of the suppression. The tint and saturation parameters modify the magenta color (orange, when you are using a blue screen) that replaces the green spill when the Spill Level is increased. Spill Contrast helps remove the white outline that can appear around keyed subjects, just like the one here.
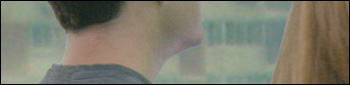
12. Position the playhead to 1:00 (or 30 frames). From the Zoom Level pop-up menu, choose 200% to get a better look at the problem.
13. Press H to choose the Pan tool. Drag in the Canvas until you see the male actor’s head and back, which will make it easier for you to see the white outline problem.

The white fringe that remains after the softness adjustment is most clearly seen around the head and back of the male actor. To remove this, you’ll move the White point handle on the Spill Contrast parameter.
14. Slowly drag the White point handle to about 0.70 to remove the white outline. The white outline darkens until it is no longer noticeable.

15. Press Shift-Z to fit the frame in the Canvas. Click Play to view your composite. Stop playback after you watch the project a few times.
The key looks complete. The last parameter in the Keyer, the Light Wrap parameter, is a bit of secret sauce that can really sell this shot by blending it with the background. You could apply it here in the Keyer as the last step, but if you are going to perform color corrections, it’s better to leave it alone in the Keyer and set it later. But before you get to all of that, you’ll quickly add and animate a shape mask that can remove unwanted areas in the foreground not covered by the green screen.
Creating a Garbage Mask
Your next step is to mask off the extraneous parts of the foreground that are not covered by the green screen. This so-called garbage mask creates a hole in the foreground layer to reveal the background layer underneath. It is meant to hide mike booms, C-stands, clamps, gaffer’s tape, or anything in the foreground not covered by the green screen. You’ll create the garbage mask using the B-Spline mask tool. Then you’ll animate it to follow the camera move.
1. Move the playhead to the start of the project, and from the Zoom Level pop-up menu, choose 50% so you have enough room in the Canvas to draw outside the frame.
2. In the Layers list, select the Green Screen layer, and from the toolbar, choose the B-Spline Mask tool, or press Option-BB.
B-splines, as you recall, are infinitely easier to deal with than Beziers when creating smooth curved shapes like your mask.
The green screen does not cover the entire set to the left of the frame so it is visible in your composite. You’ll draw the mask around this entire unwanted area to remove it.
3. Draw a rough mask around the left side of the shot that the green screen does not cover.

As you adjust shapes, it is sometimes easier to toggle the Canvas overlays off and on from the View menu, or by pressing Command-/ (slash). Doing so will hide the red mask lines and control points so that you can better see the final result.
4. After you complete the mask shape, Command-click the upper-right control point, and drag out to create a sharp corner. Do the same for the lower-left control point and the upper-left point, if necessary.
To create a sharp corner on a B-spline shape, you can also Control-click the control point and choose Linear from the shortcut menu.
By default, the mask protects what is inside it and makes transparent whatever falls outside it. But you need the reverse of this behavior.
5. Open the HUD and set the Mask Blend mode to Subtract so the mask now hides the offending area instead of isolating it.
You’ve already done the work to animate the mask, even though you may not realize it. The Match Move you applied to the background is the same animation needed for your mask. You just need to duplicate the Match Move behavior onto the B-Spline Mask layer.
6. Option-drag the Match Move behavior from the Background layer in the Layers list to the B-Spline Mask layer.

You can also animate a mask by tracking each control point on the shape by using the Track Points behavior.
7. Press Shift-Z to fit the Canvas in the window, and in the transport controls, click “Play from start” to view the composite. Save your work when you finish viewing the project.
You had it pretty easy with this animation. When you have to animate a mask using keyframes, keep a couple of things in mind: First, you want to create as few control points as possible. It’s better to create several shapes than to create one large shape with many points. Remember, however, that the more control points you have, the more time it will take to animate them.
Second, you may not need to animate every control point on every frame. You can save time if you animate just the first and last frames, animate the frame in the middle of those keyframes, and keep “splitting the difference” by animating the frame in the middle of two other existing keyframes until you are satisfied with the result.
Color Correcting a Shot
A critical step when completing your composite is to blend the color and tone of the foreground subjects and background so they look like a single seamless shot.
You can match the contrast and color levels of the foreground shot to the background using a flexible Levels filter, then match the vibrancy in the clips (or lack thereof) with a slight saturation change, and finally improve the edge blending using a new blend mode developed just for keying.
1. Select the Green screen layer, and in the toolbar, click the Add Filter pop-up menu and choose Color Correction > Levels.
If you don’t select the layer first, the filter is applied to the B-Spline mask and will have no effect.
The Levels filter is added to the Filters pane in the Inspector. The Levels filter is a great all-around filter because in one filter it gives you instant access to multiple fundamental color correction parameters.
2. Press F3 to open the Filters pane of the Inspector, and position the playhead around 4:00 (or frame 121) so the two actors fill a large part of the Canvas.
The background has a very low-contrast, low-saturation look. You need to match that by reducing the contrast areas in your foreground shot. You can do so by adjusting the midtones in the Levels control.
3. In the Filters pane of the Inspector, drag the middle gray handle under the Level’s histogram to flatten the midtones of the foreground until they closely match the contrast of the background (about 1.2).

Flattening the midtones, or gamma, evens out the overall foreground without affecting its brightest or darkest areas, and more closely matches the clip’s tones to the background. But the actors still appear quite a bit redder than the background. To more precisely examine the differences, you can compare the red, green, and blue values of the background pixels to the foreground pixels.
4. Choose Motion > Preferences to open the Motion Preferences window.
5. In the Appearance pane, select the Color checkbox, and then close the Preferences window.
The status bar above the Canvas now displays red, green, and blue (RGB) pixel values. As you move the pointer over the Canvas, these values update to reflect the RGB values of the pixel under the pointer.
6. Move the pointer over the tan building to the left of the actor’s head.
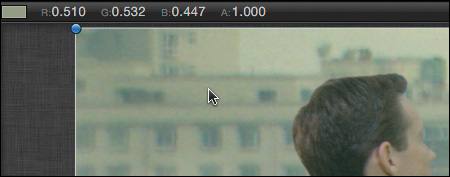
In the status bar, the values are close for red and green at about 0.500, and slightly lower for blue.
The RGBA values are calculated based on 32-bit floating-point bit depth. A value of 0 means no color in that channel, and a value of 1 means full color for that channel.
7. Move the pointer over the male actor’s neck.
Here, the status bar shows consistently higher red values—in the mid 0.600s or so—while green and blue values are lower.
You can use the Levels filter to reduce the red value and more closely match the green and blue levels to the background.
8. In the Filters pane, from the RGB pop-up menu, choose Red. Any changes you make to the histogram will now affect only the red channel.

9. Drag the red midtone handle very slightly to the right to about 0.90. Then position the pointer in the Canvas to check the RGB values on the man’s neck to verify that the red value is lower and green has risen. Be sure to also visually check that the actors match well with the background.

The Levels filter has handled most of the work, but the color still looks a bit too vibrant on the actors compared to the background. You’ll add a Saturation filter to reduce the color vibrancy of your actors.
10. In the Layers list, select the Green Screen layer. In the toolbar, click the Add Filter pop-up menu, and choose Color Correction > Hue/Saturation.
11. In the Filters pane of the Inspector, drag the Saturation slider to –0.2 to slightly reduce the color on the actors.
The last color-related task for this project is to revisit the Light Wrap parameter you skipped when adjusting the Keyer. Light wrap blends the background tones with edges of the foreground, creating a subtle but realistic edge-blending effect. If you were not going to color correct the actors, you could have applied light wrap in the Keyer. But when you do color correct the foreground, you want to do that before you add light wrap. Thoughtfully, Motion includes light wrap in the Properties pane so you can add it after all the color correction filters are applied.
12. With the Green Screen layer selected in the Layers list, press F1 to open the Properties pane in the Inspector. From the Blend Mode pop-up menu, choose Light Wrap.

The default settings are pretty good. However, you can click the Light Wrap disclosure triangle to view the parameters and manually try to improve the default. But be careful not to create a halo effect around the actors by increasing the Amount parameter too much.
13. When you are done adjusting the Light Wrap values to suit yourself, play the project, and save your work.
You have just about completed the entire composite. Feel free to adjust the levels further to refine your composite and even go back and adjust the Keyer. You should now have a solid understanding of compositing fundamentals. But remember, you have to do one last thing to complete this project. You have actors ducking in a shot for no apparent reason. Because you have some experience using Motion particles, let’s add a particle effect to complete your shot.
Using Particles in a Composite
You can use Motion particles as design elements, as you have done in previous lessons, or as realistic visual effects, as in this exercise. You’ll add and customize a Motion explosion particle effect to finish your composite.
1. Drag the playhead to 5:15 (or frame 166).
This is a good location to place your particles because it is just a frame or two before the actors begin to duck.
2. Press Command-Shift-A to make sure nothing is selected in the Layers list.
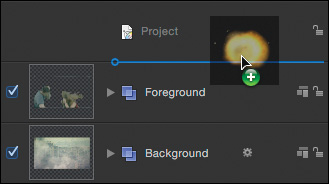
3. Press Command-2 to open the Library. Click Particle Emitters and select the Pyro category.
4. Drag the Shrapnel Explosion particle into the Layers list. Release the mouse button when the insertion line appears just below the project icon.
The particle is added to the Canvas as a group called Group. It’s a bit unwieldy in the Timeline and Layers list because all the groups are open showing all of their inner layers. Let’s close all the groups to make the list more manageable, and then correctly position Group between the Foreground group and the Background group.
5. Click the disclosure triangles to close Group, the Foreground group, and the Background group in both the Timeline layers list and the Layers list.

6. In the Layers list, select Group, and then choose Object > Send Backward.
The group is now correctly layered beneath the actors and above the background.
7. Click Play to see the explosion and then stop playback. Position the playhead at the end of the project.
It’s not that impressive an explosion. You’ll need to position and scale the explosion so that it appears more like something the actors would duck from and not just a spark from your BBQ igniter.
8. With Group selected, drag it to the lower-center of the Canvas, and watch the dynamic alignment guides to ensure that it is centered.
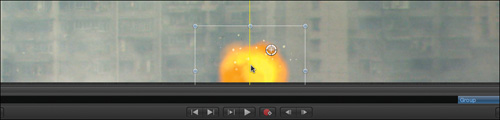
9. In the Canvas, Shift-drag the top-center scale handle for the Group group until it reaches just above the roofs of the buildings in the background. You will need to reposition Group to recenter it in the Canvas after scaling.

10. Play the project to view the explosion, and then stop playback and position the playhead at the end of the project.
You may need to finesse the explosion’s position, but overall it’s looking good. Scaling the entire particle explosion worked for the most part, but the pieces of shrapnel look a little too comical for this shot because they are so large. You can easily customize any portion or cell of a particle system in the Inspector.
11. In the Layers list, click the disclosure triangle for the group to reveal the Shrapnel Explosion layer. Then click the disclosure triangle for the Shrapnel Explosion layer.
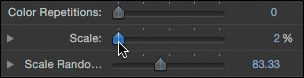
The three particle cell layers that make up this particle effect are revealed in the Layers list. One of the cell layers is named shrapnel, which makes it easy to decide which cell you need to scale down.
12. Select the shrapnel cell layer.

13. Press Command-3 to open the Inspector for the cell layer.
The Scale parameter is located at the bottom of the Inspector. You’ll use the Scale slider to scale down the shrapnel to a size that is more appropriate for your composite.
14. Drag the Scale slider to 2%, and then play the project to review the new shrapnel size. Stop playback when you are done viewing the explosion.
Two more things will really make this explosion fit within your composite: correcting its color and its blending. First, to better fit the color of the explosions within the scene, duplicate the color correction filters you applied to the Green screen layer and copy them onto your particles.
15. In the Layers list, open the Foreground group, and then open the Green screen layer to view the filters applied to it.
16. In the Layers list, click the Hue/Saturation filter, and then Command-click the Levels filter.

17. With both filters selected, Option-drag the filters onto the Group group in the Layers list.
The color adjustment is done. In the last step, you will apply a Screen blend mode to the particles to integrate them with the background.
18. In the Layers list, select the Group group, and in the Inspector, click the Properties pane. Set Blend Mode to Screen, and play the project.
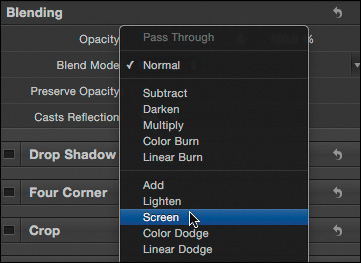
The Screen blend mode blends most of the explosion with the background but maintains its dark smoky shadows and bright white core explosion.
19. Stop playback and save your project.
You’ve done it. You started with two simple clips and created a realistic composite using stabilization, tracking, keying, color correction, masking, and particles. Although Motion excels at creating motion graphics and animating design elements, it also makes realistic visual effects fairly simple to achieve.
Lesson Review
1. You want to create a hole in a layer to reveal the layers underneath. You add a mask with the B-Spline tool, but instead of creating a hole in the layer, it restricts the layer’s visibility to the area inside the circle. How can you make it do the opposite?
2. What types of camera movements can you stabilize using the Stabilize behavior?
3. When using the Match Move behavior to track the position of one layer to another, do you apply the behavior to the layer that will inherit the new movement or to the layer that has the movement you want?
4. How can you create a sharp corner in a B-Spline mask?
5. If shades of the green or blue screen are not totally removed when you first apply the Keyer filter, how can you add additional shades?
6. You are looking at a keyed shot and the foreground subject has some areas of green fringe around it. Which parameter of the Keyer filter do you adjust?
7. You’ve perfected the matte on your subject, but a white ring appears around the foreground subjects. Describe one of two approaches to remove the white ring.
8. In what two areas can you find the Light Wrap parameters, and when would you adjust them in each location?
9. How can you check the actual RGB values of an area in your clip?
10. What does the Strength slider do in the Keyer filter?
Answers
1. In the HUD or the Mask pane of the Inspector, choose Subtract from the Mask Blend Mode pop-up menu, or click Invert in the Inspector.
2. Position, Rotation, and Scale
3. The Match Move behavior is applied to the layer you want to inherit the new movement.
4. Command-drag the control point (or Control-click the control point), and from the shortcut menu, choose Linear.
5. In the Inspector, click the Sample Color button and drag a selection rectangle around the additional color shades you want to remove.
6. The Spill Level parameter
7. Adjust the Shrink/Expand parameter to shrink the matte, or adjust the White point handle in the Spill Contrast graph.
8. The Light Wrap parameters can be found in the Keyer filter or in the Blend Mode menu on the Properties pane. You would use the Light Wrap in the Blend Mode menu when you plan to color correct the foreground of the key. Otherwise you can use the Light Wrap setting in the Keyer.
9. Select the Color checkbox in Motion Preferences, and move the pointer over pixels in the image.
10. The Strength slider adjusts the core transparency. When you reduce the slider value, you reduce the transparency by narrowing the range of green or blue used to create the matte.