
Chapter 8
Using Bank Feeds
In this chapter:
• Setting up bank feeds
• Viewing and adding transactions in the Bank Feeds Center
• Paying your bills online
• Transfering money between accounts online
With QuickBooks Bank Feeds (known as online banking in earlier QuickBooks versions), you use the Internet to connect to and download your bank and credit card account information into your QuickBooks file. When you see the word “bank” or “financial institution,” it can also be referring to your credit card company. Many financial institutions offer one of the following two methods to allow you to connect with and download this information:
• Direct Connect With this method, your financial institution exchanges data interactively with QuickBooks. This enables you to take advantage of additional Bank Feeds features, such as transaction data downloads directly into your QuickBooks bank register, transfers between bank accounts, electronic messages between you and the financial institution, and online bill payments (optional at some financial institutions). Some financial institutions charge a fee for some or all of the services available through Direct Connect.
• Web Connect Use this manual import method when your financial institution doesn’t provide a way to connect your QuickBooks data directly to the data on its own server. Instead, you access a page on the bank’s website, where you can view your account data, download your transactions, and import the downloaded file into QuickBooks.
Set Up Bank Feeds
To use Bank Feeds, your bank must support either transaction downloads or online bill paying. If your bank supports only online account access and doesn’t support online bill paying, you can still work directly with the QuickBooks Bank Feeds to automate your bill payment process. If you haven’t signed up for online services with your bank and you’re not sure if your bank has online services, choose Banking | Bank Feeds | Participating Financial Institutions to see the Financial Institutions Directory web page, as shown here.
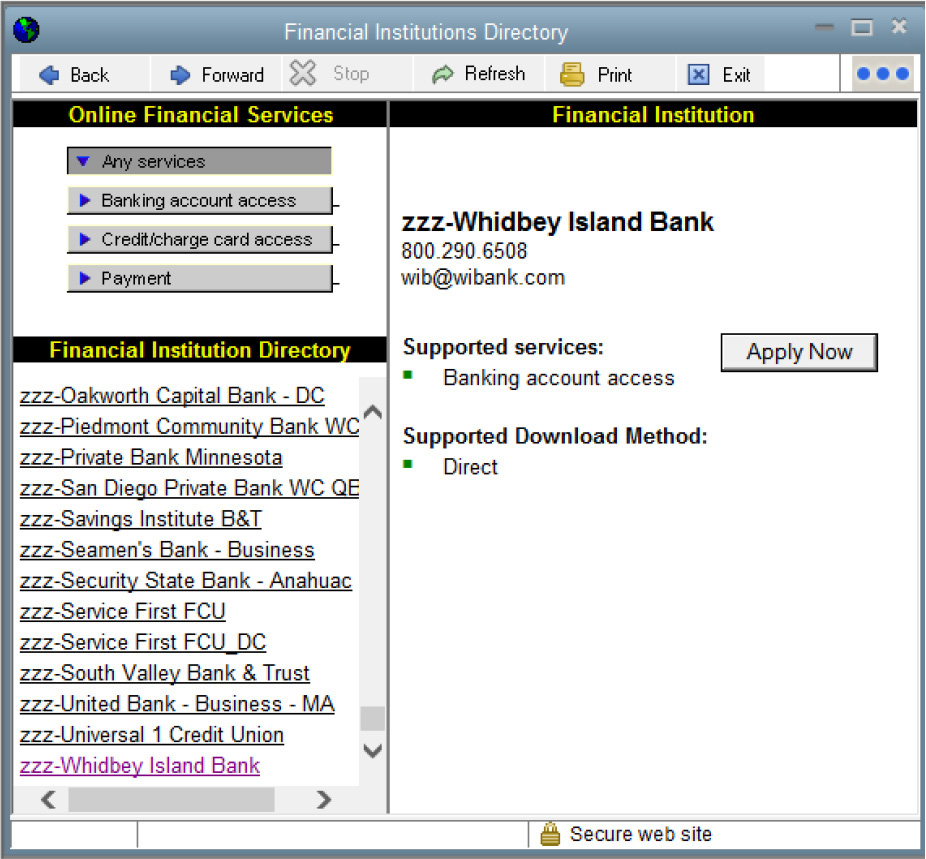
The four choices at the top of the left pane determine the contents of the Financial Institutions Directory list that QuickBooks displays. The window opens with the Any Services choice preselected, and all the banks listed provide some type of online service. If you’re interested in a particular online service (for example, you want to know about bank account access to download transactions), select that option, and the list of banks changes to those banks that offer the selected service.
Scroll through the list to find your bank and click its listing. The right pane of the Financial Institutions Directory window displays information about your bank’s online services. If your bank isn’t listed, you cannot utilize the Bank Feeds feature.
Click the Apply Now button if you want to start the application process.
If no Apply Now button appears, follow the instructions for setting up online services at the bank—usually the bank’s website displays a phone number. If online applications are available, fill out the form and submit the information. Your bank will send you information about using its online service, a login name, and a PIN or password. You need this information to enable the bank account for Bank Feeds in QuickBooks.
After you receive your login ID and a PIN or password from your bank, return to QuickBooks, which will walk you through the process of enabling Bank Feeds for your bank account. The steps differ depending on whether your bank uses Direct Connect or Web Connect.
![]()
Enabling Bank Feeds Using Direct Connect
After you receive your ID and PIN or password, you can enable a bank account for online access with Direct Connect:
1. Choose Banking | Bank Feeds | Set Up Bank Feed For An Account. The Bank Feed Setup window opens. Enter the name of your financial institution. If QuickBooks displays matching names, select one from the list offered.
2. In the next window, enter the User ID and Password your financial institution provided, and then click Connect.
3. In the next window, link your account with the bank (or credit card) account that you created in QuickBooks. If you have not already created this account in QuickBooks, select Create New Account from the QuickBooks Accounts drop-down list. Then click Connect.
4. The Bank Feed Setup window confirms that you’ve successfully enabled your account to receive Bank Feeds. Click the link Download Your Transactions From Bank Feeds at the bottom of the window to initiate your first download from the Bank Feeds Center.
![]()
Enabling Bank Feeds Using Web Connect (Manual Import)
After you receive your login information from your bank (as described in the previous section), you can enable a bank account to download as a Web Connect file as follows:
1. Choose Banking | Bank Feeds | Setup Bank Feed For An Account. QuickBooks displays an “Updating Branding Files” message. When that process is complete, enter the name of your financial institution. If QuickBooks displays matching names, select one from the list offered.
2. Once you select a financial institution, the Manually Import Transactions window opens, listing the steps required to download and import the transaction file (see Figure 8-1).
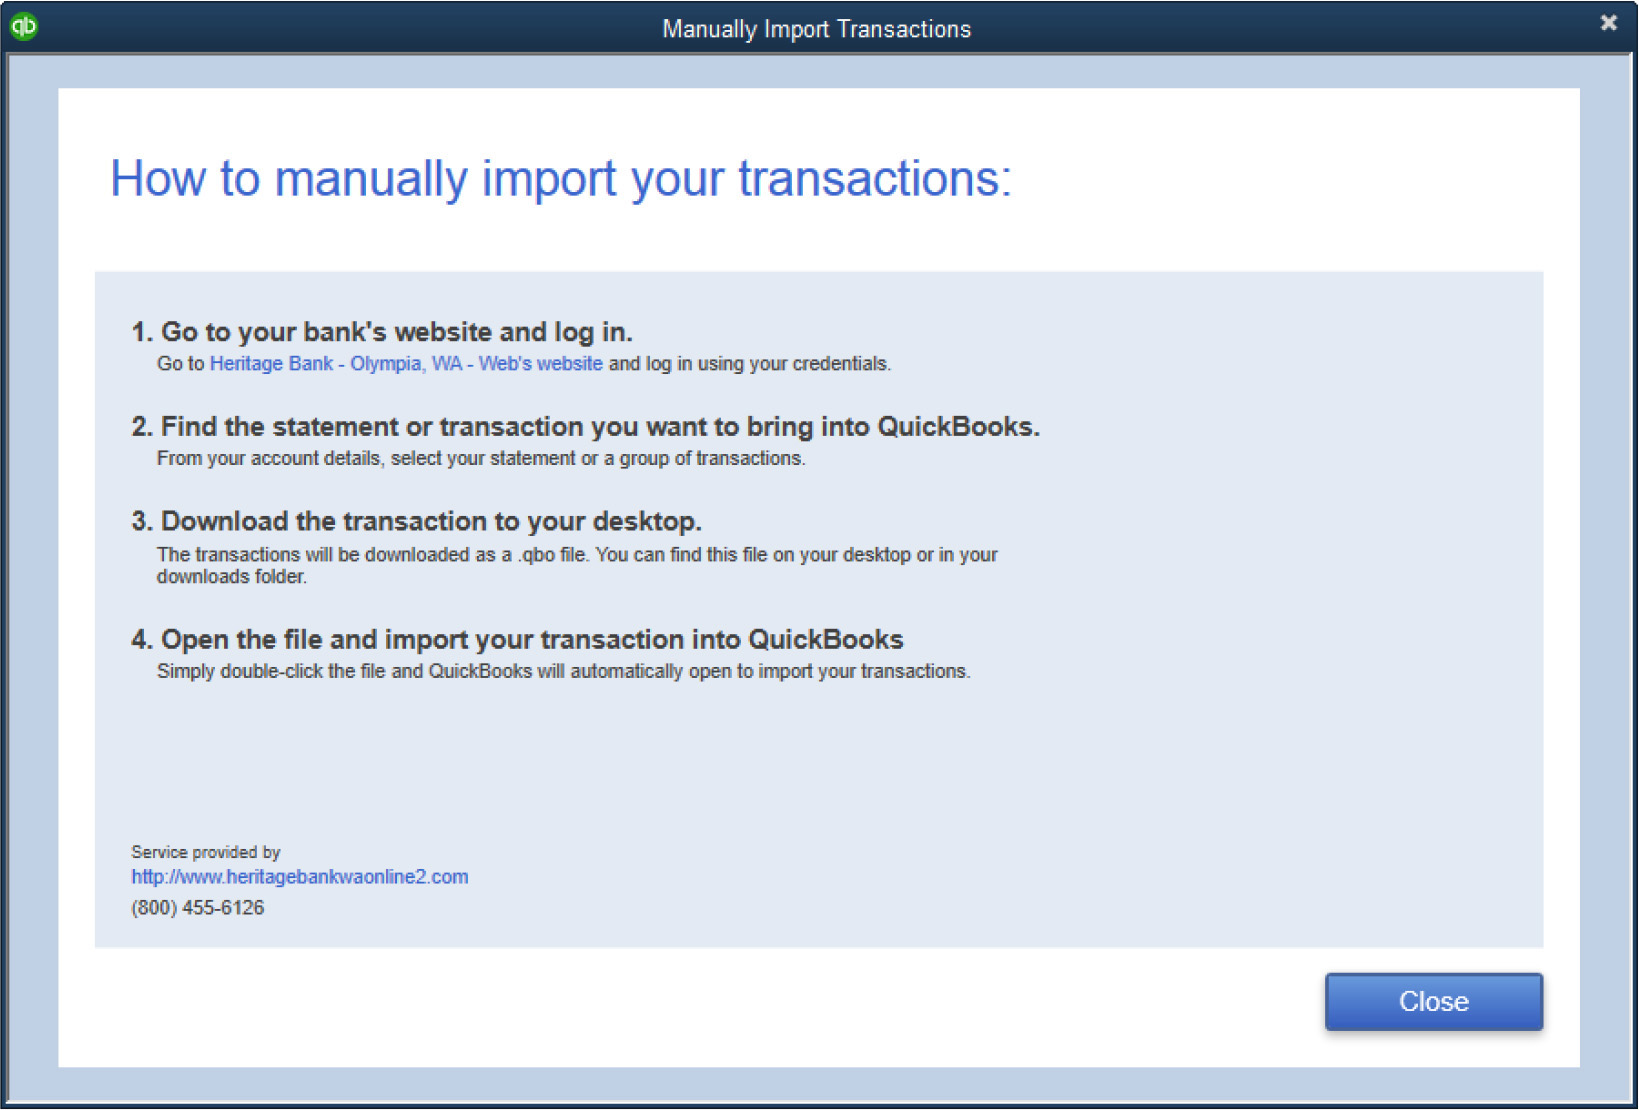
FIGURE 8-1 QuickBooks displays directions to import your transactions manually.
3. Click the link provided in step 1 to be redirected to your bank’s login page. If you don’t want to download your transactions at this time, click Close.
4. Log in, and then find the transactions that you want to import into QuickBooks. Your bank probably displays criteria selections for a date range and may also offer the option Since Last Download (which you can select after this initial download).
5. After you make your selections, your bank generates a file (it should have the extension .qbo) and displays a File Download dialog asking whether you want to open the file or save it to your computer.
• If you click Open, QuickBooks asks if you want to import the file into your bank account now or save it and import later.
• If you click Save, save the file to your desktop or your download folder.
6. When you’re ready to import the file, choose Banking | Bank Feeds | Import Web Connect Files and select the file you saved. You can also double-click the filename and it will automatically import the transactions into your QuickBooks file. These transactions are now available to you in the Bank Feeds Center.
Work with Bank Feeds Center Transactions
When you have downloaded transactions for the first time, the Bank Feeds Center opens automatically. From now on, however, if you’re using the Direct Connect method you’ll both download and view transactions right from the Bank Feeds Center. If you’re using the Web Connect (manual) method, you’ll start by logging into your bank to download your transactions.
![]()
Viewing the Downloaded Transactions
When transactions have been downloaded, the Bank Feeds Center displays a summary of the status of the transactions that need to be reviewed or that require action for each of the accounts listed in the Bank Accounts area, as shown in Figure 8-2.
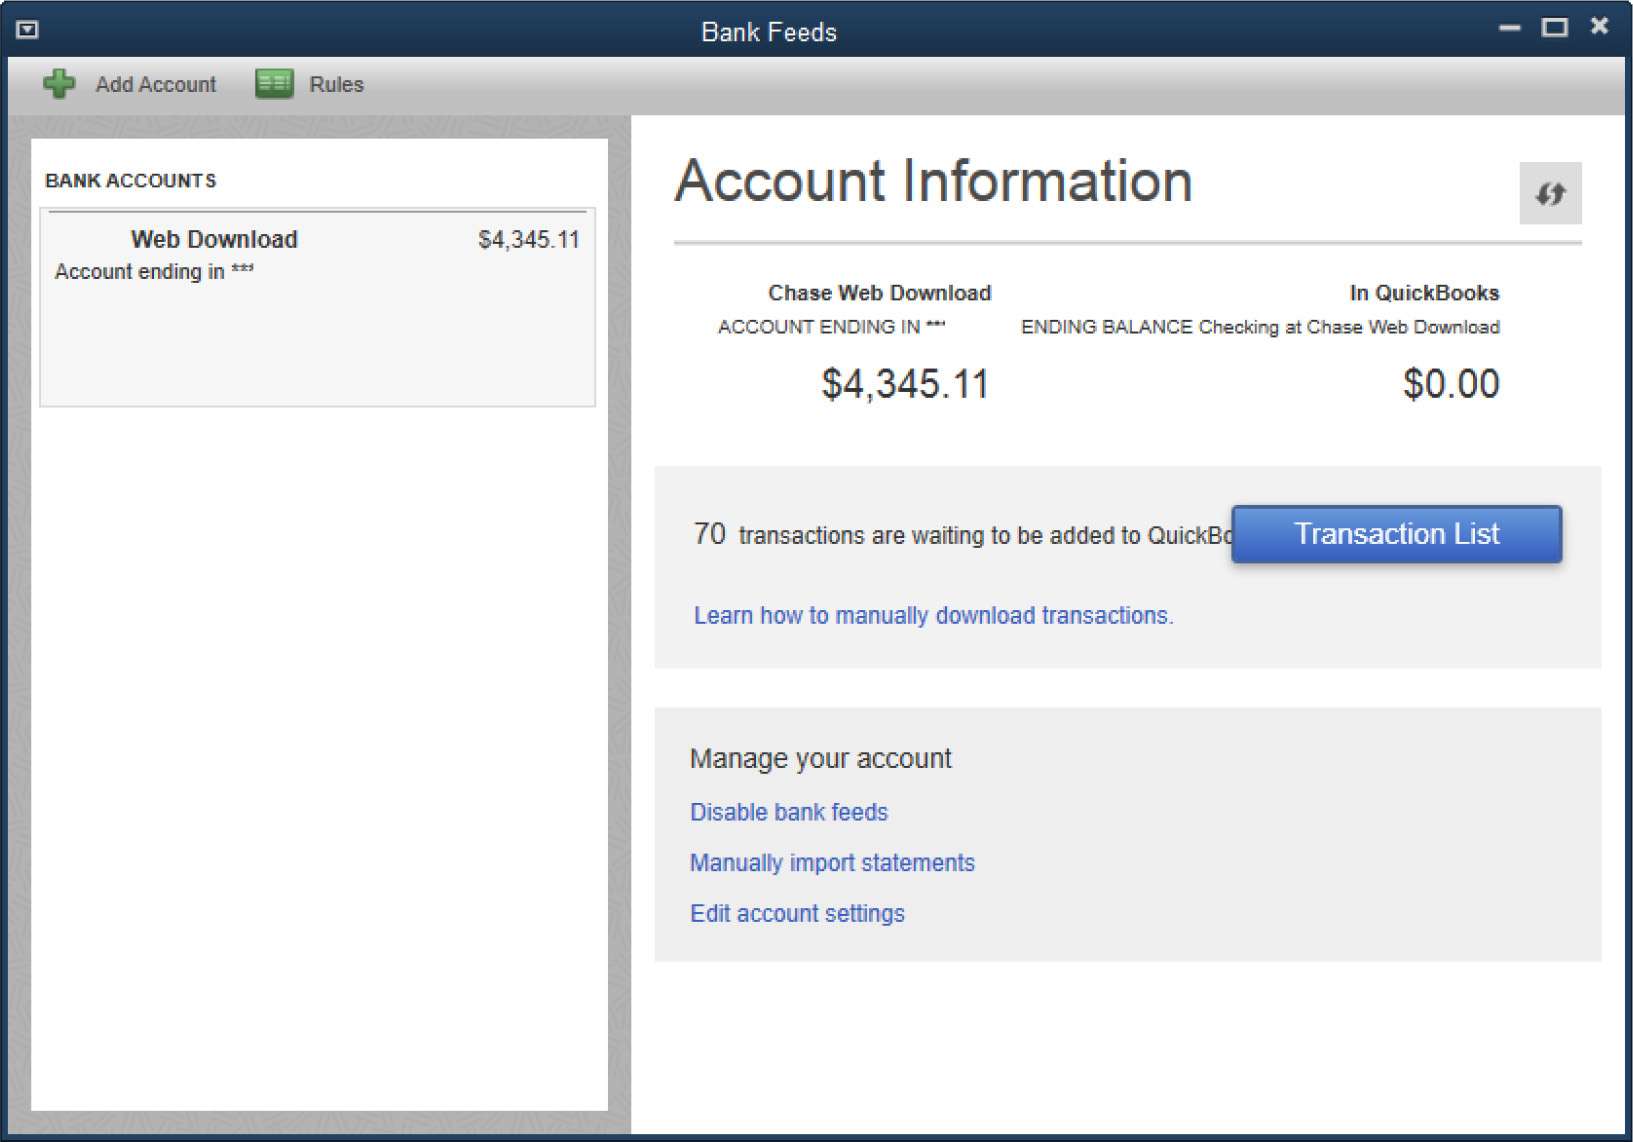
FIGURE 8-2 The Bank Feeds window displays a summary of downloaded transactions.
If you are receiving feeds from more than one financial institution (for example, you may have online bank account access at one financial institution and online credit card access at another), select the appropriate account from the list in the Bank Accounts area on the left side of the Bank Feeds window.
If there are no new transactions to review when you select an account from this list, click the Download Transactions button to get the latest transactions from your financial institution. If QuickBooks indicates that downloaded transactions are waiting to be added, click the Transaction List button to begin the process of reviewing and adding these transactions to your account register.
You can view and enter transactions in two ways: via the default Express mode or via Classic mode. Both modes offer the same functionality, with the exception that the renaming rules created in Express mode are not available in Classic mode. Likewise, aliases created in Classic mode are not available in Express mode. To switch between modes, choose Banking | Bank Feeds | Change Bank Feeds Mode.
![]()
Adding Transactions to the Account Register in QuickBooks
Clicking the Transaction List button in the Bank Feeds Center opens the Transactions List window. From here, you tell QuickBooks how to handle each downloaded transaction. You can work directly in this list to assign/change the account, customer, or vendor name for each transaction listed. You can also filter the list of transactions that appear by their status. For example, in Figure 8-3, the Status filter is set to All, but you can also filter the list to view transactions that need reviewing, those changed by renaming rules (see “Renaming Rules,” later in the chapter), and those that have been matched automatically.

FIGURE 8-3 Add transactions to your register from the Bank Feeds Transactions list.
Start with Matched Transactions
QuickBooks tries to match downloaded transactions to transactions already entered in your register. When you filter your Bank Feeds Transactions list to show Auto Matched transactions, the word “Auto” appears in the Status column, indicating that the transaction listed was already entered directly in the bank register. If you have multiple matched transactions and you don’t need to review them further, click the check box next to each one, click the Batch Actions drop-down menu (at the bottom of the Transactions List window), and select Add/Approve to add them to your QuickBooks register.
If you want to work with just one matched transaction at a time, use the Select drop-down menu in the Action column, where you’ll see four options:
• Approve Select this option to add this transaction to your register.
• View Details Select this option to see more transaction detail to confirm that it’s a match. You can also change the status to Not A Match.
• Not A Match Select this option to manually match this transaction to another one in your register.
• Ignore Select this option to delete the transaction from the Bank Feeds Transactions list.
Add Renamed Transactions
Renamed transactions have been changed by QuickBooks based on a renaming rule that you created. Filter your Transactions list to show renamed transactions. The letters “Cha” appears in the Status column in the Transactions List window for these transactions.
If you have multiple renamed transactions and you don’t need to review them further, click the check box next to each one, click the Batch Actions button (at the bottom of the Transactions List window), and select Add/Approve to add them to your QuickBooks register. If you want to work with just one renamed transaction at a time, use the Select drop-down menu in the Action column, where you’ll see four options:
• Quick Add Selecting this option adds this transaction to your register.
• Add More Details This option allows you to add more transaction detail before adding the transaction to your register. You can also add a new customer, vendor, or account if it doesn’t already exist in your QuickBooks file.
• Match To Existing Transaction Select this option to manually match this transaction to one already in your register.
• Ignore Select this option to delete the transaction from the Bank Feeds Transactions list.
Renaming Rules
When the designation “Cha” appears in the Status column in the Transactions List window, it means that a downloaded transaction was changed by a renaming rule. You use a renaming rule to tell QuickBooks that you want to use a particular name for a vendor or payee when a transaction is downloaded into the Bank Feeds Center. QuickBooks automatically creates a renaming rule the first time you assign a payee to a downloaded payment transaction and there is no matching entry in your register. You can also create your own renaming rules by clicking the Rules link at the top-left of the Bank Feeds or Transactions List window. This opens the Rules List window, where you’ll use the Manage Rules drop-down menu at the bottom of the window to create, edit, or delete a rule.
When you create a new rule, in the Add Rules Details dialog, you can choose to rename the vendor or payee based on whether the name associated with the downloaded transaction contains, starts with, ends with, exactly matches, or does not contain the text or characters that you enter.
Add Unmatched Transactions
Unmatched transactions usually require a review and more detail before they can be added to a register. Filter the Status list in the Transactions List window to show unmatched transactions. The letters “Rev” appear in the Status column in the Transactions List window for these transactions. Use the Select drop-down menu in the Action column to take one of these actions:
• Quick Add Select this option to add this transaction to your register.
• Add More Details Select this option to add more transaction detail before adding the transaction to your register. You can also add a new customer, vendor, or account if it doesn’t already exist in your QuickBooks file.
• Match To Existing Transaction Select this option to manually match this transaction to one already in your register.
• Ignore Select this option to delete the transaction from the Transactions list.
Adding a Downloaded Payment to the Register
When you select a downloaded payment transaction, the Select drop-down menu in the Action column gives you the additional choice Select Bills To Mark As Paid. This option opens the Transaction Details | Select Bills To Mark As Paid dialog, where you can apply this payment to an outstanding vendor bill. In the Vendor field, select the vendor with an open A/P bill to which this downloaded payment is linked. QuickBooks displays the open bills for the vendor.
Select the bill to pay with this transaction, and change the Amount To Pay if the transaction represented a partial payment. You can also select multiple bills for this vendor if you paid more than one bill with this payment.
Adding a Downloaded Deposit to the Register
You may need to apply a downloaded bank deposit to more than one existing QuickBooks transaction (such as open invoices, for example). From the Select drop-down menu in the Actions column for a downloaded deposit transaction, choose Add More Details to do the following:
• Match this deposit to an existing customer payment already received in QuickBooks by finding and selecting it on the Undeposited Funds tab, which contains all the current transactions waiting for deposit. You will then see these transactions in the Payments To Deposit window. (Click the Record Deposits button on the Home page to open this window.)
• Apply that payment now by finding and selecting the open invoice(s) on the Open Invoices tab, which lists all the current open invoices in your company file.
Choose the appropriate tab, and then choose the matching transaction or multiple transactions that total up to the amount of the downloaded transaction.
Ignoring (Deleting) Unmatched Transactions
Sometimes the downloaded file contains transactions that can’t be matched. This can occur when you don’t download transactions frequently and some of the transactions you download have already been cleared during a reconciliation. You can’t match transactions that have already been reconciled within QuickBooks. You should delete these transactions. If you don’t, they’ll be there waiting for you every time you download new transactions.
• To delete multiple transactions, check the check box next to each one in the Transactions List window, click the Batch Actions button (at the bottom of the Transactions List window), and select Ignore.
• To delete individual transactions, use the Select drop-down menu in the Action column and select Ignore.
You can apply the Ignore action to matched and renamed transactions, so pay attention to the Status column to avoid deleting transactions you intend to add to QuickBooks.
Use QuickBooks to Pay Your Bills Online
When you pay your bills or write checks, QuickBooks gives you the option of sending these payments electronically to your vendors. You can either use your own bank to transmit these payments to your vendors (if it offers online bill payment services or Direct Connect) or use the QuickBooks Bill Pay Service and have QuickBooks send these payments for you.
![]()
Using the QuickBooks Bill Pay Service
From the Banking menu, select Bank Feeds | Participating Financial Institutions. When the Financial Institution Directory appears in the left pane, scroll through the list and click QuickBooks Bill Pay-New!, as shown here.
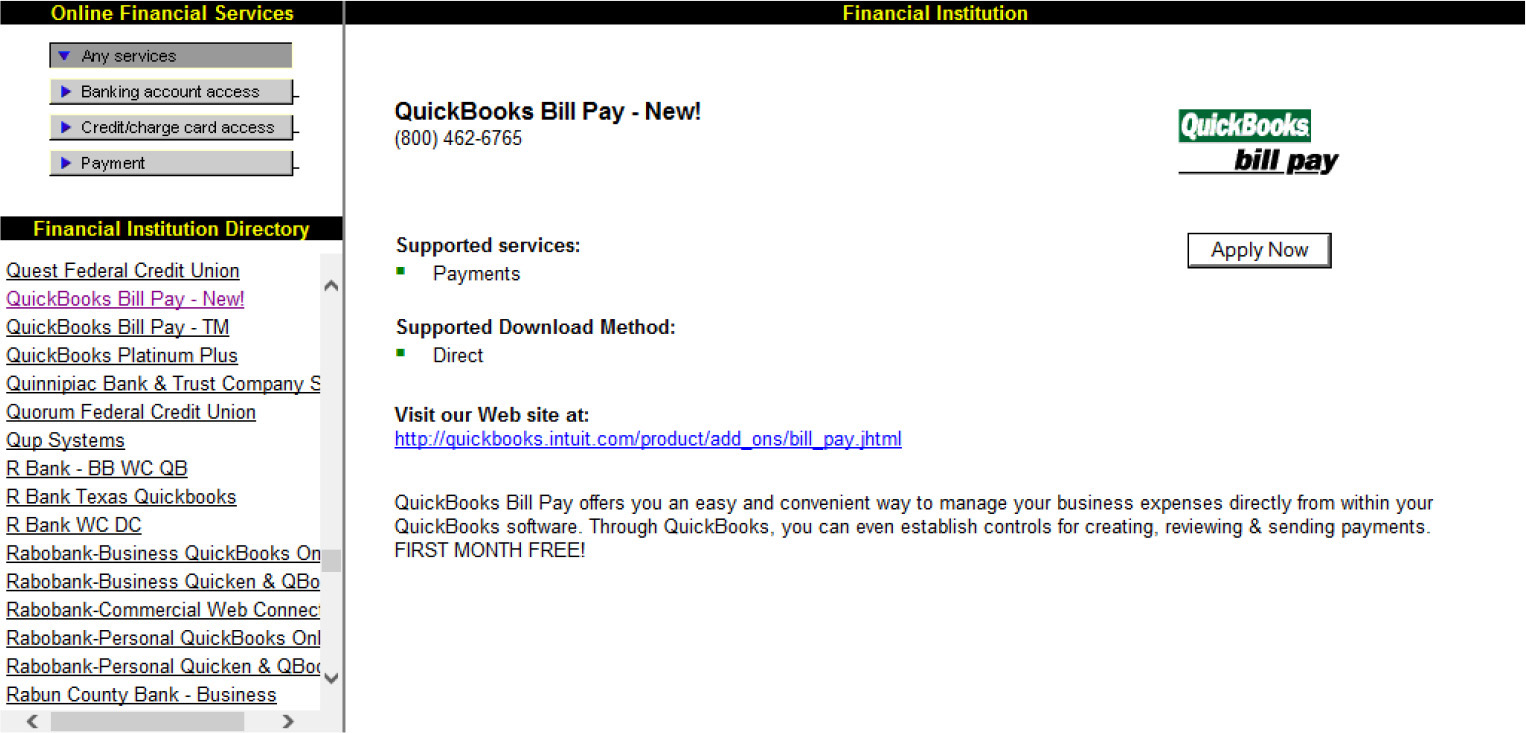
When you click this option, the right pane displays some information about the service. Click the Apply Now button to start the sign-up process.
Once you’ve completed the sign-up process, you can use either the Write Checks or Pay Bills feature in QuickBooks as you normally would. If you are writing a check instead of selecting To Be Printed, select Pay Online. Be sure to fill in the date that you want the payment to be delivered (you can schedule a payment up to one year in advance). If you are using the Pay Bills feature, pay your bills as you normally would and select Online Bank Payment as your payment method. Again, choose the date that you want the payment delivered.
After you’ve entered your checks or paid your bills, open the Bank Feeds Center and click the Send Items button. If your vendor is set up to receive electronic payments (meaning that the company is part of the national electronic payment database), QuickBooks electronically transfers your payments from your bank to your vendor/payee on the date you’ve specified. If your vendor is not able to receive electronic payments, a paper check (generated by the QuickBooks Bill Pay service) is sent via U.S. mail.
Transfer Money Between Accounts Online
If you have multiple accounts at your financial institution (for example, you may have a money market account for your business in addition to your checking account) and the financial institution uses Direct Connect, you can transfer money between those accounts within QuickBooks. To transfer money online, you must have applied at your financial institution for online banking for both accounts. You’ll probably have a unique PIN for each account. In addition, you must have enabled both accounts for online access within QuickBooks.
You can transfer funds between online accounts using the online transfer funds function or direct manual entry. The simplest way to move money between your online accounts is to use the QuickBooks Transfer Funds Between Accounts window, which you reach by choosing Banking | Transfer Funds from the menu bar.
Specify the sending and receiving accounts (remember that both must be enabled for Direct Connect online access) and enter the amount you want to transfer. Be sure to select the option for Online Funds Transfer in the Transfer Funds Between Accounts window. Click Save & Close. Then choose Banking | Bank Feeds Center. Click the Send Items button to send the transfer to your bank.
In the Account Information section of the Bank Feeds window, click the Transfers hyperlink to open the Fund Transfers To Be Sent window. Make sure the transfer transactions you want to send to your bank have check marks next to them. Close this window and click the Send Items button.