
Chapter 7
Working with Bank and Credit Card Accounts
In this chapter:
• Working with transfers and other monies
• How to handle petty cash
• Recording and tracking credit card transactions
• Understanding the important reconciliation process
• Finding and correcting balancing issues
You can enter most transactions easily in your bank and credit card accounts. However, in some situations you may need to account for your entries differently. Also, reconciling bank and credit card accounts, although one of the most important tasks connected with financial record keeping, is, sadly, one of the most avoided tasks. When you use QuickBooks, however, the job of reconciling your accounts becomes a very manageable one. This chapter covers how to deal with banking and credit card transactions that are not simply receiving and paying funds, and how to verify that your QuickBooks accounts match your bank and credit card statements.
Deposit Money That Isn’t from Customers
Even though QuickBooks takes care of recording the deposits into your bank account when you receive money from customers, sometimes you may receive money that’s unconnected to a customer payment. This might be rebate checks from manufacturers or stores, infusion of capital from an owner or partner, or a loan from an owner, partner, officer, or bank, for example.
You can use one of two ways to deposit noncustomer payments into your bank account. If the deposit is the only deposit you’re making and it will appear on your statement as an individual deposit, you can record the deposit directly in the bank account register. If you’re going to deposit the check along with other checks, use the Make Deposits window.
![]()
Using the Account Register for Deposits
To work directly in the bank account register, open the register by choosing Banking | Use Register, and then select the appropriate bank account. When the account register window opens, the next available transaction line is highlighted and the current date is displayed. To record the deposit directly into the bank account, follow these steps:
1. Change the date if necessary, and then press TAB to move to the Number field.
2. Delete the check number if one automatically appears (or wait until you enter the amount in the Deposit column, at which point QuickBooks deletes the check number).
3. Press TAB to move to the Deposit column, or click in the Deposit column and enter the amount of the deposit.
4. Move to the next field (Account) and assign the deposit to the appropriate account. Use the Memo field to enter an explanation in case your accountant asks you about the deposit.
5. Click the Record button.
![]()
Using the Make Deposits Window
Sometimes it’s better to use the Make Deposits window for a deposit that’s not related to a customer payment (such as a rebate from a vendor), because you’re planning to deposit the check along with other checks, and you want your deposit records to match the bank statement. In this case, follow these steps:
1. Choose Banking | Make Deposits to open the Payments To Deposit window.
2. Select the deposits you’re taking to the bank. Note that the check you want to deposit (for a noncustomer payment) is not listed here, because the window shows only the money you’ve received through customer payment transactions.
3. Click OK to move to the Make Deposits window.
4. Click either in the From Account column of the blank line under the last entry or in the Received From column if you need to track the payee (which is optional).
5. Select the account to which you want this deposit to be posted, or enter data in the Memo, Chk No., and Pmt Meth. columns. (Don’t forget the Class field if you’re tracking classes.)
6. Enter the amount. Your check is added to the total of the deposit you’re making. You can, if necessary, enter a payee name in the Received From column, but QuickBooks doesn’t require that. Most of the time, a payee isn’t needed. For example, if you’re depositing a rebate on a purchase you made, there’s a good chance the company that wrote the check doesn’t exist in your QuickBooks system, and there’s no point in adding a name you don’t need to produce reports about.
If the money is from an owner or partner, the name should exist in your system in the Other Names list. If the money is from a corporate officer, that officer probably exists as an employee, but don’t use the employee name for this transaction. Instead, create the name in the Other Names list to track this deposit. Because you can’t have duplicate names in QuickBooks, many users add an extra letter or symbol to the existing name, such as “O” for officer.
If you’re depositing the proceeds of a bank loan, you’ll need a vendor, because you’ll be writing checks to pay back the principal and interest. If you’re depositing your own money into the business and the business is a proprietorship or partnership, that’s capital and you should post the deposit from a capital account, which is an equity account. If you’re depositing the proceeds of a loan—from either yourself as a corporate officer or from a bank—post the deposit from the liability account for the loan. Keep in mind that you may have to create this liability account. If you’re making a deposit that’s a refund from a vendor, you can post the amount to the expense account that was used for the original expense.
If you type a payee name that doesn’t exist in any of your Names lists, QuickBooks displays a Name Not Found message offering you the following selections:
• Quick Add Lets you enter the name only after choosing a Name Type (Vendor, Customer, or Employee, for example)
• Set Up Lets you create a new name using the regular New Name window
• Cancel Returns you to the original window you were working in so you can either choose another name or delete the name of the nonexistent payee
If you select Quick Add or Set Up, you’re asked which type of name you’re adding: Vendor, Customer, Employee, or Other. Unless this payee will become a vendor or customer, choose Other.
![]()
Transfer Funds Between Accounts
It is common to move money between bank accounts. If you have a bank account for payroll, you have to move money out of your operating account into your payroll account every payday. Some people deposit all the customer payments into an interestbearing money market or savings account and then transfer the necessary funds to an operating account when it’s time to pay bills. Others do it the other way around, moving money not immediately needed from the business operating account to a money market account. Lawyers, agents, real estate brokers, and other professionals have to maintain trust and escrow accounts and move money between them and the operating account. You can use either of those two methods to transfer funds between accounts.
Using the Transfer Funds Transaction Window
QuickBooks offers a Transfer Funds feature, which is the best solution to record a “noncheck” transfer of funds between bank accounts that are at either the same or different banks. The Transfer Funds feature also works if you write a check. To transfer money between accounts using the Transfer Funds transaction window, follow these steps:
1. Choose Banking | Transfer Funds from the menu bar to open the Transfer Funds Between Accounts dialog.
2. Enter information in the fields.
3. Click Save & Close (or Save & New if you have another transfer to make).
QuickBooks posts the transaction (it is marked as “TRANSFR” in both bank accounts when you open their registers) without affecting any totals in your financial reports. All the work is done on the Balance Sheet, but the bottom line of your Balance Sheet doesn’t change because money was neither added nor removed from your company.
![]()
Handle a Returned Check
When you receive and deposit a check from a customer for payment on an open invoice, QuickBooks performs two tasks for you: It reduces your accounts receivable account, and it increases your bank account in the same amount. A week later, when your bank notifies you that your customer’s check has been returned, you also need to record that event in QuickBooks to keep both your accounts receivable and bank balance up to date. You may also need to record a returned check taken on a sales receipt (cash sale) or for a deposit that was recorded directly in your bank account register. QuickBooks handles the recording of these events differently.
Recording a Returned Customer Invoice Payment
When you receive notice of a returned customer payment (a “bounced” payment), your first step is to locate the original Receive Payments transaction in QuickBooks. If it is a fairly recent transaction, you can open the Receive Payments window by selecting Customers | Receive Payments and click the left-pointing blue arrow until you see the payment. Or you can click the Find button located on the Main tab of the Receive Payments window and search for the payment by customer name, payment amount, or date. Once you’ve located the bounced payment, follow these steps:
1. Click the Record Bounced Check button located on the Main tab of the Receive Payments window to open The Manage Bounced Check dialog shown here.
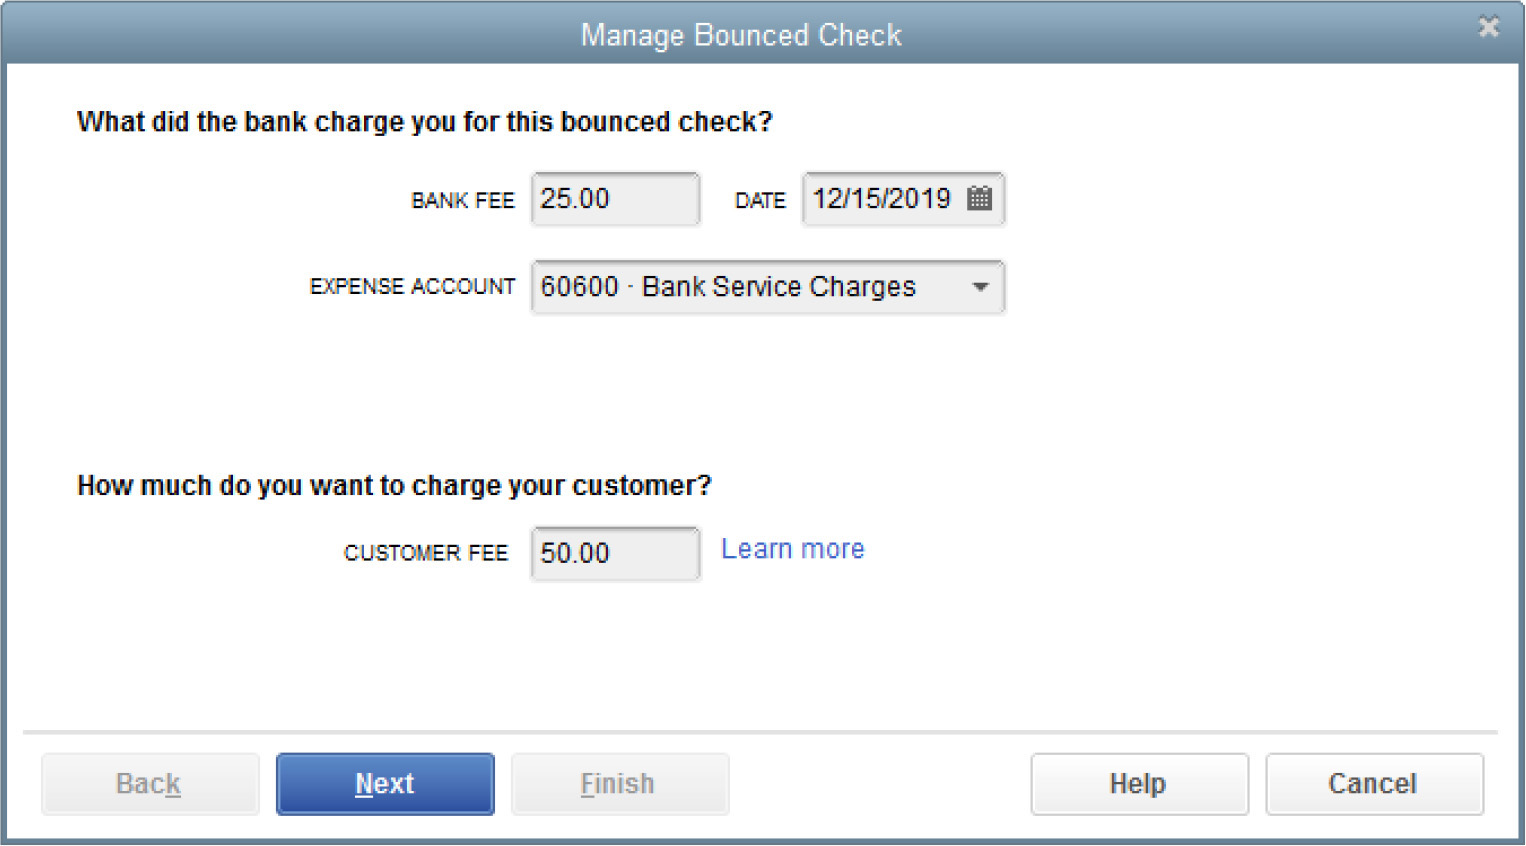
2. Enter the date and the fee that your bank has assessed you for the returned check and confirm the expense account for that bank fee. If you’re using class tracking, you can assign a class (which should be the same class that was used on the invoice transaction that this payment relates to).
3. Enter the fee that you want to charge your customer. When determining this fee, consider the extra time and effort you or your staff are expending on behalf of this customer. Then click Next.
4. Review the Bounced Check Summary that confirms the following for you:
• The original invoice(s) that will now be marked as unpaid
• The amounts that QuickBooks will deduct from your bank account for both the amount of the bounced check and the returned check fee your bank assessed
• That an invoice will be created by QuickBooks for the amount of the returned check fee you want to charge your customer
5. Click Finish to accept the transactions and complete the process. The original customer payment window will now have a “Bounced Check!” watermark.
6. If your customer asks you to redeposit the payment, create a new Receive Payments transaction (with the date of the redeposit) so that you’re treating it as if it were a new check. This method will help you keep your records straight and maintain better detail when running customer statements and balance detail reports.
![]()
Recording a Returned Cash Receipt Payment
When you record a returned check taken on a sales receipt (cash sale) or for a deposit recorded directly in your bank account register or in the Make Deposits window, you need to create special items. Then you manually create a new invoice transaction to record the amount of the bounced check as well as the fees you owe your bank and those you want to charge to your customer. Follow these steps:
1. Create a new item and name it “NSF Check.” Make it an Other Charge type that’s used to capture the amount of the check that bounced. Leave the Amount Or % field blank, select Non for the Tax Code, and link this item to your bank account (whichever account you deposit your checks into).
2. Create a new item for Your NSF Charge to Your Customer (name it “NSF Service Charge,” for example). Again, use the Other Charge type as this is a nontaxable item. This can be linked to your bank service charge expense account.
3. Create an invoice that includes the special items you just created to handle bounced checks. Be sure the date reflects the date that the payment was returned. When (or if) the new payment arrives, you’ll use the Receive Payments window to record the customer’s payment.
When you enter the NSF item on the invoice, it credits the bank account, which, in effect, reverses the amount of the original deposit of the check. It also provides both transactions in the Reconcile window when your statement arrives so you can reconcile each entry.
As a final step, don’t forget to record the fee that your bank is charging you for your customer’s bounced check. The easiest way to record this fee is directly in your bank account register. Simply enter the date and the amount of the fee in the Payment column with a note about the NSF charge in the Memo field.
![]()
Void a Check
If a check isn’t going to clear your bank, you should void it. Deleting (versus voiding) a check removes all history of the transaction from your register. This is not a good way to keep financial records, especially in the event of an audit. Voiding a check keeps the check number but sets the amount to zero.
The way QuickBooks completes the process of voiding a check differs based on how the check was used. The process starts the same way, however, by opening the bank account register and selecting the disbursement that you want to void. Next, right-click to open the shortcut menu and choose Void Check. If the check to be voided is not from a closed period, the check amount is set to zero and the check marked void. As you click anywhere in the register window, a message appears warning you that this can affect your financial reports, as shown here:

Clicking No keeps the check number along with its current date and then simply sets the amount of the check to zero without making any adjustments to a prior period.
When you’re voiding a check that is posted to an asset or liability account—the offer for the automatic journal entries is not made. The check is simply adjusted to zero. Click Record to save the transaction.
Track Cash Disbursements
Most businesses make some purchases with cash. Because the amount is usually small (or “petty”), these minor expenses are often difficult to track. It’s not uncommon for receipts to get lost or for cash on hand for the business to disappear. Whether the cash you use in your business is from a petty cash box or from an ATM machine, QuickBooks can help you keep track of every penny of it.
![]()
Keeping a Petty Cash Box
Many businesses keep a petty cash box so they have money on hand to cover such things as buying lunch for employees or a quick trip to the office supply store. When you decide to keep cash on hand, you must first put money into your petty cash box. Then you need to keep track of how the cash that’s taken is spent, and then you have to put more money into the box to replace what’s been spent. When you put money in the cash box, you tell QuickBooks about it by recording a deposit transaction into your petty cash account.
Create a new Bank type account called Petty Cash. If you use account numbers, use a number that fits in with your other bank accounts. Leave the opening balance of the petty cash account at zero as the beginning balance appears when you make your first deposit into this account.
Putting Money into Petty Cash
Most of the time, you’ll write a check (and cash it) to petty cash from your bank account. You can create the name “Petty Cash” in the Vendor or Other Names list. You can use the Write Checks window to do this, or enter the deposit directly in the petty cash account register. Be sure to enter the check number you used in the number field. Cash the check and put the entire amount into your petty cash box.
Recording Petty Cash Expenses
Each time you (or your employees) use cash from the petty cash box, ensure that a receipt for that same amount is placed in the box. Then, when you need to replenish the petty cash box, write a check from your regular bank account for the amount of the reimbursement, noting the expense for which the cash was expended. The advantage of using the Write Checks window (and not the petty cash register) is that you can use the fields at the bottom of the window to tie an expense to a customer or a class for jobcosting purposes. Note that you are writing the check for the exact amount of the receipts. That check and the amount of money left in the petty cash box should be the same as the amount shown in your petty cash account on your Balance Sheet.
![]()
Tracking Other Cash Withdrawals
Many businesses use ATM and debit cards in their day-to-day transactions. These transactions usually withdraw money from your checking account. However, ATM/debit card transactions can differ from writing checks in that the amount withdrawn often doesn’t have a specific expense attached to it at the time it’s withdrawn. To track these amounts, consider creating a special bank account type to post to when recording a debit or ATM withdrawal from your bank account. Then, as the person who made the withdrawal begins handing in receipts, you can debit the appropriate expense account directly from this account’s register.
Manage Credit Card Transactions
When you use a credit card to make purchases for your business, you can create a credit card account or treat the credit card as a bill.
![]()
Create a Credit Card Account
With this option, you create a credit card account on your Balance Sheet that has its own register and to which you’ll post individual transactions. The advantage of this method is that, as with your bank account, you can perform a reconciliation of this account and use online banking to download transactions from your credit card company.
To create a credit card account, with the chart of accounts list open, press CTRL-N to open the Add New Account window. Then do the following:
1. Select Credit Card as the account type and click Continue. Enter the name of the credit card (usually the card issuer’s name).
2. Enter an account number if you’re using account numbers. Optionally, enter a credit card number, which is required if you’ll be using online banking, as covered in Chapter 8.
3. Click Save & Close.
You can now enter individual transactions into your account in one of two ways: select Banking | Enter Credit Card Charges to enter your transactions in the Enter Credit Card Charges window, as shown in Figure 7-1 and described next; or enter transactions directly into the credit card account register.
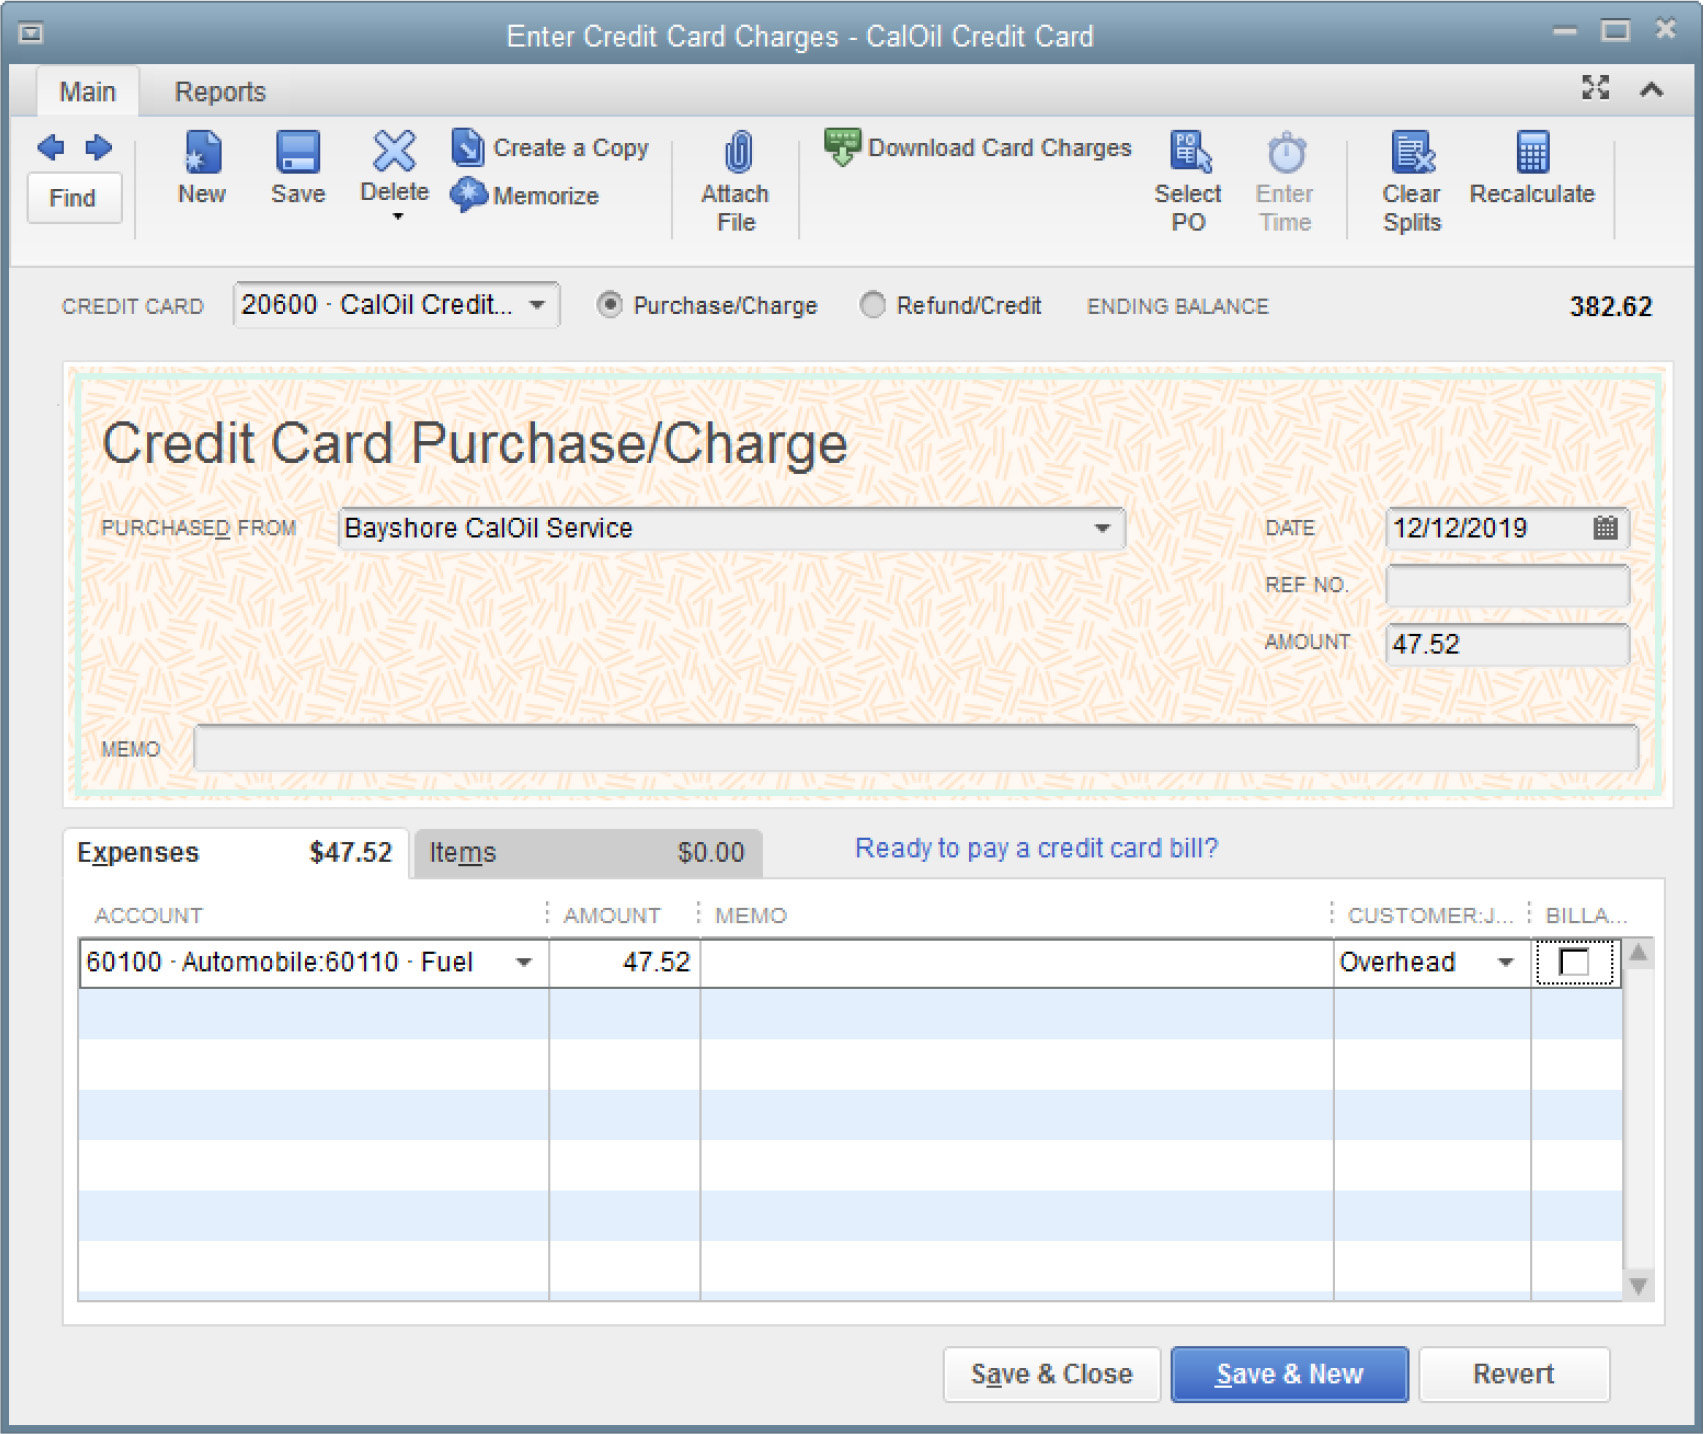
FIGURE 7-1 Use the Enter Credit Card Charges window to record charges on your credit cards.
To use the Enter Credit Card Charges window, select Banking | Enter Credit Card Charges. Then do the following:
1. From the drop-down menu in the Credit Card field, select the credit card to which you want to post transactions.
2. Select either the Purchase/Charge or Refund/Credit option.
3. In the Purchased From field, enter the name where the card was used, if you choose.
4. Enter the date of the transaction or fill in the Ref No. field with the reference number found on the credit card statement.
5. Fill in the amount of the charge.
6. Use the Expenses tab to add general expenses, or use the Items tab if the transaction was for the purchase of an item for inventory or for a customer. If you track classes, assign the transaction to the appropriate class.
When it’s time to make a payment on this card, you will use the Write Checks window and fill in the Pay To The Order Of field with the credit card company name. In the Account column (on the Expenses tab), instead of an expense account, select the credit card account from your chart of accounts.
![]()
Treat the Credit Card as a Bill
You can also enter credit card changes from the paper statement just as you would a bill from any vendor. Select Vendors | Enter Bills, and then list each transaction that appears on the statement (including any finance charges) in the Expenses tab for general expenses, or use the Items tab if the transaction was for the purchase of an inventory item.
The advantage of this method is that, in addition to your charges being posted to the appropriate expense account as you enter the bill, any amount outstanding on the card is included as part of your Accounts Payable account and listed on your reports as such. The drawback of this method, however, is that if you wait for your credit card bill to arrive in the mail, you could be posting these individual credit card charges a month or even two months after they were charged. This can be an issue if the charges you made were in December, for example, and your statement arrives in January, the start of a new tax year. Be aware of the timing of these expenses and consult with your accountant if you choose to employ this method.
Reconcile in QuickBooks
Most of the time, performing a bank or credit card reconciliation in QuickBooks is easy and straightforward. If you’ve been keeping your QuickBooks up to date, you shouldn’t have to make a lot of “catch-up” entries, because most of the data you need is already in your bank or credit card register.
![]()
The Begin Reconciliation Window
Start with the Begin Reconciliation window, seen next, which opens when you click Banking | Reconcile. If you have several bank or credit card accounts, select the account you want to reconcile from the drop-down list in the Account field.

Enter the statement date from your bank statement and then check the Beginning Balance field in the window against the beginning balance on the bank statement. (Your bank may call it the starting balance.) If the beginning balances match, enter the ending balance from your statement in the Ending Balance field. If this is the first time you’re reconciling the bank account in QuickBooks, your Beginning Balance field in QuickBooks will automatically be zero. Enter the ending balance from your statement in the Ending Balance field in QuickBooks. If the beginning balances don’t match and this is not the first time you’re reconciling the bank account in QuickBooks, see “Troubleshooting Differences in the Beginning Balance” later in this chapter, and then return to this section of the chapter to perform the reconciliation.
![]()
Entering Interest Income and Service Charges
Enter any service charge or interest shown on the statement in the Begin Reconciliation window and choose the appropriate accounts for posting. If you use the Bank Feeds feature (aka online banking) and the interest payments and bank charges have already been downloaded and entered, do not enter them again in the Begin Reconciliation window. They’ll be in the register list you see in the next window, and you can clear them as you clear checks and deposits.
Use the Service Charge field to enter a standard monthly charge. If there are other charges, such as NSF fees or charges for ordering new checks, these should be entered in your bank register. Use the Memo field to explain the transaction.
![]()
Working in the Reconcile Window
After you’ve filled out the information in the Begin Reconciliation window, click Continue to open the Reconcile window, shown in Figure 7-2. You can arrange the way transactions are displayed to make it easier to work in the window.

FIGURE 8-1 Uncleared transactions appear in the Reconcile window.
By default, QuickBooks sorts transactions first by date, and then by transaction number. For example, in the Checks And Payments pane, if multiple checks have the same date, those checks are sorted in numerical order.
Reconciling is easier if you sort the data to match the way your bank arranges the statement. For instance, if you have a lot of electronic payments in addition to checks, and your bank lists the electronic payments separately from checks, click the CHK # column header to list withdrawals without check numbers separately from checks.
Shorten the list by selecting the option Hide Transactions After The Statement’s End Date. Theoretically, transactions created after the statement ending date will not have cleared the bank. Removing them from the window leaves only those transactions likely to have cleared. If you select this option and your reconciliation doesn’t balance, deselect the option so you can clear the transactions in case a postdated check was cashed early or you made a mistake on the date of the original transaction. You may have entered a wrong month or even a wrong year, which resulted in moving the transaction date into the future.
![]()
Clearing Transactions
Next, mark the cleared transaction. If this is your first bank reconciliation in QuickBooks, in the Deposits And Other Credits pane of the Reconcile window, you’ll see a deposit transaction that represents the beginning bank balance entered either via a journal entry or directly in the check register when you set up your QuickBooks data file. You’ll need to “clear” this transaction during your first reconciliation. When you clear a transaction in the Reconcile window, a check mark appears in the leftmost (Cleared) column to indicate that the transaction has cleared the bank. If you clear a transaction in error, click again to remove the check mark—it’s a toggle.
Here are some shortcuts:
• If all, or almost all, of the transactions have cleared, click Mark All. Then deselect the transactions that didn’t clear.
• Mark multiple, contiguous transactions by dragging down the Cleared column.
• Click the Highlight Marked check box so that the items you mark as cleared have a shaded background, making them easier to distinguish from those that haven’t cleared.
• If the account you’re reconciling is enabled for online access (using the QuickBooks Bank Feed feature), click Matched to automatically clear all transactions that were downloaded and matched. QuickBooks asks for the ending date on the statement and clears each previously matched transaction up to that date.
As you check each cleared transaction, the Difference amount in the lower-right corner of the Reconcile window changes. The goal is to get that figure to 0.00.
![]()
Adding Transactions During Reconciliation
If you find a transaction on the statement that is not in your register, you don’t have to leave the Reconcile window. You can just enter the transaction into your register by right-clicking anywhere in the Reconcile window and choosing Use Register from the shortcut menu. When the account register opens, record the transaction. Then return to the Reconcile window, where that transaction is now waiting for you to clear it.
If the statement shows a deposit that doesn’t appear in your reconcile window, don’t add the deposit to your register until you check the Payments To Deposit window (choose Banking | Make Deposits). Often the payments are listed there, still awaiting deposit, even though you already may have physically deposited those checks into the bank.
Select the payments that match the total shown on the bank statement and go through the Make Deposits function. When you’re finished, the deposit appears in the Reconcile window. If the deposit isn’t in the Payments To Deposit window, then you forgot to enter a transaction. Enter the transaction now, using the appropriate transaction window. Make sure you deposit it into the bank account to have it appear in the Reconcile window.
![]()
Voiding or Deleting Transactions During Reconciliation
If you find a transaction in the Reconcile window that shouldn’t be there, you can either delete or void the transaction. To delete a transaction, double-click its listing in the Reconcile window to open the original transaction. Then right-click and select Delete. QuickBooks asks you to confirm the deletion. The transaction disappears from the Reconcile window and the bank register.
To void a transaction, double-click its listing in the Reconcile window to open the original transaction. Then right-click and select Void, which changes the amount to zero. Voiding a transaction is almost always the preferred method of removing a transaction, because QuickBooks retains most all the details of the transaction and allows you to add a note for future reference. Deleting, on the other hand, removes a transaction completely, making it more difficult for your accountant or you to track down a change in an account balance or report that occurred as a result of the deletion.
![]()
Editing Transactions During Reconciliation
Sometimes you’ll want to change some of the information in a transaction. Whatever the problem, you can correct it by editing the transaction. Double-click the transaction’s listing in the Reconcile window to open the original transaction window. Enter the necessary changes and close the window. Answer Yes when QuickBooks asks if you want to record the changes, and you’re returned to the Reconcile window where the changes are reflected.
![]()
Resolving Missing Check Numbers
Most banks list your checks in order and indicate a missing number with an asterisk on the bank statement. For instance, you may see check number 5003 followed by check number *5007 or 5007*. When a check number is missing, it means one of three things: the check is still outstanding, the check number is unused and is probably literally missing, or the check cleared in a previous reconciliation.
If a missing check number on your bank statement is puzzling, check its status. To see if the check cleared in the last reconciliation, open the Previous Reconciliation report by choosing Reports | Banking | Previous Reconciliation.
To investigate further, right-click anywhere in the Reconcile window and choose Missing Checks Report from the shortcut menu. When the Missing Checks dialog opens, select the appropriate account (if you have multiple bank accounts). You’ll see asterisks indicating missing check numbers. If a check number is listed in your Missing Checks report, it doesn’t exist in the register. It may be missing because you deleted the check that was assigned that number, the check is physically missing (usually because somebody grabbed one or more checks to carry around), or checks jammed while printing and you restarted the print run with the number of the first available check. QuickBooks doesn’t mark checks as void in that case; it just omits the numbers in the register and they show up in the Missing Checks report.
![]()
Finishing the Reconciliation
If this isn’t the first reconciliation you’re performing, there’s a good chance that the Difference figure at the bottom of the Reconcile window displays 0.00. Click Reconcile Now and print either a summary or detail (or both) reconciliation report.
![]()
Printing the Reconciliation Report
When you have a balanced reconciliation, QuickBooks offers congratulations and offers to print a reconciliation report. You can click the dialog’s Close button to skip the report, but it’s a good practice to print and keep a copy of the reconciliation report with your bank statement. Whether you print, view, or cancel, QuickBooks saves the reports and you can view them in the future by choosing Reports | Banking | Previous Reconciliation.
QuickBooks offers two reconciliation reports: Detail and Summary. The Detail report shows all the transactions that are cleared and all the transactions that haven’t yet cleared as of the statement closing date. Any transactions dated after the statement closing date are listed as New Transactions. The Summary report breaks down your transactions in the same way, but it doesn’t list the individual transactions; it shows only the totals for each category: Cleared, Uncleared, and New. Selecting the Detail report makes it easier to resolve problems in the future, since you have a list of every check and deposit and when it cleared.
When you choose to print one or both reports, the Print Reports dialog opens so you can select the printer. Then you can print the report to the selected printer and file it with that month’s bank statement in case you ever need to refer to it. You can also print the report to a file—ASCII text, comma-delimited, or tab-delimited. However, this option is not available if you decide to print both reports.
![]()
Viewing the Last Reconciliation Report
Even if you don’t display or print a reconciliation report after you reconcile, QuickBooks saves the report and stores it for you as a Previous Reconciliation report. This can be extremely helpful when you’re trying to track down a discrepancy in your beginning bank balance the next time you do a reconciliation.
Click Reports | Banking | Previous Reconciliation to open the Select Previous Reconciliation Report dialog. You’re given the option of running the Summary, Detail, or both reports in one of two ways:
• Include transactions cleared at the time of the reconciliation—essentially giving you a snapshot of what the reconciliation looked like at the time it was completed. This report prints only as a PDF file.
• Include transactions cleared at the time of the original reconciliation plus any changes made to the transactions since original reconciliation. Once the report is displayed, you can export it to Excel by clicking the Excel button at the top of the report window.
If You Don’t Balance
If the account doesn’t reconcile (the Difference figure isn’t 0.00), you can stop the reconciliation process without losing all the transactions you cleared. Click the Leave button in the Reconcile window. Clear your mind, and when you restart the reconciliation process, all the entries you made will still be there.
![]()
Finding and Correcting Problems
To investigate the cause of a difference between the ending balance and the cleared balance, try the following: Count the number of transactions on the bank statement. Then look in the lower-left corner of the Reconcile window, where the number of items you have marked cleared is displayed. Mentally add another item to that number for a service charge you entered or an interest amount you entered in the Begin Reconciliation window. If the numbers differ, the problem is in your QuickBooks records; there’s a transaction you should have cleared but didn’t or a transaction you cleared that you shouldn’t have.
If you’re sure you didn’t make any mistakes clearing transactions, do the following:
• Check the amount of each transaction against the amount in the bank statement.
• Check your transactions and make sure a deposit wasn’t inadvertently entered as a payment (or vice versa). A clue for this is a transaction that’s half the difference. For example, if the difference is $220.00, find a transaction that has an amount of $110.00 and make sure it’s a deduction if it’s supposed to be a deduction (or the other way around).
• Check for transposed figures. A clue that a transposed number is the problem is that the reconciliation difference can be evenly divided by nine.
Correct the problem when you find it, and when the Difference figure is 0.00, click Reconcile Now.
![]()
Making an Adjusting Entry
If you cannot find the reason for the difference in the beginning balances and you’ve reached the point where it isn’t worth your time to keep looking, go ahead and click the Reconcile Now button. QuickBooks presents an option to make an adjusting transaction at the end of the reconciliation process that will post to an expense account that is automatically created, called Reconciliation Discrepancies. If you ever learn the reason for the difference, you can void the adjustment made in this account post and then clear the correct transaction.
![]()
Troubleshooting Differences in the Beginning Balance
If this isn’t the first time you’ve reconciled the bank account, the beginning balance that’s displayed on the Begin Reconciliation window should match the beginning balance on the bank statement. That beginning balance is simply the ending balance arrived at from the last reconciliation you did. If the beginning balance doesn’t match the statement, it means that you or someone else working in your QuickBooks file did one (or more) of the following:
• You changed the amount on a transaction that had previously cleared.
• You voided or deleted a transaction that had previously cleared.
• You removed the cleared check mark from a transaction that had previously cleared.
• You manually entered a cleared check mark on a transaction that had not cleared.
You have to figure out which one of those actions you took after you last reconciled the account, and QuickBooks has a tool to help you. Click the Locate Discrepancies button on the Begin Reconciliation window to open the Locate Discrepancies dialog. Click Discrepancy Report in the Locate Discrepancies dialog to see if any transactions that were cleared during a past reconciliation were later changed or deleted. This report shows you the details of the transactions that cleared during a previous reconciliation if any changes were made to those transactions since that reconciliation. If the Reconciled Amount column shows a positive number, the original cleared transaction was a deposit; a negative number indicates a disbursement.
The Type Of Change column provides a clue about the action you must take to correct the unmatched beginning balances:
• Uncleared The check mark was removed in the Cleared column of the register.
• Deleted You deleted the transaction.
• Amount You changed the amount of the transaction. The difference between the amount in the Reconciled Amount column and the amount in the Effect Of Change column is the amount of the change.
This report doesn’t offer a Type Of Change named Void, so a voided transaction is merely marked as changed, and the text in the Type Of Change column is Amount.
A transaction with a changed amount equal to and opposite of the original amount was almost certainly a transaction you voided after it cleared.
Use the information in the Discrepancy Report to correct the problems you created by changing previously cleared transactions.
Correcting Changed Transactions
If you cleared or uncleared a transaction manually, open the bank register and undo this action by clicking in the Cleared column (designated by a check mark) until a check mark appears next to the transaction. If you changed the amount of a transaction that had cleared and the transaction still exists in the register with an amount, change the amount back to the original amount for that transaction.
Replacing Voided or Deleted Cleared Transactions
If the beginning balance is incorrect because you removed a transaction that had cleared (either by voiding or deleting it), you have to put the transaction back into your register. You can get the information you need from the Discrepancy report.
• If a transaction is there but marked VOID, re-enter it using the data in the reconciliation report. That transaction wasn’t void when you performed the last reconciliation; it had cleared. Therefore, it doesn’t meet any of the reasons to void a transaction.
• If a transaction appears in the reconciliation report but is not in the register, it was deleted. If it cleared, it can’t be deleted. Re-enter it using the data in the reconciliation report.
• Check the amounts on the printed check reconciliation report against the data in the register to see if any amount was changed after the account was reconciled. If so, restore the original amount.
If you re-enter a transaction that was voided or deleted after it cleared, and you put a check mark into the Cleared Column, QuickBooks adds it to your Reconcile window with a check mark already in place. This action doesn’t adjust your opening balance on the Begin Reconciliation window, but it does readjust the math so the current reconciliation works and next month’s opening balance will be correct.
![]()
Undoing the Last Reconciliation
QuickBooks lets you undo the last reconciliation, which means that all transactions cleared during the reconciliation are uncleared. This is a good way to start over if you’re “stuck” with the current reconciliation and the problems seem to stem from the previous reconciliation (especially if you forced the previous reconciliation by having QuickBooks make an adjusting entry). Click the Undo Last Reconciliation button on the Begin Reconciliation window. QuickBooks suggests you click Cancel and back up your company file before continuing. Backing up is an excellent idea, because you can restore the data back to its reconciled state in case you don’t get the results you were expecting. Then, begin reconciling again, click Undo Last Reconciliation, and click Continue. This process removes the cleared status of all transactions cleared during the last reconciliation and leaves the amounts you entered for interest and bank charges so you don’t need to re-enter them.
When the process completes, QuickBooks displays a message to confirm that fact. Click OK to clear the message and return to the Begin Reconciliation window. If there was an adjustment entry during the last reconciliation, click Cancel to close the Begin Reconciliation window. Delete the adjustment entry; it’s the entry posted to the Reconciliation Adjustment account. Hopefully, you won’t need another adjusting entry.
Start the reconciliation process again for the same month you just “undid.” The data that appears is the same data that appeared when you started the last reconciliation, including the last reconciliation date, the statement date, and the beginning balance. Enter the ending balance from the bank statement.