
CHAPTER
11
Compare Reports
 pgrades, patches, bundles, and maintenance packs contain Application Designer change projects. A change project is a collection of PeopleTools definitions that Oracle changed since the last release. Most of the definitions within a change project differ from a customer’s version because Oracle changed its own code (new version). Other differences exist because the customer made changes (a customized version). When applying these change projects, an upgrade team must decide which version of a definition to keep:
■ The original version
■ A customized version
■ The new version
In this chapter you will learn how to use the compare process to identify, report, and appropriately tag definitions. A successful compare has a significant impact on the upgrade process.
Our First Compare
A comparison involves two code repositories: these can be either two PeopleSoft applications or a combination of a project file and a PeopleSoft application. When you perform a compare between two PeopleSoft systems, both systems must be on the same PeopleTools release. As you will see later, application release is negotiable. For file compares, release is irrelevant.
Creating a Sample
Before we perform a compare, we need two code repositories. I’ve been working in a PeopleSoft Financials/Supply Chain 9.1 instance, so this represents one repository. To keep it simple, let’s export a project from this system and use that project file as the second code repository.
The Source Project
We’ve already created several custom definitions. We can add some of those to the project. For completeness, we should also add some delivered definitions to the project.
Log into Application Designer using two-tier mode. (Application Designer does not support compare operations in three-tier mode.) Create a new project definition named
OP_CH_11 and insert the following definitions into the project:■ Field
OP_DOC_ID■ Page
USER_GENERAL■ Record
OP_DM_DOCS■ Record
PSOPRDEFN■ Record
PSROLEDEFN_VW■ Message Catalog Entry 3, 1
Figure 11-1 shows the Message Catalog Entries in the Insert Into Project dialog.
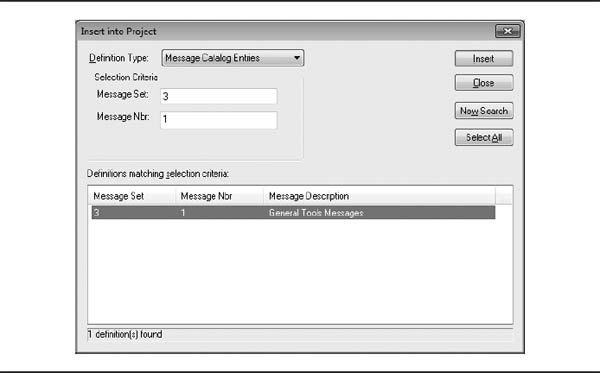
FIGURE 11-1. Message Catalog Entries in the Insert Into Project dialog
Open the record
PSOPRDEFN and choose View | View PeopleCode from the Application Designer menu bar. The PeopleCode editor will open to the OPRID FieldChange event. Choose Insert | Current Definition into Project (or press F7) to insert this PeopleCode definition into the project. Figure 11-2 shows the Application Designer project definition. Unfortunately, PeopleCode definitions and Message Catalog entries do not appear in the development tab of the project workspace, so make sure you manually add them to the project.
FIGURE 11-2.
OP_CH_11 project definitionExport this project to a file by choosing Tools | Copy Project | To File from the Application Designer menu bar. It does not matter where you place this file. Nevertheless, be sure to note the location. I recommend something short and easy to remember, such as
C:TEMP. Figure 11-3 shows the project Copy To File dialog. We will use this project as the source for compare operations.
FIGURE 11-3. Copy To File dialog
At this point, running a compare report against the project file will yield very little. Each definition in the file is identical to the definition within the database. But since this is our first opportunity to run a compare report, let’s go ahead and run one anyway.
Choose Tools | Compare and Report | From File. When the Compare and Report From File: Select Project dialog appears, ensure that you are viewing the directory containing the initial project export. For this example, I chose
C: emp. Just below the file and folder selection area is a list containing each project definition within my temp directory. Select the OP_CH_11 project and click Select. Figure 11-4 shows the project Compare And Report From File: Select Project dialog.
FIGURE 11-4. Compare And Report From File: Select Project dialog
To perform a compare, Application Designer copies a project definition’s structure into the current database. It does not copy the project items—just the structure. My database already has a project named
OP_CH_11. When I click the Select button, Application Designer will recognize the project name and ask if I want to overwrite the database version of the project definition with the file version. Again, this is just the project structure, not the project’s items. Choosing Yes, Replace, will have no impact on PSOPRDEFN or any other item within the project. Nevertheless, it is important to note that the Compare From File operation overwrites the database’s version of a project definition. Figure 11-5 shows the Compare And Report From File dialog. Notice that Message Catalog Entries are not in the list of definitions to compare. Click the Compare button to begin the compare process.
FIGURE 11-5. Compare And Report From File dialog
When the compare is finished, use the project workspace and switch to the Upgrade tab. Double-click each of the folders listed in the Upgrade tab to view the compare status of each item. Notice that all of the definitions except Message Catalog Entries show Same/Same for the source and target columns. We expect Same/Same, because we haven’t changed any definitions. Message Catalog Entries contain the value Unknown/Unknown. Application Designer does not manage Message Catalog Entries. This is why change packages include Message Catalog Data Mover scripts.
The compare process generated several reports, all of which are currently open in Application Designer. If you prefer, feel free to review them now. At this point, however, they are all empty—no changes, no rows. We’ll review them later when a compare has some differences to report.
Customizing
To gain value from this compare, something has to be different. We will tread lightly since most items in our project are delivered definitions, and making the wrong change could render the system unusable. Fortunately, we have a backup project file, but nevertheless, we must proceed with caution.
1. Within the Upgrade tab, double-click the Fields folder to open the list of fields.
2. Double-click the
OP_DOC_ID field to open the definition.3. Add a new label to the list of field labels. Set the Label ID to
OP_UNIQUE, the Long Name to Unique Identifier, and the Short Name to Unique ID. Figure 11-6 shows the field with its new label.
FIGURE 11-6.
OP_UNIQUE field label4. Save and close the field definition.
5. While still viewing the Upgrade tab, expand the PeopleCode node and then double-click the Record PeopleCode folder.
6. Double-click the
PSOPRDEFN.OPRID.SavePreChange PeopleCode row to open the item in Application Designer’s PeopleCode editor. We don’t need to change the behavior of the PeopleCode program. We just need to change the contents.7. We can evoke change by adding a comment to the very end of the event’s code listing. Add the following to the bottom of the code editor, and then save and close the PeopleCode definition.
| CAUTION
Don’t forget the line terminating semicolon! |
We can make a similar change to the SQL for the view
PSROLEDEFN_VW. Open the view in Application Designer, switch to the Record Type tab, and then click the Click To Open SQL Editor button. Add a multiline comment somewhere within the body of the SQL statement similar to the following (the comment is in bold). Then save and close the definition.
Running the Compare
With some changes in place, let’s run a compare.
1. Launch the compare by selecting Tools | Compare And Report | From File from the Application Designer menu bar.
2. When prompted, select the project file you previously exported. In the preceding example, I exported to
C: emp.3. When the Compare And Report From File dialog appears, click the Options button.
4. The Upgrade Options dialog appears. Each tab within this dialog specifies a comparison or a reporting option. When running a compare, Application Designer will use compare options to set project definition upgrade options. Reporting options define what to report, how to report it, and where to place generated reports.
Compare Options Tab
Figure 11-7 shows the Compare Options tab of the Upgrade Options dialog. The tab is divided into several areas.

FIGURE 11-7. Compare Options tab of the Upgrade Options dialog
Compare Type Compare Type asks if you want to perform a project or a database compare. When comparing to a file, you have only one option: project compare. When comparing to another PeopleSoft instance, however, you may choose project or database compares. For minor change projects with a small number of changes, a project compare is best. Use a database compare when performing an application upgrade. Chapter 12 offers more information about the database compare.
Target Orientation You may choose from one of two target orientations: PeopleSoft Vanilla or Keep Customizations. Vanilla is a flavor enhancer added to many desserts; it also represents a base flavor. A vanilla system is a base system—one that contains no customizations. The orientation tells Application Designer how to set upgrade flags while performing a compare. If the target system has customizations and you want to remove those customizations, choose PeopleSoft Vanilla. If you want to keep your customizations, choose Keep Customizations. You can change upgrade settings on a definition-by-definition basis after the compare completes. Generally speaking, a customer chooses PeopleSoft Vanilla and then later reintroduces customizations on an as-needed basis.
Compare Languages Several definition types support multi-language design. For example, a base language page definition may appear different from an Arabic language page. Select the language you want to compare. You will most likely select all languages (the default) for compare operations.
Comparison The Compare By options allow you to choose a particular release label for comparisons. To use Compare By Release, both the source and target systems must have a release label in common. A PeopleSoft database will likely have several release labels. The source and target do not have to have the same number of release labels, but they must have at least one release label in common. If two systems have no release in common, choose Compare By Date. I use this option when comparing custom cross-product utilities—for example, when I’m comparing definitions between Human Capital Management (HCM) and Financials applications.
Report Options Tab
Figure 11-8 shows the Report Options tab. This tab is also divided into several areas.

FIGURE 11-8. Report Options tab
Report Output The Report Output area is where you specify display and report type options. Click the Font button to select a different font. Select the Generate Browser Reports checkbox to create an HTML viewer for sharing reports or viewing them offline. Application Designer will generate the HTML report in a subdirectory of the folder identified at the top of the Report Output section. Figure 11-8 shows the report output directory as
c: emp.PeopleCode Report Use the PeopleCode Report section to specify how much of a PeopleCode listing to display. Printing an entire PeopleCode program is generally safer, because the full program listing offers enough context to identify a change’s location. Printing each changed program, however, can generate some very large reports. Alternatively, you can select Display Only Differences In Program and select the number of lines to show above and below the change. Be sure to select enough lines to identify the change properly.
Report Data Color If you prefer, you may select alternative colors for additions, deletions, and differences. Compare reports will set the font color according to the selected colors. For example, when using the default color scheme, a PeopleCode compare report will use a dark green color to display PeopleCode that exists in the source, but not the target.
Report Filter Tab
The Report Filter tab contains a grid that allows you to choose what types of change to display within compare reports. The grid represents an intersection of the source and target systems. The default filter identifies customizations and ignores vanilla changes. Generally speaking, a customer is concerned with reviewing only changes that impact customizations. Figure 11-9 shows the Report Filter tab.

FIGURE 11-9. Report Filter tab
Click the OK button at the bottom of the Upgrade Options dialog to dismiss the dialog. Click the Compare button on the Compare And Report dialog to perform the compare.
Interpreting the Compare Report
Running the compare process generated a report for each definition type within the project. The records, fields, pages, and reports are empty because we did not make changes to those definitions. The SQL and record PeopleCode reports, however, contain side-by-side comparisons. Figure 11-10 shows the PeopleCode compare report.

FIGURE 11-10. PeopleCode compare report
| TIP
Compare reports can be rather wide. Closing the project workspace panel provides more display area for viewing reports. |
Each compare report uses a similar layout: definition identification, child item identification, upgrade options, and differences.
Definition Identification Columns The first column identifies the definition. Some definition types, such as pages and SQL, require multiple fields to identify the definition uniquely.
Definition Child Item Identification Columns The second set of columns identifies the portion of the definition that differs between the source and target. The page report, for example, lists page fields that differ between releases.
Upgrade Options Columns The next set of columns—Source, Target, Action, and Upgrade—specify how Application Designer would apply the change project if it were imported immediately following a compare operation.
Difference Columns The final set of columns display differences. In Figure 11-10, for example, the last two columns contain side-by-side code listings, highlighting the differences between the source and target systems. The final two lines are displayed with a red font to signify that these lines would be removed if I chose to apply this project (or change package, upgrade, and so on).
Interpreting Upgrade Flags
Running the compare process performs two critical operations: generating differential reports and setting project upgrade options. While Application Designer is identifying changes, it marks a flag within the project specifying whether a changed definition should be copied, deleted, or ignored. The value chosen by the compare process depends on whether the user running the compare chose Vanilla or Keep Customizations. Figure 11-11 illustrates the impact these flags have on the compare process.
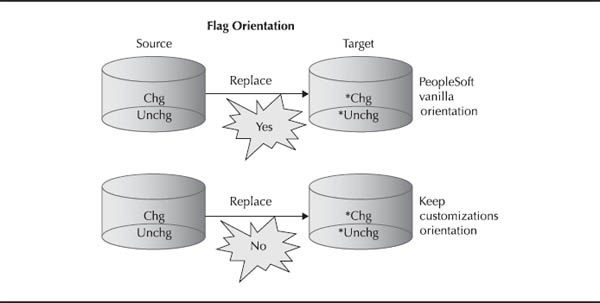
FIGURE 11-11. Flag orientation
To view upgrade flags, use the Project Workspace to switch to the Upgrade tab. Double-click each folder to open the category’s list of definitions. In our example, we added the
USER_GENERAL page to the project but made no changes. Since the compare process did not find any changes, it marked the source and target as being the same, set the Action to None, and left the Upgrade flag empty. As far as Application Designer is concerned, there is no reason to act upon this unchanged definition. Figure 11-12 shows the Page definition upgrade flags window.
FIGURE 11-12. Page definition upgrade flags
Expand the PeopleCode node and open the Record PeopleCode folder. Figure 11-13 shows the PeopleCode upgrade flags. We copied a delivered, unmodified PeopleCode definition to file and then changed that definition. After making changes, the compare process marks the file Source as Unchanged and the database Target as *Changed.
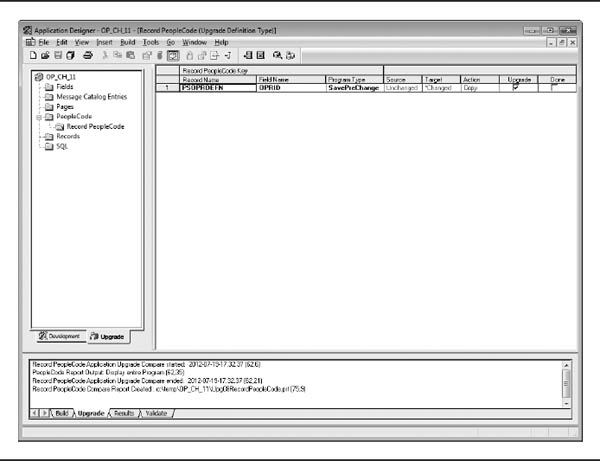
FIGURE 11-13. PeopleCode upgrade options
Source and Target Columns
The compare process classifies change with one of four categories:
■ Unchanged The definition has not changed since the last release.
■ Changed The definition has changed since the last release.
■ *Unchanged The definition is a custom definition and it has not changed.
■ *Changed The definition is a custom definition and it has changed.
When Does Same + Same = Copy?
When the compare process identifies identical definitions between source and target definitions, it sets the upgrade action to None and leaves the Upgrade flag unchecked. If two definitions are identical, Same/Same, why waste time copying one over the other? Answer: To update the target system’s Application Server cache. Copying items from a source system to a target system happens at the database level. The Application Server is not aware of the transaction. When the Application Server receives a request for a definition, it compares its cached version to the database’s version. If they have the same version number, then the Application Server uses its cached version.
A content reference is a definition that someone could migrate from a source system to a target system. Have you ever copied a content reference from one system to another, but the target never seems to show the new content reference? I have—I’ve even gone into the portal registry of the target and tried to create the copied content reference. What’s interesting is that trying to create a content reference that doesn’t show in the portal registry, but was migrated through a project, results in the application displaying a message saying the definition already exists. If it exists, then why isn’t the application displaying it? The Application Server maintains its own cache and is not aware of the new content reference.
Content references present an interesting dilemma. A user’s primary interaction with a content reference is through system menus and navigation collections. If the Application Server is not aware of the content reference, it has no reason to check the database for a new version. If a user can’t see a content reference in the menu, that user can’t initiate the request.
The Application Server caches content references based on the portal registry hierarchy. When requesting a content reference, the Application Server also makes note of the content reference’s child items. The solution to the content reference cache issue, therefore, is to copy the content reference’s parent folder even though it has not changed. Copying the parent will increment the target system’s version information. When someone accesses the parent content reference, the Application Server will reload the parent and make note of the new child content references.
The asterisk (*) signifies customization. The lack of an asterisk identifies a Vanilla definition.
How the compare process determines change depends on compare options: Compare by release, by date, by LastUpdDttm, and by LastUpdOprId. This is why either a source or a target can show Changed or Unchanged, meaning either the source or the target may have a newer version.
Action Column
The Action column specifies the upgrade action Application Designer intends to take if asked to copy the definition into the target. The compare process derives the action from a combination of the Vanilla/Customization compare option as well as the Source/Target column values. For example, if you choose the Vanilla compare option and the target is marked as Custom Changed (*Changed), then the compare process will set the Action column to Copy. Likewise, if the Source column contains the value Absent, then the Action column will be set to Delete.
Upgrade Column
The Upgrade column is a confirmation flag stating whether or not to perform the action specified. The Upgrade column is automatically marked if the Action is set to Copy.
Selecting the Source
As you saw earlier when performing a project file compare, we can use Application Designer to log into the target database. When performing a database to database comparison, you log into the source database. At compare time, Application Designer will prompt for the target database’s two-tier credentials. Figure 11-14 illustrates this process.

FIGURE 11-14. Signon database compare process
Running a Compare and Report Against a Maintenance Pack
In Chapter 7 we used Change Assistant to apply SCM 9.1 bundle 17 to a vanilla PeopleSoft instance. In Appendix A, we will manually apply bundle 18. Let’s prepare now by running the compare report. I’ve already downloaded the bundle and extracted the change project.
To run the compare, I select Tools | Compare and Report | From File. After running the compare, I have several compare reports. In this case I’m running a vanilla system, so the compare reports are empty—no customizations to report. Figure 11-15 shows the Record upgrade settings for bundle 18.

FIGURE 11-15. Record upgrade settings
Filtering Results
The compare process marked several records as Same/Same. When you’re trying to determine the impact of a change project, definitions that haven’t changed represent “noise”; they make it hard for you to understand the big picture. We can filter these results by selecting View | Filtering | Custom Filtering from the Application Designer menu bar. When the Custom Filtering dialog appears, uncheck the Show Definitions Which Are Identical In Source And Target checkbox. Figure 11-16 shows the Custom Filtering dialog.

FIGURE 11-16. Custom Filtering dialog
Filters offer a very effective mechanism for changing upgrade flags based on compare results. For example, when copying a large number of pagelet and navigation collection content references from one database to another, I also copy the parent content reference. Because the source and target versions of these parent definitions are the same, the compare process won’t copy the definitions. After the compare process, I manually change the upgrade flags by using a filter to select all unchanged definitions.
The filter in this case is exactly the opposite of the prior filter. To select all definitions that are the same in the source and target, select View | Filtering | Custom Filtering. Click the Deselect All button to remove all checkboxes and then check only the Show Definitions Which Are Identical In Source And Target checkbox. This will hide all definitions that differ between the source and target. With only Same/Same definitions showing, click the little gray box in the upper-left corner of the upgrade options grid. This will select all visible rows. Figure 11-17 shows the filtered upgrade options grid with visible rows selected.

FIGURE 11-17. Upgrade options grid with visible rows selected
Right-click anywhere within the grid to reveal a context menu containing several segments. The upgrade options are located about halfway down the menu and allow us to change the selected items’ upgrade action, tag them for upgrade, or reset their done flag. In the case of parent content references, I select Set Action | Copy, and then Tag For Upgrade.
Conclusion
In this chapter you learned how to generate and review compare reports. Running the compare process is a critical step in the upgrade process. Compare reports help an upgrade team identify customizations. A side-by-side PeopleCode compare assists that team in determining how to merge customizations back into an upgraded system. In the next chapter we will run through a full upgrade.
..................Content has been hidden....................
You can't read the all page of ebook, please click here login for view all page.