
CHAPTER
7
Change Assistant
 racle offers two primary methods for patching and upgrading PeopleSoft applications:
■ Automated through Change Assistant
■ Manual through file and project manipulation
In this chapter we will create and apply patches using Change Assistant. Appendix A explains how to apply maintenance manually.
Change Assistant is an automated upgrade project manager. It starts with a hierarchical task list complete with critical path and tasks to perform in parallel. It delegates tasks to local resources, enlisting remote resources when necessary. It reports individual task statuses as well as overall project duration. When a task fails, Change Assistant notifies someone with the authority to resolve the issue.
Setting Up Change Assistant
Before using Change Assistant, it is important that you have properly installed and configured an instance of Change Assistant. Change Assistant is a Microsoft Windows–based program. Although it’s not automatically installed with PeopleTools, the setup program is included in
%PS_HOME% setupPsCA. The next few sections tell you how to install and configure Change Assistant.Installing Change Assistant
To install Change Assistant, launch
%PS_HOME%setupPsCAsetup.exe. Work through the installation wizard, accepting the default values. Select No when Change Assistant asks if you would like to install Change Impact Analyzer. We will save a discussion of Change Impact Analyzer for the next chapter.| NOTE
The Change Assistant version does not need to match the local PeopleTools install version. You can install a newer Change Assistant version if you’d like. However, the Change Assistant version must match the EMF hub and EMF agent versions. |
After installation and before launching Change Assistant, be sure to configure your system environment variables properly. Define
PS_HOME as a new environment variable and then update your PATH environment variable to include %PS_HOME%inclientwinx86 and %PATH% jrein. To make these changes at the system level, locate your system Properties dialog (location varies by Microsoft Windows release). For most Microsoft Windows versions, you can open the system Properties dialog by right-clicking the My Computer/Computer icon and choosing Properties. Access the system’s environment variables from the Advanced tab of the system Properties dialog.Change Assistant Environment Configuration
Change Assistant is usually installed in the
Program Files directory, separate from other PeopleSoft applications installed in PS_HOME. Nevertheless, Change Assistant requires the PATH environment variable to contain references to files within PS_HOME. PeopleBooks recommends setting these environment variables at the system or user level within the Microsoft Windows operating system. These variables include setting the default Java version used by the system. I happen to have multiple Java Virtual Machines installed for a variety of different purposes. Rather than update my system default settings for Change Assistant, potentially breaking other Java-based programs, I launch Change Assistant from a batch file, shown here: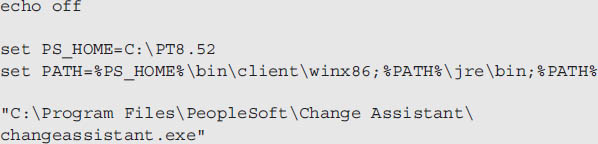
Configuring Change Assistant
You specify Change Assistant configuration options through Change Assistant menus. Before continuing, launch Change Assistant. Change Assistant will prompt for the appropriate mode. Figure 7-1 shows the Mode Selection dialog. Click Cancel to move on to configuration.
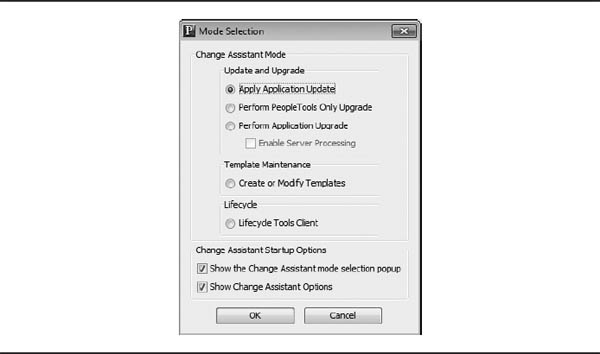
FIGURE 7-1. Mode Selection dialog
| NOTE
On Windows Vista or later operating system versions, Change Assistant must be launched using the Run As Administrator operating system option. Failure to launch Change Assistant as an administrator will result in the error, “Another Instance of Change Assistant Is Already Running.” |
Change Assistant will immediately display the Change Assistant Options dialog. Enter appropriate values for Download, PS_HOME, Staging, and Output. Figure 7-2 shows my Change Assistant options.

FIGURE 7-2. Change Assistant Options dialog
Switch to the Environment Management tab and set the appropriate values for Server Host and Server Port. Click the Ping button to verify your settings. Click the View button to confirm that Change Assistant, in cooperation with the EMF hub, identified each tier of your installation. Because I am communicating with my EMF hub over a Secure Shell (SSH) tunnel, I entered
localhost as my Server Host.The default value for Drives To Crawl is
C:|D:. Update this value with your workstation’s valid drive list. For example, delete |D: if you do not have a D: drive. Change Assistant will scan the drives and/or directories for installation details and utilities to assist with upgrades. The safest solution is to list all valid drives. The amount of time a scan requires, however, is directly related to the number of files and folders on these drives. Therefore, it may be more efficient just to list directories for software Change Assistant requires. For example, I list only my PS_HOME and my ORACLE_HOME. Figure 7-3 shows my Environment Management configuration.
FIGURE 7-3. Change Assistant Environment Management configuration
Validate the Change Assistant environment after configuration by choosing Tools | Validate from the Change Assistant menu bar. Change Assistant will respond by running a series of tests to ensure that your workstation contains the appropriate tools and can communicate with your servers as well as Oracle’s update servers. Figure 7-4 shows the Change Assistant validation results.

FIGURE 7-4. Change Assistant validation results
Applying Application Updates Through Change Assistant
Change Assistant is a convenient tool for running menial tasks and maintaining update/upgrade status, although it’s not required that you use it. Prior to Change Assistant, I tracked bundle application status by printing an update’s installation instructions and then placing a checkmark next to each step.
Using the Gateway
The Update Gateway was an online service provided by Oracle. The service worked in tandem with the Environment Management Framework (EMF) to discover available updates. Oracle retired the PeopleSoft Update Gateway on July 13, 2012.
| NOTE
As I write, the blogosphere and forums are abuzz with customers expressing their condolences to the Update Gateway. By the time this book goes to print, Oracle will have no replacement for the Update Gateway. By the time you read this book, however, I suspect things will be a little different. Historically speaking, PeopleTools releases occur annually around the OpenWorld conference that occurs in the early autumn. Because Change Assistant is part of PeopleTools, we should not expect significant changes until the next release of PeopleTools. So keep your ears open. I do not think we have seen the last of the Update Gateway technology. |
Although the Update Gateway itself may have retired, we do not yet know the fate of the Update Gateway technology. The PeopleTools Lifecycle Management team has a lot of energy invested in the EMF and Update Gateway technology.
That said, depending on your version of Change Assistant, you may still see options for Go To Update Gateway and Download Change Packages in the Change Assistant Tools menu.
Manual Discovery
With the Update Gateway out of commission and no replacement announced, our only option for applying maintenance is through manual discovery. Fortunately, after finding available updates, the Change Assistant manual process is nearly identical to the Update Gateway process.
Determining Your Patch Level
Before searching for application updates, you should note your system’s current patch level. Application patches and bundles often require prerequisite patches or bundles. You can discover your current patch and/or bundle level through metadata available from the EMF Viewer (described in Chapter 6) as well as from the
PS_MAINTENANCE_LOG table. I typically search the PS_MAINTENANCE_LOG table’s DESCRLONG field for %Bundle% and sort by UPDATE_ID in descending order:
Finding Patches Online
After determining the current patch level by module, log into https://support.oracle.com/. Locate the “Patches & Updates” section of the support site and begin searching for bundles or maintenance packs. Figure 7-5 shows an Oracle Support search for American English bundles associated with PeopleSoft SCM Strategic Sourcing version 9.1.

FIGURE 7-5. Oracle Support bundle search
I usually start with the largest bundle number and review the bundle’s prerequisites. If I do not have the prerequisites installed, I move down to the prior bundle number. Once I settle on a bundle for which I have the prerequisites, that bundle number should be one greater than the bundle level identified earlier by querying
PS_MAINTENANCE_LOG. I can confirm my prerequisite status by querying PS_MAINTENANCE_LOG for update IDs listed in the bundle’s prerequisites. If a bundle lists several prerequisites, it might be easier to import the prerequisite IDs into a table and join to PS_MAINTENANCE_LOG to identify update IDs not found in PS_MAINTENANCE_LOG.After identifying necessary patches and bundles, you can download the associated files. Change Assistant will prompt for the location of downloaded files, but for consistency, place downloaded Zip file(s) in your Change Assistant download directory. This is the directory you specified when configuring Change Assistant’s options. I configured my workstation to use
C:PSCADownload. Change Assistant can pretty much take over from here.Patching
I happen to be running a PeopleSoft Financials and Supply Chain Management (FSCM) 9.1 Oracle VM. Based on my analysis of this system, it appears the last SCM bundle applied to this server was Bundle 16 with update ID 860100. When writing this chapter, SCM had moved on to Bundle 22. The following example demonstrates using Change Assistant to apply Bundle 17 to this FSCM instance.
To apply application updates using Change Assistant, switch to Apply Application Update mode either by selecting this mode on startup or choosing Tools | Options from the Change Assistant menu bar. Tell Change Assistant you are ready to go by selecting Tools | Apply Change Packages. Change Assistant will respond by walking you through several wizard-based dialogs. Let’s walk through the wizard steps now.
Apply Updates to the Target Environment
The first step in the wizard asks about comparisons: apply with compare or apply without a compare. A compare may generate a significant amount of output.
■ If you have made no modifications, there is no reason to compare an update’s changes.
■ If you have made modifications but plan to roll back those modifications, it may be worth running a compare. Running a compare in this scenario may help you identify changes that the upgrade will remove.
■ If you have made modifications and intend to keep those modifications, you definitely want to run a compare. The compare will help you identify overwritten modifications so you can reapply them later during the update process.
We will discuss the database compare in Part III of this book.
Apply Updates Using the Change Impact Analyzer
Next, select the option Apply Without using Change Impact Analyzer. (Change Impact Analyzer is the subject of Chapter 8 and I don’t want to steal its thunder by discussing it now.)
Select a Product Line Release
During our Change Assistant configuration, we gave Change Assistant a few details about our server. Specifically, we told Change Assistant how to contact and query our EMF hub. Using that information, Change Assistant discovered that I had one environment installed: Financials/SCM. Figure 7-6 shows this step. Ensure that your product is selected and click the Next button.

FIGURE 7-6. Select a product line release
Select a Target Environment
Select the target environment from the list of displayed environments.
Prepare the Environment
This step of the Apply Change Packages wizard asks the administrator to confirm completion of the appropriate pre-update steps. Those steps include the following:
■ Running the
SYSAUDIT and DDDAUDIT reports (see Chapter 2 for more details)■ Resolving any issues identified by those reports
■ Creating a backup of the target environment
If you did not complete these steps, you have two options:
■ Exit the wizard and complete those steps.
■ Continue the wizard, but on the last step, choose Review And Apply instead of Begin Apply.
Select the File Servers
Select each file server to update. The list contains environments discovered by each of the EMF agents reporting to the EMF hub identified in Change Assistant’s options. If the dialog does not list any file servers, check your agents as well as the EMF Viewer (see Chapter 6 for more details).
Enter the Username and Password
Enter the username and password of the PeopleSoft user responsible for applying this update to the selected environment. In the Access ID and Access Password fields, enter the credentials of a database system administrator. This is usually the PeopleSoft database owner:
SYSADM or sa.| NOTE
These credentials may be case-sensitive (it depends on the database configuration). |
Select the Apply Directory
Select the directory containing the downloaded Zip file—do not select the downloaded Zip file, just the directory containing the Zip file. If you followed my advice, then your downloaded change package is in Change Assistant’s download directory. I placed mine in
C:PSCADownload.Select Change Packages
Change Assistant searched the directory specified in the previous step. In this step, Change Assistant displays a list of all discovered updates. Select each update you want to apply. Figure 7-7 shows the update selection step.

FIGURE 7-7. Select Change Packages dialog
Select a Method for Applying Database Changes
Change Assistant allows for two database script execution methods: Automatic or Manual. If you choose Automatic, Change Assistant will build and execute database change scripts without human intervention. On the other hand, if you prefer to review and manually apply database change scripts, choose Manual. Selecting Manual will cause Change Assistant to pause, alerting the administrator that manual intervention is required. Since I am working with a vanilla Financials/Supply Chain system, I chose Automatic.
Confirm Your Selections
In this step, Change Assistant displays the selected environment and change package. If this information is incorrect, click the Back button to select alternative values.
Apply Now
Apply Now is the final step in the wizard. You’ll see a button in the middle of the Apply Now dialog. Oracle recommends that you click this Validate Now button to revalidate your environment information before continuing. If the validation process does not find any errors, you can either click the Review And Apply button or the Begin Apply button. Review And Apply will open the template in Change Assistant so that you can review and make changes prior to running the Change Assistant template. Figure 7-8 shows this final step.

FIGURE 7-8. Apply Now dialog
| CAUTION
Close any open Data Mover and Application Designer sessions before continuing. Change Assistant uses these programs to perform certain steps. These steps will not be successful if Application Designer and Data Mover are open on the workstation running Change Assistant. |
Figure 7-9 shows the SCM 9.1 Bundle 17 template within Change Assistant.

FIGURE 7-9. Change Assistant template example
If you chose Review And Apply instead of Apply, Change Assistant inserted a new chapter named Manual Stop Step for Review that includes a manual step. Mark this step as complete before running the Change Assistant template. To mark the step as complete, either right-click the step and select Complete from the context menu or select the step and press the F7 shortcut key on your keyboard.
Run the Template
Choose Run | Run when you are ready to run the Change Assistant template. Change Assistant will display environment details and allow you to confirm your decision to run the template. The template will run unattended until it either encounters an error or a manual step. In either case, take appropriate action and run the template again. Change Assistant will start where it left off. If you plan to run Change Assistant on a Windows server within your data center and do not want to monitor the template’s status continuously, you can configure Change Assistant’s e-mail settings. Change Assistant will use these settings to notify you when intervention is required.
Dealing with Errors
Change Assistant will display a list of log files when it fails to execute a step. Review these log files for clues as to why the step failed. Common reasons for failure include the following:
■ Invalid Change Assistant configuration (although unlikely since Change Assistant passed validation)
■ Incorrect EMF Agent configuration
■ Improper change package deployment options
■ The step succeeded but a utility returned the wrong exit code
Invalid Change Assistant Configuration
If you find yourself in this situation, review the Change Assistant–generated log file for errors. Once you’ve identified them, confirm your Change Assistant options by choosing Tools | Options. If something in your environment has changed since you last validated Change Assistant, choose Tools | Validate. If you are not able to identify the cause of the error, try copying the Change Assistant command line for the command and then run the command in a Microsoft Windows
cmd.exe “black box” window.Incorrect EMF Agent Configuration
The following log file entry describes Change Assistant’s attempt to deploy files to an EMF agent through the EMF hub. The hub appears to identify the correct agent, but the agent does not have write access to the decoupled
$PS_APP_HOME target directory. For identification purposes, I emphasized the log’s error notification with boldface text. The resolution in this case is to reconfigure the EMF agent so that it is running as a user with write access to the $PS_APP_HOME directory. Refer to Chapter 6 for more information regarding EMF agent configuration.

Improper Change Package Deployment Options
The following log file shows a Change Assistant template that attempted to deploy COBOL source files to a web server. COBOL resides on application servers, batch servers, and file servers, but not on web servers. The error is at the end of the following log file and is highlighted in boldface text.


The reported error states that the EMF agent identified as Peer ID 6 does not have write access to
$PS_CFG_HOME. This is true. An EMF agent configured for an application update in a decoupled install should deploy files to $PS_APP_HOME, not $PS_CFG_HOME. Interestingly, the target location listed in the error isn’t actually the web server’s directory. In a coupled installation, the location described as the web server’s directory would actually have been my $PS_HOME. In a decoupled installation, however, the location /home/psadm2/psft/pt/8.52/FSCM912 represents my $PS_CFG_HOME. Given this information, a coupled $PS_HOME installation would have succeeded without reporting errors.Later in this chapter you will learn how to select target server types for file references. Unfortunately, the target must be selected within Application Designer before generating the Change Assistant template. Since we cannot update the template, the appropriate action is to verify that the valid portions of the step completed successfully and then mark the step as complete. To validate the step’s results, verify the file timestamps, ownership, and checksums within appropriate deployment locations and then ignore invalid deployment errors. After you’ve verified deployment, mark the step as complete and restart the Change Assistant template.
Success, but Marked as Failure
A step may actually succeed, but Change Assistant might mark it as failed. Think of Change Assistant as a project management tool. It doesn’t actually perform the tasks of a project, but it delegates those tasks to highly skilled, focused utilities. It expects those utilities to execute tasks properly and return the correct response code. Change Assistant places a certain amount of trust in its utilities and takes a utility’s response code at face value, even if the utility reports the wrong results. Consider the following Data Mover log file produced while Data Mover was running from Change Assistant. Don’t spend too much time looking for the error—there isn’t one.
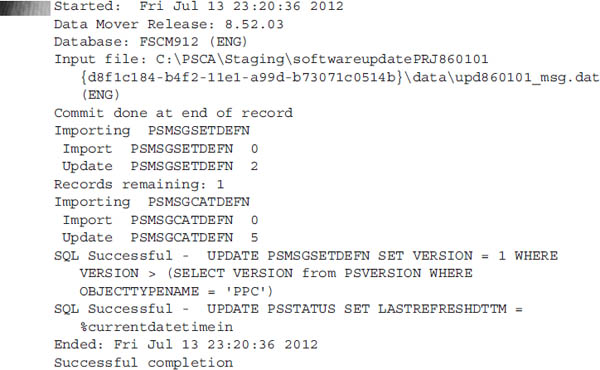
Even though the log file reported no errors, Change Assistant marked this step in error. What is an administrator to do when encountering an issue such as this? In this case the Data Mover import script was safe to run multiple times, so I ran it from the command line using the syntax generated by Change Assistant and marked the step as complete.
Creating Custom Change Packages
In Chapter 2 we created a record definition to store some of our favorite data management URLs. Assuming we built this record definition in a development environment, let’s create a change package to migrate that record definition and its contents to a test environment. This exercise will involve the following:
1. Creating data migration scripts
2. Adding fields, records, and file references to a project
3. Generating a change package
4. Updating a new Change Assistant template
5. Finalizing the Change Assistant template
6. Testing the change package
Creating Data Migration Scripts
The
OP_DM_DOCS SQL table contains a few rows of data that need to be migrated along with the project definition. Application Designer moves definitions only, not data. To migrate this data, we will have to write an export and then an import migration script. Create the export script by first logging into Data Mover in your development environment and then entering the following text:
1. Save the file in your default
%PS_HOME%scripts directory and name it OP_CH_07_OP_DM_DOCS.dms.2. After saving the file, run the Data Mover script. Running the script will produce a file named
OP_CH_07_OP_DM_DOCS.dat in your Data Mover default output directory (configured through Configuration Manager).3. Upon successful completion, create a new Data Mover script and name it
%PS_HOME%scriptsOP_CH_07_OP_DM_DOCS_IMPORT.dms.4. Enter the following into the Data Mover text editor, save, and then close Data Mover:

Creating the App Designer Change Project
A change project is an Application Designer project definition with a few additional attributes.
Change Project Configuration
We’ll start by configuring the change project.
1. Launch Application Designer and create a new project.
2. Name the new project
OP_CH_07.3. From the Application Designer menu bar, choose File | Project Properties.
4. After Application Designer opens the Project Properties window, enter a description and check the Change Project checkbox. Figure 7-10 shows the new project’s Properties window.

FIGURE 7-10.
OP_CH_07 project properties5. After you’ve marked the project as a Change Project, Application Designer will add the Update IDs and Pre-Requisites tabs to the Project Properties dialog.
■ If your organization uses an incident tracking system (as every organization should), use the Update IDs tab to link the change project to an incident or list of incidents. Often incident requests take the form of a Development Request (DR), Change Request (CR), or Service Request (SR).
■ If your organization does not use some form of incident tracking system, then make up an ID. Application Designer requires an update ID for change packages. At a minimum, use a spreadsheet to track internal update IDs. I’m sure your Oracle sales representative would be happy to help your organization identify a more robust incident tracking system.
Update IDs may consist of alpha and numeric characters. To distinguish your updates from Oracle’s updates, and to avoid update ID collisions, I recommend using your standard site-specific prefix as the prefix for update IDs created by your organization. For this book, I chose OP (Oracle Press) for our site-specific prefix. Since this is our first update, we will use the ID
OP000001. Figure 7-11 shows the Update IDs tab.
FIGURE 7-11. Update IDs tab
Add as many update IDs as necessary. Application Designer will use the first ID added to the list as the change package’s ID.
As your organization builds a library of change packages, you will find that some changes depend on other changes. Use the Project Properties Pre-Requisites tab to track these dependencies.
Project Items
We need to tell Application Designer what to include in this change project. Insert the following into the change project:
1. Field
OP_DOC_ID2. Record
OP_DM_DOCSAdding the field and record managed definitions to our project will create a change package with structure, but no data. To migrate the data, we also need to create new file references. These file references will point to the previously exported .DAT file and our untested Data Mover import script.
1. Create a new file reference definition by choosing File | New from the Application Designer menu bar.
2. In the New Definition selection dialog, choose File Reference, as shown below.

3. When the new File Reference definition window appears, select the filename and path of the .DAT file you previously exported:
C:PT8.52dataOP_CH_07_OP_DM_DOCS.dat.4. Change the PeopleSoft Server attribute to File Server. Since we will import this .DAT file through a step in Change Assistant, we won’t need this file to exist on any other tier except the one running Change Assistant—the file server. As we saw earlier while applying SCM Bundle 17, selecting the correct target server is critical to Change Assistant’s success. Keep the remaining attributes at their default values: Database Platform, Operating System, Unix Target Directory Security. Figure 7-12 shows my new file definition.
5. Save the new file reference and name it
OP_CH_07_OP_DM_ DOCS_DAT.6. When the Save As dialog appears, choose the File Type Code of DATA. The File Type Code provides Change Assistant with the target deployment location for this file reference. For example, a file type of DATA will deploy to the
%ps_home%data directory, whereas a file type of COBOL will deploy to %ps_home%srccblase.7. To view (or even create new) File Type codes, from Application Designer, choose Tools | Miscellaneous Definitions | File Type Codes. The Save As dialog showing the selected file type code is shown below.

8. In like manner, create a new file reference for the
OP_CH_07_OP_ DM_DOCS_IMPORT.dms Data Mover import script. For this file reference, choose the File Type Code of SCRIPTS. Figure 7-13 shows this new file reference.
FIGURE 7-12.
OP_CH_07_OP_DM_DOCS_DAT file reference
FIGURE 7-13.
OP_CH_07_OP_DM_DOCS_IMPORT_DMS file reference| TIP
Rather than hard-code file paths into projects, use environment variables. File reference metadata exists in the database. The actual file does not. If multiple developers are working on the same change package, it is safe to assume that all of them have the same files, but do not assume those files exist in the same location. I rarely see two workstations with the exact same configuration. Using environment variables will allow multiple developers to generate the same change package regardless of workstation configuration. For the file references used in step 3, I could substitute %PS_HOME% for C:PT8.52. |
When Application Designer builds a change package for this project, we want it to deploy the .DAT file and run the Data Mover script. To flag the Data Mover script for execution, in Application Designer, do the following:
1. Switch to the Upgrade tab.
2. Open the File References project item to display the list of File References.
3. Select the Execute box next to the
OP_CH_07_OP_DM_DOCS_ IMPORT_DMS item.Figure 7-14 shows the File Reference project upgrade attributes.

FIGURE 7-14. File Reference project upgrade attributes
Generate the Change Package
To create a Change Package from a Change Project, select Tools | Create Change Package. Figure 7-15 shows the Create Change Package dialog. For this Change Package, we can accept the default values. Click the OK button when you are ready to generate the package.

FIGURE 7-15. Create Change Package dialog
| NOTE
When creating a Change Package, Application Designer defaults the Export Directory to the workstation’s %temp% directory. Creating the package is an intermediate step. The %temp% directory offers a convenient resting place for this file prior to finalizing the Change Project. |
File Reference Settings If any of your file references included the
%FILEREFPATH% variable, provide a value for File Reference Path and Update ID. If the variable is not included, ignore this setting.Generate New or Merge Existing? Change Packages include Change Assistant templates. If you are creating a new Change Package that does not have a template, select the Generate New Template option. On the other hand, if you have an existing template and are only regenerating the Application Designer portion of the Change Package, select the Merge Existing Template option and select an existing Change Assistant Template file.
Backport IB Settings PeopleTools 8.48 significantly changed Integration Broker. If your Change Project includes Integration Broker definitions and the target for your Change Project is a pre-8.48 system, select the Backport IB To Pre-8.48 PeopleTools checkbox.
Modify the Change Package
Based on Application Designer metadata, the Create Change Package command generated a directory named
updOP000001 (upd + our primary Update ID) containing several files. In addition to some Change Assistant metadata, the directory contains the following:■ A Change Assistant XML template
■ The
OP_CH_07 project definition■ Each file reference (.DAT and Data Mover script)
■ Documentation—manual application instructions for administrators who choose to manually apply this update
■ A
manifest.xml file containing the Update IDs associated with this Change PackageIf you have experience applying PeopleSoft patches and bundles, you may recognize the directory contents and structure as matching that of delivered patches and bundles.
Modify the HTML Documentation There is more to the install HTML document than just HTML. The generated documentation contains special XML metadata elements. If you are comfortable working with markup languages, feel free to make changes. Generally speaking, it is safe to change the text inside paragraph (
<p></p>) HTML tags. Rather than change the markup, however, I recommend using Change Assistant’s documentation editing capabilities, which are discussed in the next section.Modify the Change Assistant Template To review, and potentially change, the auto-generated Change Assistant template, launch Change Assistant in Create or Modify mode. Figure 7-16 shows the Change Assistant Mode Selection dialog after switching modes.

FIGURE 7-16. Change Assistant Mode Selection dialog
| NOTE
You can switch modes from within Change Assistant after startup. If the Change Assistant Mode Selection dialog does not appear when you launch Change Assistant, choose Tools | Options. In the Change Assistant Options dialog, select Create Or Modify Templates. |
After you’ve selected the proper mode, import the template.
1. Choose File | Import template.
2. Select the Change Assistant template and click the OK button to import the template. For example, since my Change Package is at
C:UserssarahAppDataLocalTempupdOP000001 and my original project is named OP_CH_07, my Change Assistant template is at C:UserssarahAppDataLocalTemp updOP000001changeassistanttemplateop_ch_07.xml.3. With the template imported, our next step is to open the template. Choose File | Open Template.
4. In the Open dialog, as shown in Figure 7-17, select the template name. In our example, the template name is
OP_CH_07. The template will appear as an outline on the left side of Change Assistant. The auto-generated documentation will appear in the center region. Figure 7-18 shows the template within Change Assistant.
5. Review the template and make any changes necessary. For example, I could change the run location of the package’s data mover script by doing the following:
■ Expanding Deploy Files > File Type Code: SCRIPTS
■ Selecting
OP_CH_07_OP_DM_DOCS_IMPORT_DMS■ Choosing Edit | Step Properties

FIGURE 7-17. Template selection dialog

FIGURE 7-18. Change Assistant template
Let’s add a database backup task as a Manual Stop step to our Change Assistant template. Because taking a backup could be considered part of planning an upgrade, we will add this task and step to the “Plan Your Upgrade chapter.” To add the new task and step, follow these steps:
1. On the left side of Change Assistant, choose Plan Your Upgrade.
2. Choose Edit | Insert Task. Name the new task
Backup Database.3. Ensure that the Backup Database task is selected. Choose Edit | Insert Step. Name the step
Create a backup.4. To mark this step as a Manual Stop step, choose Edit | Step Properties. Change the Type value to ManualStop.
Figure 7-19 shows the Step Properties dialog.

FIGURE 7-19. Create a backup step properties
The following list describes the step types available in Change Assistant:
■ Application Engine Execute an Application Engine program.
■ Build Project Build a project (tables, views, and so on). The Build Project step has the same build options as the Application Designer Build Project command.
■ Compare and Report Offers the same compare options as the Application Designer Compare and Report command.
■ Copy Database Copy a project from one database to another—same as an Application Designer project copy.
■ Copy from File Copy a project from a file—same as an Application Designer file copy.
■ Copy to File Copy a project to a file—same as an Application Designer file copy.
■ Create Project Creates a project inside Change Assistant.
■ Merge Project Merges two projects into a single project—same as Application Designer project merge.
■ Data Mover – Bootstrap Runs a Data Mover script in bootstrap mode.
■ Data Mover – User Runs a Data Mover script in normal mode.
■ Deploy File Deploys files from the Change Package.
■ Execute Process Runs non-interactive (headless) batch files. For Change Assistant to mark the step complete, the batch file must return to completion without requiring human intervention.
■ Manual Stop Causes Change Assistant to pause and wait for human intervention. After completing any tasks noted in the manual step, mark the step as complete.
■ Process Scheduler Runs a process scheduler process.
■ PTF Test Executes a PeopleSoft Test Framework test.
■ SQL Command Executes an SQL command using the query tool specified in the Change Assistant configuration.
■ SQL Script Executes an SQL script using the query tool specified in the Change Assistant configuration.
■ SQR Report Executes an SQR using the PeopleTools
sqr command line program.Immediately following the step Type selection list is a large text box for step parameters. Use this box to enter parameters for steps that require additional information. Figure 7-20 shows our Change Package’s Copy Project parameters.

FIGURE 7-20. Copy Project parameters
Table 7-1 describes common step parameters. Consult the PeopleBook PeopleTools: Change Assistant appendix on “Modifying Step Properties and Parameters” to see a list of valid parameters and sample text.

TABLE 7-1. Change Assistant Step Parameters
Table 7-2 shows a list of common variables that may be used to reference values from Change Assistant’s configuration. Others, such as
PTPS_APP_HOME, are listed in PeopleBooks along with the other Change Assistant step parameters.
TABLE 7-2. Change Assistant Step Variables
Use these variables on the right side of a parameter expression. Here’s an example:
Figure 7-21 shows an example of using the
#OutputDirectory variable within a BuildProject step.
FIGURE 7-21. Script filenames
Our template structure is complete, but our new task and step lack documentation. To add documentation to a step, choose Edit | Edit Documentation. Change Assistant will present an editor for entering documentation, as shown in Figure 7-22.

FIGURE 7-22. Change Assistant documentation editor
After making documentation changes, finalize those updates by choosing Edit | Finalize Documentation. Change Assistant will then merge new documentation into the
upd*_install.htm file.Exporting the Change Assistant Template When you finish updating the Change Assistant template, export it over the Application Designer–generated template by choosing File | Export Template. When you’re prompted to replace the existing file, choose Yes.
Finalize the Change Package
Our template and documentation are ready for deployment.
1. Open Application Designer and execute the Finalize Change Package command by choosing Tools | Finalize Change Package.
2. When prompted, select the same directory that was used earlier to create the export and click OK. Application Designer will validate the change package and generate a Zip file for future deployment.
3. Since we created this change package in the highly volatile
%temp% directory, now is a good time to move that change package to your corporate change package repository (most likely a shared file system location).| TIP
Can’t find your change package Zip file? Look in the export directory. Application Designer creates the Zip file in the same location as the export directory and names the Zip file after the directory. In my example, I exported the change package to C:Userssarah AppDataLocalTempupdOP000001. Application Designer, therefore, created the Zip file updOP000001.zip within that same directory. |
Test the Change Package
You can test your Change Package by moving it to your Change Assistant download directory and then choosing Tools | Apply Change Packages. Follow the steps outlined earlier in the “Patching” section of this chapter.
Conclusion
Change management best practices require a separation of duties. The patch creator and the patch applier should be separate people. Often times the only person with enough knowledge to apply a patch accurately, however, is the person who created the patch. As you saw in this chapter, Application Designer’s change packaging and Change Assistant allow a patch creator to generate enough metadata to hand a patch over successfully to another person with minimal transition effort.
With the information contained in this chapter, you are ready to create and deploy your own change packages, improving upon your overall change management strategy.
..................Content has been hidden....................
You can't read the all page of ebook, please click here login for view all page.