
In this chapter, we will look at how to insert and change data in your MySQL database with the INSERT, DELETE, and UPDATE statements.
We will cover the following:
• Using INSERT
• Using DELETE
• Using UPDATE
• Uploading data with LOAD DATA INFILE
• Extensions: REPLACE and TRUNCATE
We have now moved into the DML (Data Manipulation Language) aspects of SQL. After we have learned how to insert data into a database, we will spend the next few chapters learning the many and varied ways to retrieve data from a database.
The INSERT SQL statement is used to insert rows into a table. We'll begin by looking at an example. Again, you can type these statements directly into the MySQL monitor or into a file, or you can download this file from the book's Web site.
Some sample insert statements are shown in Listing 5.1.
Listing 5.1. employee_data.sql
use employee;
delete from department;
insert into department values
(42, 'Finance'),
(128, 'Research and Development'),
(NULL, 'Human Resources'),
(NULL, 'Marketing'),
delete from employee;
insert into employee values
(7513,'Nora Edwards','Programmer',128),
(9842, 'Ben Smith', 'DBA', 42),
(6651, 'Ajay Patel', 'Programmer', 128),
(9006, 'Candy Burnett', 'Systems Administrator', 128);
delete from employeeSkills;
insert into employeeSkills values
(7513, 'C'),
(7513, 'Perl'),
(7513, 'Java'),
(9842, 'DB2'),
(6651, 'VB'),
(6651, 'Java'),
(9006, 'NT'),
(9006, 'Linux'),
delete from client;
insert into client values
(NULL, 'Telco Inc', '1 Collins St Melbourne', 'Fred Smith', '95551234'),
(NULL, 'The Bank', '100 Bourke St Melbourne', 'Jan Tristan', '95559876'),
delete from assignment;
insert into assignment values
(1, 7513, '2003-01-20', 8.5);
You'll see that before we insert any data into each table, we are running a DELETE statement—again, this isn't necessary, but it will clean out any test data that you may have inserted so far. We'll come back to the DELETE statement in the next section.
Also note that we have inserted the sample data to match the examples in Chapter 3, “Database Design Crash Course.” We have added some additional rows as well.
All of these INSERT statements are pretty similar. Let's look at the first one to see how it works:
insert into department values
(42, 'Finance'),
(128, 'Research and Development'),
(NULL, 'Human Resources'),
(NULL, 'Marketing'),
We specify the table that we want to insert data into on the first line—in this case, department. Here, we are inserting four rows into the table. You may recall that the department table has two columns, departmentID and name. (You can check this for yourself by running a describe department command.)
In the first two rows, we have specified the departmentID that we want to use. Let's look back at the definition of departmentID. You may recall that in the last chapter, we declared it as
departmentID int not null auto_increment primary key
Because this is an auto_increment column, we can specify the value or let MySQL calculate it for us. (Usually, in this case, we would let MySQL allocate a number, but there may be cases like this one in which we have an existing number we want to use.)
In the rows for Human Resources and Marketing, you will see that we have left the departmentID as NULL. This will allow the auto_increment to do its magic and allocate a value. Let's see what we get from this INSERT statement.
If you look through the various INSERT statements, you will see that when we insert data into a string or date type, we enclose it in single quotes, for example, 'Research and Development'. When it is a numerical type, you should not use quotes.
If we are enclosing data in quotes, what do we do when the data contains quotes? The answer is that we need to escape the quotes. In simple terms, we need to put a backslash () in front of the single quote, for example, 'O'Leary'.
Obviously, this brings up the question, “What do we do if we want a backslash to be just a backslash, without any special meaning?” In this case, we need to escape the backslash in the same way—replace the backslash with two backslashes (\).
We retrieve data from the database using the SELECT statement. We will cover SELECT fairly exhaustively in the next few chapters. For the moment, we only need to know that typing
select * from tablename;
will return all the data currently stored in a table.
If you type
select * from department;
you should get output similar to the following:
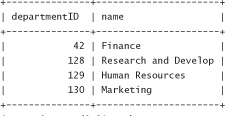
4 rows in set (0.01 sec)
You should be able to see that the effect of auto_increment is a value which is one greater than the highest current value in the column.
The general form of the INSERT statement from the MySQL manual is as follows:
INSERT [LOW_PRIORITY | DELAYED] [IGNORE]
[INTO] tbl_name [(col_name,...)]
VALUES ((expression | DEFAULT),...),(...),...
[ ON DUPLICATE KEY UPDATE col_name=expression, ... ]
or INSERT [LOW_PRIORITY | DELAYED] [IGNORE]
[INTO] tbl_name [(col_name,...)]
SELECT ...
or INSERT [LOW_PRIORITY | DELAYED] [IGNORE]
[INTO] tbl_name
SET col_name=(expression | DEFAULT), ...
[ ON DUPLICATE KEY UPDATE col_name=expression, ... ]
The examples we have looked at all follow the first form of the expression. You will note that the keyword INTO is optional. We could leave it out and begin our query with insert employee values, but we find it a little harder to read.
With this first form, we need to list values for each column value in each row in the same order as the columns are in the table. For example, we had to specify the departmentID first, followed by the name, because that's the way the department table is structured. As demonstrated, this form allows us to insert multiple rows in a table with a single INSERT statement.
The second form ends in a SELECT statement. Rather than inserting values manually, this allows us to retrieve data from another table or tables in the database and store it in this table.
The third form allows us to specify which columns data should be inserted into. An example of using INSERT in this way is
insert into department
set name='Asset Management';
This form only allows you to insert a single row at a time, but you don't need to specify values for all the columns. In this case, we are setting a value for only the name. All the unspecified values will either take their default value, if one is specified, or be NULL. In this case, departmentID will be set to NULL, which causes the auto_increment to work its magic and generate a new departmentID for us. (You can check this by typing select * from department again.)
There are a couple of optional clauses in the INSERT statement. Let's briefly go through what these do:
• We can specify that an INSERT should be LOW PRIORITY or DELAYED. Both of these clauses will cause the insertion to be delayed until no client is trying to read from the table. The difference between them is that LOW PRIORITY will block the inserting client and DELAYED will not. What this means is that if you run a LOW PRIORITY insert, you may wait for some time before you can continue running queries in your client. With DELAYED, you will be told OK and can continue running queries, but you need to remember that the insert will not be performed until the table is not in use.
• Specifying IGNORE is chiefly useful when you are inserting multiple rows. Normally, if one of the rows you are trying to insert clashes with an existing row's PRIMARY KEY or UNIQUE value, an error will occur and the insert will be aborted. If you specify IGNORE, the error will be ignored and the insert will continue and will attempt to insert the next row.
• We can specify that a column should contain its default value by specifying DEFAULT as the value for that column.
• The ON DUPLICATE KEY UPDATE clause allows us to deal elegantly with clashing primary key or unique values. We follow this clause with an update statement that we can use to change the primary key or unique value in the row already in the table so that it no longer clashes with the new row.
The following short example demonstrates a common style of use for the ON DUPLICATE KEY UPDATE clause:
create table warning
(
employeeID int primary key not null references employee(employeeID),
count int default 1
) type =InnoDB;
insert into warning (employeeID)
values (6651)
on duplicate key update count=count+1;
This clause is very useful for situations in which you want to not only record unique events, but also take some action, such as incrementing a counter when non-unique events occur. Any sort of logging would be a good example, but in keeping with the employee database we have been using, we will record employees who have been given a warning in the table warning.
To record somebody's warning, we run this insert statement. Because count has a default value of 1 and we are not specifying a value in the insert, it will be 1 the first time the insert is done for each employeeID. Subsequent inserts with the same employeeID will trigger the ON DUPLICATE KEY UPDATE clause and will increment the counter.
The REPLACE statement is exactly like the INSERT statement except that if a key clash occurs, the new row you are inserting will replace the old row.
This is the general form of REPLACE from the MySQL manual:
REPLACE [LOW_PRIORITY | DELAYED]
[INTO] tbl_name [(col_name,...)]
VALUES (expression,...),(...),...
or REPLACE [LOW_PRIORITY | DELAYED]
[INTO] tbl_name [(col_name,...)]
SELECT ...
or REPLACE [LOW_PRIORITY | DELAYED]
[INTO] tbl_name
SET col_name=expression, col_name=expression,...
The similarity to INSERT should be obvious.
The DELETE SQL statement allows us to delete rows from a table. There are some delete statements in Listing 5.1, for example,
delete from department;
In this form, the delete statement will delete all the rows from the department table.
We can also limit which rows are deleted using a WHERE clause, for example,
delete from department where name='Asset Management';
This will only delete the rows matching the criteria in the where clause. In this case, only rows in which the department name is 'Asset Management' will be deleted.
It is unusual to want to delete all the rows from a table. However, because this is the shortest form of the delete statement, you may sometimes type it by accident without a WHERE clause. You can save yourself this anguish by switching on the -–safe-updates or –-iam-a-dummy command-line options of the mysql client as discussed in Chapter 2, “Quick Tour.” These options prevent you from deleting (or updating) rows without specifying a key constraint in the WHERE clause. That is, you need to specify that you want to delete only rows containing certain key values.
This is the general form of the DELETE statement from the MySQL manual:
DELETE [LOW_PRIORITY] [QUICK] FROM table_name
[WHERE where_definition]
[ORDER BY ...]
[LIMIT rows]
or
DELETE [LOW_PRIORITY] [QUICK] table_name[.*] [, table_name[.*] ...]
FROM table-references
[WHERE where_definition]
or
DELETE [LOW_PRIORITY] [QUICK]
FROM table_name[.*] [, table_name[.*] ...]
USING table-references
[WHERE where_definition]
The first form is the one we have seen examples of so far.
The other two forms are designed to allow us to delete rows from one or more tables with references to other tables. For example:
delete employee, employeeSkills
from employee, employeeSkills, department
where employee.employeeID = employeeSkills.employeeID
and employee.departmentID = department.departmentID
and department.name='Finance';
This example deletes all the employees who work for the Finance department and erases all records of their skills. Note that rows are deleted from employee and employeeSkills (the tables listed in the initial where clause), but not department (because it is listed only in the from clause).
The tables in the initial delete clause will have rows deleted from them, whereas the tables listed in the from clause are used for searching for data and will not have rows deleted unless they are also listed in the delete clause.
Note that this is quite a complex example because it involves three tables! We need three tables to illustrate this example, but we suggest that you come back and review the WHERE clause after reading about joins in Chapter 7, “Advanced Queries.”
We have used a couple of new things in this where clause: the AND operator and the table.column notation. We have used AND to join our conditions together. This is a simple Boolean AND. We have also used the notation employee.employeeID. This notation means “the employeeID column of the employee table.” We will revisit both of these things in more detail in the next two chapters.
The third form of DELETE is similar to the second form, except that, in this case, we delete only from the tables listed in the FROM clause while referring to the tables in the USING clause. For example:
delete from employee, employeeSkills
using employee, employeeSkills, department
where employee.employeeID = employeeSkills.employeeID
and employee.departmentID = department.departmentID
and department.name='Finance';
This is equivalent to the preceding example, except that it uses an alternative syntax.
There are a couple of other optional clauses in the general form of the DELETE statement:
• The LOW_PRIORITY clause works in the same way as it does in the INSERT statement.
• Specifying QUICK may speed up the DELETE statement by telling MySQL not to do some of its housekeeping on indexes while deleting from the table.
• The ORDER BY clause specifies the order in which to delete rows. This is most useful in conjunction with the LIMIT clause—we may want to delete the oldest n rows from a table, for example.
• The LIMIT clause allows us to set a maximum number of rows that can be deleted by the DELETE statement. This is useful either in conjunction with the ORDER BY clause or to save us from accidentally deleting too many rows.
The TRUNCATE statement allows us to delete all the rows from a table. For example:
TRUNCATE TABLE employee;
This query would delete all the employees from the employee table. This is faster than a DELETE statement because it works by dropping the table and re-creating it empty. One thing to bear in mind is that TRUNCATE is not transaction safe.
We can use the UPDATE SQL statement to change rows already stored in the database. For example, imagine that one of our employees changes jobs:
update employee
set job='DBA'
where employeeID='6651';
This statement changes the value of the job column for employee number 6651.
The general form of the UPDATE statement from the MySQL manual is as follows:
UPDATE [LOW_PRIORITY] [IGNORE] tbl_name
SET col_name1=expr1 [, col_name2=expr2 ...]
[WHERE where_definition]
[ORDER BY ...]
[LIMIT rows]
or
UPDATE [LOW_PRIORITY] [IGNORE] tbl_name [, tbl_name ...]
SET col_name1=expr1 [, col_name2=expr2 ...]
[WHERE where_definition]
The UPDATE statement is similar in many respects to the DELETE statement.
We can use an optional WHERE clause to update particular rows or leave it off to update all rows. Again, you can fall into the trap of forgetting to specify a WHERE clause—I remember one project when a foolish colleague typed something along these lines:
update user
set password='test';
This again highlights the usefulness of the --i-am-a-dummy mysql option, particularly if you are forced to work with dummies.
The second version of the UPDATE statement listed previously is a multi-table update. This works similarly to the multi-table deletes we looked at before. Note that only the columns you specifically list in the SET clause will be updated.
We have seen all the other clauses of the UPDATE statement before. The LOW_PRIORITY and IGNORE clauses work the same way as they do in INSERT. The ORDER BY and LIMIT clauses work the same way they do in DELETE.
The LOAD DATA INFILE command allows you to bulk insert data from a text file into a single table without having to write INSERT statements. For example, we could have loaded the data in the department table using this technique as follows. Listing 5.2 shows the contents of a data file containing department information.
Listing 5.2. department_infile.txt
42 Finance
128 Research and Development
NULL Human Resources
NULL Marketing
This file is in the default LOAD DATA INFILE format, with each row listed on a separate line with tabs between column values. (This is configurable and we will see how in a minute.)
We can load this information into the department table with the following LOAD DATA INFILE statement:
load data local infile 'department_infile.txt'
into table department;
This facility is particularly useful for converting data from another database format, spreadsheet, or CSV (comma-separated values) file.
The LOAD DATA INFILE statement requires the FILE privilege—see Chapter 11, “Managing User Privileges,” for further information, especially if you are having trouble running this command. The privilege to perform this is often restricted for good security reasons—to stop people from loading in /etc/passwd, for example.
The general form of the LOAD DATA INFILE statement is as follows:
LOAD DATA [LOW_PRIORITY | CONCURRENT] [LOCAL] INFILE 'fileName.txt'
[REPLACE | IGNORE]
INTO TABLE tbl_name
[FIELDS
[TERMINATED BY ' ']
[[OPTIONALLY] ENCLOSED BY '']
[ESCAPED BY '' ]
]
[LINES TERMINATED BY '
']
[IGNORE number LINES]
[(col_name,...)]
The optional clauses are as listed here:
• The LOW PRIORITY clause works the same way it does in the INSERT statement by waiting for other clients to stop reading from the table. CONCURRENT, on the other hand, allows other clients to read from the table while the bulk insert is going on.
• In our example, we specified the optional keyword LOCAL, meaning that the data file is on the client machine. If this is not specified, MySQL will look for the infile on the server.
• If you have key clashes while inserting data, REPLACE and IGNORE provide two methods for dealing with this. Specifying REPLACE tells MySQL to replace the old row with the new row, while IGNORE tells MySQL to keep the old row.
• The FIELDS and LINES clauses specify how the data in the infile is laid out. The values in the general form are the defaults—each row on a new line, column values separated by tabs. We can also enclose column values in quotes and use the backslash character to escape any special characters (like single quotes) that might confuse MySQL.
• The IGNORE number LINES clause tells MySQL to ignore the first number lines in the infile.
• The final clause allows you to specify that you only want to read data into some of the table's columns.
A common format to receive data in is CSV or comma-separated values. Many programs can read and write files of this type, but one notable example is Microsoft Excel. Listing 5.3 shows a small CSV file saved from Excel.
Listing 5.3. new_programmers.csv
Name, Job, DepartmentID
Julia Lenin, Programmer, 128
Douglas Smith, Programmer, 128
Tim O'Leary, Programmer, 128
We can load this data into the employee table with the following query:
load data infile 'e:\new_programmers.csv'
into table employee
fields terminated by ','
lines terminated by '
'
ignore 2 lines
(name, job, departmentID);
You can see that we have used more options to load this data than we did when the data was in the default format. A few points are worth noting:
• Because we have used a Windows/DOS-style path that includes a backslash, we need to escape the backslash. Our path therefore became 'e:\new_programmers.csv'.
• It possibly goes without saying that the fields in a CSV file are terminated by commas, but we need to specify it.
• We do not need to specify that lines are terminated by a newline character, but we have chosen to.
• This file has a header, so the first two lines do not contain data and should be ignored.
• The data in this file does not contain employeeIDs, so to allocate the three columns of data into the four columns in the database, we need to specify what columns (in order) the data will be mapped to. In this case, we have specified (name, job, departmentID).
In this chapter, we looked at ways to insert, delete, and update data from the tables in our database.
• String values should be in quotes. Single quotes or backslashes within a string need to be escaped with a backslash.
• Add data to tables with the INSERT statement:
INSERT [LOW_PRIORITY | DELAYED] [IGNORE]
[INTO] tbl_name [(col_name,...)]
VALUES ((expression | DEFAULT),...),(...),...
[ ON DUPLICATE KEY UPDATE col_name=expression, ... ]
or INSERT [LOW_PRIORITY | DELAYED] [IGNORE]
[INTO] tbl_name [(col_name,...)]
SELECT ...
or INSERT [LOW_PRIORITY | DELAYED] [IGNORE]
[INTO] tbl_name
SET col_name=(expression | DEFAULT), ...
[ ON DUPLICATE KEY UPDATE col_name=expression, ... ]
• The REPLACE statement is just like INSERT, but it overwrites rows where a key clash occurs. INSERT fails or triggers the ON DUPLICATE KEY UPDATE clause when a key clash occurs.
• Avoid disasters with --i-am-a-dummy.
• Delete data from tables with the DELETE statement:
DELETE [LOW_PRIORITY] [QUICK] FROM table_name
[WHERE where_definition]
[ORDER BY ...]
[LIMIT rows]
or DELETE [LOW_PRIORITY] [QUICK] table_name[.*] [, table_name[.*] ...]
FROM table-references
[WHERE where_definition]
or DELETE [LOW_PRIORITY] [QUICK]
FROM table_name[.*] [, table_name[.*] ...]
USING table-references
[WHERE where_definition]
• The TRUNCATE TABLE statement deletes all rows from a table.
• Update data in tables with the UPDATE TABLE statement:
UPDATE [LOW_PRIORITY] [IGNORE] tbl_name
SET col_name1=expr1 [, col_name2=expr2 ...]
[WHERE where_definition]
[ORDER BY ...]
[LIMIT rows]
or UPDATE [LOW_PRIORITY] [IGNORE] tbl_name [, tbl_name ...]
SET col_name1=expr1 [, col_name2=expr2 ...]
[WHERE where_definition]
• Use LOAD DATA INFILE to load the contents of a text file into a table:
LOAD DATA [LOW_PRIORITY | CONCURRENT] [LOCAL] INFILE 'file_name.txt'
[REPLACE | IGNORE]
INTO TABLE tbl_name
[FIELDS
[TERMINATED BY ' ']
[[OPTIONALLY] ENCLOSED BY '']
[ESCAPED BY '\' ]
]
[LINES TERMINATED BY '
']
[IGNORE number LINES]
[(col_name,...)]
In Chapter 6, “Querying MySQL,” we will begin looking at the workhorse of SQL: the SELECT statement, in all its many variations.