
So far, we have covered designing, creating, and populating a MySQL database. In this chapter and the two that follow it, we will look at the other end of this process: retrieving data from your database.
In this chapter, we will cover the SQL SELECT statement in some detail. This is probably the most important statement in SQL. It is the statement we use to select rows from one or more database table(s).
In this chapter, we will discuss how to select rows from a single database table. We'll cover the following:
• Overview of SELECT
• Simple queries
• Selecting particular columns
• Column aliases
• Using the WHERE clause to select particular rows
• Using the GROUP BY clause
• Selecting particular groups with HAVING
• Sorting search results with ORDER BY
• Limiting search results with LIMIT
In Chapter 7, “Advanced Queries,” we'll cover more advanced queries, specifically queries that span multiple tables and the different types of joins and subqueries.
In Chapter 8, “Using MySQL Built-In Functions with SELECT,” we'll look at the range of functions MySQL has built in to help you with your queries.
We'll begin by looking at the general form of the SELECT statement.
The SELECT statement has the following general form:
SELECT columns
FROM tables
[WHERE conditions]
[GROUP BY group
[HAVING group_conditions]]
[ORDER BY sort_columns]
[LIMIT limits];
This is not a full set of syntax—we'll cover that in the next chapter—but it gives you an idea of the general form of the statement. We will cover all the previously listed clauses in this chapter.
The SELECT statement has many optional clauses. You can use these or not as you choose, but they must appear in the order shown.
An example of the simplest form of the SELECT statement is as follows:
select * from department;
If you run this query on the data we have in the employee database, you should get a result something like this:

4 rows in set (0.00 sec)
This query has selected all the data in the chosen table—that is, all the rows and all the columns from the department table.
You can test this out on another table—try selecting all the rows and columns from the employeeSkills table, for example.
Of course, the power of a relational database is not in its capability to give you back all the data you put in, but instead in its capability to allow you to search the data for particular pieces of information.
The next step we can take is to limit the columns that are returned. The * in the previous query (select * from department) means “all the columns in the table.” Instead of specifying *, we can list a set of columns we would like returned. This can be a single column, a subset of table columns, or even the complete set of columns in any order that suits us. You should specify the column names as a list of comma-separated values.
For example, the following query selects only the values in the employeeID and name fields of the employee table:
select name, employeeID from employee;
If you run this query on the employee database, you should get a result that looks similar to the following:
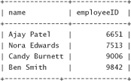
4 rows in set (0.00 sec)
You can see that only the two columns we specified have been returned. Note that the columns are displayed in the order in which we requested the columns in the query, rather than the order in which they appear in the database schema.
An additional piece of notation you should be aware of at this point allows you to absolutely specify which database and table we are talking about. For example, we can refer to the name column in the employee table as employee.name. For example:
select employee.name
from employee;
This should give something similar to the following result:

4 rows in set (0.41 sec)
Similarly, we can absolutely specify which table in which database we are talking about, for example:
select name
from employee.employee;
(This should give the same result as the preceding query.)
Here, we are making explicit reference to the employee table within the employee database. The notation here is database.table.
If desired, we can specify which database and table a column belongs to. The same example could be written using database.table.column syntax like this:
select employee.employee.name
from employee;
For these simple queries, this syntax is not very useful, but as we move on to more complex queries, this allows us to be unambiguous about what information we are looking for.
At this point, we should discuss the concept of column and table aliasing.
We have the ability to rename columns or expressions in a SELECT statement, and the new name will be what is shown in the output. For example, we can use the following query:
select name as employeeName
from employee;
Here, we have renamed the column name as employeeName just within the context of this query. The results of running this query on the employee database are as shown here:

4 rows in set (0.01 sec)
You can see that in the results, the contents of the name column are now listed under the heading employeeName.
The identifier employeeName is known as an alias. There are some rules about what we can and cannot do with aliases, and we will cover these as we come to them.
This specific example of an alias is not particularly useful. As we begin to write more complex queries and queries that involve calculation, you should see its power.
We can also use aliases for tables, like this:
select e.name
from employee as e;
This will give the same result as if we had written the query not using aliases. This notation will become useful when we begin running queries over multiple tables in the next chapter.
In the last two examples, the keyword AS is optional. We could simply have written
select name employeeName
from employee;
and
select e.name
from employee e;
You may choose to write the queries either way. It is simply a matter of style. As you can see here and in many other places in the book, there are many ways to write the same SQL query. Individual programming style in SQL varies as it does in other languages.
So far, we have looked at selecting all data from a table and selecting particular columns. Next, we will consider how to select particular rows. This is useful because we frequently want to select records from a table or tables that match particular search criteria. This becomes more important when we need to retrieve a few useful rows from a much larger table.
We can accomplish this using the WHERE clause of the SELECT statement. A simple example follows:
select employeeID, name
from employee
where job='Programmer';
(Remember, by the way, that we can set queries out on multiple lines. Each query is terminated by a semicolon. We lay out the SELECT statement like this to make it easier to read.)
The results of running this query on the employee database are as shown here:

2 rows in set (0.42 sec)
We used a condition in the WHERE clause to match only the rows in the table that met the specified criteria—in this case, they had to be employed as programmers.
Notice that we have combined this with a specific list of desired columns (employeeID and name) to pull out only the information we are interested in.
In this case, we have used a test of equality in the WHERE clause. Note that SQL uses = for testing equality. This is different from various other languages that use == or eq.
A huge variety of functions are available for use in the WHERE clause, and we will address these in detail in Chapter 8. For the time being, we will mention only the most commonly used operators:
• Equality, or =, which we have seen used previously.
• Inequality, expressed as != or <>.
• All the permutations of > (greater than), < (less than), >= (greater than or equal to), and <= (less than or equal to).
• IS NULL and IS NOT NULL, which are used to test whether a value is or is not NULL. You cannot do this by testing whether somevalue=NULL. (We will discuss why in Chapter 8.)
• The arithmetic operators you would expect, typically used in conjunction with comparison operators. For example, we might like to test whether somevalue > someothervalue*10.
• The standard Boolean operators AND, OR, and NOT, which we can use to group tests together. These are lower in precedence than the comparison operators, so, for example, salary > 30000 AND salary < 50000 works as you would expect.
In addition to the operators, we will use one function in some examples. The count() function allows us to count the number of rows returned by a query. For example:
select count(*) from employee;
This query will tell us how many rows there are in the employee table.
Finally, we can control precedence by grouping expressions with parentheses.
An example of a slightly more complex query using WHERE is as follows:
select * from assignment
where employeeID=6651 and hours > 8;
This query selects all the work assignments performed by employeeID 6651 (Ajay Patel) in which he performed more than 8 hours of work.
One important point to note is that we are not allowed to use any column aliases in the WHERE clause. We must use the original column name. This is an ANSI SQL limitation. The reason for it is that the value of the aliased column may be unknown at the time the WHERE condition is examined.
You can use the keyword DISTINCT in your queries to specify that you do not want to see duplicate results. For example, consider the following query:
select job
from employee;
This will return the following data:

4 rows in set (0.01 sec)
Note that the data Programmer appears twice. This is because this value occurs in two rows. This query has simply returned the complete list of values in the job column of this table.
Now, consider this query:
select distinct job
from employee;
This will return the following rows:

3 rows in set (0.04 sec)
Here, the duplicates have been removed.
In this case, the difference doesn't seem like that big of a deal—sure, the second set of results is a little neater, but it doesn't really improve things much. It would be a little more important for a big table with a lot of repetition, but it would still be presenting accurate information.
On the other hand, consider this:
1 row in set (0.01 sec)
This query tells us there are four values in the job column. This is kind of misleading. It certainly doesn't tell us that there are four different values in the job column because we can see by inspection of the data that there are only three.
It is relatively easy to type the previous query by mistake when what you actually meant was this:
select count(distinct job) from employee;
This will give you the following result:
1 row in set (0.05 sec)
This tells us how many different values are in the job column, a more useful piece of information.
The next clause we will look at is the GROUP BY clause. This allows us to consider retrieved rows in groups. This is really useful only when we use it in combination with functions that operate over a group of rows. The only one of these we have mentioned so far is count(), but we will look at many more in Chapter 8.
Consider the following query:
select count(*), job
from employee
group by job;
This query will count the number of employees in each job grouping—that is, the number of employees who hold each job. If you run this query on the employee database, you should see a result similar to the following:

3 rows in set (0.04 sec)
There are two differences between the way GROUP BY works in MySQL and ANSI SQL.
In ANSI SQL, you must group by all the columns you have listed in the initial SELECT clause. MySQL allows you to have additional fields in the SELECT clause that are not in the GROUP BY clause.
MySQL also allows you to sort the group order in which the results are presented. The default order is ascending. If we want to repeat the last query but see the results in descending order, we can use the following query:
select count(*), job
from employee
group by job desc;
This will produce results similar to the following:

3 rows in set (0.04 sec)
As you can see, the names of the jobs are now in reverse alphabetical order. You can also specify ASC (for ascending), but this is the default, so it's redundant to do so.
The next clause in the SELECT statement is HAVING. A GROUP BY with a HAVING clause is like a SELECT with a WHERE clause. For example:
select count(*), job
from employee
group by job
having count(*)=1;
This query will select the jobs in the company for which we have only one employee in the role. It should produce results similar to the following:

2 rows in set (0.05 sec)
It's been our experience that people who are just beginning to use SQL often get WHERE and HAVING confused. You will use WHERE in just about every query you write to test conditions that relate to individual rows. You will use HAVING when you want to apply a conditional to whole groups.
The next clause in the SELECT statement is ORDER BY. This clause allows us to sort the result rows on one or more columns. The sort can be either ascending, denoted ASC, or descending, denoted DESC. For example:
select *
from employee
order by job asc, name desc;
This will select all the rows and columns from the employee table. They will be sorted according to job in alphabetical order, and if two or more people have the same job, they will be sorted in reverse alphabetical order by name. This will give the following results:

4 rows in set (0.02 sec)
If you just specify ORDER BY column with no ASC or DESC, the default is ASC. Note that if ORDER BY is not specified, you can't assume anything about the order in which rows will be returned.
The final clause of the SELECT statement we will look at in this chapter is LIMIT.
The LIMIT clause is used to limit the number and range of rows that are returned from a query. For example, consider the following query:
select *
from employeeSkills
limit 5;
This query will return only the first five rows that match the selection criteria. In this particular case, we will simply get the first five rows found in the table, as shown here:

5 rows in set (0.44 sec)
We can also specify that we want a subset of rows other than the first n. If we, for example, wanted to retrieve rows 6 through 8 from the preceding query, we would do so like this:
select *
from employeeSkills
limit 5, 3;
When we pass two parameters to limit, the first parameter is the offset (start point) and the second parameter is the maximum number of rows we would like returned. Contrast this with the previous case: When we pass only a single parameter, it represents the maximum number of rows we would like returned.
Row numbering starts from zero when specifying offsets (as you can see in the preceding example—for the sixth row, we specify offset 5). Our first LIMIT example selected rows 0 to 4, and our second selected rows 5 to 7.
If you specify the second parameter as -1, the query will return the rows from the offset to the end of the table.
The LIMIT clause is normally used with ORDER BY so that the order in which rows are returned makes some sense. Remember that without an ORDER BY clause, the records are not retrieved in any logical order.
This clause is especially useful when building Web or GUI applications using MySQL because it provides an easy mechanism for paging results.
• The SELECT statement has the following general form:
SELECT columns
FROM tables
[WHERE conditions]
[GROUP BY group
[HAVING group_conditions]]
[ORDER BY sort_columns]
[LIMIT limits];
• The clause select * retrieves all columns; select columnname retrieves a particular column.
• We can specify tables as database.table and columns as table.column or database.table.column to avoid ambiguity.
• Aliases are alternative names for tables and columns. Specify them this way:
select column as column_alias
from table as table_alias;
• The WHERE clause is used to select rows matching search criteria.
• The keyword DISTINCT removes duplicates from the result set.
• The GROUP BY clause treats the rows retrieved group by group. Its chief use is in conjunction with group functions like count().
• The HAVING clause is like a WHERE clause for groups.
• The ORDER BY clause sorts result rows according to the columns you specify.
• The LIMIT clause is used to control which rows are returned from the total possible result set. You can specify the maximum rows returned and an offset from which to start.
In the next chapter, “Advanced Queries,” we will discuss queries that span multiple tables, as well as further subtleties of the SELECT statement.