

© Amber Palmer
Shooting outdoor recreation and competition can be some of the most thrilling and challenging photography you'll encounter. Be prepared to shoot fast action in bright conditions, and often in conditions where you'll need to protect your equipment carefully — as well as yourself! Whether you're boating, standing alongside a car racetrack, or carrying your equipment on a bike trip, you'll want to take some specific things into consideration not only to get the best shots, but to make sure you get your equipment home safely.
This chapter covers some specific areas of outdoor recreation and competition, but there is a seemingly endless variety of sports that take place outside that people are doing for both the competition and just for the fun of it. I've divided this into some specific areas that you might encounter, and if you're doing something different altogether (ice sailing, anyone?) you should be able to extrapolate from what is covered and apply it to your chosen sporting pursuit.
In this chapter, some of the same principles apply for all of the sports. Then again, there are specific issues for each sport in terms of positioning, equipment, and settings. So even if you aren't planning to shoot boating, for example, you may still want to read through it to see how some of the techniques will apply to another sport you may want to go after. And who knows? You may find a new niche you never thought you'd like! Figure 5-1 was taken at Seattle's Pacific Raceways, where I was able to get about 20 feet away from the racers.
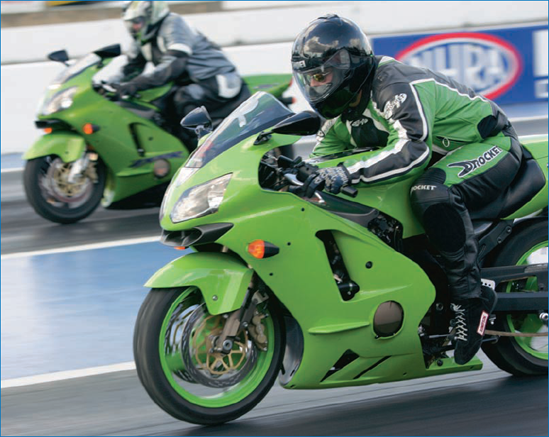
Figure 5-1. Getting close enough to take cool shots of car and motorcycle racing such as these bikes at Seattle's Pacific Raceways requires a fast camera, access to the track, and earplugs.: © Amber Palmer
I've personally shot quite a bit of outdoor recreation and competition, but this chapter also includes photos from a number of great photographers. It's lots of fun to shoot outdoors and you always get shots that surprise and delight you when you get back to your computer and download them — as well as some shots that you thought would be absolutely great that turn out to be disappointing. Outdoor recreation and competition can take place on land, water, or snow, as illustrated in Figure 5-2, Figure 5-3, and Figure 5-4, all of which are covered in this chapter.
Note
Other outdoor sports, including rock climbing, surfing, hang gliding, and other extreme/adventure forms of recreation, are covered in Chapter 7 and Chapter 8.

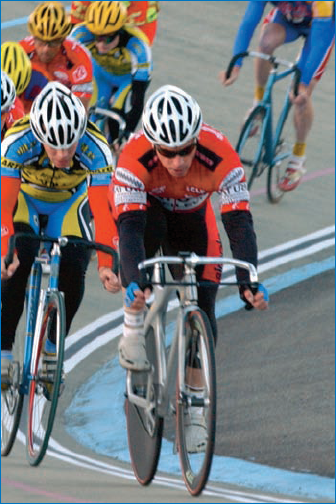
Figure 5-2. Cycling, whether racing on road or track, is a fast sport that can benefit from the effect of motion being used in your images. As in this photo, you can achieve this effect by panning with the riders, making them focused and crisp but giving a lateral blur to the surroundings.: © Amber Palmer
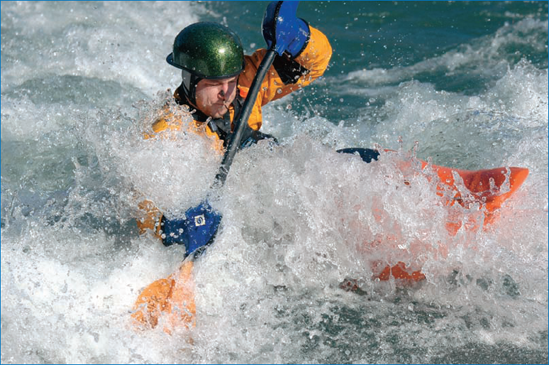
Figure 5-3. The challenge with water sports like kayaking is getting close enough to the athlete without getting drenched. Stop-action shots, taken with a wide aperture and a fast shutter, really allow you to capture detail.: © Amber Palmer
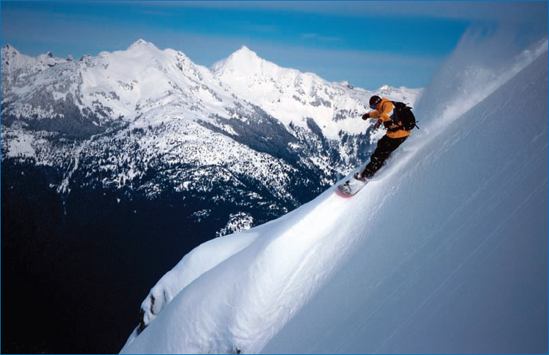
Figure 5-4. Skiing and snowboarding shots require that you have the winter sports skills and ability to reach spots on the mountain where the action is taking place.: © Neil Thatcher
Whether you're in a ski boat or on the ski slope, reviewing images on your camera may be very difficult. Furthermore, downloading them to a hard drive may have to wait until you can get your equipment in a more suitable and safe location. Carrying a laptop on snow-covered slopes or opening your camera to remove a flash card in a ski boat isn't the greatest idea.
When you are photographing very active sports, you'll need to have a good grasp of how your camera operates, a good idea of the settings that will give you the best shots, and the ability to judge whether you're getting good photos because you may not have the luxury of being able to effectively review your images — even on your LCD. It's difficult to see even the best LCD screens in bright light, much less in a moving vehicle such as a boat.
Tip
Products such as those made by Hoodman are small rubber or plastic baffles that attach to your LCD, allowing you to view images in bright outdoor light. These help, but sometimes get in the way of shooting (especially on SLRs, where you have your eye against the eyepiece and the baffle bumps against your cheek) and are not always that effective. However, I have used them with reasonable success in very harsh light, and they're worth trying.
There are some special considerations for shooting around water for a variety of reasons. For starters, you need to protect your equipment from moisture, you may not be able to get as close to your subject as you like, and being stable can be tough in a boat that's pitching and rolling. A long lens may be need for shooting many types of water sports, especially when shooting another boat or skier from the shore or from another boat; on the other hand, you can use a fish-eye lens (for example, 15mm) to get dramatic close-up shots of a boat you're on as well as interesting perspectives of the boat, the water, and other boats.
Sometimes you'll have a luxury of space on the water, if, for example, you're on a large powerboat. On the other hand, if you're in a kayak or canoe, equipment stowage space may be extremely limited, not to mention hazardous. So equipment considerations for sports photography on the water not only have to do with just the water, but if you're situated on or beside it. In addition, you may be further limited by a lack of power sources; for example, if you are on a multi-day canoe trip, you're not likely to be able to recharge batteries, and you'll need a way to download and store images on something other than a laptop.
Getting close to the water may be necessary for good shots, but it also means protecting your equipment from getting wet. Figure 5-5 shows a photo of a water skier falling; even if you're in the boat, when surrounded by water your equipment is at constant risk.

Figure 5-5. Shooting spectacular shots in and around the water? Get those great shots, but protect your gear!: © Amber Palmer
Having a way to protect your equipment from the water, as well as from being bumped and jostled, is essential. A Swiss sailing photographer friend uses a cooler; inside, it is cushioned with spongy foam to protect the equipment from bouncing around. You can also use a photographer's fanny pack and place it in a cooler. For smaller boats, bring a few bungee cords to tie down your gear and the cooler. If you're on a very small boat (canoe or kayak, for example), you'll need to store your equipment in a case that's 100 percent waterproof and that will float if it goes into the drink.
Tip
Pelican makes some very durable and airtight cases. I've used them successfully in very adverse conditions, including on the water.
Note
On really hot days, it's good idea if possible to keep your cooler out of direct sunlight. Even though it's insulated, it's better not to get the camera gear too hot if you can avoid doing so. And, don't store drinks, ice, or anything other than your equipment in the cooler!
Unless you're on a larger boat, taking a laptop along on a photography trip in the water isn't the best idea. They are more sensitive to humidity, water damage, and being bumped than cameras. The best idea of all, if possible, is to be able to store all of your images on a single flash card that you don't remove from the camera — thus protecting the camera and the flash card from any possible environmental damage. If you must change cards, keep them in a sealed case or small, watertight containers that also float. And, if you must download images, use an ImageTank or other portable hard drive that you can easily access, begin the download process, and place back into your sealed and protected container.
Also, using a well-made fanny pack allows you to access your equipment quickly and keeps it as dry as possible. You can place lenses and other components in Ziploc bags inside the pack. If possible, use a journalist-style fanny pack — this type of pack zips open from the inside top (in other words, they flap open away from your body so you have access to your equipment while the pack is still attached to you) and some packs even include a rain cover that is concealed in an outside pocket, which can be pulled over the pack.
Tip
Desiccant is moisture-absorbing material, such as the silica gel in little, white sealed envelopes that is often found in packages used to ship new electronic equipment. You can buy this in larger quantities at photographic supply stores; it comes in plastic containers slightly smaller than a cigarette box. You place this inside your equipment and it absorbs moisture very effectively. And, once the desiccant becomes saturated, you can place it in a microwave to dry it out (usually you know when you need to do this because it changes colors).
Few cameras are waterproof However, if you're shooting on and around the water, having a camera that is at least somewhat water-resistant is a good idea. The Canon EOS 1D Mark II, for example, is made for photojournalism and sports photography. Its magnesium alloy body along with many rubber seals and other features that protect its interior parts keep it very protected against the elements. The Mark II, however, is very expensive, and most cameras do not feature these types of protective elements. You can purchase water-resistant cameras, underwater housing systems for almost any camera, and even some actual cameras that are themselves waterproof (Nikon's Nikonos series of cameras has been the standard in underwater photography for many years, for example), but you may generally be limited in features and paying more than for what you need.
One idea is to use some of the products made to protect camera gear from the rain — primarily used by pro photographers shooting outdoors at soccer and football games. Tenba and Kata are two brands of this type of gear (Kata is distributed in the United States by Bogen), as shown in Figures 5-6, 5-7, and 5-8. Extras like those pictured can protect your camera from the spray, but aren't intended to make your camera waterproof or safe for underwater use. Rain covers keep your equipment dry, yet allow your lens to see the action unobstructed.
Tip
If you have a camera or a camera lens that offers image stabilization, boating is a great place to use it. It is a feature that you can turn on and off, and it has become very sophisticated technology. I have it on my Canon 70–200mm 2.8 lens, and I can hear it "whirring" while I shoot as the electronics, motor, and lenses operate in synch to make my images steady — even when shooting as slowly as 1/15 of a second. You don't need as much image stabilization for wider shooting (such as below 70mm); it's much more useful for telephoto shots, which are more susceptible to blur when there is slight movement.
Figure 5-6. Notice that rain covers, such as this one made by Tenba, protect all of your camera from the rain yet leave the lens exposed so you can still take photos.: Courtesy of Tenba
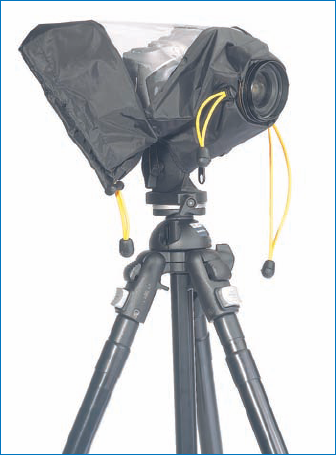
Figure 5-7. Bogen's camera rain covers allow you to insert your hands for direct access to the camera controls, which also keeps your hands dry. Also, you can see the controls through the clear plastic.: Courtesy of Bogen Imaging

Figure 5-8. Camera covers for SLRs require that they accommodate a variety of lens sizes, such as this one made by Bogen that is made to cover a large telephoto lens.: Courtesy of Bogen Imaging
When you shoot action on the water — such as skiers who are jumping or making hard turns — a fast telephoto lens will make your life a lot easier. If you're shooting from land, especially, you'll need some long glass — many pros shoot with 400mm, 600mm, and even longer lenses to really make you feel like you're about to get wet when you see the photo. Much of this type of photography is shot in bright sunlight, so you may want to use a polarizing filter to help balance overexposed areas of sky. Also, a camera capable of multiple exposures will help ensure you get some of the best shots if it can shoot at least three frames per second. Figure 5-9 shows a wakeboarder jumping a boat wake, stopped in midair. The camera position from the boat makes it look almost as if the photographer is in the water.

Figure 5-9. Stop-action, water-based photography requires lots of shooting and good exposure settings to ensure any number of factors — sun, water reflection, blurry action, to name but a few — don't prevent you from getting the shots.: © Amber Palmer
A monopod, especially if you have a large camera and lenses, will help you steady your shots, make them more consistent, and keep your arm from getting fatigued. If you're shooting with a long lens, you'll most likely have a mount that lets the monopod attach to the lens instead of the camera so that it's located at a better balance point.
Shooting outdoor recreation and competition on or from land means being mobile, protecting your gear, and having enough variety of focal lengths to be able to get whatever shots you need and want to take, whenever and wherever they may present themselves.
Whether for skiing, car racing, or a triathlon, I bring the same setup: a rolling equipment bag for the brunt of my gear that stays in my hotel room, car trunk, or other safe location, in addition to a large photojournalist's fanny pack that lets me carry whatever I need around my shoot. I used to carry a backpack, and certainly some photographers swear by them, but I like to have the immediate access to equipment without having to remove anything from my body (see Will Wissman's description of equipment for shooting skiing, later in the chapter; he carries a backpack).
Tip
If you carry equipment in your car and leave some of it there when you're off doing your shoot, be sure to stow it in your trunk or a covered area. Insurance companies that insure photography equipment often have a "trunk policy" that covers equipment differently if it's stored in a concealed area versus exposed on a car seat or the visible back of an SUV.
While it sounds paradoxical, carry as little equipment as you can get away with and still have everything you need. Paring down too much on your gear will inevitably land you in a situation where you don't have what you need and you'll be too far from your car or home to conveniently retrieve what you need. Of course, if you use a point-and-shoot camera, this isn't an issue!
Including the same packs of desiccant as described for water-based photography is also useful on land, especially if you're in areas of high humidity, rain, or snow. They're small and fit neatly into any type of pack. If you're carrying a point-and-shoot camera, look for smaller packs of desiccant from photo stores or online.
You should always carry a bulb-blower and a brush to be able to clean dust from your lenses and/or your image sensor, should it become necessary. However, be careful where you perform any equipment maintenance and make sure you're in a dry, reasonably dust-free area so that you don't make your problem worse!
Warning
Be extremely careful when you're working around an exposed digital image sensor. Never touch it with your fingers or anything else that isn't specifically designed for cleaning it (image sensor cleaning kits are available from camera stores).
Tip
Bring yourself a folding three-legged stool if you're sitting on a pier or dry land. You'll be more comfortable and shooting for long periods will be far less tiring.
Outdoor recreation and competition can take place in a wide variety of conditions, and where you position yourself to shoot varies tremendously. You may be limited to a small space, or you may have an entire lake or ski slope open to your creativity. The next several sections look at some of the major types of sports you're likely to encounter and explore how shooting can differ in terms of location, settings, and getting the shots.
Powerboats have the advantage of speed and maneuverability — you can get where you need to be quickly and without having to change course because of the wind or other environmental factors. Also, powerboats are more stable and flat, allowing you to stabilize yourself relatively easily (but you should always be prepared for that sudden wave or wake). Sailboating, conversely, is one of the most challenging of outdoor sports to shoot — whether you're on land or on a boat. The first thing to consider is the type of boating you're after: racing or cruising? Fishing? Fresh water or offshore? A regatta of Sunfish or big boats?
For big offshore racing, many pro photographers hire fast offshore boats or even use helicopters to capture the action. However, most readers of this book are unlikely to resort to these types of options. While on assignment in Athens, I met a Swiss photographer who shoots all types of sailboat racing, including the races at the Olympic Games.
To get the best shots, he took a boat about the size of a ski boat or a day cruiser into the Mediterranean Sea. He put his cameras and equipment into coolers, which protected them from the elements — meaning not only water, but also the heat (some days it exceeded 108 degrees). He could follow the racing from a distance that wouldn't disturb the boats but that got him close enough to get good shots with telephoto lenses. And he brought lots of backup equipment, flash cards with big capacities (2GB minimum), and made use of the Olympic Canon and Nikon support staff extensively (usually to clean up equipment and avoid salt-water damage).
Note
If you are wondering where the support staff came from, they are usually located in the media centers at the various professional sporting events, in this case the Olympic facilities.
If you're on a sailboat, shooting can be tricky and treacherous. Because sailboats heel (lean), you're not working on a level surface. Water can come flying over the deck if it's at all windy or the boat is sailing against the wind on a beat, and equipment can rapidly get in your way — or even swing across the boat and hit you. So finding a good position to shoot the boat you're on or another boat is something you'll want to think through very carefully.
On a powerboat, depending on the size, you have quite a few options. On a larger boat, you may be able to get up onto a flying bridge so you get a crow's-nest perspective of the boat and the surrounding waters On smaller boats, you'll want to get as far forward as possible, especially if the boat is moving quickly, because you'll be away from the spray a bit more and you can position or even anchor yourself against the seats.
If it's not too windy and you're careful, you may be able to shoot from the foredeck. This can give you a good perspective of the entire boat from the very front. If there's any notable wind (which most sailors like), you'll probably want to be in the boat's cockpit, where you can quickly cover your equipment or hand it to someone below (in a larger boat). Figure 5-10 shows a medium-sized sailboat. In calm water, getting a shot is easy. When the weather gets rough, then so does the water as well as the shooting!
Note
For a discussion of how to protect your equipment on water, see the section "Considerations on the water" in the "Equipment" section at the beginning of this chapter.
Positioning yourself at a vantage point where you have good visual access to another boat is very difficult. If you're not ready to shoot, the moment will pass quickly and you will lose that great perspective; getting to another good spot may take time and effort. You'll want to make sure you stabilize yourself as much as possible and stay out of the way of the boom or other equipment that could potentially get in your way.
Really, the best way to shoot sailing — or any type of boating, for that matter — is from a powerboat (unless you have a helicopter handy) so that you can get to virtually any vantage point quickly and with relative stability.
Note
Shooting sailboats and powerboats from land is not a common pastime. Often these boaters get too far out too quickly to get any really good shots.

Boating photography can take on a variety of conditions for lighting, action, and exposures, and these can make for lots of opportunities for incredible shots, but it can also be challenging to do things right. Water is very reflective, and often you're shooting from a moving vehicle plunging and bouncing in three dimensions — which means you have to adapt your shooting, equipment, and settings accordingly to get the best shots.
Very often the best photography takes place early in the morning or late in the afternoon, when the sun is at an extreme angle and casts shadows that lend themselves wonderfully to dramatic shots. However, given the time of day for much of boating, this may be a luxury you'll not have.
For much of boating, you'll be shooting in bright light, even if it's not sunny. If you're shooting high-speed boats, such as hydroplane racing boats or even ski boats, you'll need to shoot at a minimum shutter speed of 1/500 of a second. If you're trying to get something dramatic and quite close up — such as a long telephoto shot of the bow of a sailboat as it dips into an oncoming wave — you will want to use narrow depth of field, such as f /3.5 or f /2.8. If you set your camera to one of these f-stops and use aperture priority mode, then the camera will automatically determine the shutter speed. If you use manual mode, set the camera to a wide f-stop such as f/2.8 and your shutter speed relatively high (depending on brightness) for some great stop-action water splashing away from the hull.
If you need clarity for an entire set of boats, then you will want to use a higher f-stop so that you don't have limited depth of field (focus); this means that your shutter speed will have to be slower. This will work for sailboats, in particular, where speed isn't as big of an issue.
Night shots on the water can be beautiful, and the twinkling lights from boats make them even better. However, a long nighttime exposure taken from a moving boat isn't an ideal combination. Instead, you'll need to take shots such as this from a pier or other stationary site. A long exposure also requires the use of a tripod and a timed shutter release (set to go off a few seconds after you press the shutter) or a plunger, if your camera supports it, to make the shot steady.
Tip
For a fun effect with water — in daylight or nightlight, but it's especially dramatic at night — use a star filter. This takes each point of bright light and turns it into four-, six-, or eight-point stars (depending on the type of filter you purchase). Used with detachable lenses on SLR cameras (not point-and-shoots), they screw onto your camera lens. Don't forget to take the star filter off when you finish with it!
Shooting fast-moving, in-the-water sports is lots of fun. But how can you take these shots without getting drenched?
Jet skiing is included with water skiing and wakeboarding in this section because, from the standpoint of photography, it requires much of the same approach — meaning you won't be able to be on a jet ski to take photos unless you're using a waterproof camera. You'll have to be on a boat or on land to get shots of any of these water sports.
If you're at a ski race, you'll probably have access to the shoreline or a pier where it's close enough to see the action. Otherwise, being in a powerboat (either the tow boat or a boat following your subject) is essential.
As with boating photography, when shooting water skiing, wakeboarding, or jet skiing from a boat many of the same rules apply:
Keep your equipment dry.
Don't change flash cards unless you have a dry place to do it.
Keep equipment safe from jostling.
However, these types of sports are most-often best represented by getting as close to the action as possible, meaning you'll want to shoot most of it with a telephoto lens or on the telephoto position/setting in a fixed-lens (a point-and-shoot) camera.
Get yourself situated where you have as clear a view as possible of the person you're shooting. Many ski boats have equipment at the rear of the boat, as well as a rope for the skier. Try to get to the side of the boat and shoot at an angle so the rope and other things don't get in the way.
For skiing and jet skis, wait until the skier is at an extreme angle off to the side of the boat, or when he or she is just coming through the wake; this will provide a dramatic perspective. A shot of the skier being pulled by the boat isn't very compelling. If the skier is doing a water start, try getting shots of him or her just coming up out of the water.
For wakeboarders, tricks are what the sport's all about, and the better you can make the boarder look, the better your photography skills will appear. If you're on the boat, get as low as you can and shoot high — much like shooting a skateboarder or snowboarder. Figure 5-11 emphasizes the effect of shooting from low to high with an exposure set nicely for the athlete's face.
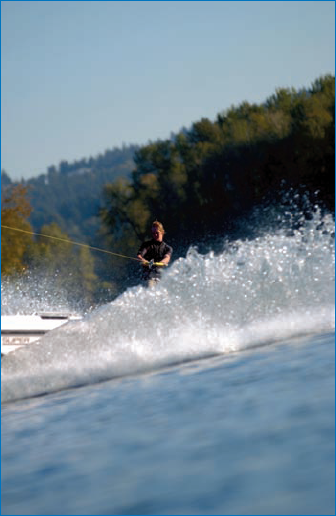
Figure 5-11. This shot, taken from the tow boat, is well balanced for the entire shot in terms of color, tonality, and composition.: © Amber Palmer
Skiers who are slaloming and jet skiers like to make hard turns to put up a big wake. You can get one of the best shots for this move if you are positioned with the sun behind the skier and get a silhouette of him or her with the light shining through the spray. This kind of shot is best taken early in the morning when the water is glassy-smooth and the sun is at a dramatic angle.
Tip
If you're shooting a skier or wakeboarder on a rope, guess what? As long as you're close to the point of where the rope is attached to the boat, you're at a fixed distance — meaning your focus doesn't have to change! You can set your focus manually or automatically, and then turn it off so it's in full manual mode There's no reason to keep focusing or have the camera do it for you.
You'll have different strategies for getting good shots depending on whether you are on land or on the water when you take your best shots. For the most part, this, more than the lighting conditions, will determine how you shoot, because seldom will you be photographing skiers, wakeboarders, or jet skiers in anything except bright daylight.
If you're sitting on land watching boarders, skiers, or jet skiers, use a long lens or at the very least your longest telephoto setting, and you'll want to keep your camera as steady as possible. Use a monopod and image stabilization, if your camera supports this feature. Find a comfortable spot on an embankment, if possible, or a bleacher, and lead the skier or wakeboarder as he or she comes to your best spot for your shot. Leading means to track the skier laterally and anticipate when they'll hit the spot where you want to get the photo. Here's how to get the shots as a landlubber:
Watch your subjects come by a few times and get a sense of the timing, speed, and action. Determine a point in their path at which want to take your shots.
Get your settings correct — preferably on manual for everything — based on the skier's face and skin tone by shooting someone on land to get the best exposure.
Try bracketing your shots, which is a feature many cameras offer. This automatically lets you shoot one or more f-stops above and below your setting, as well as your specific setting. This way, you get three shots in one but with different settings so you can choose the best one.
Try to use as even a horizontal plane as possible for tracking the athlete.
Don't worry about the skier or boarder being out of focus when beyond where you want to shoot him or her. You're only concerned with shooting him or her at your predetermined point.
Depending on your camera's burst rate and shutter lag, you'll need to start shooting multiple exposures before the athlete hits your point — unless your camera will choke as a result because it hits the extent of its image buffer. It's important to realize you will have some throwaway shots no matter what you do and how good your camera is.
If you have a point-and-shoot, make sure the flash is off as well as any other automatic settings that can slow the camera down. If the camera suffers from significant shutter lag, you'll want to try and figure out how much time it takes from when you depress the shutter to when you want the shot to fire, and lead the shot accordingly.
If you're in the boat, get yourself as steady a position as you can and give the driver some direction as to how you want to set up the shot. Unless it's a competition, communicate ahead of time with the skier so that he or she knows what types of shots you're trying to get; you may want them to emphasize tricks and jumps on one side rather than the other, if possible.
This is a situation where you'll want your camera operating as fast as possible. Whether you're using a point-and-shoot or an SLR, put your camera on the most manual settings available. If the day is sunny, shoot at ISO 100; if it's cloudy, ISO 200 will probably work well. Set your white balance for daylight — if possible, turn off your automatic white balance because it, too, can potentially slow down the camera.
Note
Remember, in any type of bright light, your LCD will not give you a very good indication of how your lighting and exposure settings are working, so learn to work without it.
Automatic camera settings — especially the ones that are general and don't allow you to control specific aspects (such as the ISO or when using shutter or aperture priority) — are taking an average reading of what is "seen" through the lens. The problem with using this while boating is that there is a wide range of exposures. Especially in a moving boat, it's anyone's guess as to what the camera will see more of when it takes a reading of the scene — it might be a bright, dark, or in-between area, or an average of all. This limits your chance of getting a good photo.
When you add to that the fact that the camera, on an automatic setting of any kind, has to "think," it is slowed down. If you're shooting multiple-frame exposures, or even if you're just taking a single shot, no doubt it will take place more slowly in automatic mode than on manual. When shooting water sports, manual settings are the key to getting the best shots. However, they take some practice and effort to get to know various conditions, your camera, and the sport well enough to increase your percentage of good photos.
Racetracks are a veritable candy store of photo ops, and racers almost always love having their cars or bikes shot. While getting a pit pass to a large event like the Indy 500 is tough, many places have local tracks where you can either get into the pits or get close enough in the stands to get good shots.
Racing allows you to use a wide range of settings and lenses. You can practice shooting high-speed, multiple-frame exposures, or you can take your time to set up detailed, wide-angle shots of a car or bike before or after the race. Furthermore, you're likely to be able to find a place to stage your shoot — perhaps near your car, if you're at a motocross track — so you can bring a bit more equipment with you. If you have a long lens, this is the place to try it out!
One thing that's important to remember in all types of sports shooting, but in racing especially, is that you need to be aware of your surroundings Are you in the way of oncoming racers? Are you obstructing the view of any officials or spectators? What's just happened, happening, or about to happen? These are important elements of racing because things happen fast, and on a busy track — in particular, if you're in the pits or close to the action — not only can you get in the way, but you can be seriously hurt or killed.
Motocross riders especially like shots where they're catching "big air," or at least look like they are doing so. If you can position yourself ahead of and below a jump, you will be in just the right spot to catch the biker as he or she comes up and off the jump. Furthermore, if you're using a point-and-shoot camera, in this type of racing you can work with the shutter lag and burst rate to time things accordingly (which may mean pressing the shutter as you hear or see the biker going up the hill before the jump happens).
Figure 5-12 is a photo taken at Pacific Raceways near Seattle, where I positioned myself as described: ahead of and below the motocross racer. His actual height for this shot was about 10 feet off the ground, but it looks much higher, especially with the trees behind him!

Figure 5-12. A motocross rider catches air — plus a little, with the help of a good camera position. Another good vantage point, which works for both bikers and cars, is at a curve. Not only are the racers at a dramatic angle and in a potentially tight spot with other racers, they are moving more slowly — meaning you have a better chance of getting a good, tight shot.
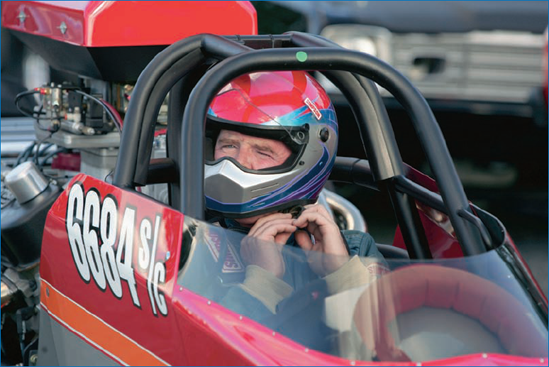
For drag racing, obviously there are no curves, but there are a couple of good points where you can get some interesting angles. Try placing yourself about 10 to 20 feet ahead of the start line (obviously, off to the side a bit); this allows you to see the racers' faces, their equipment, and to get a nice, angled perspective of both vehicles and riders/drivers. Figure 5-13 shows the face of a drag racer preparing for the race; this personal approach makes for nice personalization in a photo that's otherwise impersonal. Another good location to try is from the side or even behind the car or bike. You won't necessarily see the driver, especially in drag racing because there is a lot of smoke as the rear tires spin, but getting a shot of the car buried in the smoke can look great. Finally, if you get a shot of the racers just when they get the green light, you can frequently catch them popping a wheelie. While they don't do this intentionally during the race because it slows them down, it looks cool if you can get a shot of it.
When shooting car or bike racing, especially if you're a motor-sports enthusiast, it's easy to forget how important and nice it is to get shots of people. Fans, close-ups of racers' faces, officials, and others make for great color. And, if you're working to sell photos, remember that racers will want as many photos of themselves in the winner's circle getting their trophy as they do in their car or on their bike.
For car racing, you can make good use of almost any type of camera — from high-speed SLR to point-and-shoot. Of course, a high-speed camera with a fast lens will help if you're trying to get tight shots of fast action. Carrying a fanny pack with lenses you can quickly change to get different effects is a good idea; also, you tend to walk around racetracks a lot, so having your equipment with you is helpful if you get away from your things.
You will, however, need to protect your gear because racetracks can have everything from mud to dust to other airborne particles that can get into your equipment. Make sure you are careful when you change lenses, batteries, or flash cards — any time you open part of your camera, you risk getting dirt inside it; this counts in spades for changing lenses because this provides direct access for dirt to get onto your sensor. Make sure you bring a bulb-blower and brush to clean your equipment if you do get it dirty, and make sure you do it in a dry, relatively clean place. If you have access to your car, this is a good place to clean equipment because you can close the door and seal yourself away from the outside environment.
Using a telephoto lens is essential for NASCAR, Formula-style, or rally racing because you simply will not be able to get close to moving vehicles, nor do you really want to. A minimal focal length of 200mm, and preferably longer, will allow you to get "close" to the racers. While a wider establishment shot of the track and cars is good to have, you'll want most of your shots to be tighter and closer in. If you can get in the stands above a pit when a car is in to be serviced during a race, you can get some good shots with a medium- or wide-angle setting. If you have a fisheye lens (less than 17mm) you can get some cool images of the pits that really show everything going on in a dramatic way.
Tip
Use a high-capacity flash card so you can take large images that can be enlarged, and so that you have enough space on the card to take lots of shots without having to reload. Also, because you'll probably be shooting on multiple-frame exposures, which will give you more photos, a bigger card is a must.
Unless you're shooting a motor sport that takes place in the mud — such as motocross — you'll be shooting in bright daylight or at night under bright, stadium-type lighting.
On very bright days, you will not be able to see your LCD, but hopefully you can get to a dark spot indoors to look at shots you've taken to see what's working, and then return to take more. The idea of having a cheat-sheet card with your optimal settings is a good idea until you know the best settings for you camera and conditions well enough to deal with any changing lighting situations.
Note
See the sidebar earlier in the chapter for more about creating a useful cheat sheet.
Tip
When shooting tighter shots, presumably on a racer, or any athlete for that matter, you need to either slow down your shutter speed, open your aperture (f-stop), or both. There will be less light coming into the camera, and the shot will be underexposed without changing your settings.
For high-speed racing, you almost can't have your camera and lens shooting fast enough — at the fastest your shutter can go, if possible. If it's bright and sunlit, try putting your camera on shutter-speed priority at the highest setting.
Most cameras — including point-and-shoots — have the option of partial manual operation in shutter priority or aperture priority.
This setting allows you to set your shutter speed but will not give you access to your aperture settings. This is because the aperture settings are automatically set by the camera according to the light. The shutter speed you specify remains constant. This way you can be sure to have stop-action shots of the racing.
Set your shutter speed to as fast a setting as possible, assuming there's plenty of bright light. If not, adjust your ISO to a higher degree of sensitivity such as ISO 400 or more.
Once you've taken a series of shots in shutter-speed priority, you can analyze which ones worked and which didn't. By examining the metadata for the shots you like, you can determine what settings to use next time — but this time, in fully manual mode to speed your camera even more. In Figure 5-14, the S-curve composition makes for an interesting shot.
For motocross jumpers, pick a specific point where the bikes are likely to be at the apex of the jump or other critical moment. Watch a few jumps and get a sense of the best angles and the best moments, and how you might match that with your camera. Then position yourself as best as possible to get the most dramatic shots; it might be just as the jumper comes off the jump with dirt flying behind him or her in midair, or just as the bike hits the ground. Use a manual setting, preferably with narrow depth of field — especially if there is something behind the racer, such as part of the track, fans in the stands, or anything else — because you'll want the bike and racer to be in focus but all else to be blurred as you pan and lead the image and the shot.
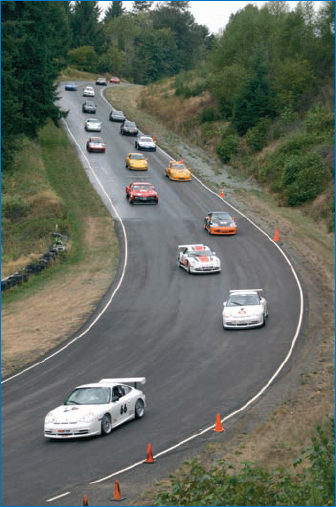
Figure 5-14. Perspective is important for car racing, whether it's a close-up or a rally shot such as this one.: © Amy Alden Timacheff
To get a narrow depth-of-field shot, you can use aperture priority mode or full manual with your f-stop set as wide as possible (this is the smallest number; for example, f/2 8 is much wider than f/16). Of course, you'll need to set your shutter speed faster to accommodate the additional light coming in, but this will give you better stop-action shots. Essentially, using a shutter-speed priority setting at high speed often results in a narrow depth-of-field shot, but there is no guarantee, in this semiautomatic setting, that the camera will always shoot the widest possible aperture. If it's narrow depth of field you're after, it's best to make sure you set it yourself.
To get the best shots of drag racers, watch the series of lights that signal when the dragsters are to go. In drag racing, the lights are vertical, beginning at the top with several red lights that go off, in succession, before hitting a final green light at the bottom. You can use these lights to your advantage: If you have a camera that has some shutter lag, and you've tried shooting drag racers and most often get either a blur or a shot of the empty spot where the racers were when you pressed the shutter release, watch the series of lights. Take a test shot when you see the first light go on Then you can look at your photo in the LCD and see which light is illuminated in your photo — which tells you exactly how long your shutter lag is taking. If it's three lights, then you simply need to press the shutter three lights before green and, voila!, you'll be able to get the racers right as they hit the accelerator.
Racing at night can be dramatic — especially drag racing, where flames shoot out of the cars and motorcycles as they accelerate off the line. The light will change at an event such as this, often because the bright stadium lights are dimmed to emphasize the dragsters flames — meaning you'll have to be quick-on-the-draw with your settings. Try various exposures to find what works best with this type of light; even a point-and-shoot camera can give good shots if you set it so that it's exposed for an illuminated vehicle. Often the strip will be relatively dark to allow emphasis on the flames, which you can use to your advantage. Set your manual exposure so that something brightly lit is exposed correctly; this is the setting you'll use for the cars when they hit the accelerator. You don't want your camera shooting too long an exposure — you almost want the flames to act as your flash, lighting up the vehicle for dramatic shadows and color. If your camera is capable of spot metering, meaning you can determine and shoot the exposure for a given portion of the image you're shooting, this is a good time to try it out.
Tip
For any type of racing other than a car or bike that's parked and standing still, use the multiple frame exposure setting on your camera. You'll inevitably need the multiple frames to be sure you get the best shots out of a series, and you can also use the images to create a montage or image series with the car or bike moving around a corner or going over a jump.
Cycling is as varied as motor sports: There's road racing, BMX riding, trick riding, dirt track biking, and simple pleasure riding. Chances are, you'll be shooting some type of racing of your child or other personal friend. While there are professionals who shoot bike races or bike racing as part of triathlons, either as sports photojournalists or to present and sell photos to the racers, that type of photography is not addressed specifically in this book. But you can learn something from how they shoot and apply it to everyday photography with almost any type of camera.
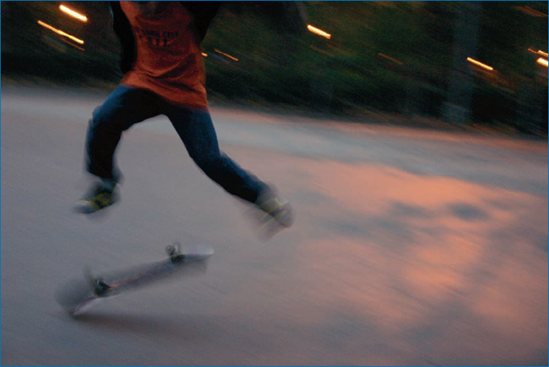
Stop-action photography is always a good effect to strive for in cycling, boarding, and blading, whether it's a pack of racers coming around a street corner or a BMXer or skateboarder in midair. Many principles examined in boating and car racing also apply here: shooting narrow depth of field can be dramatic, having a telephoto capability will help, and finding the right position and testing it out will help you get better shots. Also, as with the others, you may very well find yourself in bright light and unable to see your LCD very well, meaning you'll want to have a good grasp of correct settings for your camera without relying on looking at the shots as they're taken. Figures 5-15 and 5-16 show skateboarding and rollerblading shots taken with multiple-frame exposures using an SLR-type camera, meaning the camera was set to take a quick succession of several high-speed shots.
If you're shooting a cycling road race, you may only have one shot at the pack as it passes. If you've ever seen television coverage of the Tour de France, you know the cyclists pass the crowd very quickly. To shoot this event or any other road race you'll need to have your settings dead-on ahead of time and be positioned at a good vantage point where someone won't jump in your way at the last second. Getting to another good spot in a racecourse might be difficult. Because road races go on for miles and miles, unless you need a specific spot because of the background or unless you're shooting the finish line, you'll want to find an unobstructed location, perhaps out in the country where you can get a clear view. For dramatic effect, use a zoom lens at maximum telephoto length to get some very tight shots that compress the pack, making it look like the riders are closer to each other than they really are.
For BMX racing, you'll be on at least the sidelines of a track; if possible, try to get out into the track itself and position yourself to the side of key points. Don't just shoot for the biggest jump; see what kind of angles you can get in as many locations as possible around the entire course. Shoot from down low to up high for drama, as with motocross racing. Use a telephoto lens to get the racers' faces at the start; later, perhaps even at the very end of the race, getting a rider's face covered in mud from racing is always colorful.
Sometimes race officials have a birds-eye view from a stand. If you can get into the stand with them, and you have a variety of lenses or a point-and-shoot with a relatively wide range of focal lengths, you can capture good action because this is the broadest view of the track.
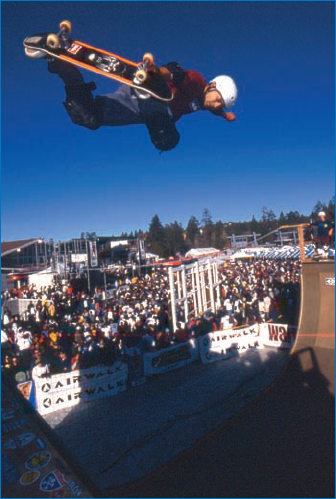
Figure 5-15. Outdoor action shots with an athlete soaring in the air can be challenging with a large range of lighting and background conditions such as shadow, sunlight, sky, and crowds.: © David Esquire
Trick cyclists and skateboarders ride in skate parks, half-pipes, and almost any urban form of construction imaginable. I was fortunate one time to shoot legendary cyclist Dave Mirra as he rode in a half-pipe along with legendary skateboarder Tony Hawk in a demonstration event. I was shooting from just where the bottom of the curve in the half-pipe almost flattened out, right alongside the edge of it, so that as Mirra passed over Hawk (literally) in midair, I got a shot of them together at maximum height.
While shooting, at one point, Tony Hawk fell on his skateboard just as I was about to snap a series of shots of Mirra; Hawk's skateboard flew up and hit me in the arm hard enough to leave a nasty bruise. Even though I was protected by a net on the side of the half-pipe, I was close enough to get hit — which is once again why I caution against getting too close to action sports and to always stay aware of your surroundings no matter where you are — even with a skateboarder!
The shooting was tough, because Mirra and Hawk were moving so quickly. There were bright lights shining on the half-pipe, and catching them in one position was almost as much luck as it was skill. Before they began, it was important to make sure settings were correct for their faces and outfits, and the camera was on full manual mode. It can be a challenge to capture the best tricks when your subjects are moving fast, but Figure 5-17 got it just right. It shows a rollerblader performing a seemingly impossible move taken at night using a flash — which is unusual for this sport, and generally not advisable in case it can momentarily blind the athlete.

Figure 5-17. The flash not only creates a stop-action image, but the contrast of the illuminated skater against the dark background increases the drama and "cool factor" of the shot.: © David Esquire
Tip
Children like having photos of themselves on their bikes and skateboards — especially if it makes them look cool. To enhance them even more, stylize the image with an interesting effect or text with their name on it.
Note
See Chapter 10 for details on how to add effects to your images.
Interview with Laura Little
Laura Little is a widely published British photographer based in New York who likes to "create work that is dedicated to flashing a little bling into a scene that is very blah." Here's what she says on shooting skateboarding:
Shooting skateboarding is one of those things where as a photographer you don't so much choose the location, the subject does. New York, where all of the images featured were taken, is truly a landscape that lends itself specifically to the sport.
Settings: Natural light is always a preference for my photography, and I consider my work to be as much about documentation, which has more of a grounding in natural light than commercial sport.
Getting the Shots: In my opinion, there are two kinds of photography associated with skateboarding. One is based upon capturing "tricks" and the technicality of skateboarding, and another that is based upon the lifestyle, image, and documentation of the skateboarder.
Tips & Tricks: Skateboarders are like dancers: They move through space and integrate with one another seamlessly. Concrete is their stage. Capture not only the action-filled moments, but the moments of falling, recuperation, and personal style. If you're shooting sports tricks, learn what they are, think about perspective and the qualities that will make the trick a good technical photograph. Most importantly, remember that your work is about you; make the images recognizable to you and your perspective on the sport. Develop a style that is specific to you, and don't listen to too many people.
Laura Little is managed by AmpGlobal.
© Laura Little
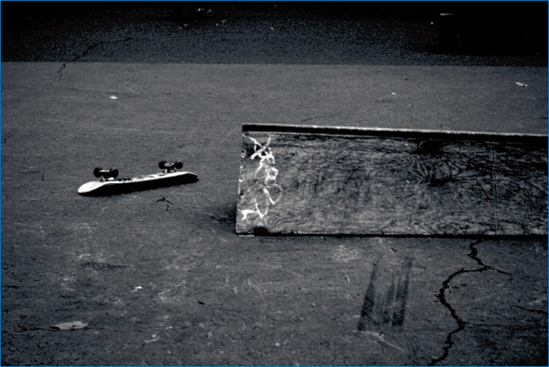
Artistic photography sometimes is enhanced by the use of "negative" space — implying or emphasizing a subject by an empty area. This image takes it one step further — the lack of the skateboarder and the board lying on the ground leads you to question where the athlete has gone or what has happened.
© Laura Little
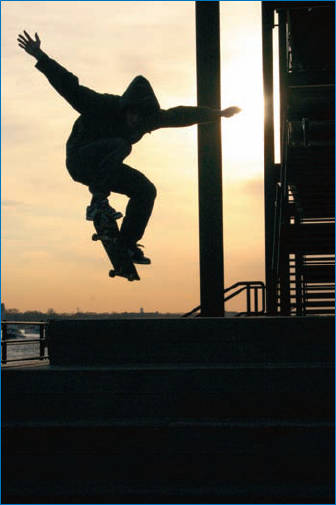
Silhouetted action shots such as this one provide great contrast between light and dark, as well as curves against geometric angles.
When shooting in skate parks or half-pipes, whether for biking, skateboarding, or rollerblading, it's vitally important to stay clear of the area where athletes are practicing; not only can you get injured, so can they. Further, these are sports practiced by kids, and kids like to show off for a camera so the potential for them trying to do something more than what they are capable of doing is quite good — thus increasing their chances of getting injured.
In skate parks, it's going to be difficult to get a low-to-high perspective because you're most often shooting from the edge and the skaters and bikers dip down into the park. However, if you can angle yourself so that you catch them going into the air, that's a good spot to try.
© Laura Little
This motion shot says a lot about a sport where movement, light, and a rough toneare embedded features of the action.
Biking is another good sport with which you can experiment with lots of lenses and settings and be as creative as you like. If you shoot racing, then you need a telephoto lens and a camera capable of shooting multiple frames per second in order to get top-notch images.
It's fun using an extremely wide-angle lens to get shots in skate parks. If you catch a biker doing a trick or jumping into the air at the center of the shot with a broad perspective of the park surrounding him or her, the effect is great, as illustrated in Figures 5-18 and 5-19.

Figure 5-18. A wide-angle rollerblading shot in a big half-pipe. The late-day light creates a nice effect with the sun at a horizontal angle on the rollerblader's face, and the wide-angle perspective emphasizes the drama of the venue.: © David Esquire
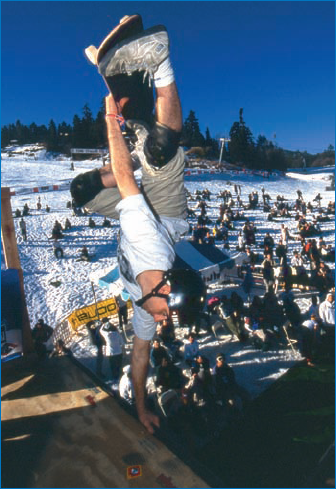
Figure 5-19. This high-contrast shot of a rider in a half-pipe at a snow park emphasizes the relationship between skateboarding and snowboarding.: © David Esquire
As you do with other outdoor sports, carry most of your equipment with you in a fanny pack or a backpack. Safely stowing it somewhere or with someone while you shoot, but maintaining quick access to it, will help you be more agile in getting around and to the right place for a good vantage point.
Cycling and boarding aren't easy sports to shoot You have a moving target — often moving quite quickly — so focusing and lighting can be challenging to master. Relying on automatic camera settings is chancy; I suggest that you do as much photography of cycling as you possibly can in a manual mode (as you may have noticed, I encourage this in many sports, for all types of cameras).
However, even when you have a perfectly focused shot and the rider is exposed equally well, you may have a badly overexposed background. Or you may have something in the background that you didn't want, like the port-a-potty that inadvertently appeared in one of my BMX shots Whatever it is, when you're shooting moving sports, be cognizant of the entire scene, not just your subject — which is why I went into some detail in the previous sections; positioning is essential.
As a photographer, integrate with the environment in which you're shooting, but at the same time, remain aloof from it in order to have a broad enough perspective to get more than just a pinpoint view of the event. This is also the foundation for creative shooting, as well — think out of the box in order to innovate how a subject can be photographed to make them look their very best and most interesting.
You'll most often be using stop-action settings for these sports, but as you've seen in some of the images from various photographers, it's nice if you can integrate a sense of motion into the images as well. This means that it's not essential for each and every shot you take to have your camera set with a fast shutter speed and wide aperture. Sometimes you may want to slow it down a bit to get some intentional blur; this may be very easy if you're using a point-and-shoot.
Sports like skateboarding, snowboarding, and rollerblading are edgy — activities that can be made to look extra cool with some special camera effects and settings. While some sports are most often shot with conventional high-speed settings, with these you can be more artistic.
Narrow depth-of-field shots have been discussed, and these shots work well for cyclists shot from a distance. If you're shooting an SLR, using a very fast, fixed 50mm lens (for example, with an f-stop of 1 4) can yield great images but you have to be close enough to the subject to get the shot. Figure 5-20 shows how highly effective a narrow depth of field can be in creating a dramatic action shot of groups of athletes vying for the lead.
As I've mentioned, a shot with a long telephoto lens of a pack of racing cyclists makes them look highly clustered. To do this, shoot at least at 150mm focal length with as wide an aperture as you can and fast shutter speed. Get ahead of the racers and plan on shooting at a specific point where you can manually focus before they get there; obviously, this is much easier in a velodrome where they keeping coming around again and again rather than on city streets where they may pass you once. Take a few readings on sideline spectators to get the best exposure possible and be sure that your camera is set accordingly. Cyclists and boarders tend to wear very loud and reflective designs and their environments can be equally loud, so you really can't expect to have a perfect exposure for each article of clothing; it's better to focus on getting their faces exposed correctly. Figure 5-21 shows a busy environment where the subject and action are equally well exposed.
The settings you'll want to use for a tight close-up using a telephoto lens will be to have your aperture set as wide as possible (remember, on some zoom lenses that means it will be variable depending on your focal length) and a shutter speed set as fast as possible. From there, you can adjust your ISO to be able to expose the image correctly for the available light.

If you've tried shooting in the snow, you've probably found that it's not that easy. Not only is snow bright and reflective, it wreaks havoc on your white balance. Opening a skiing magazine and seeing all the fabulous shots of snowboarders and skiers in various states of action, you'd think it was as simple as pointing and shooting. It's not!
That said, it is absolutely thrilling to be out in the snow, camera in hand, ready to shoot. I've taken a camera with me helicopter skiing in British Columbia, downhill skiing in the Atlas Mountains of Morocco, and cross-country trekking in −42-degree Finnish Lapland 100 miles north of the Arctic Circle. Each location brought with it challenges but, at the same time, some of the most beautiful scenes I've ever viewed through a camera lens. From the aurora borealis to action on the slopes, my camera captured it all. For each, I had to prepare and make sure that not only would my equipment be protected from the elements, but that it would perform correctly in severe weather and temperature conditions.
Depending on the types of snow sports you're shooting, your positioning will vary. Here are a few ideas to get you started:
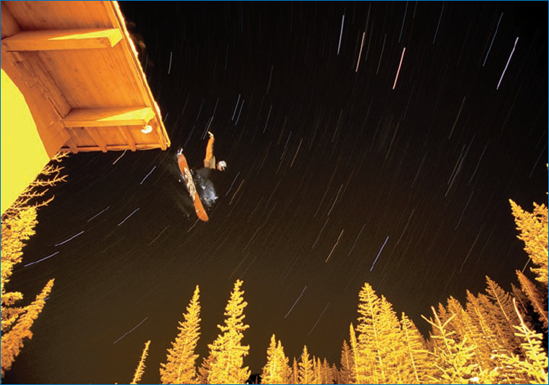
Half-pipes and snowboarding. Like wakeboarding, BMX bikes, and skateboards, snowboarding is about getting lots of air and aerial acrobatics. However, unlike some of these sports, you're going to find yourself hard-pressed to get down into the average half-pipe unless you've got a press pass at a big competitive event. Instead, you'll have to settle for the top of the edge and get close enough to the athletes that you can catch them catching air but don't get in the way. If you can catch them as they turn in the air — a 24-70mm or 70-200mm lens works fine — you'll be doing your job well. With the telephoto lens, you can also catch boarders as they drop in across the pipe. The higher you can get snowboarders, the more they like it, as shown in Figure 5-22.
Downhill skiing. Your positioning will be dictated by whether you're shooting racing, extreme, or basic recreational skiing. For extreme backcountry skiing, see Will Wissman's interview later in this section. For downhill skiing, park yourself in any of three locations: the beginning of the run when the skiers are just coming out of the gate; about midway down the slope, just ahead of a major turn at about a 45-degree angle to the path of the skiers where they come around a gate; or at the bottom of the hill as they're racing for the finish line. Depending on how close you are, a 24–70mm or 70–200mm lens will work for SLR shooting.
Cross-country skiing. Here you can combine some wonderful nature shooting along with a sport. If you can get above a cross-country ski track where you have a sweeping view of the trail surrounded by the trees, snow, and terrain, a panoramic or simple wide-angle view that dwarfs a lone skier is a wonderful scene; if you can get it in late afternoon or early morning, all the better. Cross-country skiers look more elegant when skating or striding across snow more so than when making downhill turns, so it's better to work with them on flatter slopes than you would with a downhiller.
Snowmobiling. Snowmobiles have the advantage of speed, of course, over man- or gravity-powered snow travel. Speed, then, is something to emphasize. See if you can get ahead and to the side of a snowmobile powering through deep snow or speeding down a track surrounded by deeper snow, and track the snowmobile so that it's focused but the rest of the scene is blurred. Figure 5-23 shows a snowmobile plowing through deep snow in a complex shot involving show, rider, snowmobile, water, and sky — very challenging to balance well.


Snow, as I've mentioned, is difficult to shoot because it's so reflective and it's just so white... Getting your white balance set correctly is essential to getting shots where the image is something other than gray.
White Balance: The Key to Snow Shooting
Why is white balance the key? A digital camera's white balance should, more precisely, be called a gray balance. Essentially, to ensure balanced and correct colors and tonal settings, a camera looks at the world by averaging everything that's lighted in its field of view. For most situations, that averages out to about 18 percent gray — the average of all color you see. White balance, then, measures the amount of light cast upon an 18 percent gray world.
If you shoot snow, the camera thinks that it's seeing something that's whiter than it actually is — it doesn't compute for an 18 percent gray world, so the camera automatically makes it more gray. If you keep your camera on an auto-white balance for snow, chances are the snow will look gray in the photos as shown in this figure.

© Dave Taylor
To overcome gray snow, set your white balance manually, and adjust it for a brighter, whiter light. If your camera allows custom white-balance settings, you can do so by shooting the snow and then setting it correctly. If your camera does not allow for this, you will need to experiment by setting the camera to various white-balance presets; take multiple photos of the same snow shot with the different settings, review them, and determine which is working the best. You'll want to experiment a little to see how the image comes out, but this is the trick for getting good, white snow shots as shown in this outstanding image of extreme snowshoeing.

© Neal Thatcher
Once you learn to manage your white balance in a nearly all-white world, you can move on to other considerations, such as the type of light you're dealing with.
Often you find that it's overcast in snowy and mountainous areas, so shooting with flat light is common for everyday shooting or for events and trips that take place regardless of weather conditions. However, photographers absolutely love flat light because it acts like a giant soft box, which is a studio lighting tool that lets you shine light through a large white translucent material to give an even and shadowless tonality (also called high key lighting).
You will still want to work carefully with your white balance on gray days — everything may appear white (including the sky) to the camera, so you'll want to account for that with a preset white-balance setting of cloudy or actually take some test shots and adjust accordingly.
On cloudy days you often have to adjust your f-stop to a wider setting to allow more light into the camera, especially if you still want a shutter speed that is fast enough to catch action shots. This means your depth of field becomes narrower, so it's important to be especially cognizant of your focus — using auto-focus may be a bit risky. You'd be better off parking yourself at one spot and taking a focal test shot of someone standing about where your skier or snowboarder will pass in order to be sure of your shot.
The reflective and bright nature of snow in sunlight also means that you need to use shutter speeds that are a bit faster and an aperture that's a bit smaller in order to avoid overexposing your scene. Of course, if you're trying to ensure you get all the color in your daughter's red cheeks protruding from her ski suit, then your settings will be a bit more conventional and you don't care too much if the snow detail isn't perfect. However, if you're trying to catch skiers on the slopes or emphasize the size and angles of a half-pipe, your settings need to be a bit tighter to avoid too much overexposure.
Snow often takes on a blue cast, especially in shadowed areas; this can equate to a blue cast as your camera tries to compensate with its white-balance setting. You'll want to change your white-balance settings accordingly (unless the blue tone is what you're trying to achieve). In Figure 5-24, the snow is overexposed to ensure the best possible exposure of the boarder.

Figure 5-24. This bright-light shot shows how, in some cases, you just can't — nor do you want — to have an averaged exposure that is perfect for all parts of the image.: © Neal Thatcher
Shooting in the daytime and bright light with reflective snow also means you'll need a lower ISO — something that's available on all types of cameras, from point-and-shoot to SLR. Some SLRs come with a super-low ISO rating (such as ISO 50), but for most purposes and conditions the ISO 100 setting will suffice very well. Once again, your white balance will be your most important setting to test and perfect.
First, do everything you can to keep your equipment protected and warm — nothing is worse for batteries or LCDs than cold weather. In the Arctic, my batteries had at best 50 percent of their normal life, and often less if the camera was out in the cold for too long. Keep at least one extra battery (or set of batteries, as your camera may require) in a pocket of your clothing close to your body — don't keep them in your pack where they'll get cold.
If possible, keep your camera under your jacket instead of in a fanny pack; but this may not be possible if you're lugging lots of gear. The warmer you keep your camera, the longer its batteries will last and the better it will perform. I found that when shooting in −42-degree cold, the temperature penetrated the camera very quickly so I had to keep tucking it back into my jacket to keep it warm enough that the auto-focus (which is in the lens) would stay operational (the lens is the most exposed part of the camera where the moving parts are closest to the surface). Do whatever you can to prevent snow from blowing into your camera, and most certainly, be exceedingly cautious when changing lenses, flash cards, or batteries. Your camera faces potential hazards any time it's open to the elements.
Interview: Will Wissman
Will Wissman shoots some dramatic outdoor photography, including skiing and snowboarding as well as hang gliding, mountain biking, and other adventuresome pursuits. He provides some great tips and insights into a variety of topics related to shooting snow sports:
Choosing Locations: I always follow the snow. When the snow's good, I don't get much sleep. Plus, a lot of what I shoot is located in avalanche terrain. Knowledge of the mountains I'm in and the snow pack I'm dealing with are crucial factors. Next, I always think about what areas are getting light. The "golden hour" rule makes this more complicated: In the morning, south-facing slopes get the morning glow; by evening, the south faces are draped in shadow and you must work the more westerly slopes. Some days I like to let my athletes decide where to go. They are the ones doing the skiing and if they're comfortable it always shows in the images.
Special Equipment: One of the most critical pieces of equipment is my pack. I must be able to fit all the lenses with two camera bodies and accessories into it, and to be able to access it quickly. On a big day, my pack weighs almost 40 pounds; it needs to be comfortable for all the hiking and yet sturdy enough to ride on my back down a 45-degree couloir. The better your pack, the better your chances of getting some good images. Having fast lenses is the always the best. The way people are skiing these days you really need high shutter speeds to be able to catch the action.
Settings: Most of the time I use manual focus. This is when communication with the athlete/subject is critical. You both have to be on the same page or you won't get the shot! Often I will throw snowballs into the area the skier is going to be skiing to ensure we both are thinking the same thing. I like to set my shutter speed somewhere between 1/640 and 1/1000 of a second to stop the action. I usually shoot in aperture priority mode when the light is relatively predictable, and when shooting into the sun I go to full manual mode.
Getting the Best Shots: I think it comes down to working hard. I spend a lot of the winter hiking large peaks, usually early in the morning. When you're standing at 12,000 feet as the sun peaks over the horizon, it's hard to even decide what to shoot. Everything looks amazing!
© Will Wissman
Mastering light and color in a snow-country setting — stars included (Brian Greggson, snowboarder.)
Another factor is whom you're shooting. The better the talent you shoot, the better your images. It's surprising how when you have a camera, good skiers and boarders flock to you. Spending time at a major resort, camera in hand, you're bound to run into some amazing athletes.
Yet, between weather conditions, snow quality, and light it can be tough to get good images consistently. Shooting in the mountains where it's cold and uncomfortable can be a real challenge, and keeping yourself and your camera warm is a constant battle. I use hand warmers and even have boot heaters. I always have an extra battery pack and find myself carrying it in my underwear half the time. And, of course, being a good skier yourself is always a bonus.
Shoot as much as possible. The more you use your camera, the more familiar you become with what works and what doesn't. Be creative. There are plenty of people out their shooting skiing and snowboarding, and you must find a way to stick out in the crowd. Try new things and see what happens. The great thing about digital is you can see your results instantly and make the proper adjustments.
Being passionate about what you are shooting is the key to success. I fell in love with skiing on my first run and dragging a 40-pound pack around in the snow is a good excuse to not miss a powder day. I enjoy the challenge of putting nature and all its glory together with the hands of man. With all the destruction that we bring to the earth it's nice to create something that shows a harmony and beauty between man and nature.
Will uses Canon cameras with the following lenses: Canon 17-35 2.8 USM, Canon 70-200 2.8 IS USM, Canon 15mm 2.8 fisheye, Canon 1.4 extender, and Canon 2x extender.
Tip
If it's really cold, remember that breathing on your viewfinder or lenses can actually put a frozen layer of condensation on the glass — not a desirable effect. So cover your mouth and nose with a scarf and/or a neoprene mask.
Humidity can cause severe problems for cameras, even in very dry weather conditions — primarily when transferring between a warm and cold environment. When you're going outside or inside, place your camera in a sealed zippered plastic bag until it adapts to the temperature; otherwise, condensation may form inside the camera or the lens(es) that can be difficult to remove and damaging to it. If this happens, leave the lens or equipment in as dry a location as you can; if it doesn't dissipate within a few to 24 hours it may need to be professionally serviced. I've found that protecting it from temperature changes is especially important to do when coming inside to a warm room after being out in the cold. I keep the camera in the zippered plastic bag until I'm completely certain it's warmed to the environment.
Warning
If you're skiing hard, don't keep the camera directly against your sweaty body or clothing! Keep it under your outer jacket, but not deeper in the layers, otherwise your body moisture can become a source of humidity by which the camera can be affected.
Tip
If you leave your camera in the cold for too long and it stops working or seems to slow down dramatically, place it under your jacket for at least 10 to 15 minutes and then check it. Bringing its core temperature up should let it recover without any further trouble.
Outdoor recreation and competition sports can present a vast number of challenges when it comes to digital photography — as well as tremendous opportunities to create fabulous images. Knowing how to adapt to the environment and to be ready for the truly unexpected are the keys to getting the best shots.
Shooting on the water and off are primary considerations, including such factors as protecting your equipment, limited access to downloading images, and being very careful about exposing an open camera (for example, changing flash cards, batteries, and lenses) to a harsh environment. Snow, as well, increases your chances of damaging a camera with cold or wet conditions. Knowing your equipment and how to handle it for the photo shoot you're on are important.
Sports with wheels — whether they're on a car or under your feet — offer some exciting opportunities for cool photos. Being able to set your camera so that it is optimized for the different types of speed, action, and light helps to ensure you capture the action and represent the sport in the best way possible.
Photography in the snow is unique because of what it does to a camera's white balance. Understanding how to deal with this, in addition to other factors such as the cold, will help you achieve photos where the snow is white and the skiers' faces are suitably red!
Knowing how to create a cheat-sheet for exposures will help you remember the settings on your camera for the best shots, whether you have a point-and-shoot or a fancy SLR. The most important factor is that you learn to manage your equipment while staying very aware of your environment, whether it's on a racetrack, at a bike race, or on a ski boat.