

© Amber Palmer
The digital studio, or digital darkroom, as it's sometimes called, is an essential part of digital photography for amateurs, pros, and enthusiasts alike And with digital virtually everyone has a computer and is at least potentially capable of processing his or her own photographs While it's conceivable that you could simply have a digital camera and take your flash cards to a lab to be printed, it's by far the majority of photographers who process them to some degree on the computer first.
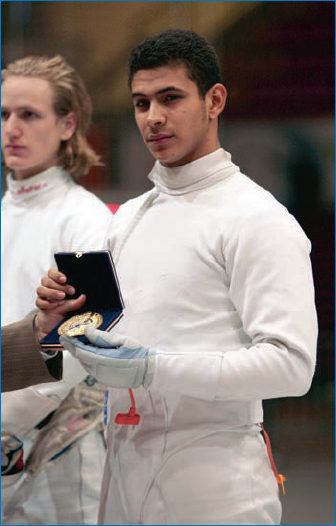
Figure 10-1, for example, is a photo I shot of U S Olympic and World Champion foil fencer Emily Cross winning a gold medal at the 2005 Junior & Cadet World Fencing Championships in Linz, Austria The image is okay, but it could use a little improvement in the digital studio, such as cropping and sharpening So, with just a little work in the digital studio, the final version emphasizes the subject much better, as you can see in Figure 10-2

Figure 10-1. Emily Cross wins a gold medal. But the shot could benefit from some editing to really make it shine.

Figure 10-2. This the same photo of Emily Cross after being edited using sharpening, cropping, touch-up, and brightness/contrast levels tools to refine it for publication. You couldn't even see the American flag before the adjustments were made.
Going out and taking the photos is only half the battle in digital photography Once they're safely in your studio, you begin the often laborious — but rewarding — process of backing up, archiving, editing, managing, and enhancing the photos you've taken Take a look at what this involves, including the various stages of digital photography workflow, as well as the resources such as hardware and software applications that you'll want to have and to use.
One of the most challenging and important factors in processing sports photographs is being able to manage and catalog them so that they are protected, yet readily accessible If you're a prolific photographer, this may mean managing lots of photos; for example, I have more than 400,000 photos of fencing alone, not to mention the photos the cities where the fencing events where held Obviously, if you're a casual shooter or even a semipro, you probably won't generate this number of images But with digital sports photography you tend to take more photos because you often shoot on a multiple-exposure setting, taking as many shots as possible to get the right angles, action, and exposures This means being able to store and locate the images later.
You're bound to decide after looking at your photos on the camera's LCD, that some of them are unusable. Should you delete photos on the camera or on the computer.
This is a tricky area. If you delete the images on the camera, you won't have to deal with them later and you'll keep a bit more space open on your flash card. However, what if you accidentally delete a photo you want Worse yet, what if you inadvertently click the wrong setting and delete all the photos on the card instead of just the one.
Here are some tips to remember when considering deleting images when still in the field.
When you have extra time — waiting for the next inning to begin, for example — look at the images on your camera's flash card and consider deleting obviously bad ones.
If you are uncertain about a photo, don't delete it. Camera LCD screens are known for notoriously poor quality, and you may end up getting rid of a photo you really wish you had later.
Don't just delete a photo because it looks soft (blurry). There are ways to artistically treat soft images to make them look very nice — which is covered later in this chapter.
Remember that deleting photos leaves numerical gaps in your camera's file-numbering system, so don't be surprised later if you're missing some files!.
Use your camera's zoom, if it has one, to look at images up close to see if they're usable. I often look for the catch lights — the white twinkle — in peoples' eyes to see how well the image is focused.
Don't delete photos because someone's head or feet have been cut off. These can often be edited further to create a tight and interesting shot.
Don't be in a hurry. More than one photographer has deleted an entire card without meaning to because he or she was in a hurry and pressed OK instead of Cancel.
If you are running out of room on your only remaining flash card and you must delete an image, look for very obviously bad, unimportant, or redundant images to delete.
If worse comes to worse, you can acquire rescue software for deleted files Some of the more expensive and high-speed flash cards even come bundled with it, and it can get you out of a digital pickle if something goes wrong Some even claim to be able to rescue images from cards that have been formatted.
There are very definite steps that you take in moving your images from the camera to the computer and processed to a state of readiness In virtually all cases, you'll want to know how to get your photos from the field — meaning from a flash card or a portable storage device — to your computer safely, uncorrupted, quickly, and ready to be processed in your digital darkroom Then, you'll want to process the images, including renaming them (if necessary), storing and archiving the ones you want to keep, readying them for digital treatment, categorizing files according to events and subjects, and ensuring they are sized to the dimensions and resolutions that will be optimal for your needs.
At that point, you can begin editing your shots, which means everything from cropping and adjusting contrast and lighting to adding text or other decorative elements Finally, you may want to get creative and try your hand at artistically treating sports photos to make them look like a painting or treating them with a variety of digital effects.
Let's take a look at these areas.
If you don't shoot many photos at your sports event, or you have a large flash card, everything may still be on a flashcard when you return to your computer A 1GB card, for example, can hold approximately 600 photos taken at a medium megapixel size If that equates to about four or five megapixels per image on your camera, it means you'll have shots that are good enough to be enlarged to 8x10 prints before you begin to lose quality.
You may also have photos stored on a portable storage device such as an ImageTank Also, some of the new MP3 players, such as Creative's Nomad Jukebox Zen Extra, are now sufficiently large to hold many photos and offer the ability to connect as storage devices for data files in addition to music (the Zen, for example, has a 40MB hard drive).
Tip
If you're using a portable hard drive, make sure it supports FireWire or USB 2.1 connections; USB 1.0 is dismally slow.
Transferring your files to the computer is relatively easy if you know a couple of basic things. First, how you move files onto your system depends on how they're stored in the field:
Flash card. If you have your photos on a flash card, you'll need a flash card reader connected to your computer. Insert the reader's connector into your computer's USB (or, in some cases, FireWire) port. Put the flash card into the reader and it will appear on the computer like another hard drive.
Direct from camera. Most cameras come with a cable that lets you connect directly from the camera to the USB port. The cable plugs into a small USB connection on the camera. Once the cable is connected, the camera essentially acts like a flash card reader and appears as a virtual hard drive on your computer.
Portable hard drive. A portable hard drive also connects to the computer's USB or FireWire port. It appears as a hard drive and you can see the images on the drive, ready to be transferred to the computer.
You can use Windows Explorer or an image-editing package like ACDSee or Photoshop Elements to transfer images to your computer Windows Explorer is a very simple but reliable way to transfer images; simply click and drag files from your storage device to your computer's hard drive Image-editing packages are more elaborate and usually allow you to resize, renumber, rotate, and rename the files as they are transferred You can also delete them from the source location.
Warning
I consider it a bit risky to delete files as you transfer them; I prefer to transfer them and then delete them once I am certain they have made it safely to their destination.
The biggest factor in transferring images is where they're going, more than where they've come from. Have a file folder that refers to your sports event ready to hold your new images, and make sure that if there are already images in it that there aren't any files with the same names as what you're transferring.
Some people like to use the My Photos subfolder of the My Documents folder that comes preconfigured with Windows Others like to create a separate subfolder for photos or even several subfolders for specific events, for example.
If you store your images on a separate hard drive, create folders, as well If you shoot lots of photos, storing them on your computer's main hard drive along with your operating system, applications, and other system information may fill up the drive quickly — especially if you use a camera that supports 5-megapixel or higher photos.
Warning
Never stop a flash card while it is transferring images This can permanently corrupt the images Don't ever remove or unplug it unless you're absolutely certain it's finished.
I suggest you create folders to store your images based on event and be able to reference them by date as well If you're shooting something more than just personal shots of friends and family members, you'll probably want to be able to reference files by player names, teams, or even specific games.
Processing photos happens once you transfer your images to the computer and are ready to work with them.
You may have done this when you first downloaded, but if you haven't already you'll want to separate your photos into logical groups that make sense for what you're shooting and for what you'll ultimately do with the photos If you're just shooting shots for posterity of your son's or daughter's high school basketball game, for example, then your processing task is pretty easy — just eliminate the obviously bad photos, store the original files in a folder with a title that references the event, and then you can begin working with individual shots that you want to print or share.
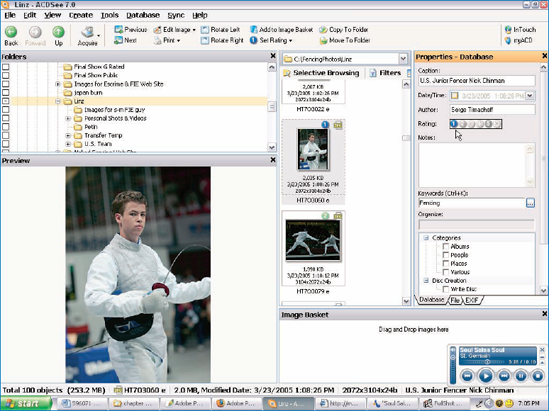
For example, I took many pictures at the world fencing championships in Linz, Austria I took several shots of Venezuelan junior champion Ruben Limardo receiving a World Cup medal from Rene Roch, president of the International Fencing Federation So, when I began processing, I narrowed it down to the three I thought best (Figures 10-3, 10-4, and 10-5), and then had to decide on the one best image (Figure 10-5).
If you work with a larger set of images for more than just personal reasons, processing can become quite complicated and tedious For example, if you shoot a college tennis match, the first thing to realize is you're going to generate hundreds of files from one day's shoot You need to tag the images with keywords so you can sort them, possibly rename the files, and make sure you know who was playing in what match and to be able to access those files Some cameras also allow you to add on-camera audio notes, meaning you can record a voice note onto the flash card using the camera; the note is associated with the image file This can be handy for later reference and is a feature supported by most image-editing packages.
After a sports shoot, I typically sit down with all the images, and after I make an archival backup of the files, I make sure they are stored in subfolders for a specific event Each subfolder represents an individual aspect of the event — a match between two players, one inning of a baseball game, and so on Each sport will be different in how it is segmented and you'll want to logically match your subfolders to match the sport's structure and individuals Remember, the key is to be able to process digital files into folders where you can most easily find and use them.
I suggest that you process the smallest number of photos possible to save time and keep your computer from choking on a giant set of images. Plus, doing anything on your computer in batch mode (processing many images at once automatically) will always take much longer for a big set of images. As a result, the next taskis to find your best shots. This may sound easy, but unless you've done this in one sport for many thousands of shots, it's more difficult than it seems. Assuming you have several hundred photos in one subfolder, you probably need to paredown the set to as few as five to 20 shots — which means you have to be quite brutal in eliminating photos.


When prioritizing photos, you don't need to erase the bad ones — just choose the best ones. Here are some tricks for doing this.
Try not to select multiple shots that are redundant; you don't need several shots of the same swimmer poised to dive. Try to find the one that looks the very best, whatever that means to you — perhaps it's the athlete's position, the look on his or her face, or subtle differences in how the light is falling.
Look for interesting action shots and movement — someone falling, a ball hitting a racket at just the right moment, or two athletes colliding on the field.
Find classic sports shots, especially if you're shooting for a sports organization. For example, while a newspaper or magazine might want cool action of athletes contorted in seemingly impossible moves, a sports club or federation may only want to properly represent the sport with approved moves and actions.
Personality and drama are always welcome — wins and losses, injuries, players celebrating together — and you may need to get quite close to the athletes to take these images. However, quite often this type of shot takes place immediately after play has ceased; it's when you see photojournalists and fans together running onto the field or court to rush the players. Even at a particularly important peewee football game, you'll want to be ready to do this to catch some cool shots of players.
In most image-editing applications, you can flag or prioritize the images you find to be the best These images can be sorted separately from the others and you can store them in a subfolder of the subfolder, called something like chosen shots or something similar This way, you have the best shots in a subfolder of each logical division of the sport you've covered; later, you can eliminate the unwanted shots, if you like — or just keep the subfolder structure the way it is and reference the chosen shots as you find necessary In Figure 10-6, I use the number/rating feature in ACDSee to prioritize images.
Another important aspect of processing photos is ensuring the files are sized to bite-sized chunks Many cameras — even relatively inexpensive consumer models — can shoot at high-megapixel rates today, which means the files you generate might be larger than you'll need and larger than images shot at lower resolutions When you process images, you may want to resize a group of them to create a more workable set of files Also, remember that TIFF files, while they are lossless, are much larger than compressed, lossy JPEG files — and, for most typical photography purposes, JPEG files are absolutely sufficient.
If you produce large prints, you need relatively large files, and you may not need to resize them However, if you don't print anything larger than an 8 × 10, or if the images are to go onto the Web, then you definitely don't need images that are very large Most Web images shouldn't be bigger than 72 dpi (screen resolution) and maybe 3-x-5 inches or so Chances are the images coming out of your camera will be larger than this.
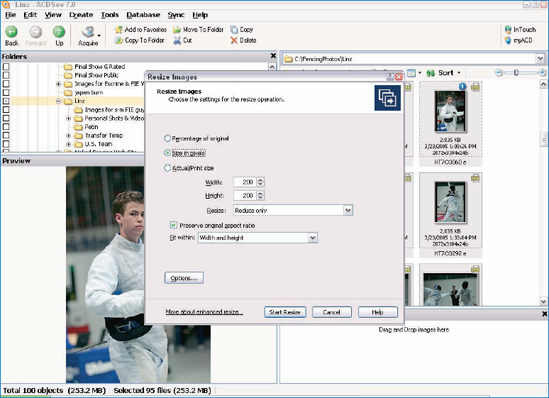
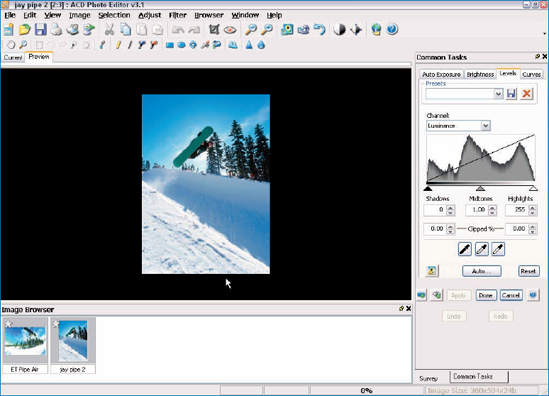
I think ACDSee, Paint Shop Pro, and iView Mediapro are the easiest applications for accomplishing this sizing task (plus, if you work with Windows, Adobe only offers it in Photoshop CS) ACDSee also gives you a number of options as to how you resize photos, as you can see in Figure 10-7 It lets you resize according to specific dimensions or by a percentage, and you can easily maintain or change the aspect ratio — the proportion of width to height In Figure 10-7, I'm resizing a batch of photos in ACDSee.
Note
Remember, once you resize images to be smaller, you need to go back to the archive set of photos you made earlier to start again with the bigger image If you try to enlarge the already reduced images, you won't be able to make them bigger again without causing jaggies (jagged, blocky edges and patterns).
Finally, you may want to rename the images that have been put in order and processed This is so that individual files can be referenced by something other than a number and, like keywords, allow you to easily sort and reference them You can rename individual files if you don't have too many of them, but you can also batch rename files easily in applications like Photoshop Elements and ACDSee.
Warning
It's easy to rename files — even large batches of them — using various image-editing applications However, if you've already backed-up and archived your files elsewhere, you'll want to be careful to keep the original file number at least as part of the renamed file so that you can refer back if you need to This is especially true when you're working with large numbers of images, where comparing sets of photos could be extremely tedious And it's difficult, once you've renamed files, to put them back to their original sequence.
Renaming typically involves renumbering and/or adding text If you have a set of images that has been selected from a variety of locations, you may want to renumber them into a 1-2-3 order Or, you may want to simply add a text reference in the filename that allows you to know these images are all common: For example, you may have gold-medalist players from a sport spread across multiple files; by adding the word "gold" to the filename, you can search a large set of folders all at once for that term, and those files will pop up.
I suggest that you keep your original file number-or at least a critical portion of it-when you're renaming images This way the files can still be easily referenced-back to your archived originals You can still add a different chronological pattern of numbers, however, so you can have the best of both worlds For example, Table 10-1 shows some renaming ideas for series of files (one from a family ski trip to Aspen, and one from a soccer match between the Chargers and Strikers).
In Figure 10-8, you can see how to rename files this way using Photoshop Elements Most image-editing applications use a system for renaming that requires you to type a special symbol or series of symbols (for example, ###) for the computer to recognize a number series; in many applications, you can also begin at whatever number you want — you don't have to start at 1 and go up; you can begin with another digit, as shown in Figure 10-8.
Simply placing images into named folders is a faster and easier way to reference, store, and access images; however, this may not always make sense, especially if you tend to combine photos onto other media like CDs or if you need to search frequently for individual shots.
Use Image Keywords for Easy Organizing
Every digital image has what is called metadata associated with it. For example, a JPEG image that comes out of your camera has information specifying the camera with which it was shot, the focal length of the lens, the shutter speed, the ISO, the f-stop, and much more. In addition, you can add keywords in most applications that let you store specific information about the image. ACDSee (shown here, iView MediaPro, and Photoshop Elements let you easily manage and create your own keywords; you can sort your files according to these keywords, and you can do a search for them using one or more keywords. (While you can view a file's keywords in Photoshop Elements, only in the Mac version can you actually change them. Hopefully Adobe will add this feature in future versions. It is a feature in the Windows version of Photoshop CS.
Using keywords means being logical and using words that help anyone who needs to access the image locate and sort them according to whatever appropriate names may be necessary — too many make it overly complicated and too few do not allow easy location of key images.
While metadata is transferable from one application to another, be aware that it's not necessarily true of keywords If you use them in Photoshop Elements, for example, they won't appear in ACDSee but you can see them in iView MediaPro So if you use multiple image-editing or storage/archival applications, this is something you'll want to check.
A big part of processing digital images is arranging them in a logical order that lets you sort and access them easily over time Using keywords is an excellent way to do this.

There are a number of ways to store photos, and many times this is driven by how you access those images For example, if you shoot lots of photos but you don't need access to all of them on a day-to-day basis, then it might make sense to burn them onto a DVD or CD and keep them in a disk envelope However, if you need to access many different images created over long time periods, then you'll also need to keep them in live storage — most likely on a hard drive(s) (as opposed to being stored on a CD or DVD and not immediately accessible without locating the disc and loading it into a drive).
For most people, hard drives are the best choice for storing images. While you can easily store photos on external or internal hard drives (large storage capacity has become very affordable, usually less than $1 per gigabyte), there are a few things to keep in mind.
Hard drives are machines with working parts, and they can fail. So it's good to have a nonvolatile (meaning they won't fail as long as they're stored properly) backup of what's on them, such as on DVD.
If you have particularly important images on a hard drive, store them in a secure place — just as you would jewelry or other valuables — when you are gone, such as a safe-deposit box.
Use USB 2.1 or FireWire hard drives.
External hard drives are more portable and don't involve internal PC storage, although they are a bit more expensive.
Some external hard drives are more portable than others based on size, weight, and durability factors.
FireWire-connected drives can be connected from device-to-device in a chain, meaning you only need oneconnection to the computer.
Some external hard drives can be combined so that you can stack them together and use only one USB cable and power cable The RocketPod drives, for example, are high speed and have a docking port on the top and bottom of each; you can plug any one of them into the computer and still access all of them This is a very convenient and space-wise method for adding storage.
When storing data on a DVD or CD, you'll need a burner Most laptop and desktop computers today ship with at least a CD burner (identified by a CD-R/CD-RW symbol), and many also burn DVDs (DVD-R and DVD-RW) DVDs hold much more data — some up to 7GB or more using a new double-layer technology; they are quite reliable and durable CD burners are much faster, writing at speeds of up to 40x and more; DVD burners are commonly 8x but are getting faster all the time You can purchase external and internal burners if your computer doesn't have one; DVD burners almost always also support CD burning.
Note
Also see Chapter 9 for more information about building a digital studio and the equipment you'll want to consider using.
Tip
Be careful about buying CDs and DVDs because the quality varies significantly Sometimes the cheapest, no-name discs can have a high failure rate; it's better to spend a bit more and get a reliable product from a known name such as Fuji, Maxell, Memorex, or TDK.
There are a number of software applications availabel for burning CDs and DVDs, and oftentimes if you purchase aburner, the software comes bundled with it While you can use the software that comes with Windows — Windows Explorer — to burn discs, it's not the most convenient application Products like RecordNow and Nero Express are both very reliable and offer some really nice features such as showing you if you're trying to put too many photos onto one disc, options for choosing different burners you may have attached to your computer, options for copying multiple discs and saving the burn project you're doing, and the ability to verify that the disc burned correctly.
Figure 10-9 shows RecordNow in action A number of conveniences like the ability to verify a successful (or unsuccessful) recording, easy audio or data recording, and a fullness meter make burning CDs and DVDs faster, more reliable, and convenient.

Some software lets you do one-touch backups that intelligently know what you've already stored and what you haven't This is convenient, although I tend to still do things the old-fashioned way of manually copying files and backing them up; I guess I'm a bit nit-picky and want to be 100 percent sure the files have been copied and are the ones I'm storing.
Using a catalog system of thumbnails, it's easy to move photos around and manage them without having to view full-size images, as you can see in Figure 10-10.
Products like iView MediaPro allow you to use a catalog system to manage all of your photos Most photographers are visually oriented and want to be able to see the shots in thumbnail form, which tends to be an easy way to be sure the shots you took are in the place you want them to be iView's system is very easy to use Because it creates thumbnails of images, you don't have to view full-size images — which tends to slow image viewing down However, you want to be sure that whatever photos you need to review that have been archived are on a hard drive, CD, or DVD that's attached to the computer when you're reviewing and working with them (otherwise, you're just working with the thumbnails).
Using Windows Explorer can be a quick way to locate a file, although large images, such as TIFs, tend to be slow to display on all but the fastest computers Furthermore, you can't see images in RAW I use Windows Explorer to reorganize files sometimes because it's a simple and easy way to move folders and large numbers of files However, it won't rename batches of files so you'll need an image-editing or archival/storage package to do so.
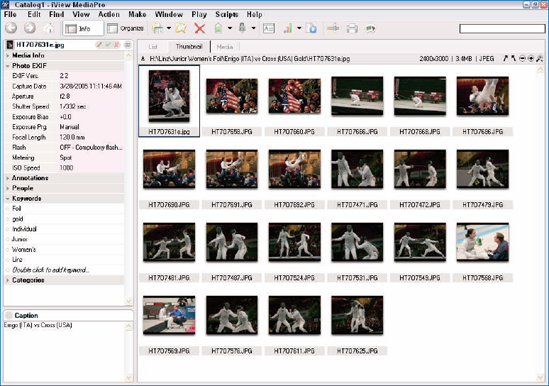
Figure 10-10. A catalog of digital sports image thumbnails in iView MediaPro. Note how the keywords and image captions are displayed alongside the file for easy notation and identification.
Photoshop Elements and ACDSee are good tools for viewing images; however, they can be a bit slow when it comes to managing them — for example, copying them to a different subfolder and other similar tasks Every time you access a subfolder in the Photoshop Elements image browser, it generates a preview of the image Once all the thumbnails are fully loaded, you can skim easily through a large set of images in a subfolder, as shown in Figure 10-11 However, while the thumbnails are loading they appear jaggy (rough and blocky) before displaying at full resolution.
So for storing and archiving images, it's a good idea to know how to use Windows Explorer and your image-editing application in concert or use a dedicated archival and image-editing tool like iView MediaPro Either way, getting on top of how your images are safely and easily stored and accessed is a key part of digital photo processing and being able to successfully manage the post-photo-shoot aspects of your digital photography workflow.

Few of your images will come out of the camera ready for distribution or display As they are most likely sized incorrectly, you'll want to make sure the photos are the right width, height, and resolution — as well as file format Next, they will probably need a little correction in terms of color, shadows and highlights, and brightness and contrast They also may need to be cropped Then, once these factors have been addressed, you may want or need to do some touch-up editing, such as sharpening, facial/blemish removal, or removing or changing minor (or maybe major) factors in the image to perfect it.
This isn't creative work, per se. We get into that in the next section when you get going on some fun edits to images Image editing is more of a nitty-gritty task with which you'll need to accustom yourself to ensure the photos you intend to use are truly ready for prime time.
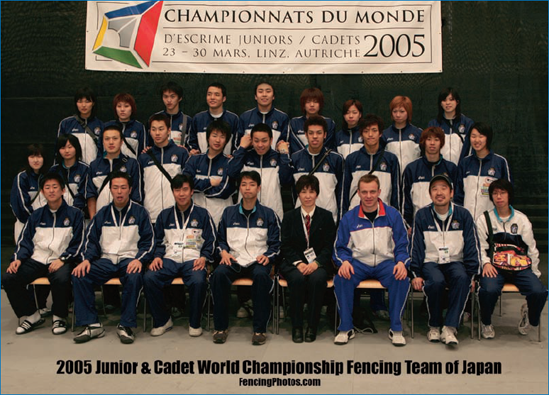
Providing photography services at a major world fencing championship in Linz, Austria, I was approached by the president of the Japanese fencing federation to do a photo shoot of its fencing delegation of about 30 people I assumed she wanted to schedule the photo session for later that day; as it turned out, she said the delegation was ready immediately So I followed her to a point in the venue where, lo and behold, the entire delegation was waiting for me, posed perfectly (usually this is the time-consuming part) I took several photos, and went back to my booth.
The delegation leader came to the booth and on the spot ordered an 8-x-10-inch print for each member, which I could print on-site. "A quick sale," I thought and assumed I could just make sure the color and brightness were good and I was ready to go Figure 10-12 is the one she chose.

Figure 10-12. This is the original photo chosen by the Japanese delegation leader — a nice shot, but one that needs some editing work.
Notice the left-most member with his eyes closed? What about the sign above the group is cut off? Additionally, I had to add text to the photo to customize it for the delegation.
To clean the chosen image up, I took a copy of the cut-off sign from another image, and used the Duplicate Layers feature of Photoshop to paste it into the chosen image I then used various editing tools to clean it up so it looked like it belonged there.
Next, using the Lasso tool, I copied the blinking fencer's face from another image where he wasn't blinking. I then pasted it into the first image, covering precisely his face with the face from the other shot. No more blinks.
Finally, I cropped and sized the photo to an 8 × 10 (I could have done this at the beginning to both images, but decided to do it in a larger size to have more detail at my disposal), played a very little bit with brightness and contrast, and then added text to the bottom of the photo to customize it Voila! The image was ready to be printed, as shown in Figure 10-13.
While this is a professional example — you may not have an entire foreign delegation depending on your editing skills on short notice — many of the tasks I addressed in this example are ones you'll encounter in day-to-day image editing.
Depending on how your camera has been set, it stores different-sized photos, usually in JPEG format (some cameras will store in TIFF and/or RAW). JPEG files are compressed to ensure the storage space they occupy is as small as possible, but each image is a specific width, height, and dpi (dots per inch, meaning resolution). Making the file larger than its original size quickly degrades the photo and makes it appear jaggy. This is a result of the software you're using interpolating or adding information between pixels that wasn't there originally. Figure 10-14 shows how an image that is enlarged beyond the size it came out of the camera causes a jaggy effect.
Take a brief look at image size and resolution to help you understand how digital images are constructed Many cameras produce files that are quite large in dimension, but only 72 dpi, which is the right resolution for the Web but not for printing in a lab or on your printer For this type of printing, you'll want your images to be 300 dpi Every image is sized according to a grid of pixels — tiny picture elements of individual colors and shades — that make up your image's size.
Take a look at Figure 10-15

Figure 10-14. This image, originally shot at 14 × 9 inches and 240 dpi, was reduced to a 3 × 4 image at 72 dpi. Then it was enlarged again from that file to the 4 × 7 at 300 dpi.
Fresh out of my camera, you can see the image dimensions listed with the photo in the Image Size dialog box You can see there are two separate dimensions shown — one of pixels (pixel dimensions) and the other of width, height, and resolution (document size).
The pixel dimensions show how many pixels are in the photo, given the dots per inch combined with the width and height. These factors are forever intertwined. Consider the following.
If you multiply 72 dpi times the width of 43.111 inches, the result is 3103.99, which is the pixel width of 3104 (rounded).
If you multiply 72 dpi times the height of 28.778 inches, you get 2072.02, the pixel height (rounded).
If you change the dpi to more than 72, but you don't change the height and width, the pixel dimensions will go up.
If you multiply the pixel dimensions by each other, you'll get the megapixel size of the photo (3104 × 2072 = 6431488, or 6.4 megapixels).
If you change the pixel dimensions, then the height and/or width change accordingly.
If you make the image smaller by changing the width and height, the resolution will go up — which is what you'll want to do to print on your own printer. This won't affect your photo visually.
If you make the image bigger by changing the width and height, and you keep the dpi the same, the image becomes physically larger and the dots have to become bigger to interpolate the image artificially — which often causes the image to be distorted. This is also called resampling the image, and many editing packages give you optional ways of doing this.
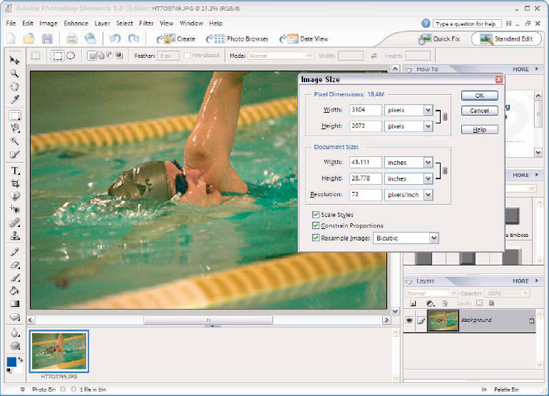
Figure 10-15. A full-sized photo of a swimmer as opened in Photoshop Elements just after downloading from my camera
In Photoshop Elements, for example, you can choose to keep the ratio between the document size — width, height, and resolution — at a constant ratio, which can let you increase your resolution, and your image size will decrease accordingly To do so, deselect the Resample Image option Then the Width, Height, and Resolution are locked together If I take the same example from above but deselect the Resample Image option and change the resolution to 300, the result is the shown in the Figure 10-16
As you can see in the Image Size dialog box, the image changed to 10 347 × 6 907 inches, but the pixel dimensions remain constant This means I basically have the same photo, but at a different resolution and physical size optimized for the resolution I need What I've done is resize the image so that it's optimized for printing on an inkjet printer, or to send to a lab.
If I were going to use this photo to put onto a Web site, my original resolution of 72 is what I will want to use because screen resolution — what you see on your computer screen — can only display up to this size In this case, I would not deselect the Resample Image option because, if I do, it will not be possible to make my photo small enough for the Web If I change the physical size — say, drop my 43 × 28-inch image to a width of 4 × 2.67 inches, I want my resolution to stay the same (72 dpi); if I keep Resampling turned off, the resolution jumps to 776! This, then, becomes a very small file, which is what you want for storing and loading quickly onto a Web site.
So, resizing images largely depends on whether you intend to put them on the Web and computer screens or onto paper If they're going to be printed, they need to be higher resolution, and if they're going to be on the Web or a screen, they need to be smaller An image that's too small that's enlarged on paper will be distorted and jaggy; an image that's too big and placed on the Web will be unwieldy and take a long time to load.

Tip
If you're submitting photos to a newspaper or magazine, make sure to send them in the larger (for print) size While the publication may also put it on its Web site, it can always downsize the image to Web resolution; an image sent in Web resolution will not be able to be enlarged for print without becoming distorted with jaggies.
Before going on to the next topic, you might want to note that labs often have a way to make images larger than their original size and still look good I won't go into deep technical detail on this topic, but suffice it to say that various high-end printers have technology that allows them to enlarge images without distortion Another method involves actually projecting a digital image onto chemically processed, traditional photographic paper, thus bypassing the resolution limitations.
As I've mentioned, there are few images that need no correction at all While you may have set your white-balance correctly along with your exposure, few photographers take the image straight from the flash card to printer.
That said, on occasion when I'm in a hurry to print a photo — such as at a big tournament where I'm providing lots of images to many customers — I print images directly from a flash card However, the printer I use in a tournament vendor booth (in this case, a Canon Pixma 6000 — a wonderful little printer that costs less than $200) lets me make minor image adjustments on-the-fly However, I have to be pretty darned certain that the photo is close to being perfect in terms of brightness, contrast, shadows, highlights, and color in order to do this Also, I obviously cannot add text or other features to the photo like I could if I had processed it in an image-editing application first.
The tool that will help you the most when determining the level of editing an image needs is the histogram Many people rely on their camera's display of a histogram to ensure the highlights and other light/dark features of an image are correctly balanced Many digital cameras, including the better point-and-shoot models, can display a histogram and it can be very useful in helping you know your shot is correctly balanced — no matter how good or bad your LCD screen might be.
Checking your histogram on a test shot when you're shooting an event will help ensure your photos are well exposed when you get them into the computer.
The same histogram, then, is displayed in various image-editing packages, such as the one you can see in Figure 10-17 in ACDSee The histogram features three major points: shadows, midpoints, and highlights These are the three areas of a photo that make up full tonality; an overexposed or underexposed photo will have very flat points in a histogram, while one with full tonality will have points distributed throughout the display.
Shadows are the area of your photo that are completely dark Highlights are those that are completely light Midtones are the areas in between that represent the substantive subject of your photo Together, these factors work in concert to portray a well-balanced image.
The soccer photo in Figure 10-18 shows a histogram for the youth soccer shot, as displayed in Photoshop CS2 (it looks very similar in Photoshop Elements). The left side of the histogram represents shadows; the center represents midtones (often the largest part of your histogram); and the right represents highlights (the most lightly exposed area). None of the areas is particularly flat or without features. The three main slider points in the histogram represent, from left to right, Shadows, Midtones, and Highlights — which can all be adjusted on-the-fly.
Every histogram displays differently for different photos; none is the same as another And the histogram changes for every adjustment you make to brightness, contrast, shadows, and so on In higher-end image-editing packages such as Photoshop CS2, you can also look at the histogram on a color-by-color basis (for example, Red, Green, and Blue) However, what you're looking for are major features of the histogram to be within a reasonable scope to be sure you've got good, broad tonality.
Tip
A histogram will not tell you if your colors are well balanced or if your photo is in sharp focus.
The histogram feature in Photoshop Elements, found under the Image menu, isn't as detailed as the one you find by choosing Layer
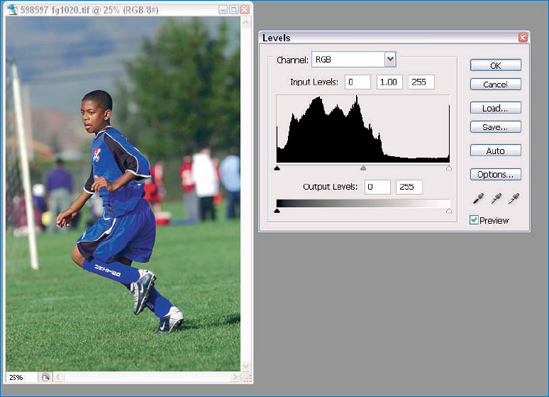
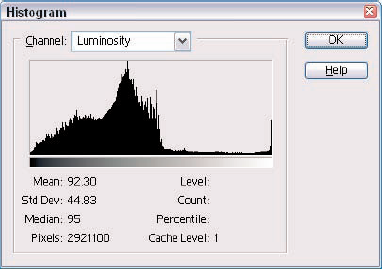
Figure 10-19. Click and drag the sliders below the histogram to make adjustments to the image in the three areas represented — Shadows, Midtones, and Highlights.
But what if you tested your histogram when starting your event shoot and the images are still not exposed correctly.
Brightness, contrast, and color are the three most common areas you'll be working with when making adjustments to a photo. Most image-editing packages offer a quick-and-easy way to do this using Auto Levels, Auto Color Correction, and Auto Contrast, as in Photoshop Elements. These sometimes work well and are worth trying if you have a monitor that's been color-corrected and you're pretty sure will displays the image similarly to how it will be printed.
I sometimes find that all I need is Auto Contrast Often, if I let the computer do color correction — either with Auto Levels or Auto Color Correction — it isn't able to give me precisely what I want; however, Auto Contrast seems to be quite effective.
Warning
Once you save your original with changes, there's no going back. So, you should never do a correction on the original image. You can create a duplicate layer or add an adjustment layer and make changes on the new layer. That allows you to use various blending methods. With the adjustment layer, you can make change after change without hurting the original image. And remember, original refers to your working image — not the archive of the file that came from your camera; that should never be altered.
To get more detailed, you can use the histogram and begin to edit images at a deeper level; I suggest you play with some test images in the histogram and see how the Shadows, Midtones, and Highlights adjustments can make a difference.
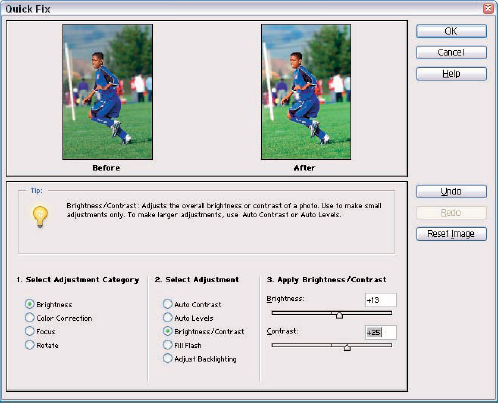
Also, in Photoshop Elements, you can use the Quick Fix dialog box that presents many of the adjustments and lets you make them while seeing the results before they are applied, as shown in Figure 10-20 This can be very helpful and is a great way to get to know how images can be adjusted in various ways; it also contains some handy tips for what the various effects do and how they can be effectively used and manipulated.
Here are a couple of other areas of image-editing controls you'll want to use to explore and experiment with your photos, all of which are availabel in Photoshop Elements.
This emphasizes the shape of your subject, when, for example, the background behind a subject has been overexposed Say you've taken a photo of a baseball pitcher standing on the mound, ready to pitch Behind the pitcher, the sun is shining brightly, but you've accounted for this by exposing your camera for the pitcher, not the background (you can do this by setting your exposure based on a darker area of the baseball park and then applying that exposure to the scene in a manual mode on your camera) Once you have downloaded this photo, however, you may find that the background — the part for which you didn't set your exposure — is overexposed Using the Backlighting feature in Photoshop Elements, you can darken the background to make it look better.
This software filter does the opposite of backlighting If you didn't expose your pitcher photo correctly and the background looks good but you can't see detail on his uniform or face, then Fill Flash can help fix it One way to compensate for backlighting is to use your flash — even on a bright day — to illuminate a scene like this But, if you are too far away when taking the photograph for the flash to have any effect, the Fill Flash feature does this for you in the software.
You most certainly will need to crop photos for many reasons One is that you may simply have areas in a photo that you don't want or need Another is that you may need to make sure the image is set to specific size requirements for printing Either way, you'll need to crop your image, which means digitally cutting away parts of the photo.
In Photoshop Elements, you have two basic ways you can crop an image.
Rectangular Marquee, Elliptical Marquee, or Lasso tools. You can draw a shape around the area you want to crop. By choosing Image

Crop tool. You can cut an image down to specific dimensions and resolution. This is very helpful if you're working to get a photo to a specific size for printing, such as a 5 × 7 or 8 × 10. In Figure 10-23, you can see I've specified 8 × 10 and 300 dpi in the space at the top of the page, and then outlined what I want cropped (the lighter area surrounded by the dashed line) using the Crop tool.

Figure 10-21. Outlining mountain biker Cory Saudabine using the Elliptical Marquee tool in Photoshop Elements: © Will Wissman

Figure 10-22. By choosing Image

Figure 10-23. The original photo of mountain biker Cory Saudabine cropped using the Crop tool with 300 dpi, 8-x-10-inch photo defined: © Will Wissman
Tip
Be careful that you don't select a small portion of the image and enlarge it by cropping. If you have an 8 × 10 image at 72 dpi and crop a portion of it to 6 × 9 at 300dpi, you'll have a pixellated mess on your hands!
Tip
Some printers and software applications will automatically resize your image to a defined paper size and/or image size at the time of printing. While this is very easy and often works well, note that it essentially is an automatic way of cropping your photos. If you're not careful, key elements at the outer edges of your photo may be cut off based on the original image size and what is being printed (if the aspect ratio between the two is different).
Photos are seldom perfect, and neither are the subjects you shoot Perfecting photographs becomes something of an obsession for some photographers, and the software tools availabel today are extensive and powerful Portrait photographers become specialists in tasks like facial touchup to remove blemishes from high school seniors, making people look younger by removing wrinkles around their eyes or from their forehead and cheeks Other photographers may have to remove parts of a photo they don't want, such as a power line obscuring an otherwise perfect sky, or add parts to a photo that they do want, such as a brand logo that should appear on a model's shirt in an advertising photo shoot.
In sports, touchup is often less of an issue because you rarely need to do facial retouching, and busy elements often enhance a photograph Also, serious touchup requires tools availabel only in higher-end image-editing packages like Photoshop CS2 The Patch and Healing Brush tools are very intelligent features that are difficult and time-consuming to learn and use effectively However, if you are at all serious about generating some income from your images, you should consider making the investment in Photoshop CS2.
For most amateurs and enthusiasts, Photoshop Elements, ACDSee, and other mainstream image-editing packages will offer a good selection of touchup tools to experiment with Red-eye, which is caused by a direct flash exposure reflecting off the back of the human eye, can be removed with some simple tools In Photoshop Elements, the Redeye tool is availabel on the Tools palette, and it operates in a paintbrush manner And, if you want to have a little fun, you can select the original eye color and replace it with another In ACDSee, you select eye color from a list and then draw a little square around the part of the eye you want to correct, as seen in Figure 10-24.
For simple touchup of a blemish or other element in the photo (removing a soda can from a soccer field, for example), you can use the Clone Stamp tool availabel on the Tools palette of Photoshop Elements For example, using the soda can example, you can sample an area of empty grass on the field and then stamp that onto the area where the can is The tool intelligently blends the edges of your stamp so that it looks natural and doesn't have a cut-off look You can adjust the size and type of the Clone Stamp selection brushes by right-clicking after selecting the tool Play with this tool to try it out and get comfortable with it because it can be a bit tricky to use; you'll find that you can just as easily ruin a photo with it as fix one.

Sharpening is another major tool offered in virtually every image-editing package Like salt, it's best used in minor and measured amounts — too little, and it's unnoticeable; too much, and it ruins everything If you have a photo where the subject is slightly blurry, you can sometimes repair the photo enough so that it appears to be in focus However, you should be aware that sharpening doesn't actually make a blurred image focused; what it does, essentially, is increase the contrast among dark areas in your image and surrounding lighter areas This has the visual effect of a sharper image, because it reduces some of the fuzzy qualities of the photo's elements.
To sharpen a photo in Photoshop Elements, you have a couple of choices One option is a predefined Sharpen selection that automatically sharpens your image Keep selecting the Sharpen tool, and you can keep changing the image until it's utterly distorted Another and better option is Unsharp Mask (a term referring to a technique called unsharp masking used in film-based photography), which allows you to define a range of applied effect all at once Choose Filter
One thing you should note, in particular, is that the effects of sharpening are much more visible when displayed on-screen than what appears in print This is because the resolution of printed pixels is much finer (300 dpi, for example) than on-screen (72 dpi).
Tip
By selecting specific areas of your photo in Photoshop Elements with the Lasso or Marquee tools, you can just sharpen a specific area of your photo.
In the Unsharp Mask dialog box, you have three settings: Amount, Radius, and Threshold The Amount slider lets you determine the amount of contrast for specific pixels; Adobe recommends 150 to 200 percent if you're going to print the photo (less if it's only being displayed on-screen) The Radius slider lets you be specific about the number of pixels you want sharpened around the edges of objects in your photo The Threshold slider specifies how much different pixels will be from their surrounding area in order to be sharpened.
You need to experiment with these sliders on various images — see how they can help, and where they become too much for an image When you find values that work well for a common type of image with which you might be working, then you might want to jot down the values you're using for Amount, Radius, and Threshold so you can replicate it in the future — at least as a starting place for a subsequent image.
You'll find a number of other useful touchup tools that you may want to try. Photoshop Elements probably has the broadest and most intelligent set of touchup tools availabel in the mainstream consumer image-editing packages, although ACDSee has some powerful tools as well. Here is a selection of important Photoshop Elements features.
Eraser tool. This tool erases anything you may have done that you don't want any more or that you added by mistake. You can adjust the size of the swath that is erased.
Step backward. This isn't really a tool. This feature is how Photoshop and Photoshop Elements handle what other packages call "undo." It lets you go back several steps — even after flattening a layer or doing other seemingly irreversible actions. However, if you go back four steps, for example, and make changes, you can't go forward again. The changes you made and stepped back through are lost and will have to be done again. So, use this carefully to avoid losing work.
Blur tool. This tool blurs hard edges by creating a softer look and reducing detail.
Sponge tool. This tool changes the color saturation of an area that you've dragged over.
Dodge tool. This tool creates a lighter effect over an area.
Burn tool. Use this tool to create a darker effect over an area.
Gradient tool. This tool allows you to gradually blend multiple colors.
Paint Bucket tool. Use this tool to fill an area with a given color.
Selection brush. This tool lets you select areas of an image with many types and styles of brushes.
If you've shot a photo that isn't quite straight, image-editing applications let you rotate it This is also useful if you want to turn a sideways image right-side up Choose Image
You can also use the Flip function to flip a photo vertically or horizontally (note, however, that doing this reverses letters or numbers) Additionally, you have several selections of 90- and 180-degree rotations you can make automatically.
For really extensive alterations to an image — such as the earlier example of adding a complete tournament sign above the Japanese Federation's heads — you will want to use the Photoshop Elements Layer capability Layers are used commonly in Photoshop CS2 and Elements They are an important way of working with images, and they let you create images with many additional features and changes that can be turned off and on — so your original image is left intact but the entire effect may be dramatically different.
Note
You cannot save an image with multiple layers in JPEG format It first must be flattened, and the changes are then irreversible unless you also save your layered photo in Photoshop PSD format Use the Save As command to create a JPEG or other file type to do so.
Think of a layer as just that — layers based on adding new things on top of your original image. They might be text, other photos, or color filters. Whatever they are, they affect how your image appears, can be turned on and off, and can be transparent or opaque to varying degrees to the image underneath.
In the earlier example with the Japanese Federation photo, I had to fix the partially cropped banner, the fencer with the close eyes, and add text I began by adding a layer for the new, full banner In another image, I used the Marquee tool to select the full banner that was to be added to the new layer I just created in the other image.
In the image with the full banner, I selected the Feather option (it feathers the edges out to create a softer edge) to make sure the edges would blend more easily Depending on how much of the image you have selected and want to feather, and how broad you want the change to be, you can adjust the pixel range of the feathering tool (specified in numbers when you select it) By right-clicking on my selection, it allowed me to soften the image edges according to a specific amount I then copied the selection and pasted the selection into the new layer in the image I was fixing The full banner now covered the partial banner completely To make sure the edges blended well, I selected the Clone Stamp tool and went over the edges of the pasted banner This sign appears in my Photoshop PSD file as one layer that I can turn off if I want to.
I used nearly the same technique to fix the closed eyes on the fencer I added another new layer to the image I was working in In another image where the fencer has his eyes open, I used the Lasso tool to circle his face, feathered it, and copied it I then pasted it into the image being fixed, positioned it on top of his face, and it was ready to go after just a little bit of lightening in the levels to make sure the color of the copy matched his skin tone in the new image This copied face also then became yet another layer that could be turned on or off It appears as Layer 1in the Layers palette shown in Figure 10-25
Layers are an important and unique aspect of working with images in Photoshop CS2 and Photoshop Elements Even though I have been working with them for years, I am continually finding new ways to use them and new techniques for improving, editing, and altering images.

Sports art has become a genre unto itself, with high-end original paintings of sports events and athletes selling for thousands of dollars, and millions spent on various types of consumer artistic sports products Likewise, computer art is now recognized and accepted as a legitimate and respected area of artistic endeavor.
John and Terry Reimer, owners of San Jose, California-based Legacy Artists, have made a successful business of producing art that combines computer technology with traditional artistic techniques Part of their work is in the area of sports — in fact, most recently working with Terrell Lloyd, the San Francisco 49ers photographer who has contributed some of his spectacular football images to this book.
John Lexar, founder and former CEO of Lexar Media, the compact flash company, began Legacy Artists (www.legacyartists.com) in a vision developed with his wife, who is an accomplished oil-and-canvas painter Together, they developed a technique that begins with a digital photograph (or a scanned photo from a slide or negative); they then digitally and artistically enhance the photo in Corel Painter, a high-end painting package that is often used to work with images.
After they transform a photo into what looks like a painting on a print, they transfer that to canvas and Terry literally paints the image to give it depth, texture, and relief — as well as to add artistic personal touches and elements that may not have even been in the original photo This is really more than enhancing the original photo; it becomes a partnership between the artist and the photographer to produce a combined work of art, an example of which is shown in Figure 10-26
This type of art is interesting and cutting-edge work, but may not very practical for the enthusiast or semipro photographer But that doesn't mean you can't make art from your digital sports photos So, take a look at some simpler, more readily availabel and achievable artistic effects in working with digital photographs Consider trying some of these to make your images look really cool for your family, friends, teams, and maybe even customers.
Let's look at a few ways you can apply some interesting artistic effects to your images to get you going in the right direction Then you can let your artistic juices flow.
Want to turn a color photo into black and white, as with the weightlifting images shown as before and after in Figures 10-27 and 10-28?

Figure 10-26. A large oil-and-canvas painting based on an original digital photo by Terrell Lloyd of the San Francisco 49ers. The large work of art is 20 × 24 inches plus the size of the frame and sells for a considerable sum.: © Terry Reimer

Figure 10-27. An interesting image when it was taken in full color, with nice rule-of-thirds composition, color tonality, and narrow depth-of-field...
There are two ways you can accomplish a conversion from black and white using Photoshop Elements.
Choose Image
Chose Layer

One of the simplest ways of artistically enhancing an image is to simply add text and a frame to it In Photoshop Elements, the easiest way to do this is to select the Text tool (identified by a T in the Tools palette) and click on your image wherever you want to add your text This automatically creates another layer that you can change later if you like You can add layer styles to the text by clicking on Layer Styles in the menu tabs in the Layers palette; this will allow you to bevel or shadow your text to give it some depth and an interesting look That's what I've done to the fall mountain-biking image in Figure 10-30 to see how it would look as a calendar image.
Figure 10-30. This fall mountain-biking shot has had text added to ready it for a four-season calendar.: © Will Wissman
When you're ready to work with the image, you can print directly from the image with the layers unflattened However, do not forget that if you want to save the file as a JPEG and put it on a Web site, doing so gets rid of the multiple layers irreversibly So you should also always save a working copy as a PSD (Photoshop) or TIFF file so you can continue to work on it later if you need to.
For fonts, you can use the fonts availabel in the Photoshop Elements font box If you want to add more, many are availabel online from various sources (search Google for "free fonts") that you can install on your PC or Mac.
Additionally, you can add various effects to your fonts using the Effects option For example, make sure you have the text layer selected in your Layer palette Then, in the Effects palette, select Text Effects in the option box and you'll see a number of optional text treatment choices Double-click any of them and your text changes accordingly; you can use Step Backwards to reverse your selection and try another.
While frames are of course a subjective element and up to each photographer's personal taste, I typically caution people when they want to add frames to an image only because the wrong frame style can detract from a very nice photograph Frequently, if you need a frame to enhance an image, a plain line around it is all that's required Another simple and effective — and quite impressive — frame effect is to give it a shadowed look To do so, simply select Frames in your Effects tab You have several options, one of which is the Drop Shadow Frame Double-clicking this transforms your photo so that it has a drop-shadow, which makes it appear to be floating above the page.
There are a number of Frames styles you can select to apply to your image, but I only use them on rare occasions You can find other frame options (as well as other effects) by searching Google for Photoshop Elements Plug-ins These are made by third-party software developers and are downloadable (sometimes for free, sometimes not) You place them into your plug-in folders under the Adobe program file area on your computer When Photoshop Elements loads the next time, the new plug-ins appear on the appropriate palette as new options.
If you want to make a larger area of space around your photo to a specific size, you can define a canvas around it Choose Image
The easiest way to apply artistic effects to your image is using what are called Filters These are availabel as a menu item in Photoshop Elements, and several dozen are availabel in various categories They vary according to style; some distort the image by adding effects such as rippling or a wave appearance Others give it an artistic treatment, such as making it look like a watercolor or pencil sketch Other tools add lighting effects such as lens flare (a reflecting set of circles like light based on a bright point in your image, as if light had reflected in a camera lens).
Note
Many of the filters in Photoshop Elements are scaled-down, simplified versions of what Photoshop CS2 and Corel Painter will do. However, both Photoshop CS2 and Corel Painter also have many complicated, high-end tools that Photoshop Elements does not replicate.
Warning
While there are a variety of filters, they can look at bit tacky and amateurish if overused or done too simplistically, so proceed with caution It's best to keep it relatively simple and not too overdone to achieve the most powerful effects.
If you're diligent enough to keep notes while you work with various effects, the best thing to do is write down your settings when you achieve something you like Most of the effects use sliders with numerical values — sometimes several of them at once — and it's often hard to remember which filter you used to create an effect, much less what the settings were.
Filters can be one of the very best tools you have to make that interesting, but blurry or soft image, work to your benefit By applying one or more filters, you can sometimes completely overcome what otherwise would have been an unusable photo and turn it into something fun and, if you're inclined to do so, something able to be sold At the World Junior Fencing Championships in Linz, Austria, one of the photos I took of an attacking saber fencer was a bit blurry and unusable as a photo by itself (see Figure 10-31) But it was a cool shot, and I still wanted to be able to use it somehow.

Figure 10-31. A photo too blurry to be used as an untreated photo and unable to be remedied using a sharpening tool
So, I decided to experiment on it I opened the image in Photoshop Elements and tried some filters and effects Eventually, I achieved an artistic look I was happy with.
I started by cropping the image and adjusting the histogram a bit so it would have a bit more contrast. Oftentimes filters work better with images that have more, not less, contrast.
I applied the Cutout filter (Filters
To the filtered image, I then applied yet another filter — Poster Edges (Filters
I finished my artistic additions by adding text to represent the tournament, as shown in the final product, Figure 10-33.
The image was a hit in the booth where I was displaying fencing photographs at the competitions, and I printed them on-site and sold several as a souvenir of the tournament.
Tip
Do you have a photo that you want to use publicly but you don't have a model release? Try treating it artistically with a filter that makes the person unrecognizable.
Filters can be a great way of not only creating interesting artistic effects, but also for rescuing images that you aren't otherwise able to use Experimenting with them can be lots of fun, and you can create some very interesting and artistic effects with your photographs.

Working in a digital studio combines elements of photography, graphic arts, and computer skills all in one The infinite variety of talents you can exercise and develop in this stage of processing digital sports images is limited only by your imagination and resources.
Once your images are safely transferred to your computer, they will need to be managed so that they are safe and workable Furthermore, they need to be accessible and able to be located with no more than a few mouse clicks, so it's good to understand how to wrangle large numbers of images in a logical and orderly fashion There are software tools to help with this, and, depending on how prolific a photographer you are, you will find various ways to archive and manage photos and groups of photos that work best for you.
Once in order, images must be prioritized, cherry-picked, and then readied for whatever ultimate purpose they are intended Software tools such as iView Mediapro, ACDSee, and Photoshop (Elements and/or CS2) become invaluable photographer's assistants in your efforts.
Most images require some form of editing, such as cropping, sharpening, resizing, and other small tweaks Knowing how to do this quickly and efficiently, and in some cases in a batch mode, is common practice in the digital darkroom Beyond that, knowing how to touch-up images and apply artistic effects to them provides an endless amount of perfecting of images to occupy your time.
In sports photography, it's common to take lots of photos to get a few really good shots Knowing how to process these images efficiently and make the most of the top picks (and even a few of the not-so-top-picks) will be key to mastering your workflow and presenting your work in its best form.